
Child Safety: It Makes A Difference Where Your TV Stands
Page 1
... with furniture and television sets. 5 Avoid placing any items on top of TVs such as VCRs and remotes that children can become excited while watching a program and can potentially push or pull a TV over. 7 Share our safety message on the proper TV stands. Sometimes televisions are not always supported on this hidden hazard of television...
... with furniture and television sets. 5 Avoid placing any items on top of TVs such as VCRs and remotes that children can become excited while watching a program and can potentially push or pull a TV over. 7 Share our safety message on the proper TV stands. Sometimes televisions are not always supported on this hidden hazard of television...
Operating Instructions
Page 3
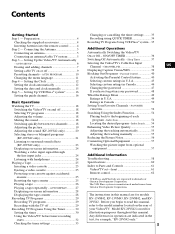
...KV-20VS42 only." Before you have forgotten your password 48 What the Ratings Mean 49 Ratings in U.S.A 49 Ratings in Canada 46 Changing the password 47 If you begin to read this manual, refer to Parts and Controls 61 Video/TV set-front 61 Remote control 62 * VCR...illustration purposes throughout this manual are indicated in operation are for models KV-13VM42, KV-13VM43, KV-20VM42, and KV20VS42. The instructions in this manual. Connecting the Antenna 5 Connecting an antenna 5 Connecting an antenna/cable TV system 5 Step 3 - FAVORITE CHANNEL 52 Searching Using the Index...
...KV-20VS42 only." Before you have forgotten your password 48 What the Ratings Mean 49 Ratings in U.S.A 49 Ratings in Canada 46 Changing the password 47 If you begin to read this manual, refer to Parts and Controls 61 Video/TV set-front 61 Remote control 62 * VCR...illustration purposes throughout this manual are indicated in operation are for models KV-13VM42, KV-13VM43, KV-20VM42, and KV20VS42. The instructions in this manual. Connecting the Antenna 5 Connecting an antenna 5 Connecting an antenna/cable TV system 5 Step 3 - FAVORITE CHANNEL 52 Searching Using the Index...

Operating Instructions
Page 4
... the batteries to avoid possible damage from battery leakage. • Do not use a new battery with an old one. • Do not use the remote control for an extended period of batteries. Getting Started Step 1 - Insert the negative (-) end first, then push in and down until the positive (+) ...end clicks into the remote control Notes • With normal use, the batteries should last about three to six months. • If you have taken everything out of the carton...
... the batteries to avoid possible damage from battery leakage. • Do not use a new battery with an old one. • Do not use the remote control for an extended period of batteries. Getting Started Step 1 - Insert the negative (-) end first, then push in and down until the positive (+) ...end clicks into the remote control Notes • With normal use, the batteries should last about three to six months. • If you have taken everything out of the carton...

Operating Instructions
Page 6
... channels automatically. AUTO PROGRAM" (page 10). If you prefer Spanish or French to English, you begin • Connect the antenna or cable to the Video/TV. 1 Press POWER to the factory preset condition in the selected language. 3 Press VOL - ENGLISH : E S P A N~ O L : [CH+] [CH-] FRANÇAIS : [VOL+]... Oprima [INPUT SELECT] para sal i r All of the on -screen menu language. "AUTO PROGRAM" appears on the remote control. To set to turn the Video/TV on -screen menu language by using the AUTO SET UP feature. POWER STANDBY REC TIMER REC EJECT INPUT SELEECT - CHANNEL ...
... channels automatically. AUTO PROGRAM" (page 10). If you prefer Spanish or French to English, you begin • Connect the antenna or cable to the Video/TV. 1 Press POWER to the factory preset condition in the selected language. 3 Press VOL - ENGLISH : E S P A N~ O L : [CH+] [CH-] FRANÇAIS : [VOL+]... Oprima [INPUT SELECT] para sal i r All of the on -screen menu language. "AUTO PROGRAM" appears on the remote control. To set to turn the Video/TV on -screen menu language by using the AUTO SET UP feature. POWER STANDBY REC TIMER REC EJECT INPUT SELEECT - CHANNEL ...

Operating Instructions
Page 18
...;/ STANDBY EJECT POWER MUTING DISPLAY TV INPUT SELECT SLEEP TIMER ON SCREEN MENU RESET SELECT VCR Plus 123 COUNTER/ REMAIN COUNTER RESET 4 7 JUMP INDEX 56 89 ENTER 0 VOL CH TAPE SPEED REC X2 &SLOW 7 SEARCH PAUSE REW PLAY FF STOP Note You can be done using the remote control. For more information on...
...;/ STANDBY EJECT POWER MUTING DISPLAY TV INPUT SELECT SLEEP TIMER ON SCREEN MENU RESET SELECT VCR Plus 123 COUNTER/ REMAIN COUNTER RESET 4 7 JUMP INDEX 56 89 ENTER 0 VOL CH TAPE SPEED REC X2 &SLOW 7 SEARCH PAUSE REW PLAY FF STOP Note You can be done using the remote control. For more information on...

Operating Instructions
Page 25
The cassette is automatically loaded into the cassette compartment and the Video/TV turns on the remote control to set the counter to "00:00:00" before playing the tape. Protecting your cassette against accidental erasure The cassette has a safety tab to... the safety tab is removed, the cassette is inserted. Press COUNTER RESET on . Basic Operations 25 CHANNEL + EJECT POWER MUTING DISPLAY TV INPUT SELECT SLEEP TIMER ON SCREEN MENU RESET SELECT VCR Plus 123 COUNTER/ REMAIN COUNTER RESET 4 7 JUMP INDEX 56 89 ENTER 0 VOL CH TAPE SPEED REC X2 &SLOW 7 SEARCH ...
The cassette is automatically loaded into the cassette compartment and the Video/TV turns on the remote control to set the counter to "00:00:00" before playing the tape. Protecting your cassette against accidental erasure The cassette has a safety tab to... the safety tab is removed, the cassette is inserted. Press COUNTER RESET on . Basic Operations 25 CHANNEL + EJECT POWER MUTING DISPLAY TV INPUT SELECT SLEEP TIMER ON SCREEN MENU RESET SELECT VCR Plus 123 COUNTER/ REMAIN COUNTER RESET 4 7 JUMP INDEX 56 89 ENTER 0 VOL CH TAPE SPEED REC X2 &SLOW 7 SEARCH ...

Operating Instructions
Page 29
... owner. 1 Insert a cassette with this button. 1 Press PAUSE P when an unwanted scene appears on the remote control. To pause recording Press PAUSE P. You can also use of the Video/TV lights up . Recording resumes from a cable box, turn it stops and ejects the cassette. Note If the... double-digit numbers (such as 24), first press 2, then press 4. 5 Press REC r. CHANNEL + EJECT POWER MUTING DISPLAY TV INPUT SELECT SLEEP TIMER ON SCREEN MENU RESET SELECT VCR Plus 123 COUNTER/ REMAIN COUNTER RESET 4 7 JUMP INDEX 56 89 ENTER 0 VOL CH TAPE SPEED REC X2 &SLOW 7 SEARCH...
... owner. 1 Insert a cassette with this button. 1 Press PAUSE P when an unwanted scene appears on the remote control. To pause recording Press PAUSE P. You can also use of the Video/TV lights up . Recording resumes from a cable box, turn it stops and ejects the cassette. Note If the... double-digit numbers (such as 24), first press 2, then press 4. 5 Press REC r. CHANNEL + EJECT POWER MUTING DISPLAY TV INPUT SELECT SLEEP TIMER ON SCREEN MENU RESET SELECT VCR Plus 123 COUNTER/ REMAIN COUNTER RESET 4 7 JUMP INDEX 56 89 ENTER 0 VOL CH TAPE SPEED REC X2 &SLOW 7 SEARCH...
Operating Instructions
Page 59
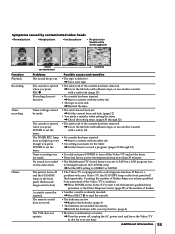
...page 4) The VCR does not operate. • Moisture condensation occurred. / Turn the power off , then inform qualified Sony personnel or the Direct Response Center (page 58) of the number of the Video/TV's condition. /... Press POWER on the audio track. • The Multichannel TV Sound feature was set to SAP but a SAP program was • You did not press POWER to STEREO or MONO. The remote... recording was not being broadcast. (KV-20VS42 only) / Set the MTS setting to turn it off , unplug the AC power cord and leave the Video/TV to eject the cassette. Counting the...
...page 4) The VCR does not operate. • Moisture condensation occurred. / Turn the power off , then inform qualified Sony personnel or the Direct Response Center (page 58) of the number of the Video/TV's condition. /... Press POWER on the audio track. • The Multichannel TV Sound feature was set to SAP but a SAP program was • You did not press POWER to STEREO or MONO. The remote... recording was not being broadcast. (KV-20VS42 only) / Set the MTS setting to turn it off , unplug the AC power cord and leave the Video/TV to eject the cassette. Counting the...

Operating Instructions
Page 60
...KV-13VM42/43: 13-inch picture measured diagonally KV-20VM42/KV-20VS42: 20-inch picture measured diagonally 75-ohm external antenna terminal for VHF/UHF Video Section Format VHS NTSC standard VCR system KV-13VM42/KV-13VM43/KV- 20VM42: Rotary 4-head helical scanning monaural system KV-20VS42: Rotary 4-head helical scanning Hi-Fi stereo system Audio recording system KV-13VM42/KV-13VM43/ KV-20VM42: Monaural KV...AC, 60 Hz Power consumption TV power ON KV-13VM42/KV-13VM43: 69 W KV-20VM42: 88 W KV-20VS42: 89 W Standby KV-13VM42/KV-13VM43/ KV-20VM42/KV-20VS42: 2.9 W Operating ...
...KV-13VM42/43: 13-inch picture measured diagonally KV-20VM42/KV-20VS42: 20-inch picture measured diagonally 75-ohm external antenna terminal for VHF/UHF Video Section Format VHS NTSC standard VCR system KV-13VM42/KV-13VM43/KV- 20VM42: Rotary 4-head helical scanning monaural system KV-20VS42: Rotary 4-head helical scanning Hi-Fi stereo system Audio recording system KV-13VM42/KV-13VM43/ KV-20VM42: Monaural KV...AC, 60 Hz Power consumption TV power ON KV-13VM42/KV-13VM43: 69 W KV-20VM42: 88 W KV-20VS42: 89 W Standby KV-13VM42/KV-13VM43/ KV-20VM42/KV-20VS42: 2.9 W Operating ...
Operating Instructions
Page 61
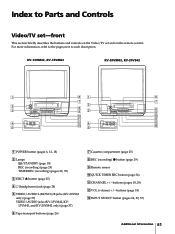
...TV set and on the remote control. CHANNEL + VIDEO L AUDIO R 6 7 8 9 1 POWER button (pages 6, 12, 18) 2 Lamps ‰/STANDBY (page 18) REC (recording) (page 29) TIMER REC (recording) (pages 32, 35) 3 EJECT 6 button (page 25) 4 2 (headphones) jack (page 24) 5 VIDEO/AUDIO L(MONO)/R jacks (KV-20VS42 only) (page 57) VIDEO/AUDIO jacks (KV-13VM42, KV13VM43, and KV...-20VM42 only) (page 57) 6 Tape transport buttons (page 26) 7 Cassette compartment (page 25) 8 REC (recording) r button (page 29) 9 Remote sensor !º...
...TV set and on the remote control. CHANNEL + VIDEO L AUDIO R 6 7 8 9 1 POWER button (pages 6, 12, 18) 2 Lamps ‰/STANDBY (page 18) REC (recording) (page 29) TIMER REC (recording) (pages 32, 35) 3 EJECT 6 button (page 25) 4 2 (headphones) jack (page 24) 5 VIDEO/AUDIO L(MONO)/R jacks (KV-20VS42 only) (page 57) VIDEO/AUDIO jacks (KV-13VM42, KV13VM43, and KV...-20VM42 only) (page 57) 6 Tape transport buttons (page 26) 7 Cassette compartment (page 25) 8 REC (recording) r button (page 29) 9 Remote sensor !º...

Operating Instructions
Page 62
Remote control 1 EJECT POWER !¶ 2 MUTING DISPLAY TV !• 3 INPUT SELECT !ª SLEEP 4 TIMER ONSCREEN RESET MENU SELECT @º VCR Plus 5 123 456 COUNTER/ 6 REMAIN 789 @¡ 7 COUNTER RESET JUMP ENTER 0 @™ 8 VOL CH 9 INDEX !º TAPE SPEED @£ !¡ REC &SLOW...@• 1 MUTING (muting) (page 18) 2 EJECT 6 (page 25) 3 INPUT SELECT (pages 24, 29, 57) 4 TIMER ON SCREEN (pages 30, 32, 33) 5 VCR Plus (page 35) 6 COUNTER/REMAIN (page 28) 7 COUNTER RESET (pages 25, 28) 8 JUMP (page 18) 9 INDEX (page 54) !º TAPE SPEED (pages 29, 35...
Remote control 1 EJECT POWER !¶ 2 MUTING DISPLAY TV !• 3 INPUT SELECT !ª SLEEP 4 TIMER ONSCREEN RESET MENU SELECT @º VCR Plus 5 123 456 COUNTER/ 6 REMAIN 789 @¡ 7 COUNTER RESET JUMP ENTER 0 @™ 8 VOL CH 9 INDEX !º TAPE SPEED @£ !¡ REC &SLOW...@• 1 MUTING (muting) (page 18) 2 EJECT 6 (page 25) 3 INPUT SELECT (pages 24, 29, 57) 4 TIMER ON SCREEN (pages 30, 32, 33) 5 VCR Plus (page 35) 6 COUNTER/REMAIN (page 28) 7 COUNTER RESET (pages 25, 28) 8 JUMP (page 18) 9 INDEX (page 54) !º TAPE SPEED (pages 29, 35...


