Operating Instructions
Page 2
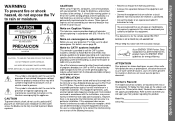
...: KP-57XBR10W, KP-65XBR10W Please keep the brightness and contrast functions at low settings. This equipment generates, uses, and can be of sufficient magnitude to constitute a risk of electric shock to persons. You are designed to provide reasonable protection against harmful interference in accordance with the instructions, may cause harmful interference with your projection TV...
...: KP-57XBR10W, KP-65XBR10W Please keep the brightness and contrast functions at low settings. This equipment generates, uses, and can be of sufficient magnitude to constitute a risk of electric shock to persons. You are designed to provide reasonable protection against harmful interference in accordance with the instructions, may cause harmful interference with your projection TV...
Operating Instructions
Page 4
... MODE 29 Watching Two Programs at One Time - Table of Contents Before You Begin Welcome 1 Using this Manual 2 Precautions 2 Important Safeguards 3 Installing and Connecting the Projection TV Carrying Your Projection TV 6 Installing the Projection TV 6 Mounting the Rear Speakers (not supplied). . 6 Connector Types 7 Making Connections 8 Connecting Directly to a Cable or an Antenna 8 Connecting a Cable Box 9 Connecting an...
... MODE 29 Watching Two Programs at One Time - Table of Contents Before You Begin Welcome 1 Using this Manual 2 Precautions 2 Important Safeguards 3 Installing and Connecting the Projection TV Carrying Your Projection TV 6 Installing the Projection TV 6 Mounting the Rear Speakers (not supplied). . 6 Connector Types 7 Making Connections 8 Connecting Directly to a Cable or an Antenna 8 Connecting a Cable Box 9 Connecting an...
Operating Instructions
Page 5
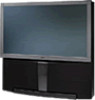
Thank you for models KP-57XBR10W and KP-65XBR10W. and "Pro Logic" are unsuitable for your children. • DRC (Digital Reality Creation), a technology unique to Sony, allowing you to obtain a finer, more detailed picture with zoom-in -Picture (PIP) - The features you will enjoy ... You Begin Welcome! "Dolby," the double-D symbol ; Model KP-57XBR10W is on the VIDEO 5 (DTV) IN jacks). • Four AUDIO/VIDEO/S VIDEO inputs. 1 Before You Begin CHANNEL INDEX, allowing you to view and choose from twelve programs - This manual is for purchasing the Sony Projection TV.
Thank you for models KP-57XBR10W and KP-65XBR10W. and "Pro Logic" are unsuitable for your children. • DRC (Digital Reality Creation), a technology unique to Sony, allowing you to obtain a finer, more detailed picture with zoom-in -Picture (PIP) - The features you will enjoy ... You Begin Welcome! "Dolby," the double-D symbol ; Model KP-57XBR10W is on the VIDEO 5 (DTV) IN jacks). • Four AUDIO/VIDEO/S VIDEO inputs. 1 Before You Begin CHANNEL INDEX, allowing you to view and choose from twelve programs - This manual is for purchasing the Sony Projection TV.
Operating Instructions
Page 6
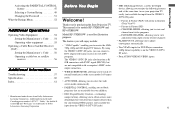
... the wall outlet only one way. Instructions in this manual are unable to fit into the outlet, contact your initial set up. It is designed, for cleaning. Precautions Safety • Operate the projection TV only on the projection TV. • To obtain the best picture, do not...inside the cabinet, unplug the projection TV immediately and have it may be necessary to begin using the projection TV for the remote control. Similar controls may be found on cleaning Clean the cabinet of the projection TV with opaque drapery. Using this Manual We recommend that you carefully review...
... the wall outlet only one way. Instructions in this manual are unable to fit into the outlet, contact your initial set up. It is designed, for cleaning. Precautions Safety • Operate the projection TV only on the projection TV. • To obtain the best picture, do not...inside the cabinet, unplug the projection TV immediately and have it may be necessary to begin using the projection TV for the remote control. Similar controls may be found on cleaning Clean the cabinet of the projection TV with opaque drapery. Using this Manual We recommend that you carefully review...
Operating Instructions
Page 7
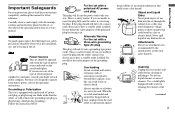
...wire grounding type plug (a plug having one way. Grounding or Polarization This set , or described in the operating instructions or service manual. Do not defeat the safety purpose of any kind on the serial/model plate. Alternate Warning For the set with water for ...unable to have a suitable outlet installed. Overloading Do not overload wall outlets, extension cords or convenience receptacles beyond their capacity, since this manual for long periods of electrical power supplied to your home, consult your electrician to insert the plug fully into a grounding-type power ...
...wire grounding type plug (a plug having one way. Grounding or Polarization This set , or described in the operating instructions or service manual. Do not defeat the safety purpose of any kind on the serial/model plate. Alternate Warning For the set with water for ...unable to have a suitable outlet installed. Overloading Do not overload wall outlets, extension cords or convenience receptacles beyond their capacity, since this manual for long periods of electrical power supplied to your home, consult your electrician to insert the plug fully into a grounding-type power ...
Operating Instructions
Page 21
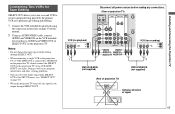
... input signal while editing through SELECT OUT. • When connecting a single VCR to the projection TV: if VCR LINE OUT is connected to VIDEO IN on the projection TV, do not connect the SELECT OUT on the projection TV to AUDIO and VIDEO OUT of SELECT OUT on page 45) • When the... instructions on page 10 of this manual. 2 Using an AUDIO/VIDEO cable, connect AUDIO and VIDEO IN on the VCR intended for recording) R AUDIO R AUDIO L VIDEO LINE IN OUT IN 2 VMC-810S/820S (not supplied) VMC-810S/820S (not supplied) (Rear of projection TV) VIDEO IN SELECT OUT Indicates direction...
... input signal while editing through SELECT OUT. • When connecting a single VCR to the projection TV: if VCR LINE OUT is connected to VIDEO IN on the projection TV, do not connect the SELECT OUT on the projection TV to AUDIO and VIDEO OUT of SELECT OUT on page 45) • When the... instructions on page 10 of this manual. 2 Using an AUDIO/VIDEO cable, connect AUDIO and VIDEO IN on the VCR intended for recording) R AUDIO R AUDIO L VIDEO LINE IN OUT IN 2 VMC-810S/820S (not supplied) VMC-810S/820S (not supplied) (Rear of projection TV) VIDEO IN SELECT OUT Indicates direction...
Operating Instructions
Page 28
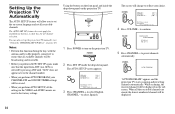
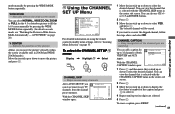
You can also set up the projection TV manually. (see "Using the CHANNEL SET UP Menu" on the sub screen. SET UP ENGLISH : ESPAÑOL : AUTO SET UP : [ CH + ] [ CH - ] [ VOL - ] First Please ... all the receivable channels are reset to the factory settings. Using the buttons on the front panel and inside the drop-down panel on the projection TV: POWER TIMER/ STAND BY STEREO SET UP FLASH FOCUS VOLUME CHANNEL ++ - The AUTO SET UP screen appears. YES: [CH +] NO : [CH -] 5 Press CHANNEL + to reflect...
You can also set up the projection TV manually. (see "Using the CHANNEL SET UP Menu" on the sub screen. SET UP ENGLISH : ESPAÑOL : AUTO SET UP : [ CH + ] [ CH - ] [ VOL - ] First Please ... all the receivable channels are reset to the factory settings. Using the buttons on the front panel and inside the drop-down panel on the projection TV: POWER TIMER/ STAND BY STEREO SET UP FLASH FOCUS VOLUME CHANNEL ++ - The AUTO SET UP screen appears. YES: [CH +] NO : [CH -] 5 Press CHANNEL + to reflect...
Operating Instructions
Page 30
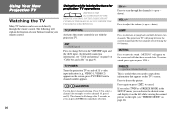
...jump back and forth between the VHF/UHF input and the AUX input. (for use with the projection TV. JUMP Press to adjust the volume (+ up or - The projection TV will dim three seconds later. "MUTING" will appear on your remote control. To restore sound, ... indication (e.g., VIDEO 1, VIDEO 2) appears on the TV's screen. Using the white labeled buttons for projection TV operations REFER TO THE ILLUSTRATION OF THE REMOTE CONTROL ON THE INSIDE FRONT COVER OF THIS MANUAL AS YOU REVIEW THE FOLLOWING DESCRIPTIONS TV (FUNCTION) Activates the remote control for detailed connection information...
...jump back and forth between the VHF/UHF input and the AUX input. (for use with the projection TV. JUMP Press to adjust the volume (+ up or - The projection TV will dim three seconds later. "MUTING" will appear on your remote control. To restore sound, ... indication (e.g., VIDEO 1, VIDEO 2) appears on the TV's screen. Using the white labeled buttons for projection TV operations REFER TO THE ILLUSTRATION OF THE REMOTE CONTROL ON THE INSIDE FRONT COVER OF THIS MANUAL AS YOU REVIEW THE FOLLOWING DESCRIPTIONS TV (FUNCTION) Activates the remote control for detailed connection information...
Operating Instructions
Page 32
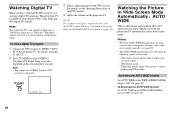
... ID-1 (16:9 aspect ratio recorded) signal is connected. AUTO WIDE When a 480i format signal with digital TV formats. Whenever you can enjoy digital TV programs. This projection TV is always displayed in FULL mode) Activating the AUTO WIDE function Set AUTO WIDE in the WIDE SCREEN MODE ... - The digital TV format being received is displayed on the projection TV. (for details, see pages 13 and 12) 2 Press TV/VIDEO to select VIDEO 5. Notes: • When the AUTO WIDE function does not work correctly due to the quality of signal, select wide screen mode manually. (see page 29...
... ID-1 (16:9 aspect ratio recorded) signal is connected. AUTO WIDE When a 480i format signal with digital TV formats. Whenever you can enjoy digital TV programs. This projection TV is always displayed in FULL mode) Activating the AUTO WIDE function Set AUTO WIDE in the WIDE SCREEN MODE ... - The digital TV format being received is displayed on the projection TV. (for details, see pages 13 and 12) 2 Press TV/VIDEO to select VIDEO 5. Notes: • When the AUTO WIDE function does not work correctly due to the quality of signal, select wide screen mode manually. (see page 29...
Operating Instructions
Page 33
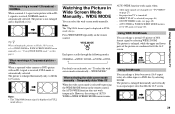
... condensed to an equal aspect ratio that fills the 16:9 screen. , ZOOM 29 Using Your New Projection TV When selecting the wide screen mode manually - the projection TV is selected (see "TV/VIDEO" on this page) When receiving a 4:3 squeezed picture - AUTO WIDE in FULL mode always.... The picture is displayed in WIDE SCREEN MODE menu manually. (see page 40) - WIDE MODE." The picture is ...
... condensed to an equal aspect ratio that fills the 16:9 screen. , ZOOM 29 Using Your New Projection TV When selecting the wide screen mode manually - the projection TV is selected (see "TV/VIDEO" on this page) When receiving a 4:3 squeezed picture - AUTO WIDE in FULL mode always.... The picture is displayed in WIDE SCREEN MODE menu manually. (see page 40) - WIDE MODE." The picture is ...
Operating Instructions
Page 34
... (It will dim in about continued wide screen mode usage for 4:3 aspect ratio pictures This projection TV was designed primarily for viewing TV broadcasts in NORMAL mode will lead to change the TV channel or video source using WIDE MODE button. Consistent and exclusive viewing of 4:3 aspect ratio ...ILLUSTRATION OF THE REMOTE CONTROL ON THE INSIDE FRONT COVER OF THIS MANUAL AS YOU REVIEW THE FOLLOWING DESCRIPTION Tip z If you select WIDE ZOOM mode by using the white labeled buttons below. The symbol "b" or "B" indicates which picture's TV channel or input source can be changed .
... (It will dim in about continued wide screen mode usage for 4:3 aspect ratio pictures This projection TV was designed primarily for viewing TV broadcasts in NORMAL mode will lead to change the TV channel or video source using WIDE MODE button. Consistent and exclusive viewing of 4:3 aspect ratio ...ILLUSTRATION OF THE REMOTE CONTROL ON THE INSIDE FRONT COVER OF THIS MANUAL AS YOU REVIEW THE FOLLOWING DESCRIPTION Tip z If you select WIDE ZOOM mode by using the white labeled buttons below. The symbol "b" or "B" indicates which picture's TV channel or input source can be changed .
Operating Instructions
Page 36
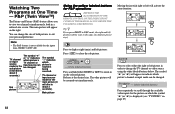
...left pictures. LEFT RIGHT ACTIVE Press to select either RIGHT or LEFT to view two channels simultaneously, both pictures to close the sub picture. TV/VIDEO - (white labeled button) Press repeatedly to change the size of both in order to scroll through the available video inputs for the sub... to indicate which picture's sound is not available for P&P operations REFER TO THE ILLUSTRATION OF THE REMOTE CONTROL ON THE INSIDE FRONT COVER OF THIS MANUAL AS YOU REVIEW THE FOLLOWING DESCRIPTIONS Tip z If you to zoom in on the right. Note: • The P&P feature is being received. ...
...left pictures. LEFT RIGHT ACTIVE Press to select either RIGHT or LEFT to view two channels simultaneously, both pictures to close the sub picture. TV/VIDEO - (white labeled button) Press repeatedly to change the size of both in order to scroll through the available video inputs for the sub... to indicate which picture's sound is not available for P&P operations REFER TO THE ILLUSTRATION OF THE REMOTE CONTROL ON THE INSIDE FRONT COVER OF THIS MANUAL AS YOU REVIEW THE FOLLOWING DESCRIPTIONS Tip z If you to zoom in on the right. Note: • The P&P feature is being received. ...
Operating Instructions
Page 38
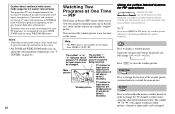
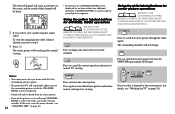
...THIS MANUAL AS YOU REVIEW THE FOLLOWING DESCRIPTIONS TV/VIDEO Press to scroll the center picture through CHANNEL INDEX is canceled and the normal picture reappears. The selected channel will zoom in and move the cyan frame until all of the surrounding pictures appear. • The projection TV ...Using the yellow labeled buttons for CHANNEL INDEX operations REFER TO THE ILLUSTRATION OF THE REMOTE CONTROL ON THE INSIDE FRONT COVER OF THIS MANUAL AS YOU REVIEW THE FOLLOWING DESCRIPTIONS Press to select a channel for the center picture. (for an hour without any additional operation,...
...THIS MANUAL AS YOU REVIEW THE FOLLOWING DESCRIPTIONS TV/VIDEO Press to scroll the center picture through CHANNEL INDEX is canceled and the normal picture reappears. The selected channel will zoom in and move the cyan frame until all of the surrounding pictures appear. • The projection TV ...Using the yellow labeled buttons for CHANNEL INDEX operations REFER TO THE ILLUSTRATION OF THE REMOTE CONTROL ON THE INSIDE FRONT COVER OF THIS MANUAL AS YOU REVIEW THE FOLLOWING DESCRIPTIONS Press to select a channel for the center picture. (for an hour without any additional operation,...
Operating Instructions
Page 45
... After AUTO SET UP, you to select the desired channel. CHANNEL CAPTION - Move the joystick up to four digits are watching You can erase unnecessary TV channels from the channel preset memory. or 0-9 and ENTER buttons. 2 Press . 3 Move the joystick up or down to "Learning Menu Selection" on each ...display the first letter or number of the caption and press to select it. 4 Repeat until up or down to fill the 16:9 screen manually by pressing the WIDE MODE button repeatedly. Using the CHANNEL SET UP Menu CHANNEL SET UP CHANNEL SKIP CHANNEL CAPTION CABLE : ON AUTO PROGRAM ...
... After AUTO SET UP, you to select the desired channel. CHANNEL CAPTION - Move the joystick up to four digits are watching You can erase unnecessary TV channels from the channel preset memory. or 0-9 and ENTER buttons. 2 Press . 3 Move the joystick up or down to "Learning Menu Selection" on each ...display the first letter or number of the caption and press to select it. 4 Repeat until up or down to fill the 16:9 screen manually by pressing the WIDE MODE button repeatedly. Using the CHANNEL SET UP Menu CHANNEL SET UP CHANNEL SKIP CHANNEL CAPTION CABLE : ON AUTO PROGRAM ...
Operating Instructions
Page 46
... Select ON if your projection TV is set to ON automatically. AUTO SET UP will be set CABLE to MANUAL. AUTO PROGRAM - When all receivable TV channels. to VIDEO 1, use the FAVORITE CHANNEL when watching the signal input from VIDEO 5 (DTV) IN. 42 OFF: When you want to use the TV's tuner while fixing the...
... Select ON if your projection TV is set to ON automatically. AUTO SET UP will be set CABLE to MANUAL. AUTO PROGRAM - When all receivable TV channels. to VIDEO 1, use the FAVORITE CHANNEL when watching the signal input from VIDEO 5 (DTV) IN. 42 OFF: When you want to use the TV's tuner while fixing the...
Operating Instructions
Page 47
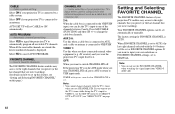
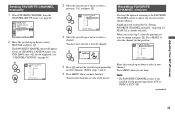
... CHANNEL menu will also be displayed. (see page 41) CHANNEL SET UP CHANNEL SKIP CHANNEL CAPTION CABLE : ON AUTO PROGRAM FAVORITE CHANNEL : AUTO CHANNEL FIX : MANUAL Move Select Exit MENU 2 Move the joystick up or down to select a position (1-8), and press . FAVORITE CHANNEL 1 . 1 CNN 2. 2 3 . 10 SPTN 4 . ... Exit MENU Move the joystick up or down to select a channel. Simply proceed as described in "Setting FAVORITE CHANNEL manually" (skip step 2 if MANUAL is not available for that position. Press MENU when you have now selected a favorite channel. Adjusting Your SET UP ...
... CHANNEL menu will also be displayed. (see page 41) CHANNEL SET UP CHANNEL SKIP CHANNEL CAPTION CABLE : ON AUTO PROGRAM FAVORITE CHANNEL : AUTO CHANNEL FIX : MANUAL Move Select Exit MENU 2 Move the joystick up or down to select a position (1-8), and press . FAVORITE CHANNEL 1 . 1 CNN 2. 2 3 . 10 SPTN 4 . ... Exit MENU Move the joystick up or down to select a channel. Simply proceed as described in "Setting FAVORITE CHANNEL manually" (skip step 2 if MANUAL is not available for that position. Press MENU when you have now selected a favorite channel. Adjusting Your SET UP ...

Operating Instructions
Page 63
... recorded with sound from the other program. b If you are recording the main picture and you press TV/VIDEO b Ensure that VIDEO LABEL is set to the sound of the sub picture using the AUDIO button... does not display your choices b Verify that FAVORITE CHANNEL is not set to MANUAL in the CHANNEL SET UP menu. (see "Setting FAVORITE CHANNEL manually" on page 46) Recording through SELECT OUT does not function properly when recording in... video sources do not appear when you switch to SKIP. (see the instruction manual supplied with this projection TV. Only the main picture will be recorded.
... recorded with sound from the other program. b If you are recording the main picture and you press TV/VIDEO b Ensure that VIDEO LABEL is set to the sound of the sub picture using the AUDIO button... does not display your choices b Verify that FAVORITE CHANNEL is not set to MANUAL in the CHANNEL SET UP menu. (see "Setting FAVORITE CHANNEL manually" on page 46) Recording through SELECT OUT does not function properly when recording in... video sources do not appear when you switch to SKIP. (see the instruction manual supplied with this projection TV. Only the main picture will be recorded.
Operating Instructions
Page 66
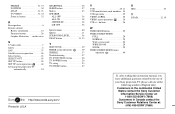
...UP menu operations . . . . 44 Setting up the projection TV automatically 24 Printed in Canada contact the Sony Customer Relations Center at: (416) 499-SONY (7669) Customers in the continental United States contact the Sony Customer Information Service Center at: 1-800-222-SONY (7669) Customers in U.S.A SHARPNESS 36 SLEEP button 27 ...29 ZOOM 29 WIDE SCREEN MODE menu operation 40 X XDS 27 Y Y/PB/PR 12, 19 If, after reading this instruction manual, you have additional questions related to the use of your Sony projection TV, please call one of the following numbers (English only).
...UP menu operations . . . . 44 Setting up the projection TV automatically 24 Printed in Canada contact the Sony Customer Relations Center at: (416) 499-SONY (7669) Customers in the continental United States contact the Sony Customer Information Service Center at: 1-800-222-SONY (7669) Customers in U.S.A SHARPNESS 36 SLEEP button 27 ...29 ZOOM 29 WIDE SCREEN MODE menu operation 40 X XDS 27 Y Y/PB/PR 12, 19 If, after reading this instruction manual, you have additional questions related to the use of your Sony projection TV, please call one of the following numbers (English only).


