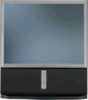

Child Safety: It Makes A Difference Where Your TV Stands
Page 1
...electronic components). 2 Use appropriate angle braces, straps and anchors to secure your furniture to the wall (but never screw anything directly into the TV). 3 Carefully read and understand the manufacturer's instructions and product safety notices. 4 Don't allow children to making home entertainment enjoyable and safe.... Child Safety: It Makes A Difference Where Your TV Stands The Issue If you are like most Americans, you ! 2500 Wilson Boulevard Arlington, VA 22201 Tel 703 907 7600 Fax 703 ...
...electronic components). 2 Use appropriate angle braces, straps and anchors to secure your furniture to the wall (but never screw anything directly into the TV). 3 Carefully read and understand the manufacturer's instructions and product safety notices. 4 Don't allow children to making home entertainment enjoyable and safe.... Child Safety: It Makes A Difference Where Your TV Stands The Issue If you are like most Americans, you ! 2500 Wilson Boulevard Arlington, VA 22201 Tel 703 907 7600 Fax 703 ...

Limited Warranty (U.S. Only)
Page 1
... obtain warranty service. This warranty is determined to be presented to any Sony authorized service facility. 4-557-168-03 ® LIMITED WARRANTY HDTV Color TV XBR Projection TV Sony Electronics Inc. ("Sony") warrants this Product is invalid if the factory applied serial number has ...been altered or removed from your convenience, Sony Electronics Inc. This warranty does not cover customer instruction...
... obtain warranty service. This warranty is determined to be presented to any Sony authorized service facility. 4-557-168-03 ® LIMITED WARRANTY HDTV Color TV XBR Projection TV Sony Electronics Inc. ("Sony") warrants this Product is invalid if the factory applied serial number has ...been altered or removed from your convenience, Sony Electronics Inc. This warranty does not cover customer instruction...

Dimensions Diagram (Front & Top)
Page 1
SONY WILL NOT BE RESPONSIBLE FOR INACCURACIES IN THE DESIGN OR MANUFACTURE OF ENCLOSURES . DESCRIPTION: 53" Projection TV DIMENSIONS HD Capable (WHD): 47 15/16 " x 57 1/2 " x 25 " WEIGHT: 185 lbs POWER REQUIREMENTS: 120V AC POWER 60Hz CONSUMPTION: 240 w max 1w ... TO MAKE THE ACTUAL MEASUREMENTS. Consumer Integrated Systems • Park Ridge, New Jersey 07656 • FAX (201) 986 3062 • b2b.sel.sony.com Features and specifications subject to change without notice. • Non-metric weights and measurements are approximate. KP-53HS10 NOTE: IR Receiver in "O" of Logo.
SONY WILL NOT BE RESPONSIBLE FOR INACCURACIES IN THE DESIGN OR MANUFACTURE OF ENCLOSURES . DESCRIPTION: 53" Projection TV DIMENSIONS HD Capable (WHD): 47 15/16 " x 57 1/2 " x 25 " WEIGHT: 185 lbs POWER REQUIREMENTS: 120V AC POWER 60Hz CONSUMPTION: 240 w max 1w ... TO MAKE THE ACTUAL MEASUREMENTS. Consumer Integrated Systems • Park Ridge, New Jersey 07656 • FAX (201) 986 3062 • b2b.sel.sony.com Features and specifications subject to change without notice. • Non-metric weights and measurements are approximate. KP-53HS10 NOTE: IR Receiver in "O" of Logo.

Operating Instructions
Page 2
...see page 24. NOTIFICATION This equipment has been tested and found to call upon your projection TV, keep this product meets the ENERGY STAR guidelines for long periods of time especially at... and used in a particular installation. Record these numbers in the spaces provided below the Sony logo, on the sticker, and also on Caption Vision This television receiver provides display of...interference in accordance with the limits for the remote control RM-Y902 MODELS: KP-53HS10, KP-61HS10 Please keep the brightness and contrast functions at a high brightness or contrast setting...
...see page 24. NOTIFICATION This equipment has been tested and found to call upon your projection TV, keep this product meets the ENERGY STAR guidelines for long periods of time especially at... and used in a particular installation. Record these numbers in the spaces provided below the Sony logo, on the sticker, and also on Caption Vision This television receiver provides display of...interference in accordance with the limits for the remote control RM-Y902 MODELS: KP-53HS10, KP-61HS10 Please keep the brightness and contrast functions at a high brightness or contrast setting...

Operating Instructions
Page 3
.... VTR (VCR)/MDP/DVD Player, DBS (Direct Broadcast Satellite)/CABLE, or projection TV. For a detailed explanation of the buttons on the remote control are presented in different colors to power operations, like turning the projection TV, DBS/CABLE, or VTR (VCR)/MDP/DVD Player on page 25. Green... functions. Keep this flap unfolded and use this projection TV. Remote Control In the instructions that follow, we will refer to control; SLEEP (page 26) VTR1/2/3/ DVD/MDP switch (page 53) VCR/DVD/ MDP operation buttons (page 54) CODE SET (pages 53, 55) MTS (page 35) POWER MUTING SYSTEM...
.... VTR (VCR)/MDP/DVD Player, DBS (Direct Broadcast Satellite)/CABLE, or projection TV. For a detailed explanation of the buttons on the remote control are presented in different colors to power operations, like turning the projection TV, DBS/CABLE, or VTR (VCR)/MDP/DVD Player on page 25. Green... functions. Keep this flap unfolded and use this projection TV. Remote Control In the instructions that follow, we will refer to control; SLEEP (page 26) VTR1/2/3/ DVD/MDP switch (page 53) VCR/DVD/ MDP operation buttons (page 54) CODE SET (pages 53, 55) MTS (page 35) POWER MUTING SYSTEM...

Operating Instructions
Page 4
...Contents Before You Begin Welcome 1 Using this Manual 2 Precautions 2 Important Safeguards 3 Installing and Connecting the Projection TV Carrying Your Projection TV 6 Installing the Projection TV 6 Connector Types 6 Making Connections 7 Connecting Directly to a Cable or an Antenna 7 Connecting a Cable Box 8 Connecting an... Set Up Using the Remote Control 22 Setting Up the Projection TV Automatically 23 Adjusting the Convergence Automatically (FLASH FOCUS 24 Using Your New Projection TV Watching the TV 25 Watching Digital TV 27 Watching Two Programs at One Time - PIP 28 ...
...Contents Before You Begin Welcome 1 Using this Manual 2 Precautions 2 Important Safeguards 3 Installing and Connecting the Projection TV Carrying Your Projection TV 6 Installing the Projection TV 6 Connector Types 6 Making Connections 7 Connecting Directly to a Cable or an Antenna 7 Connecting a Cable Box 8 Connecting an... Set Up Using the Remote Control 22 Setting Up the Projection TV Automatically 23 Adjusting the Convergence Automatically (FLASH FOCUS 24 Using Your New Projection TV Watching the TV 25 Watching Digital TV 27 Watching Two Programs at One Time - PIP 28 ...

Operating Instructions
Page 5
...view and choose from SRS Labs, Inc. Model KP-53HS10 is for purchasing the Sony Color Rear Video Projection TV. The features you will enjoy include: • "1080i Capable," enabling you for models KP-53HS10 and KP-61HS10. Picture-in function (Twin View™) -... in Canada 51 Additional Operations Operating Video Equipment 53 Setting the Manufacturer's Code . . . . 53 Operating video...
...view and choose from SRS Labs, Inc. Model KP-53HS10 is for purchasing the Sony Color Rear Video Projection TV. The features you will enjoy include: • "1080i Capable," enabling you for models KP-53HS10 and KP-61HS10. Picture-in function (Twin View™) -... in Canada 51 Additional Operations Operating Video Equipment 53 Setting the Manufacturer's Code . . . . 53 Operating video...
Operating Instructions
Page 6
... menus and adjust your dealer. • If any liquid or solid object should fall inside of the projection TV. Precautions Safety • Operate the projection TV only on the projection TV. • To obtain the best picture, do not block the ventilation openings. • Do not ... for the remote control. Never pull on page 3. It is designed, for a long period of the projection TV with solution of your new projection TV. 1 Installing and Connecting the Projection TV This section guides you the basic skills needed to operate your remote control's features. 4 Adjusting Your Set...
... menus and adjust your dealer. • If any liquid or solid object should fall inside of the projection TV. Precautions Safety • Operate the projection TV only on the projection TV. • To obtain the best picture, do not block the ventilation openings. • Do not ... for the remote control. Never pull on page 3. It is designed, for a long period of the projection TV with solution of your new projection TV. 1 Installing and Connecting the Projection TV This section guides you the basic skills needed to operate your remote control's features. 4 Adjusting Your Set...

Operating Instructions
Page 8
.... Never place the set in a confined space, such as to rest on or off. Power-Cord Protection Do not allow anything to provide some projection TV sets to wear or abuse. for example, near a bathtub, washbowl, kitchen sink, or laundry tub, in wire to an antenna discharge unit, ...not place the set near or over the power cord, and do not place the set is continuous or frequent while the projection TV is operating, unplug the projection TV and consult your dealer or service technician. The set may cause the appliance and cart combination to grounding electrodes, and requirements for...
.... Never place the set in a confined space, such as to rest on or off. Power-Cord Protection Do not allow anything to provide some projection TV sets to wear or abuse. for example, near a bathtub, washbowl, kitchen sink, or laundry tub, in wire to an antenna discharge unit, ...not place the set near or over the power cord, and do not place the set is continuous or frequent while the projection TV is operating, unplug the projection TV and consult your dealer or service technician. The set may cause the appliance and cart combination to grounding electrodes, and requirements for...

Operating Instructions
Page 10
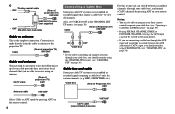
Recommended viewing area (Vertical) min.m2i.n1.m2.(4amp5p(3r6a"o1px"p.r7ofxt..)8ft.) 20˚ 20˚ Installing the Projection TV Recommended viewing area (Horizontal) min. 60˚ 2.1m5m3("ainp.p2r.o4xm. 6(a1p"prox. 7 ft.) 8 ft.) 60&#...three video connectors. Video - Please move your projection TV using the casters. Yellow Audio (Left) - Green PB (CB, Cb or B-Y) - Installing and Connecting the Projection TV Carrying Your Projection TV Carrying the projection TV requires three or more people. Coaxial cable Standard TV cable and antenna cable Plug Type Push into ...
Recommended viewing area (Vertical) min.m2i.n1.m2.(4amp5p(3r6a"o1px"p.r7ofxt..)8ft.) 20˚ 20˚ Installing the Projection TV Recommended viewing area (Horizontal) min. 60˚ 2.1m5m3("ainp.p2r.o4xm. 6(a1p"prox. 7 ft.) 8 ft.) 60&#...three video connectors. Video - Please move your projection TV using the casters. Yellow Audio (Left) - Green PB (CB, Cb or B-Y) - Installing and Connecting the Projection TV Carrying Your Projection TV Carrying the projection TV requires three or more people. Coaxial cable Standard TV cable and antenna cable Plug Type Push into ...

Operating Instructions
Page 11
...8226; VHF only or • VHF/UHF or • Cable 75-ohm coaxial cable (Rear of projection TV) VHF/UHF B (Rear of all Sony equipment. G/Y - To control the projection TV with the projection TV's remote control, connect the CONTROL S IN jack of the equipment to a Cable or an Antenna ...supplied) Push into connection. still other Sony equipment with a remote control for another Sony product, connect the CONTROL S OUT jack of the equipment to Sony products and allow greater control of 300-ohm twin • VHF only lead cable projection TV) VHF/UHF or • UHF only...
...8226; VHF only or • VHF/UHF or • Cable 75-ohm coaxial cable (Rear of projection TV) VHF/UHF B (Rear of all Sony equipment. G/Y - To control the projection TV with the projection TV's remote control, connect the CONTROL S IN jack of the equipment to a Cable or an Antenna ...supplied) Push into connection. still other Sony equipment with a remote control for another Sony product, connect the CONTROL S OUT jack of the equipment to Sony products and allow greater control of 300-ohm twin • VHF only lead cable projection TV) VHF/UHF or • UHF only...
Operating Instructions
Page 12
...box, you can only be controlling all channels. Cable (Rear of projection TV) VHF/UHF Cable and antenna You may be able to program your Sony remote control to ON in the CHANNEL SET UP menu. (see page 38) (Rear of Projection TV) Cable VHF/UHF IN OUT *cable box Note: • ... the AUX input and would like to switch between scrambled channels (through your remote control. C 75-ohm coaxial cable • VHF (Rear of projection TV) VHF/UHF and EAC-66 U/V mixer (not supplied) • UHF 300-ohm twin lead cable Cable or antenna This is made directly from ...
...box, you can only be controlling all channels. Cable (Rear of projection TV) VHF/UHF Cable and antenna You may be able to program your Sony remote control to ON in the CHANNEL SET UP menu. (see page 38) (Rear of Projection TV) Cable VHF/UHF IN OUT *cable box Note: • ... the AUX input and would like to switch between scrambled channels (through your remote control. C 75-ohm coaxial cable • VHF (Rear of projection TV) VHF/UHF and EAC-66 U/V mixer (not supplied) • UHF 300-ohm twin lead cable Cable or antenna This is made directly from ...

Operating Instructions
Page 13
... you are connecting a monaural VCR, connect only the single audio output to AUDIO and S VIDEO IN on the projection TV. S VIDEO (Rear of the S VIDEO cable. Installing and Connecting the Projection TV Connecting an Antenna/Cable TV System to a VCR 1 Attach the coaxial cable from the incoming cable connection or antenna to IN on the... VCR. 2 Using a coaxial cable, connect OUT on the VCR to VHF/UHF on the projection TV. 3 Using AUDIO and S VIDEO* cables, connect AUDIO and S VIDEO OUT on the VCR to the left (MONO) input on the...
... you are connecting a monaural VCR, connect only the single audio output to AUDIO and S VIDEO IN on the projection TV. S VIDEO (Rear of the S VIDEO cable. Installing and Connecting the Projection TV Connecting an Antenna/Cable TV System to a VCR 1 Attach the coaxial cable from the incoming cable connection or antenna to IN on the... VCR. 2 Using a coaxial cable, connect OUT on the VCR to VHF/UHF on the projection TV. 3 Using AUDIO and S VIDEO* cables, connect AUDIO and S VIDEO OUT on the VCR to the left (MONO) input on the...
Operating Instructions
Page 14
... the video input which the cable box is not equipped with S VIDEO, use a VIDEO cable (yellow) instead of the S VIDEO cable. Connecting a VCR and Projection TV to a Cable Box 1 Connect the single (input) jack of the splitter to the incoming cable connection, and connect the other two (output) jacks (using the... coaxial cable) to IN on the cable box and VHF/UHF on the projection TV. 2 Using a coaxial cable, connect OUT on the cable box to IN on the VCR. 3 Using AUDIO and S VIDEO* cables, connect AUDIO and S VIDEO ...
... the video input which the cable box is not equipped with S VIDEO, use a VIDEO cable (yellow) instead of the S VIDEO cable. Connecting a VCR and Projection TV to a Cable Box 1 Connect the single (input) jack of the splitter to the incoming cable connection, and connect the other two (output) jacks (using the... coaxial cable) to IN on the cable box and VHF/UHF on the projection TV. 2 Using a coaxial cable, connect OUT on the cable box to IN on the VCR. 3 Using AUDIO and S VIDEO* cables, connect AUDIO and S VIDEO ...

Operating Instructions
Page 15
... DTV receiver to AUDIO of VIDEO 5 (DTV) IN on the projection TV (WhiteAUDIO Left, Red-AUDIO Right). 4 Select VIDEO 5 by the TV/VIDEO button. 5 Select the SET UP menu and set DTV INPUT to R.G.B. (see "DTV INPUT" on the projection TV. Installing and Connecting the Projection TV Connecting a DTV (Digital Television) Receiver Before connecting, be sure to...
... DTV receiver to AUDIO of VIDEO 5 (DTV) IN on the projection TV (WhiteAUDIO Left, Red-AUDIO Right). 4 Select VIDEO 5 by the TV/VIDEO button. 5 Select the SET UP menu and set DTV INPUT to R.G.B. (see "DTV INPUT" on the projection TV. Installing and Connecting the Projection TV Connecting a DTV (Digital Television) Receiver Before connecting, be sure to...

Operating Instructions
Page 16
... three VIDEO cables, connect Y, PB and PR of COMPONENT VIDEO OUT on the DTV receiver to Y, PB and PR of VIDEO 5 (DTV) IN on the projection TV. 3 Using an AUDIO cable, connect LINE OUT on the DTV receiver to AUDIO of VIDEO 5 (DTV) IN on the... projection TV (WhiteAUDIO Left, Red-AUDIO Right). 4 Select VIDEO 5 by the TV/VIDEO button. 5 Select the SET UP menu and set DTV INPUT to CR, Cr or R-Y. Connect PR (red) to Y PB PR. (see "DTV...
... three VIDEO cables, connect Y, PB and PR of COMPONENT VIDEO OUT on the DTV receiver to Y, PB and PR of VIDEO 5 (DTV) IN on the projection TV. 3 Using an AUDIO cable, connect LINE OUT on the DTV receiver to AUDIO of VIDEO 5 (DTV) IN on the... projection TV (WhiteAUDIO Left, Red-AUDIO Right). 4 Select VIDEO 5 by the TV/VIDEO button. 5 Select the SET UP menu and set DTV INPUT to CR, Cr or R-Y. Connect PR (red) to Y PB PR. (see "DTV...

Operating Instructions
Page 17
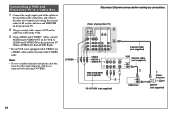
Disconnect all power sources before making any connections. (Rear of projection TV) CONTROL S IN OUT AUX IN OUT VIDEO 4 VIDEO 5 (DTV) SELECT IN VIDEO 1 VIDEO 3 HD VD Cable/ Satellite antenna Antenna cable 21 S VIDEO VIDEO L (MONO) AUDIO R Y... AUDIO and S VIDEO cables, connect AUDIO and S VIDEO OUT on the DBS receiver to by pressing TV/VIDEO on the projection TV (White-AUDIO Left, RedAUDIO Right). Installing and Connecting the Projection TV Connecting a DBS (Direct Broadcast Satellite) Receiver 1 Connect the cable from the satellite antenna to the DBS receiver. 2 Attach the ...
Disconnect all power sources before making any connections. (Rear of projection TV) CONTROL S IN OUT AUX IN OUT VIDEO 4 VIDEO 5 (DTV) SELECT IN VIDEO 1 VIDEO 3 HD VD Cable/ Satellite antenna Antenna cable 21 S VIDEO VIDEO L (MONO) AUDIO R Y... AUDIO and S VIDEO cables, connect AUDIO and S VIDEO OUT on the DBS receiver to by pressing TV/VIDEO on the projection TV (White-AUDIO Left, RedAUDIO Right). Installing and Connecting the Projection TV Connecting a DBS (Direct Broadcast Satellite) Receiver 1 Connect the cable from the satellite antenna to the DBS receiver. 2 Attach the ...

Operating Instructions
Page 18
... and S VIDEO IN on the VCR. 5 Using AUDIO and S VIDEO* cables, connect AUDIO and S VIDEO OUT on the VCR to by pressing TV/VIDEO on the projection TV (White-AUDIO Left, Red-AUDIO Right). * If your DBS receiver or VCR is connected to AUDIO and S VIDEO IN on the remote control. Connecting... the DBS or VCR, select the video input which your VCR or DBS receiver is not equipped with S VIDEO, use a VIDEO cable (yellow) instead of projection TV) CONTROL S IN OUT AUX IN OUT VIDEO 4 VIDEO 5 (DTV) SELECT IN VIDEO 1 VIDEO 3 HD VD Coaxial cable (not supplied) 3 SATELLITE IN LINE OUT VHF/...
... and S VIDEO IN on the VCR. 5 Using AUDIO and S VIDEO* cables, connect AUDIO and S VIDEO OUT on the VCR to by pressing TV/VIDEO on the projection TV (White-AUDIO Left, Red-AUDIO Right). * If your DBS receiver or VCR is connected to AUDIO and S VIDEO IN on the remote control. Connecting... the DBS or VCR, select the video input which your VCR or DBS receiver is not equipped with S VIDEO, use a VIDEO cable (yellow) instead of projection TV) CONTROL S IN OUT AUX IN OUT VIDEO 4 VIDEO 5 (DTV) SELECT IN VIDEO 1 VIDEO 3 HD VD Coaxial cable (not supplied) 3 SATELLITE IN LINE OUT VHF/...

Operating Instructions
Page 19
Disconnect all power sources before making any connections. (Front of projection TV) S VIDEO Push to the left (MONO) input on the projection TV (WhiteAUDIO Left, Red-AUDIO Right**). 2 Press VIDEO 2 to select the video inputs from your camcorder. 1 Using AUDIO and S VIDEO* cables,... connect AUDIO and S VIDEO OUT on the camcorder to AUDIO and S VIDEO IN inside the lower front panel on the projection TV. Connecting a Camcorder Use this connection to view a picture directly from a camcorder. * If your camcorder is not equipped with S VIDEO, use a VIDEO ...
Disconnect all power sources before making any connections. (Front of projection TV) S VIDEO Push to the left (MONO) input on the projection TV (WhiteAUDIO Left, Red-AUDIO Right**). 2 Press VIDEO 2 to select the video inputs from your camcorder. 1 Using AUDIO and S VIDEO* cables,... connect AUDIO and S VIDEO OUT on the camcorder to AUDIO and S VIDEO IN inside the lower front panel on the projection TV. Connecting a Camcorder Use this connection to view a picture directly from a camcorder. * If your camcorder is not equipped with S VIDEO, use a VIDEO ...

Operating Instructions
Page 20
... OUT" on page 41) 16 VCR (for playback) AUDIO R AUDIO L VIDEO LINE OUT OUT IN 1 Disconnect all power sources before making any connections. (Rear of projection TV) CONTROL S IN OUT AUX IN OUT VIDEO 4 VIDEO 5 (DTV) SELECT IN VIDEO 1 VIDEO 3 HD VD S VIDEO VIDEO L (MONO) AUDIO R Y Y/G L PB PB/B ...• When connecting a single VCR to the projection TV: if VCR LINE OUT is connected to VIDEO IN on the projection TV, do not connect the SELECT OUT on the projection TV to AUDIO and VIDEO OUT of SELECT OUT on the projection TV. Connecting Two VCRs for Tape Editing SELECT OUT ...
... OUT" on page 41) 16 VCR (for playback) AUDIO R AUDIO L VIDEO LINE OUT OUT IN 1 Disconnect all power sources before making any connections. (Rear of projection TV) CONTROL S IN OUT AUX IN OUT VIDEO 4 VIDEO 5 (DTV) SELECT IN VIDEO 1 VIDEO 3 HD VD S VIDEO VIDEO L (MONO) AUDIO R Y Y/G L PB PB/B ...• When connecting a single VCR to the projection TV: if VCR LINE OUT is connected to VIDEO IN on the projection TV, do not connect the SELECT OUT on the projection TV to AUDIO and VIDEO OUT of SELECT OUT on the projection TV. Connecting Two VCRs for Tape Editing SELECT OUT ...


