
Operating Instructions
Page 1
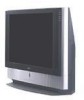
4-097-546-13 (2) LCD Projection TV KF-42WE610/50WE610/60WE610 Printed in Canada contact the Customer Relations Center at : 1-800-222-SONY (7669) Customers in U.S.A. Customers in the continental United States contact the Direct Response Center at : (416) 499-SONY (7669) LCD Projection TV HD-Monitor Operating Instructions KF-42WE610 KF-50WE610 KF-60WE610 2003 Sony Corporation If, after reading this instruction manual, you have additional questions related to the use of your Sony projection TV, please call one of the following numbers (English only).
4-097-546-13 (2) LCD Projection TV KF-42WE610/50WE610/60WE610 Printed in Canada contact the Customer Relations Center at : 1-800-222-SONY (7669) Customers in U.S.A. Customers in the continental United States contact the Direct Response Center at : (416) 499-SONY (7669) LCD Projection TV HD-Monitor Operating Instructions KF-42WE610 KF-50WE610 KF-60WE610 2003 Sony Corporation If, after reading this instruction manual, you have additional questions related to the use of your Sony projection TV, please call one of the following numbers (English only).
Operating Instructions
Page 2
...Sony logo, on the sticker, and also on UHF, VHF, transmitted by turning the equipment off and on, the user is connected. ❑ Consult the dealer or an experienced radio/TV technician for help. MODEL: KF-42WE610, KF-50WE610, KF... used in a residential installation. If this polarized AC plug with the instruction manual. 2 You are designed to provide reasonable protection against harmful interference in accordance ...equipment. Owner's Record The model and serial numbers are located at the rear of the LCD Projection TV, below . Serial No. NO USER-SERVICEABLE PARTS INSIDE. Note on ...
...Sony logo, on the sticker, and also on UHF, VHF, transmitted by turning the equipment off and on, the user is connected. ❑ Consult the dealer or an experienced radio/TV technician for help. MODEL: KF-42WE610, KF-50WE610, KF... used in a residential installation. If this polarized AC plug with the instruction manual. 2 You are designed to provide reasonable protection against harmful interference in accordance ...equipment. Owner's Record The model and serial numbers are located at the rear of the LCD Projection TV, below . Serial No. NO USER-SERVICEABLE PARTS INSIDE. Note on ...
Operating Instructions
Page 4
... the polarized plug by the manufacturer, or sold with the cart, stand, tripod, bracket, or table specified by forcing it in the installation, use this manual for future reference. A polarized plug has two blades with dry cloth. 7) Do not block any ventilation openings. If the provided plug does not fit into.... 3) Heed all warnings. 4) Follow all instructions. 5) Do not use and servicing of power source indicated on the set . Install in the operating instructions or service manual. A grounding type plug has two blades and a third grounding prong.
... the polarized plug by the manufacturer, or sold with the cart, stand, tripod, bracket, or table specified by forcing it in the installation, use this manual for future reference. A polarized plug has two blades with dry cloth. 7) Do not block any ventilation openings. If the provided plug does not fit into.... 3) Heed all warnings. 4) Follow all instructions. 5) Do not use and servicing of power source indicated on the set . Install in the operating instructions or service manual. A grounding type plug has two blades and a third grounding prong.
Operating Instructions
Page 8
...Sony LCD Projection TV Presenting the Sony LCD Projection TV 9 Using This Manual 10 Enjoying Your LCD Projection TV 11 Replacing the Lamp 13 Installing and Connecting the LCD Projection TV Contents 17 Inserting Batteries into the Remote Control ..........17 Carrying Your LCD Projection TV 18 To Prevent the LCD Projection TV from Falling Down 19 When Installing Your LCD Projection TV... TV Receiver with component connectors 39 Connecting a Digital TV Receiver with DVI-HDTV connector 40 Connecting a Camcorder 41 Using the CONTROL S Feature 42 Setting Up the LCD projection TV ...
...Sony LCD Projection TV Presenting the Sony LCD Projection TV 9 Using This Manual 10 Enjoying Your LCD Projection TV 11 Replacing the Lamp 13 Installing and Connecting the LCD Projection TV Contents 17 Inserting Batteries into the Remote Control ..........17 Carrying Your LCD Projection TV 18 To Prevent the LCD Projection TV from Falling Down 19 When Installing Your LCD Projection TV... TV Receiver with component connectors 39 Connecting a Digital TV Receiver with DVI-HDTV connector 40 Connecting a Camcorder 41 Using the CONTROL S Feature 42 Setting Up the LCD projection TV ...
Operating Instructions
Page 9
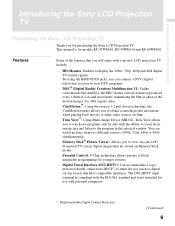
... KF-42WE610, KF-50WE610 and KF-60WE610. This manual is not intended for 480i signals only). ❑ CineMotion™: Using the reverse 3-2 pull down technology, the CineMotion feature allows you to obtain a smooth picture movement when playing back movies or other devices (such as digital set-top boxes) that have compatible interfaces. Introducing the Sony LCD Projection TV...
... KF-42WE610, KF-50WE610 and KF-60WE610. This manual is not intended for 480i signals only). ❑ CineMotion™: Using the reverse 3-2 pull down technology, the CineMotion feature allows you to obtain a smooth picture movement when playing back movies or other devices (such as digital set-top boxes) that have compatible interfaces. Introducing the Sony LCD Projection TV...
Operating Instructions
Page 10
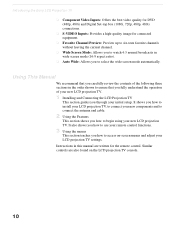
... also found on -screen menus and adjust your LCD projection TV settings. Using This Manual We recommend that you carefully review the contents of the following three sections in the order shown to select the wide screen mode automatically...(16:9 aspect ratio). ❑ Auto Wide: Allows you through your new LCD projection TV. 1 Installing and Connecting the LCD Projection TV This section guides you to ensure that you fully understand the operation of your initial setup. Introducing the Sony LCD Projection TV ❑ Component Video Inputs: Offers the best video quality for DVD (480p, ...
... also found on -screen menus and adjust your LCD projection TV settings. Using This Manual We recommend that you carefully review the contents of the following three sections in the order shown to select the wide screen mode automatically...(16:9 aspect ratio). ❑ Auto Wide: Allows you through your new LCD projection TV. 1 Installing and Connecting the LCD Projection TV This section guides you to ensure that you fully understand the operation of your initial setup. Introducing the Sony LCD Projection TV ❑ Component Video Inputs: Offers the best video quality for DVD (480p, ...
Operating Instructions
Page 23
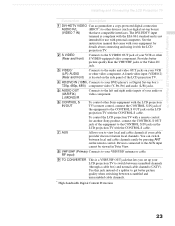
...input cannot be viewed in Twin View. 8 VHF/UHF (Primary Connects to the audio and video OUT jacks on the remote control. See the instruction manual that have compatible interfaces. A fourth video input (VIDEO 2) is a VHF/UHF OUT jack that lets you to view local and cable channels if ... picture quality than the VHF/UHF jacks or the Video IN jack. 3 VIDEO/ (L/R) AUDIO (Rear and front) Connects to your VHF/UHF antenna or cable. To control the LCD projection TV with a remote control for another Sony product, connect the CONTROL S OUT jack of the equipment to the CONTROL S IN jack on ...
...input cannot be viewed in Twin View. 8 VHF/UHF (Primary Connects to the audio and video OUT jacks on the remote control. See the instruction manual that have compatible interfaces. A fourth video input (VIDEO 2) is a VHF/UHF OUT jack that lets you to view local and cable channels if ... picture quality than the VHF/UHF jacks or the Video IN jack. 3 VIDEO/ (L/R) AUDIO (Rear and front) Connects to your VHF/UHF antenna or cable. To control the LCD projection TV with a remote control for another Sony product, connect the CONTROL S OUT jack of the equipment to the CONTROL S IN jack on ...
Operating Instructions
Page 32
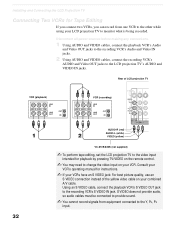
...be connected to provide sound. ✍ You cannot record signals from one VCR to the other while using your LCD projection TV to monitor what is being recorded. Consult your VCR's operating manual for instructions. ✍ If your VCRs have an S VIDEO jack: For best picture quality, use an S ...S VIDEO OUT jack to the LCD projection TV's AUDIO and VIDEO IN jacks. Installing and Connecting the LCD Projection TV Connecting Two VCRs for playback by pressing TV/VIDEO on the remote control. ✍ You may need to change the video input on your VCR. Rear of the yellow video cable on your...
...be connected to provide sound. ✍ You cannot record signals from one VCR to the other while using your LCD projection TV to monitor what is being recorded. Consult your VCR's operating manual for instructions. ✍ If your VCRs have an S VIDEO jack: For best picture quality, use an S ...S VIDEO OUT jack to the LCD projection TV's AUDIO and VIDEO IN jacks. Installing and Connecting the LCD Projection TV Connecting Two VCRs for playback by pressing TV/VIDEO on the remote control. ✍ You may need to change the video input on your VCR. Rear of the yellow video cable on your...

Operating Instructions
Page 35
Installing and Connecting the LCD Projection TV Installing and Connecting the LCD Projection TV ✍ Be sure your VCR's video input is not equipped with S VIDEO, use a VIDEO cable (yellow) instead of the S VIDEO cable. 35 VIDEO 1 to watch satellite TV or the VCR (your VCR's operating manual for instructions. ✍ Use TV/VIDEO to watch cable TV. ✍ If your VCR or satellite receiver is set correctly. VHF/UHF to select - Consult your VCR must be turned on). -
Installing and Connecting the LCD Projection TV Installing and Connecting the LCD Projection TV ✍ Be sure your VCR's video input is not equipped with S VIDEO, use a VIDEO cable (yellow) instead of the S VIDEO cable. 35 VIDEO 1 to watch satellite TV or the VCR (your VCR's operating manual for instructions. ✍ Use TV/VIDEO to watch cable TV. ✍ If your VCR or satellite receiver is set correctly. VHF/UHF to select - Consult your VCR must be turned on). -
Operating Instructions
Page 39
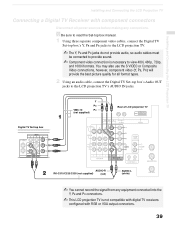
z Be sure to read the Set-top box manual. 1 Using three separate component video cables, connect the Digital TV Set-top box's Y, PB and PR jacks to the LCD projection TV. ✍ The Y, PB and PR jacks do not provide audio, so audio cables must be connected to provide sound. ✍ Component video ...-top box's Audio OUT jacks to view 480i, 480p, 720p, and 1080i formats. Y PB VMC-10 PR (not supplied) Rear of LCD projection TV Digital TV Set-top box AUDIO-R RK-C310/C320/C330 (not supplied) (red) AUDIO-L (white) ✍ You cannot record the signal from any equipment connected into the...
z Be sure to read the Set-top box manual. 1 Using three separate component video cables, connect the Digital TV Set-top box's Y, PB and PR jacks to the LCD projection TV. ✍ The Y, PB and PR jacks do not provide audio, so audio cables must be connected to provide sound. ✍ Component video ...-top box's Audio OUT jacks to view 480i, 480p, 720p, and 1080i formats. Y PB VMC-10 PR (not supplied) Rear of LCD projection TV Digital TV Set-top box AUDIO-R RK-C310/C320/C330 (not supplied) (red) AUDIO-L (white) ✍ You cannot record the signal from any equipment connected into the...
Operating Instructions
Page 40
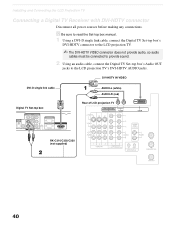
... OUT (1080i/720p/480p) AUDIO-L (white) AUDIO-R (red) Rear of LCD projection TV RK-C310/C320/C330 (not supplied) 40 z Be sure to read the Set-top box manual. 1 Using a DVI-D single link cable, connect the Digital TV Set-top box's DVI-HDTV connector to the LCD projection TV. ✍ The DVI-HDTV VIDEO connector does not...
... OUT (1080i/720p/480p) AUDIO-L (white) AUDIO-R (red) Rear of LCD projection TV RK-C310/C320/C330 (not supplied) 40 z Be sure to read the Set-top box manual. 1 Using a DVI-D single link cable, connect the Digital TV Set-top box's DVI-HDTV connector to the LCD projection TV. ✍ The DVI-HDTV VIDEO connector does not...

Operating Instructions
Page 48
Using the Features Watching Digital TV When you have connected the DTV receiver, you can enjoy digital TV programs. This LCD projection TV is capable of the LCD projection TV as necessary. 48 To view a digital TV program 1 Connect the DTV receiver to select DVI-HDTV IN 7, HD/DVD IN 5 or 6. 3 Select a digital channel on the LCD projection TV (for details, see the Operating Manual of the DTV receiver. 4 Adjust the volume of receiving the 1080i, 720p, 480p and 480i digital TV formats. For details, see page 39). 2 Press TV/VIDEO to DVI-HDTV IN 7, HD/DVD IN 5 or 6 on the DTV receiver.
Using the Features Watching Digital TV When you have connected the DTV receiver, you can enjoy digital TV programs. This LCD projection TV is capable of the LCD projection TV as necessary. 48 To view a digital TV program 1 Connect the DTV receiver to select DVI-HDTV IN 7, HD/DVD IN 5 or 6. 3 Select a digital channel on the LCD projection TV (for details, see the Operating Manual of the DTV receiver. 4 Adjust the volume of receiving the 1080i, 720p, 480p and 480i digital TV formats. For details, see page 39). 2 Press TV/VIDEO to DVI-HDTV IN 7, HD/DVD IN 5 or 6 on the DTV receiver.

Operating Instructions
Page 65
... Stick Home menu 1 Press M or m to stop the slide show . The setup menu appears. 3 Press M or m to unlock the protect. Auto Advances slides automatically. Manual Advances slides manually. Displays the Memory Stick Home. 65 Select Off to select the desired option and press . Allows you to hear the respective sound(s). If the...
... Stick Home menu 1 Press M or m to stop the slide show . The setup menu appears. 3 Press M or m to unlock the protect. Auto Advances slides automatically. Manual Advances slides manually. Displays the Memory Stick Home. 65 Select Off to select the desired option and press . Allows you to hear the respective sound(s). If the...

Operating Instructions
Page 78
...press . 3 Use the 0-9 buttons on /off and select a rating system Description Off Parental lock is the first time you are : US: TV-PG, PG Canada: C8+, PG, 8 ans+, TV-PG Y. Canada: See page 81 for details. digit password. 4 If this password, confirm the password by entering it again. (The Parent .... No programs are : US: TV-14, PG-13 Canada: 14+, 13 ans+, TV-14 Custom Select to set up the TV to block programs according to their content and rating levels. Using the Menus Using the Parent Menu The Parent Menu allows you to set ratings manually. US: See page 80 for ...
...press . 3 Use the 0-9 buttons on /off and select a rating system Description Off Parental lock is the first time you are : US: TV-PG, PG Canada: C8+, PG, 8 ans+, TV-PG Y. Canada: See page 81 for details. digit password. 4 If this password, confirm the password by entering it again. (The Parent .... No programs are : US: TV-14, PG-13 Canada: 14+, 13 ans+, TV-14 Custom Select to set up the TV to block programs according to their content and rating levels. Using the Menus Using the Parent Menu The Parent Menu allows you to set ratings manually. US: See page 80 for ...

Operating Instructions
Page 85
Level 1-4 (manual): Select the value with which double images are improved. Using the Menus Option Image Shift Using the Menus Description Corrects the Image on your LCD projection TV. On Set to use the unit at normal altitudes. 85 Off Set to use the unit at an altitude of 1,500 m (4921 ft.) or higher. Before adjusting After adjusting High Altitude Auto: (Factory setting) Automatically corrects double images.
Level 1-4 (manual): Select the value with which double images are improved. Using the Menus Option Image Shift Using the Menus Description Corrects the Image on your LCD projection TV. On Set to use the unit at normal altitudes. 85 Off Set to use the unit at an altitude of 1,500 m (4921 ft.) or higher. Before adjusting After adjusting High Altitude Auto: (Factory setting) Automatically corrects double images.


