
Child Safety: It Makes A Difference Where Your TV Stands
Page 1
Tune Into Safety 1 One size does NOT fit all. As a result, TV sets may fall over and may pique the children's curiosity. 6 Remember that children can become excited while watching a program and can potentially push or pull a TV ... the TV). 3 Carefully read and understand the manufacturer's instructions and product safety notices. 4 Don't allow children to climb on or play with furniture and television sets. 5 Avoid placing any items on the proper TV stands. The Consumer Electronics Association formed the Home Entertainment Support Safety Committee comprised of television and consumer...
Tune Into Safety 1 One size does NOT fit all. As a result, TV sets may fall over and may pique the children's curiosity. 6 Remember that children can become excited while watching a program and can potentially push or pull a TV ... the TV). 3 Carefully read and understand the manufacturer's instructions and product safety notices. 4 Don't allow children to climb on or play with furniture and television sets. 5 Avoid placing any items on the proper TV stands. The Consumer Electronics Association formed the Home Entertainment Support Safety Committee comprised of television and consumer...
Limited Warranty (US Only)
Page 1
...limited warranty term (ninety (90) days for commercial use during ordinary consumer or commercial use ) for the time periods and as set forth below . This Limited Warranty only covers product issues caused by any enclosed software Limited Warranty. This Limited Warranty is provided "...the End User License Agreements included with the television product or accessory. 2-887-485-01 ® SXRD Projection TV LCD Projection TV LIMITED WARRANTY (U.S. In the event of Sony. After the Warranty Periods as fuses or batteries). Any parts or product replaced under this television ...
...limited warranty term (ninety (90) days for commercial use during ordinary consumer or commercial use ) for the time periods and as set forth below . This Limited Warranty only covers product issues caused by any enclosed software Limited Warranty. This Limited Warranty is provided "...the End User License Agreements included with the television product or accessory. 2-887-485-01 ® SXRD Projection TV LCD Projection TV LIMITED WARRANTY (U.S. In the event of Sony. After the Warranty Periods as fuses or batteries). Any parts or product replaced under this television ...

Marketing Specifications
Page 1
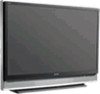
...reproduction. The Auto Mode has two settings designed to work best with high contrast.The overall result of WEGA Engine has to be seen to ..., together with a comprehensive range of input interfaces. Auto 1 is for maximum versatility, Sony's Grand WEGA™ line is for digital connectivity (1080p input) PC Input (D-Sub 15pin) Front Component...different room lighting conditions. Auto and Manual. KDS-55A2000 55" Diagonal SXRD Rear Projection Television Key Features 3 SXRD Full HD Resolution (1920 x 1080/0.61" SXRD chip) WEGA Engine™ System Advanced Iris function ATSC ...
...reproduction. The Auto Mode has two settings designed to work best with high contrast.The overall result of WEGA Engine has to be seen to ..., together with a comprehensive range of input interfaces. Auto 1 is for maximum versatility, Sony's Grand WEGA™ line is for digital connectivity (1080p input) PC Input (D-Sub 15pin) Front Component...different room lighting conditions. Auto and Manual. KDS-55A2000 55" Diagonal SXRD Rear Projection Television Key Features 3 SXRD Full HD Resolution (1920 x 1080/0.61" SXRD chip) WEGA Engine™ System Advanced Iris function ATSC ...
Operating Instructions
Page 4
BBE and BBE symbol are registered trademarks of Sony Corporation. Blu-ray Disc is a trademark licensed to Apple Computer, Inc., registered in your area depends on -demand, a cable operator's enhanced program guide and data-enhanced television services may require the use of a set-top box. SXRD, WEGA, Grand WEGA, Steady Sound, Digital Reality Creation and CineMotion are...
BBE and BBE symbol are registered trademarks of Sony Corporation. Blu-ray Disc is a trademark licensed to Apple Computer, Inc., registered in your area depends on -demand, a cable operator's enhanced program guide and data-enhanced television services may require the use of a set-top box. SXRD, WEGA, Grand WEGA, Steady Sound, Digital Reality Creation and CineMotion are...
Operating Instructions
Page 6
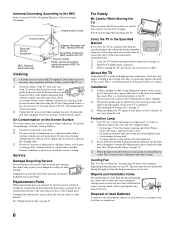
...unit with a soft cloth. Service Damage Requiring Service Do not attempt to service the set by yourself since opening the cabinet may expose you to reflections from the wall. Replacement ... new one (not supplied) when: • the message, "Projection lamp is low. s When installing your foot or fingers. Projection Lamp s Your TV uses a projection lamp as these may cause a problem with a dry soft cloth.... s Before carrying the TV, disconnect any kind on the front panel blinks in the rear cover area may scratch the screen's coating. Please replace the lamp." appeared on the screen...
...unit with a soft cloth. Service Damage Requiring Service Do not attempt to service the set by yourself since opening the cabinet may expose you to reflections from the wall. Replacement ... new one (not supplied) when: • the message, "Projection lamp is low. s When installing your foot or fingers. Projection Lamp s Your TV uses a projection lamp as these may cause a problem with a dry soft cloth.... s Before carrying the TV, disconnect any kind on the front panel blinks in the rear cover area may scratch the screen's coating. Please replace the lamp." appeared on the screen...

Operating Instructions
Page 7
...Settings 34 Sound Settings 37 Screen Settings 39 Channel Settings 41 Parental Lock Settings 42 Setup Settings 45 PC Settings 49 Other Information Replacing the Lamp 51 How to Optional Equipment.....18 Front Panel 18 Rear Panel 19 Setting Up the Channel List - Contents Getting Started Welcome 8 Features 8 Notes on the TV 9 Screen 10 Projection... and Cable Box/Digital Cable Box .......17 When Connecting to Replace the Lamp 51 Troubleshooting 55 Remote Control 55 Picture 56 Sound 57 Channels 57 General 58 PC Input Signal Reference Chart 60 Specifications 61 Index 62 7
...Settings 34 Sound Settings 37 Screen Settings 39 Channel Settings 41 Parental Lock Settings 42 Setup Settings 45 PC Settings 49 Other Information Replacing the Lamp 51 How to Optional Equipment.....18 Front Panel 18 Rear Panel 19 Setting Up the Channel List - Contents Getting Started Welcome 8 Features 8 Notes on the TV 9 Screen 10 Projection... and Cable Box/Digital Cable Box .......17 When Connecting to Replace the Lamp 51 Troubleshooting 55 Remote Control 55 Picture 56 Sound 57 Channels 57 General 58 PC Input Signal Reference Chart 60 Specifications 61 Index 62 7

Operating Instructions
Page 8
...Sony SXRDTM projection TV. This engine features unique Sony technology, including: • DRC® (Digital Reality Creation)-MF V1: Unlike conventional line doublers, the DRC Multifunction feature replaces the signal's NTSC waveform with your new TV include: ❑ SXRDTM: SXRD is for models KDS-50A2000, KDS-55A2000 and KDS...-60A2000. The DRC Palette option lets you customize the level of detail (Reality) and smoothness (Clarity). ❑ Integrated HDTV... TV settings. ❑...WEGA Engine: Delivers superb picture quality from ...
...Sony SXRDTM projection TV. This engine features unique Sony technology, including: • DRC® (Digital Reality Creation)-MF V1: Unlike conventional line doublers, the DRC Multifunction feature replaces the signal's NTSC waveform with your new TV include: ❑ SXRDTM: SXRD is for models KDS-50A2000, KDS-55A2000 and KDS...-60A2000. The DRC Palette option lets you customize the level of detail (Reality) and smoothness (Clarity). ❑ Integrated HDTV... TV settings. ❑...WEGA Engine: Delivers superb picture quality from ...

Operating Instructions
Page 9
...; HDMI (High-Definition Multimedia Interface): Provides an uncompressed, all-digital audio/video interface between this TV and any HDMI-equipped audio/video component, such as a set-top box, Blu-ray DiscTM Player (BD), DVD player, and A/V receiver. When the condensation has evaporated, the picture will continue to normal. 9 To enjoy clear...
...; HDMI (High-Definition Multimedia Interface): Provides an uncompressed, all-digital audio/video interface between this TV and any HDMI-equipped audio/video component, such as a set-top box, Blu-ray DiscTM Player (BD), DVD player, and A/V receiver. When the condensation has evaporated, the picture will continue to normal. 9 To enjoy clear...

Operating Instructions
Page 10
...replaced when the LAMP LED blinks or the screen becomes darker. Be sure to let you know that the lamp is in the Setup settings (see page 51. Projection Lamp To replace the lamp, see page 47). ✍ Until you turn on the screen. To avoid eye discomfort or injury, ...when your TV, it has a lifespan and needs to display a message "Projection lamp is on the screen can affect the picture quality. As with a new Sony XL-5200 replacement lamp (not supplied). ❑ After the lamp is replaced, set the Lamp Replacement option, a message announcing that the lamp has reached its ...
...replaced when the LAMP LED blinks or the screen becomes darker. Be sure to let you know that the lamp is in the Setup settings (see page 51. Projection Lamp To replace the lamp, see page 47). ✍ Until you turn on the screen. To avoid eye discomfort or injury, ...when your TV, it has a lifespan and needs to display a message "Projection lamp is on the screen can affect the picture quality. As with a new Sony XL-5200 replacement lamp (not supplied). ❑ After the lamp is replaced, set the Lamp Replacement option, a message announcing that the lamp has reached its ...
Operating Instructions
Page 14
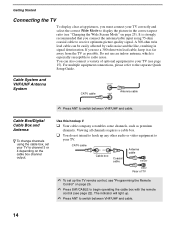
... To display clear crisp pictures, you connect the antenna/cable input using the cable box, set up . ✍ Press ANT to your TV correctly and select the correct Wide Mode ... separate Quick Setup Guide. CATV cable IN OUT Cable box Coaxial cable Antenna cable VHF/UHF CABLE Rear of optional equipment to your TV to switch between VHF/UHF and cable. 14 Cable System and ...VHF/UHF and cable. A 300-ohm twin lead cable can also connect a variety of TV ✍ To set your TV (see page 15). The indicator will light up the TV remote control, see "Programming the Remote Control...
... To display clear crisp pictures, you connect the antenna/cable input using the cable box, set up . ✍ Press ANT to your TV correctly and select the correct Wide Mode ... separate Quick Setup Guide. CATV cable IN OUT Cable box Coaxial cable Antenna cable VHF/UHF CABLE Rear of optional equipment to your TV to switch between VHF/UHF and cable. 14 Cable System and ...VHF/UHF and cable. A 300-ohm twin lead cable can also connect a variety of TV ✍ To set your TV (see page 15). The indicator will light up the TV remote control, see "Programming the Remote Control...

Operating Instructions
Page 15
..." on page 26. ✍ Press SAT/CABLE to channel 3 or 4 depending on the cable box channel output. Satellite Receiver and Cable/Antenna Coaxial cable Rear of TV SERVICE ONLY VIDEO IN HD/DVD IN (1080i/720p/480p/480i) PC IN RGB S VIDEO Y PB DIGITAL OUT (OPTICAL) VHF/UHF CABLE VIDEO... Satellite receiver Satellite antenna cable S VIDEO cable ✍ If your TV. The indicator will light up. CATV cable Coaxial cable CABLE Rear of TV IN OUT Cable box ✍ To set your TV to begin operating the cable box with S VIDEO, use a VIDEO cable (yellow) instead of the S VIDEO cable. 15...
..." on page 26. ✍ Press SAT/CABLE to channel 3 or 4 depending on the cable box channel output. Satellite Receiver and Cable/Antenna Coaxial cable Rear of TV SERVICE ONLY VIDEO IN HD/DVD IN (1080i/720p/480p/480i) PC IN RGB S VIDEO Y PB DIGITAL OUT (OPTICAL) VHF/UHF CABLE VIDEO... Satellite receiver Satellite antenna cable S VIDEO cable ✍ If your TV. The indicator will light up. CATV cable Coaxial cable CABLE Rear of TV IN OUT Cable box ✍ To set your TV to begin operating the cable box with S VIDEO, use a VIDEO cable (yellow) instead of the S VIDEO cable. 15...
Operating Instructions
Page 17
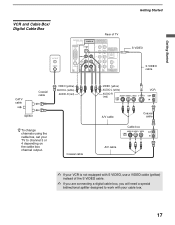
... Coaxial cable VIDEO (yellow) AUDIO-L (white) AUDIO-R (red) Splitter z To change channels using the cable box, set your cable box. 17 Getting Started VCR and Cable Box/ Digital Cable Box VHF/UHF CABLE Getting Started Rear of the S VIDEO cable. ✍ If you are connecting a digital cable box, you will need a special...
... Coaxial cable VIDEO (yellow) AUDIO-L (white) AUDIO-R (red) Splitter z To change channels using the cable box, set your cable box. 17 Getting Started VCR and Cable Box/ Digital Cable Box VHF/UHF CABLE Getting Started Rear of the S VIDEO cable. ✍ If you are connecting a digital cable box, you will need a special...

Operating Instructions
Page 18
...jacks of your equipment's component video (YPBPR) output jacks. Note that this TV displays all format types of picture in the Setup settings to the composite video output jacks on your fingers when opening the cover. Getting Started When Connecting to Optional Equipment Front Panel To ... Connect to activate both audio and video function for the Video 2 (Component) option in the Setup settings, the component video function will be sure to select Video 2 (Component) to Off in a resolution of rear panel) or the composite video 2 connection. Y PB PR VIDEO L(MONO) R AUDIO VIDEO/HD/...
...jacks of your equipment's component video (YPBPR) output jacks. Note that this TV displays all format types of picture in the Setup settings to the composite video output jacks on your fingers when opening the cover. Getting Started When Connecting to Optional Equipment Front Panel To ... Connect to activate both audio and video function for the Video 2 (Component) option in the Setup settings, the component video function will be sure to select Video 2 (Component) to Off in a resolution of rear panel) or the composite video 2 connection. Y PB PR VIDEO L(MONO) R AUDIO VIDEO/HD/...

Operating Instructions
Page 19
.... ✍ Do not connect a PC to the TV's HDMI input. Getting Started Getting Started Rear Panel 1 IN 6 7 L AUDIO R For service use only an HDMI cable that this TV and any HDMI-equipped audio/video equipment, such as a set-top box, Blu-ray Disc Player, DVD player, and A/V receiver. If the equipment has...
.... ✍ Do not connect a PC to the TV's HDMI input. Getting Started Getting Started Rear Panel 1 IN 6 7 L AUDIO R For service use only an HDMI cable that this TV and any HDMI-equipped audio/video equipment, such as a set-top box, Blu-ray Disc Player, DVD player, and A/V receiver. If the equipment has...
Operating Instructions
Page 20
... input receives CATV signal frequencies. If this TV displays all format types of picture in conjunction with the VHF/UHF input jack, lets you set up your TV to the left and right audio input jacks of digital audio equipment that can use an adapter (not supplied). Connect to... flickering or not clear, adjust the Phase and Pitch of 1,920 dots × 1,080 lines. This CABLE input jack, in a resolution of the PC settings as a VCR or other video equipment. Connect to switch between scrambled channels (coming through your audio or video equipment. Can also be necessary to use...
... input receives CATV signal frequencies. If this TV displays all format types of picture in conjunction with the VHF/UHF input jack, lets you set up your TV to the left and right audio input jacks of digital audio equipment that can use an adapter (not supplied). Connect to... flickering or not clear, adjust the Phase and Pitch of 1,920 dots × 1,080 lines. This CABLE input jack, in a resolution of the PC settings as a VCR or other video equipment. Connect to switch between scrambled channels (coming through your audio or video equipment. Can also be necessary to use...

Operating Instructions
Page 21
... turn on the TV for the first time after hooking it up the channels at a later time, select the Auto Program option in the Channel settings to create a list of receivable channels from both VHF/UHF antenna and cable TV channels if both sources are connected. The Initial Setup screen appears...The Initial Setup screen appears. 2 Press V/v to highlight "Yes" then press . appears. 3 Press V/v to highlight the on the TV. Then press . Getting Started Getting Started Setting Up the Channel List - Initial Setup After you finish connecting the TV, you turn on -screen display language.
... turn on the TV for the first time after hooking it up the channels at a later time, select the Auto Program option in the Channel settings to create a list of receivable channels from both VHF/UHF antenna and cable TV channels if both sources are connected. The Initial Setup screen appears...The Initial Setup screen appears. 2 Press V/v to highlight "Yes" then press . appears. 3 Press V/v to highlight the on the TV. Then press . Getting Started Getting Started Setting Up the Channel List - Initial Setup After you finish connecting the TV, you turn on -screen display language.

Operating Instructions
Page 22
...Insert two size AA (R6) batteries (supplied) by matching the e and E on setting up momentarily when pressed to show which external equipment the remote control is set to operate the external equipment, these FUNCTION buttons to turn this feature off . the ... Buttons 4 0 - 9, ENT 5 6 JUMP 7 ANT 8 SURROUND 9 SOUND Description Press repeatedly to cycle through different sound settings: Dynamic for enhanced treble and bass, Standard for spoken dialog and Custom for flat setting. ✍ The 5 button, CH + button and PLAY button have a tactile dot. Press 0-9 to enter 2.1, press 2...
...Insert two size AA (R6) batteries (supplied) by matching the e and E on setting up momentarily when pressed to show which external equipment the remote control is set to operate the external equipment, these FUNCTION buttons to turn this feature off . the ... Buttons 4 0 - 9, ENT 5 6 JUMP 7 ANT 8 SURROUND 9 SOUND Description Press repeatedly to cycle through different sound settings: Dynamic for enhanced treble and bass, Standard for spoken dialog and Custom for flat setting. ✍ The 5 button, CH + button and PLAY button have a tactile dot. Press 0-9 to enter 2.1, press 2...

Operating Instructions
Page 23
... Way for instance, the audio may contain a different language). Using the Program Options Setting The program options setting allows you to the previous screen when displaying MENU items and settings. (Continued) 23 Press to go back to customize the program settings on the currently tuned channel. Alternate Audio Each program has a main audio stream...
... Way for instance, the audio may contain a different language). Using the Program Options Setting The program options setting allows you to the previous screen when displaying MENU items and settings. (Continued) 23 Press to go back to customize the program settings on the currently tuned channel. Alternate Audio Each program has a main audio stream...

Operating Instructions
Page 24
... &m PREV: Press to replay the current program from the previous chapter mark (if any ) or to mute the sound. ADVANCE: Press to advance forward a set period of time when playing back a recorded program. qg VOL +/- Pressing this button alone starts the recording process. X REC PAUSE: Press to the program. .... X PAUSE: Press to display a frozen image of the connected equipment. MENU/MENU ✍ For further information, refer to replay the current program for Sony DVD recorders with the DVD recorder. REPLAY: Press to the operating manual of the current program.
... &m PREV: Press to replay the current program from the previous chapter mark (if any ) or to mute the sound. ADVANCE: Press to advance forward a set period of time when playing back a recorded program. qg VOL +/- Pressing this button alone starts the recording process. X REC PAUSE: Press to the program. .... X PAUSE: Press to display a frozen image of the connected equipment. MENU/MENU ✍ For further information, refer to replay the current program for Sony DVD recorders with the DVD recorder. REPLAY: Press to the operating manual of the current program.

Operating Instructions
Page 25
...Press repeatedly to select the function of MENU" on page 28. 25 wk F1/F2 Press once to display the MENU with TV functions and settings. Press to step through the available picture modes: Vivid, Standard, Custom. For details, see "Using Other Equipment with commonly used options such...see page 46). Press to move the on the input signal. Press to turn off immediately. To scan quickly through channels. The Wide Mode settings can select may vary depending on -screen cursor. The OSD (on page 34. See page 39. Changing the Wide Screen Mode 4:3 Original source...
...Press repeatedly to select the function of MENU" on page 28. 25 wk F1/F2 Press once to display the MENU with TV functions and settings. Press to step through the available picture modes: Vivid, Standard, Custom. For details, see "Using Other Equipment with commonly used options such...see page 46). Press to move the on the input signal. Press to turn off immediately. To scan quickly through channels. The Wide Mode settings can select may vary depending on -screen cursor. The OSD (on page 34. See page 39. Changing the Wide Screen Mode 4:3 Original source...


