Operating Instructions
Page 3
...Music 33 Navigating through Music 34 Music Options 34 How to Use TV Guide On Screen 35 Using BRAVIA Sync with Your Remote Control 28 Exploring Fun Features Favorites 29 Displaying Favorites 29 Navigating Favorites 29 ...Settings 41 Picture Settings 42 Sound Settings 44 Screen Settings 45 Channel Settings 47 CC Closed Captions (CC) Settings 48 Parental Lock Settings 48 External Inputs Settings 51 HDMI Settings 51 Network Settings 52 General Setup Settings 52 Initial Setup 53 Other Information Troubleshooting 55 Specifications 58 Index 59 Customer Support http://www.sony...
...Music 33 Navigating through Music 34 Music Options 34 How to Use TV Guide On Screen 35 Using BRAVIA Sync with Your Remote Control 28 Exploring Fun Features Favorites 29 Displaying Favorites 29 Navigating Favorites 29 ...Settings 41 Picture Settings 42 Sound Settings 44 Screen Settings 45 Channel Settings 47 CC Closed Captions (CC) Settings 48 Parental Lock Settings 48 External Inputs Settings 51 HDMI Settings 51 Network Settings 52 General Setup Settings 52 Initial Setup 53 Other Information Troubleshooting 55 Specifications 58 Index 59 Customer Support http://www.sony...
Operating Instructions
Page 4
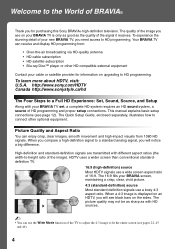
... the quality of the TV to adjust the 4:3 image to HD programming. When a 4:3 image is only as good as with your BRAVIA TV set, a complete HD system requires an HD sound system, a source of the image you for information on upgrading to fit the entire screen... will notice a big difference. Welcome to connect other HD compatible external equipment Contact your cable or satellite provider for purchasing this Sony BRAVIA® high-definition television. To learn more about HDTV, visit: U.S.A. Picture Quality and Aspect Ratio You can receive and display HD programming from 1080 ...
... the quality of the TV to adjust the 4:3 image to HD programming. When a 4:3 image is only as good as with your BRAVIA TV set, a complete HD system requires an HD sound system, a source of the image you for information on upgrading to fit the entire screen... will notice a big difference. Welcome to connect other HD compatible external equipment Contact your cable or satellite provider for purchasing this Sony BRAVIA® high-definition television. To learn more about HDTV, visit: U.S.A. Picture Quality and Aspect Ratio You can receive and display HD programming from 1080 ...
Operating Instructions
Page 5
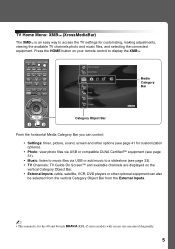
... way to display the XMB™. TV Home Menu: XMB™ (XrossMediaBar) The XMB™ is for the 40 and 46 inch BRAVIA KDL-Z series models with screen size measured diagonally. 5 Press the HOME button on the vertical Category Object Bar. • External Inputs: cable, satellite,... VCR, DVD players or other optional equipment can control: • Settings: timer, picture, sound, screen and other options (see page 41 for customization options). • Photo: view photo files via USB or compatible ...
... way to display the XMB™. TV Home Menu: XMB™ (XrossMediaBar) The XMB™ is for the 40 and 46 inch BRAVIA KDL-Z series models with screen size measured diagonally. 5 Press the HOME button on the vertical Category Object Bar. • External Inputs: cable, satellite,... VCR, DVD players or other optional equipment can control: • Settings: timer, picture, sound, screen and other options (see page 41 for customization options). • Photo: view photo files via USB or compatible ...
Operating Instructions
Page 6
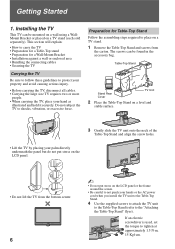
... 1 Remove the Table-Top Stand and screws from the bottom center. 6 ~ • Do not put stress on the LCD panel. • Do not lift the TV from the carton. The screws can be found in the accessory bag. Installing ...the TV This TV can be mounted on a wall using a WallMount Bracket or placed on the LCD panel or the frame around the screen. • Be careful to not pinch your palm directly underneath the panel ... at approximately 1.5 N·m, 15 Kgf·cm. If an electric screwdriver is used, set the torque to the "Attaching the Table-Top Stand" flyer).
... 1 Remove the Table-Top Stand and screws from the bottom center. 6 ~ • Do not put stress on the LCD panel. • Do not lift the TV from the carton. The screws can be found in the accessory bag. Installing ...the TV This TV can be mounted on a wall using a WallMount Bracket or placed on the LCD panel or the frame around the screen. • Be careful to not pinch your palm directly underneath the panel ... at approximately 1.5 N·m, 15 Kgf·cm. If an electric screwdriver is used, set the torque to the "Attaching the Table-Top Stand" flyer).
Operating Instructions
Page 7
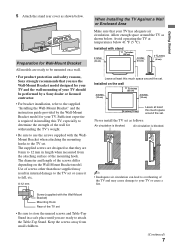
...11 7/8 inches (30 cm) 4 inches (10 cm) 4 inches (10 cm) 2 3/8 inches (6 cm) Leave at least this much space around the set as shown below . Never install the TV set . The diameter and length of the wall for withstanding the TV's weight. • Be sure to attach the Table-Top Stand. Keep...; Be sure to store the unused screws and Table-Top Stand in internal damage to the TV set or cause it to the TV set . Installed on a wall. • For product protection and safety reasons, Sony strongly recommends that your TV should be mounted on the wall 4 inches (10 cm) 11 7/8 inches ...
...11 7/8 inches (30 cm) 4 inches (10 cm) 4 inches (10 cm) 2 3/8 inches (6 cm) Leave at least this much space around the set as shown below . Never install the TV set . The diameter and length of the wall for withstanding the TV's weight. • Be sure to attach the Table-Top Stand. Keep...; Be sure to store the unused screws and Table-Top Stand in internal damage to the TV set or cause it to the TV set . Installed on a wall. • For product protection and safety reasons, Sony strongly recommends that your TV should be mounted on the wall 4 inches (10 cm) 11 7/8 inches ...
Operating Instructions
Page 9
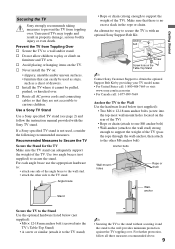
...~ • Securing the TV to the stand without securing it cannot be used , consider the following recommended measures. Getting Started Securing the TV Sony strongly recommends taking measures to prevent the TV from Toppling Over s Secure the TV to a wall and/or stand. s Avoid placing or hanging ... over . s Install the TV where it and the stand to secure the stand. s Never install the TV on furniture and TV sets. If a Sony specified TV stand is no excess slack in property damage, serious bodily injury or even death. For further protection, follow the instruction manual ...
...~ • Securing the TV to the stand without securing it cannot be used , consider the following recommended measures. Getting Started Securing the TV Sony strongly recommends taking measures to prevent the TV from Toppling Over s Secure the TV to a wall and/or stand. s Avoid placing or hanging ... over . s Install the TV where it and the stand to secure the stand. s Never install the TV on furniture and TV sets. If a Sony specified TV stand is no excess slack in property damage, serious bodily injury or even death. For further protection, follow the instruction manual ...
Operating Instructions
Page 11
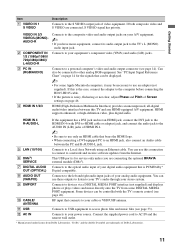
...the computer before connecting the HD15-HD15 cable. • If the picture is noisy, flickering or not clear, adjust Phase and Pitch of Screen settings on your stereo system. 9 DMPORT Connects to devices via a DIGITAL MEDIA PORT interface (not supplied) and displays photos or plays videos and music... be necessary to use these outputs to listen to your TV's audio through your A/V equipment. ~ • If you are connecting the optional BRAVIA external module (DMex). 7 DIGITAL AUDIO Connects to the optical audio input of your digital audio equipment that is for the signals that can use ...
...the computer before connecting the HD15-HD15 cable. • If the picture is noisy, flickering or not clear, adjust Phase and Pitch of Screen settings on your stereo system. 9 DMPORT Connects to devices via a DIGITAL MEDIA PORT interface (not supplied) and displays photos or plays videos and music... be necessary to use these outputs to listen to your TV's audio through your A/V equipment. ~ • If you are connecting the optional BRAVIA external module (DMex). 7 DIGITAL AUDIO Connects to the optical audio input of your digital audio equipment that is for the signals that can use ...
Operating Instructions
Page 12
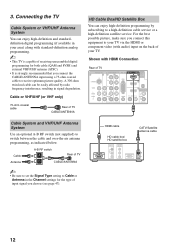
... interference, resulting in signal degradation. Cable Antenna A-B RF switch A Rear of TV B CABLE/ANTENNA ~ • Be sure to set the Signal Type setting to Cable or Antenna in your area) along with standard-definition analog programming. ~ • This TV is capable of receiving unscrambled ... high-definition satellite service. A 300-ohm twin lead cable can enjoy high-definition and standarddefinition digital programming (if available in the Channel settings for both cable (QAM and 8VSB) and external VHF/UHF antenna (ATSC). • It is strongly recommended that you connect the ...
... interference, resulting in signal degradation. Cable Antenna A-B RF switch A Rear of TV B CABLE/ANTENNA ~ • Be sure to set the Signal Type setting to Cable or Antenna in your area) along with standard-definition analog programming. ~ • This TV is capable of receiving unscrambled ... high-definition satellite service. A 300-ohm twin lead cable can enjoy high-definition and standarddefinition digital programming (if available in the Channel settings for both cable (QAM and 8VSB) and external VHF/UHF antenna (ATSC). • It is strongly recommended that you connect the ...
Operating Instructions
Page 14
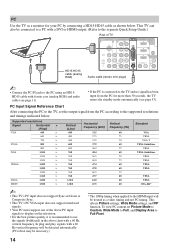
... output signal from the PC for your PC by connecting a HD15-HD15 cable as a video timing and not PC timing. This affects Picture settings, Wide Mode settings, and PIP function. In plug and play, signals with a 60 Hz vertical frequency will be detected automatically. (PC reboot may be necessary.) * ...-T VESA Guidelines VESA VESA Guidelines VESA VESA VESA VESA VESA VESA CEA-861* ~ • This TV's PC input does not support Sync on the television. • For the best picture quality, it is recommended to use the signals (boldfaced) in the above chart with ferrite core (analog RGB) and...
... output signal from the PC for your PC by connecting a HD15-HD15 cable as a video timing and not PC timing. This affects Picture settings, Wide Mode settings, and PIP function. In plug and play, signals with a 60 Hz vertical frequency will be detected automatically. (PC reboot may be necessary.) * ...-T VESA Guidelines VESA VESA Guidelines VESA VESA VESA VESA VESA VESA CEA-861* ~ • This TV's PC input does not support Sync on the television. • For the best picture quality, it is recommended to use the signals (boldfaced) in the above chart with ferrite core (analog RGB) and...
Operating Instructions
Page 16
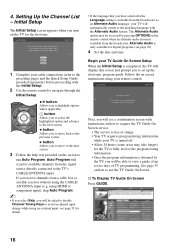
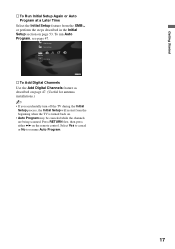
...for digital channels. Highlight a choice and press to run Auto Program. If you turn on the TV for digital programs (see page 45). 4 Set the date and time. Alternate Audio is complete. s To Display TV Guide On Screen Press GUIDE. 16 Initial Setup Step 1 of 6 Initial ... b button: Allows you will apply to the TV's CABLE/ANTENNA input. Auto Program will scan for available channels from the broadcaster. Language settings will see page 51 for the TV to fully receive the program listing information. • Once the program information is available from the signal...
...for digital channels. Highlight a choice and press to run Auto Program. If you turn on the TV for digital programs (see page 45). 4 Set the date and time. Alternate Audio is complete. s To Display TV Guide On Screen Press GUIDE. 16 Initial Setup Step 1 of 6 Initial ... b button: Allows you will apply to the TV's CABLE/ANTENNA input. Auto Program will scan for available channels from the broadcaster. Language settings will see page 51 for the TV to fully receive the program listing information. • Once the program information is available from the signal...
Operating Instructions
Page 17
... the channels are being scanned. To run Auto Program, see page 47. Select Yes to cancel or No to resume Auto Program. 17 HDMI Settings General Setup Settings Initial Setup TV s To Add Digital Channels Use the Add Digital Channels feature as described on page 47. (Useful for antenna installations.) ~ • If...
... the channels are being scanned. To run Auto Program, see page 47. Select Yes to cancel or No to resume Auto Program. 17 HDMI Settings General Setup Settings Initial Setup TV s To Add Digital Channels Use the Add Digital Channels feature as described on page 47. (Useful for antenna installations.) ~ • If...
Operating Instructions
Page 20
...: Press to advance forward to the next chapter mark (if any ) or from the previous chapter mark (if any ) or to advance forward a set period of connected equipment (not available on all regions. 20 ADVANCE: Press to live TV cache. M (fast forward): Press to operate external equipment. ...Select the HDMI device and then press SYNC MENU to replay the current program for a set period of your dealer or www.sony.com/bravia for details). The banner will light up in the Sound settings. The FUNCTION button indicator light will time out in red for "Programming the Remote ...
...: Press to advance forward to the next chapter mark (if any ) or from the previous chapter mark (if any ) or to advance forward a set period of connected equipment (not available on all regions. 20 ADVANCE: Press to live TV cache. M (fast forward): Press to operate external equipment. ...Select the HDMI device and then press SYNC MENU to replay the current program for a set period of your dealer or www.sony.com/bravia for details). The banner will light up in the Sound settings. The FUNCTION button indicator light will time out in red for "Programming the Remote ...
Operating Instructions
Page 21
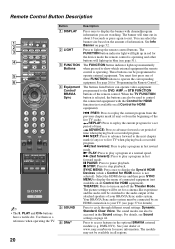
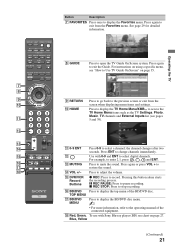
...and External Inputs list (see chart on page 35. 9 RETURN 0 HOME Press to go back to exit from the screen when displaying menu items and settings. Press to display the TV Home Menu/XMB™ to display the top menu of the connected equipment. qg DVR/VCR Record Buttons z REC: Press.... 8 GUIDE Press to adjust the volume. Press again or press VOL + to display the Favorites menu. the channel changes after two seconds. Use with Sony Blu-ray player (BD) see pages 5 and 39). Operating the TV DISPLAY LIGHT POWER TV POWER DVD AMP STB TV FUNCTION PREV REPLAY ADVANCE NEXT...
...and External Inputs list (see chart on page 35. 9 RETURN 0 HOME Press to go back to exit from the screen when displaying menu items and settings. Press to display the TV Home Menu/XMB™ to display the top menu of the connected equipment. qg DVR/VCR Record Buttons z REC: Press.... 8 GUIDE Press to adjust the volume. Press again or press VOL + to display the Favorites menu. the channel changes after two seconds. Use with Sony Blu-ray player (BD) see pages 5 and 39). Operating the TV DISPLAY LIGHT POWER TV POWER DVD AMP STB TV FUNCTION PREV REPLAY ADVANCE NEXT...

Operating Instructions
Page 22
POWER wa WIDE Press to cycle through the available Wide Mode settings: Wide Zoom, Normal, Full, H Stretch, Zoom. Press repeatedly to turn on and off the TV. Changing the Wide Screen Mode 4:3 Original source 16:9 Original source ... DVD AMP STB TV FUNCTION PREV REPLAY ADVANCE NEXT PLAY ql w; Full H Stretch This mode is not available. The Wide Mode settings can be also accessed in the Screen settings (see pages 45 and 46). Button Description ql TV POWER Press to turn on and off the external equipment selected by FUNCTION...
POWER wa WIDE Press to cycle through the available Wide Mode settings: Wide Zoom, Normal, Full, H Stretch, Zoom. Press repeatedly to turn on and off the TV. Changing the Wide Screen Mode 4:3 Original source 16:9 Original source ... DVD AMP STB TV FUNCTION PREV REPLAY ADVANCE NEXT PLAY ql w; Full H Stretch This mode is not available. The Wide Mode settings can be also accessed in the Screen settings (see pages 45 and 46). Button Description ql TV POWER Press to turn on and off the external equipment selected by FUNCTION...

Operating Instructions
Page 23
...Background TV Motion Enhancer Device Control Device Control (Menu) for Closed Captions (CC): On, Off, and On with the current program in the Picture settings. Press a third time to return to display a list of External Inputs and TV mode. The OPTIONS menu items vary based on page 42...., Video, Text. (Available options depend on the current mode.) The picture modes can also be accessed in a window. For details, see Picture settings on current input and content. Freeze Operating the TV PLAY SYNC MENU PAUSE STOP THEATER SOUND PICTURE WIDE CC FREEZE VOL MUTING CH JUMP REC...
...Background TV Motion Enhancer Device Control Device Control (Menu) for Closed Captions (CC): On, Off, and On with the current program in the Picture settings. Press a third time to return to display a list of External Inputs and TV mode. The OPTIONS menu items vary based on page 42...., Video, Text. (Available options depend on the current mode.) The picture modes can also be accessed in a window. For details, see Picture settings on current input and content. Freeze Operating the TV PLAY SYNC MENU PAUSE STOP THEATER SOUND PICTURE WIDE CC FREEZE VOL MUTING CH JUMP REC...
Operating Instructions
Page 25
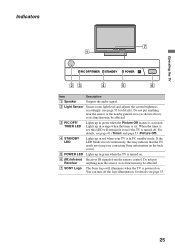
... above), as its function may indicate that the TV needs servicing (see contacting Sony information on the back cover). 5 POWER LED Lights up in green when the Picture Off feature is set , this may be affected. 7 SONY Logo The Sony logo will remain lit even if the TV is powered on . 6 (IR...) Infrared Receives IR signals from the remote control. When the timer is set . For details, see page 41 (Timer) and page...
... above), as its function may indicate that the TV needs servicing (see contacting Sony information on the back cover). 5 POWER LED Lights up in green when the Picture Off feature is set , this may be affected. 7 SONY Logo The Sony logo will remain lit even if the TV is powered on . 6 (IR...) Infrared Receives IR signals from the remote control. When the timer is set . For details, see page 41 (Timer) and page...
Operating Instructions
Page 26
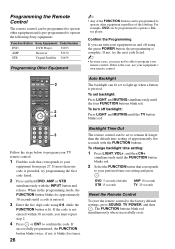
.... Programming the Remote Control The remote control can be programmed to operate other equipment and is pre-programmed to operate the following Sony equipment. If not, try programming the first code listed. 2 Press and hold DVD, AMP or STB simultaneously with the FUNCTION... button blinks for approximately 30 seconds until the FUNCTION button blinks red. 2 Select the FUNCTION button that corresponds to the factory default settings, press SOUND, TV POWER, and then . The FUNCTION buttons blink red simultaneously when successfully reset. To turn your equipment on and...
.... Programming the Remote Control The remote control can be programmed to operate other equipment and is pre-programmed to operate the following Sony equipment. If not, try programming the first code listed. 2 Press and hold DVD, AMP or STB simultaneously with the FUNCTION... button blinks for approximately 30 seconds until the FUNCTION button blinks red. 2 Select the FUNCTION button that corresponds to the factory default settings, press SOUND, TV POWER, and then . The FUNCTION buttons blink red simultaneously when successfully reset. To turn your equipment on and...
Operating Instructions
Page 29
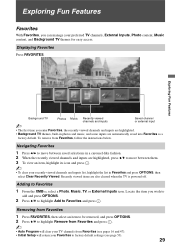
... Viewed. Navigating Favorites 1 Press B/b to move between them. 3 To view an item, highlight its icon and press . ~ • To clear your Favorites to factory default settings (see page 53). 29 Exploring Fun Features Background TV Photos Music Recently viewed channels and inputs Saved channel or external input ~ • The first time...
... Viewed. Navigating Favorites 1 Press B/b to move between them. 3 To view an item, highlight its icon and press . ~ • To clear your Favorites to factory default settings (see page 53). 29 Exploring Fun Features Background TV Photos Music Recently viewed channels and inputs Saved channel or external input ~ • The first time...
Operating Instructions
Page 32
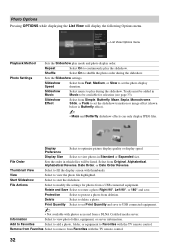
... Protection Select to protect a photo from Original, Alphabetical, Alphabetical Reverse, Date Order, or Date Order Reverse. Print Quantity Select to set the photo display duration. Remove from Favorites Select to remove from Favorites with photos accessed from Simple, Butterfly, Maze, Sepia, Monochrome,...screen with the TV remote control. Display Size Select to view photo folder, equipment, or server information. File Order Sets the order in which files will display the following Options menu. Thumbnail View Select to play during the slideshow. ...
... Protection Select to protect a photo from Original, Alphabetical, Alphabetical Reverse, Date Order, or Date Order Reverse. Print Quantity Select to set the photo display duration. Remove from Favorites Select to remove from Favorites with photos accessed from Simple, Butterfly, Maze, Sepia, Monochrome,...screen with the TV remote control. Display Size Select to view photo folder, equipment, or server information. File Order Sets the order in which files will display the following Options menu. Thumbnail View Select to play during the slideshow. ...
Operating Instructions
Page 33
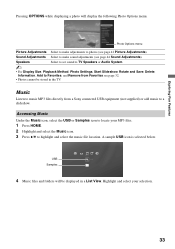
... to TV Speakers or Audio System. ~ • For Display Size, Playback Method, Photo Settings, Start Slideshow, Rotate and Save, Delete, Information, Add to a slideshow. Music Listen to music MP3 files directly from a Sony connected USB equipment (not supplied) or add music to Favorites, and Remove from Favorites see page 32. • Photos...
... to TV Speakers or Audio System. ~ • For Display Size, Playback Method, Photo Settings, Start Slideshow, Rotate and Save, Delete, Information, Add to a slideshow. Music Listen to music MP3 files directly from a Sony connected USB equipment (not supplied) or add music to Favorites, and Remove from Favorites see page 32. • Photos...


