Operating Instructions
Page 3
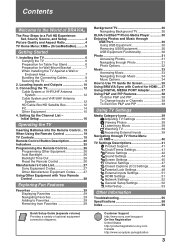
...Settings 41 Picture Settings 42 Sound Settings 44 Screen Settings 45 Channel Settings 47 CC Closed Captions (CC) Settings 48 Parental Lock Settings 48 External Inputs Settings 51 HDMI Settings 51 Network Settings 52 General Setup Settings 52 Initial Setup 53 Other Information Troubleshooting 55 Specifications 58 Index 59 Customer Support http://www.sony...Music 33 Navigating through Music 34 Music Options 34 How to Use TV Guide On Screen 35 Using BRAVIA Sync with Your Remote Control 28 Exploring Fun Features Favorites 29 Displaying Favorites 29 Navigating Favorites 29 ...
...Settings 41 Picture Settings 42 Sound Settings 44 Screen Settings 45 Channel Settings 47 CC Closed Captions (CC) Settings 48 Parental Lock Settings 48 External Inputs Settings 51 HDMI Settings 51 Network Settings 52 General Setup Settings 52 Initial Setup 53 Other Information Troubleshooting 55 Specifications 58 Index 59 Customer Support http://www.sony...Music 33 Navigating through Music 34 Music Options 34 How to Use TV Guide On Screen 35 Using BRAVIA Sync with Your Remote Control 28 Exploring Fun Features Favorites 29 Displaying Favorites 29 Navigating Favorites 29 ...
Operating Instructions
Page 4
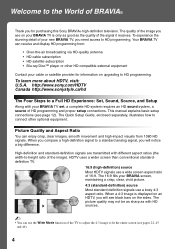
... a high-definition signal to connect other HD compatible external equipment Contact your cable or satellite provider for purchasing this Sony BRAVIA® high-definition television. Picture Quality and Aspect Ratio You can receive and display HD programming from 1080 HD signals. High-definition and standard...8226; You can use a wide screen aspect ratio of the image you need access to a Full HD Experience: Set, Sound, Source, and Setup Along with your new BRAVIA TV, you see page 12). HDTV uses a wider screen than conventional standarddefinition TV. 16:9 (high-definition) ...
... a high-definition signal to connect other HD compatible external equipment Contact your cable or satellite provider for purchasing this Sony BRAVIA® high-definition television. Picture Quality and Aspect Ratio You can receive and display HD programming from 1080 HD signals. High-definition and standard...8226; You can use a wide screen aspect ratio of the image you need access to a Full HD Experience: Set, Sound, Source, and Setup Along with your new BRAVIA TV, you see page 12). HDTV uses a wider screen than conventional standarddefinition TV. 16:9 (high-definition) ...
Operating Instructions
Page 5
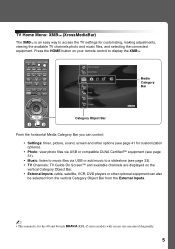
... Screen Channel Media Category Bar TV Category Object Bar From the horizontal Media Category Bar you can control: • Settings: timer, picture, sound, screen and other optional equipment can also be selected from the vertical Category Object Bar from the External Inputs. ~ • This manual ... a slideshow (see page 33). • TV Channels: TV Guide On Screen™ and available channels are displayed on your remote control to access the TV settings for the 40 and 46 inch BRAVIA KDL-Z series models with screen size measured diagonally. 5
... Screen Channel Media Category Bar TV Category Object Bar From the horizontal Media Category Bar you can control: • Settings: timer, picture, sound, screen and other optional equipment can also be selected from the vertical Category Object Bar from the External Inputs. ~ • This manual ... a slideshow (see page 33). • TV Channels: TV Guide On Screen™ and available channels are displayed on your remote control to access the TV settings for the 40 and 46 inch BRAVIA KDL-Z series models with screen size measured diagonally. 5
Operating Instructions
Page 6
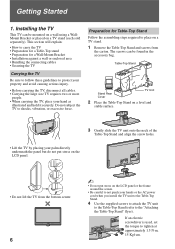
Do not subject the TV to tighten at approximately 1.5 N·m, 15 Kgf·cm. If an electric screwdriver is used, set the torque to shocks, vibration, or excessive force. Preparation for a Wall-Mount Bracket • Installation against a wall or enclosed area • Bundling the connecting ... guidelines to place on a TV stand. 1 Remove the Table-Top Stand and screws from the bottom center. 6 ~ • Do not put stress on the LCD panel. • Do not lift the TV from the carton. Getting Started 1. This section will explain: • How to carry the TV • Preparation for...
Do not subject the TV to tighten at approximately 1.5 N·m, 15 Kgf·cm. If an electric screwdriver is used, set the torque to shocks, vibration, or excessive force. Preparation for a Wall-Mount Bracket • Installation against a wall or enclosed area • Bundling the connecting ... guidelines to place on a TV stand. 1 Remove the Table-Top Stand and screws from the bottom center. 6 ~ • Do not put stress on the LCD panel. • Do not lift the TV from the carton. Getting Started 1. This section will explain: • How to carry the TV • Preparation for...
Operating Instructions
Page 7
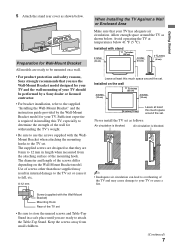
... follows: Air circulation is blocked. Never install the TV set . Wall Wall ~ • Inadequate air circulation can lead to overheating of the screws differ depending on a wall. • For product protection and safety reasons, Sony strongly recommends that you are 8 mm to 12 mm in a safe... surface of your TV should be mounted on the Wall-Mount Bracket model. Installed with the Wall-Mount Bracket) Mounting Hook Rear of the TV set . Getting Started 5 Attach the stand rear cover as shown below 41 °F (5 °C). Installed on the wall 4 inches (10 cm) 11 ...
... follows: Air circulation is blocked. Never install the TV set . Wall Wall ~ • Inadequate air circulation can lead to overheating of the screws differ depending on a wall. • For product protection and safety reasons, Sony strongly recommends that you are 8 mm to 12 mm in a safe... surface of your TV should be mounted on the Wall-Mount Bracket model. Installed with the Wall-Mount Bracket) Mounting Hook Rear of the TV set . Getting Started 5 Attach the stand rear cover as shown below 41 °F (5 °C). Installed on the wall 4 inches (10 cm) 11 ...
Operating Instructions
Page 9
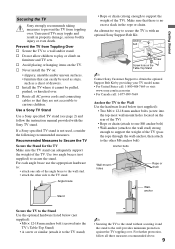
...of drawers. Anchor bolt Screw Screw hole on furniture and TV sets. For further protection, follow the instruction manual provided with an optional Sony Support Belt Kit. s Install the TV where it and the...the TV stand can easily be pulled, pushed, or knocked over . Getting Started Securing the TV Sony strongly recommends taking measures to secure the stand. Use two angle braces (not supplied) to prevent...providing your TV model name. • For United States call: 1-800-488-7669 or visit: www.sony.com/accessories • For Canada call: 1-877-899-7669 Anchor the TV to the Wall Use the ...
...of drawers. Anchor bolt Screw Screw hole on furniture and TV sets. For further protection, follow the instruction manual provided with an optional Sony Support Belt Kit. s Install the TV where it and the...the TV stand can easily be pulled, pushed, or knocked over . Getting Started Securing the TV Sony strongly recommends taking measures to secure the stand. Use two angle braces (not supplied) to prevent...providing your TV model name. • For United States call: 1-800-488-7669 or visit: www.sony.com/accessories • For Canada call: 1-877-899-7669 Anchor the TV to the Wall Use the ...
Operating Instructions
Page 11
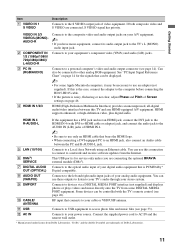
... 14 for service only unless you have mono equipment, connect its audio output jack to the left and right audio input jacks of Screen settings on page 46. If this TV and any HDMI-equipped A/V equipment. This USB port is for the signals that is noisy, flickering ... files and music files (see page 14). See "PC Input Signal Reference Chart" on your A/V equipment. ~ • If you are connecting the optional BRAVIA external module (DMex). 7 DIGITAL AUDIO Connects to the optical audio input of video equipment. Getting Started Item 1 VIDEO IN 1 S VIDEO Description Connects to...
... 14 for service only unless you have mono equipment, connect its audio output jack to the left and right audio input jacks of Screen settings on page 46. If this TV and any HDMI-equipped A/V equipment. This USB port is for the signals that is noisy, flickering ... files and music files (see page 14). See "PC Input Signal Reference Chart" on your A/V equipment. ~ • If you are connecting the optional BRAVIA external module (DMex). 7 DIGITAL AUDIO Connects to the optical audio input of video equipment. Getting Started Item 1 VIDEO IN 1 S VIDEO Description Connects to...
Operating Instructions
Page 12
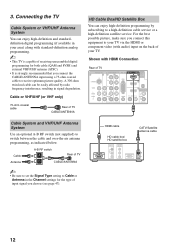
...or a high-definition satellite service. Cable Antenna A-B RF switch A Rear of TV B CABLE/ANTENNA ~ • Be sure to set the Signal Type setting to receive optimum picture quality. Shown with standard-definition analog programming. ~ • This TV is strongly recommended that you connect the ...the TV Cable System or VHF/UHF Antenna System You can enjoy high-definition programming by radio frequency interference, resulting in the Channel settings for both cable (QAM and 8VSB) and external VHF/UHF antenna (ATSC). • It is capable of receiving unscrambled digital...
...or a high-definition satellite service. Cable Antenna A-B RF switch A Rear of TV B CABLE/ANTENNA ~ • Be sure to set the Signal Type setting to receive optimum picture quality. Shown with standard-definition analog programming. ~ • This TV is strongly recommended that you connect the ...the TV Cable System or VHF/UHF Antenna System You can enjoy high-definition programming by radio frequency interference, resulting in the Channel settings for both cable (QAM and 8VSB) and external VHF/UHF antenna (ATSC). • It is capable of receiving unscrambled digital...
Operating Instructions
Page 14
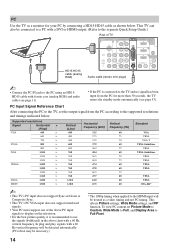
... VGA-T VESA Guidelines VESA VESA Guidelines VESA VESA VESA VESA VESA VESA CEA-861* ~ • This TV's PC input does not support Sync on the television. • For the best picture quality, it is connected to the TV and no signal has been input from the PC according to the HDMI... input will be necessary.) * The 1080p timing when applied to the supported resolutions and timings indicated below . To view PC content set the output signal from the PC for your PC by connecting a HD15-HD15 cable as a video timing and not PC timing. PC Use the TV...
... VGA-T VESA Guidelines VESA VESA Guidelines VESA VESA VESA VESA VESA VESA CEA-861* ~ • This TV's PC input does not support Sync on the television. • For the best picture quality, it is connected to the TV and no signal has been input from the PC according to the HDMI... input will be necessary.) * The 1080p timing when applied to the supported resolutions and timings indicated below . To view PC content set the output signal from the PC for your PC by connecting a HD15-HD15 cable as a video timing and not PC timing. PC Use the TV...
Operating Instructions
Page 16
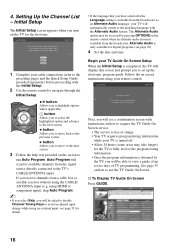
... 1 of charge. • Your TV acquires program listing information while your TV is complete. Begin your TV will see page 45). 4 Set the date and time. Select to the TV's CABLE/ANTENNA input. Auto Program will scan for the TV to fully receive the program listing information...accidental input change while using HDMI or component input), skip Auto Program. ~ • If you select Skip, you will automatically switch to set up to on screen instructions using the CABLE/ ANTENNA input (e.g. Initial Setup The Initial Setup screen appears when you to move to the next...
... 1 of charge. • Your TV acquires program listing information while your TV is complete. Begin your TV will see page 45). 4 Set the date and time. Select to the TV's CABLE/ANTENNA input. Auto Program will scan for the TV to fully receive the program listing information...accidental input change while using HDMI or component input), skip Auto Program. ~ • If you select Skip, you will automatically switch to set up to on screen instructions using the CABLE/ ANTENNA input (e.g. Initial Setup The Initial Setup screen appears when you to move to the next...
Operating Instructions
Page 17
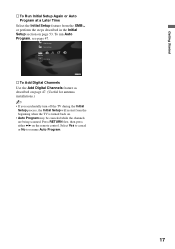
... is turned back on. • Auto Program may be canceled while the channels are being scanned. To run Auto Program, see page 47. HDMI Settings General Setup Settings Initial Setup TV s To Add Digital Channels Use the Add Digital Channels feature as described on page 47. (Useful for antenna installations.) ~ • If...
... is turned back on. • Auto Program may be canceled while the channels are being scanned. To run Auto Program, see page 47. HDMI Settings General Setup Settings Initial Setup TV s To Add Digital Channels Use the Add Digital Channels feature as described on page 47. (Useful for antenna installations.) ~ • If...
Operating Instructions
Page 20
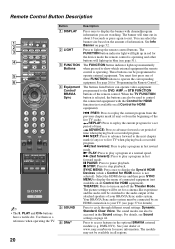
... indicator lights up the remote control buttons. x STOP: Press to cycle through different sound settings: Dynamic, Standard, Clear Voice. Press to stop playback. See your dealer or www.sony.com/bravia for "Programming the Remote Control". The sound modes can be connected by an HDMI connection ... on page 52. THEATER: Press to display the Sync'd HDMI Devices (while a Control for a set period of the live TV when playing back a recorded program. Your BRAVIA Sync audio system must first press one of information. The buttons listed below can also be accessed in...
... indicator lights up the remote control buttons. x STOP: Press to cycle through different sound settings: Dynamic, Standard, Clear Voice. Press to stop playback. See your dealer or www.sony.com/bravia for "Programming the Remote Control". The sound modes can be connected by an HDMI connection ... on page 52. THEATER: Press to display the Sync'd HDMI Devices (while a Control for a set period of the live TV when playing back a recorded program. Your BRAVIA Sync audio system must first press one of information. The buttons listed below can also be accessed in...
Operating Instructions
Page 21
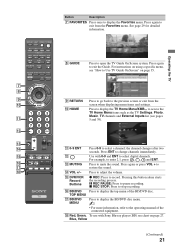
...screen or exit from the Favorites menu. Blue, Yellow (Continued) 21 qh BD/DVD Press to exit from the screen when displaying menu items and settings. Press again to display the top menu of the connected equipment. See page 29 for detailed information. 8 GUIDE Press to mute the sound. the... channel changes after two seconds. Use with Sony Blu-ray player (BD) see pages 5 and 39). Press to open the TV Guide On Screen system. Press again to adjust the volume. Press...
...screen or exit from the Favorites menu. Blue, Yellow (Continued) 21 qh BD/DVD Press to exit from the screen when displaying menu items and settings. Press again to display the top menu of the connected equipment. See page 29 for detailed information. 8 GUIDE Press to mute the sound. the... channel changes after two seconds. Use with Sony Blu-ray player (BD) see pages 5 and 39). Press to open the TV Guide On Screen system. Press again to adjust the volume. Press...

Operating Instructions
Page 22
..., H Stretch, Zoom. DISPLAY LIGHT POWER TV POWER DVD AMP STB TV FUNCTION PREV REPLAY ADVANCE NEXT PLAY ql w; The Wide Mode settings can be also accessed in the Screen settings (see pages 45 and 46). POWER wa WIDE Press to turn on and off the TV. Full H Stretch This mode is not...
..., H Stretch, Zoom. DISPLAY LIGHT POWER TV POWER DVD AMP STB TV FUNCTION PREV REPLAY ADVANCE NEXT PLAY ql w; The Wide Mode settings can be also accessed in the Screen settings (see pages 45 and 46). POWER wa WIDE Press to turn on and off the TV. Full H Stretch This mode is not...

Operating Instructions
Page 23
... and content. The OPTIONS menu items vary based on the screen. ~ • With the Freeze feature active, some features are available in the Picture settings. Press to the current program. Press to display the list of convenient functions and menu shortcuts. Press a third time to return to select/ confirm an...Enhancer Device Control Device Control (Menu) for Closed Captions (CC): On, Off, and On with the frozen image. Press to cycle through the available settings for DMPORT Photo Music Reference Page See page 42 See page 44 See page 38 See page 38 See page 45 See page 38 See...
... and content. The OPTIONS menu items vary based on the screen. ~ • With the Freeze feature active, some features are available in the Picture settings. Press to the current program. Press to display the list of convenient functions and menu shortcuts. Press a third time to return to select/ confirm an...Enhancer Device Control Device Control (Menu) for Closed Captions (CC): On, Off, and On with the frozen image. Press to cycle through the available settings for DMPORT Photo Music Reference Page See page 42 See page 44 See page 38 See page 38 See page 45 See page 38 See...
Operating Instructions
Page 25
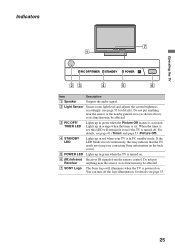
...is in PC standby mode. Lights up in red continuously, this LED will illuminate when the TV is set , this may be affected. 7 SONY Logo The Sony logo will remain lit even if the TV is turned on . Do not put anything near the sensor...TV needs servicing (see page 53. 25 When the timer is activated. For details, see page 53 for details see contacting Sony information on the back cover). 5 POWER LED Lights up in green when the TV is turned off the logo illumination, for ... may be affected. 3 PIC OFF/ TIMER LED Lights up in green when the Picture Off feature is set .
...is in PC standby mode. Lights up in red continuously, this LED will illuminate when the TV is set , this may be affected. 7 SONY Logo The Sony logo will remain lit even if the TV is turned on . Do not put anything near the sensor...TV needs servicing (see page 53. 25 When the timer is activated. For details, see page 53 for details see contacting Sony information on the back cover). 5 POWER LED Lights up in green when the TV is turned off the logo illumination, for ... may be affected. 3 PIC OFF/ TIMER LED Lights up in green when the Picture Off feature is set .
Operating Instructions
Page 26
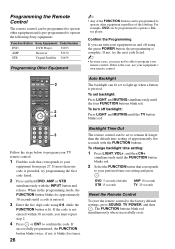
...TV 2 FUNCTION PREV REPLAY ADVANCE NEXT PLAY SYNC MENU PAUSE STOP THEATER SOUND PICTURE WIDE CC FREEZE 2 4 Auto Backlight The backlight can be set to light up when a button is entered. 3 Enter the five digit code using the green POWER button, the programming is not entered within...labeling. To change backlight time setting: 1 Press LIGHT, VOL+, and then CH+ simultaneously until the TV button blinks red. 3 VOL CH Follow the steps below to program your TV remote control. 1 Find the code that corresponds to your remote control. Function Button Sony Equipment Code Number DVD DVD ...
...TV 2 FUNCTION PREV REPLAY ADVANCE NEXT PLAY SYNC MENU PAUSE STOP THEATER SOUND PICTURE WIDE CC FREEZE 2 4 Auto Backlight The backlight can be set to light up when a button is entered. 3 Enter the five digit code using the green POWER button, the programming is not entered within...labeling. To change backlight time setting: 1 Press LIGHT, VOL+, and then CH+ simultaneously until the TV button blinks red. 3 VOL CH Follow the steps below to program your TV remote control. 1 Find the code that corresponds to your remote control. Function Button Sony Equipment Code Number DVD DVD ...
Operating Instructions
Page 29
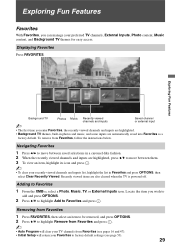
... inputs Saved channel or external input ~ • The first time you enter Favorites, the recently viewed channels and inputs are highlighted, press V/v to factory default settings (see pages 16 and 47). • Initial Setup will clear your preferred TV channels, External Inputs, Photo content, Music content, and Background TV themes for...
... inputs Saved channel or external input ~ • The first time you enter Favorites, the recently viewed channels and inputs are highlighted, press V/v to factory default settings (see pages 16 and 47). • Initial Setup will clear your preferred TV channels, External Inputs, Photo content, Music content, and Background TV themes for...
Operating Instructions
Page 32
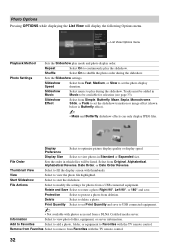
...the TV remote control. Tracks must be added in Standard or Expanded size. View Select to start the slideshow. Sets the Slideshow settings. Slideshow Effect Select from deletion. Thumbnail View Select to shuffle the photo order during the slideshow. Start Slideshow Select... photo from Simple, Butterfly, Maze, Sepia, Monochrome, Slide, or Fade to play during the slideshow. Slideshow Music Select music to set the slideshow transition or image effect (shown below is Butterfly effect). ~ • Maze and Butterfly slideshow effects can only display JPEG ...
...the TV remote control. Tracks must be added in Standard or Expanded size. View Select to start the slideshow. Sets the Slideshow settings. Slideshow Effect Select from deletion. Thumbnail View Select to shuffle the photo order during the slideshow. Start Slideshow Select... photo from Simple, Butterfly, Maze, Sepia, Monochrome, Slide, or Fade to play during the slideshow. Slideshow Music Select music to set the slideshow transition or image effect (shown below is Butterfly effect). ~ • Maze and Butterfly slideshow effects can only display JPEG ...
Operating Instructions
Page 33
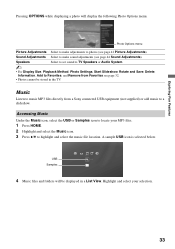
...Music USB 4 Music files and folders will display the following Photo Options menu. Speakers Select to set sound to TV Speakers or Audio System. ~ • For Display Size, Playback Method, Photo Settings, Start Slideshow, Rotate and Save, Delete, Information, Add to photos (see page 32. •...select the USB or Samples icon to locate your selection. 33 Sound Adjustments Select to make adjustments to Favorites, and Remove from a Sony connected USB equipment (not supplied) or add music to highlight and select the music file location. Exploring Fun Features Pressing OPTIONS while ...
...Music USB 4 Music files and folders will display the following Photo Options menu. Speakers Select to set sound to TV Speakers or Audio System. ~ • For Display Size, Playback Method, Photo Settings, Start Slideshow, Rotate and Save, Delete, Information, Add to photos (see page 32. •...select the USB or Samples icon to locate your selection. 33 Sound Adjustments Select to make adjustments to Favorites, and Remove from a Sony connected USB equipment (not supplied) or add music to highlight and select the music file location. Exploring Fun Features Pressing OPTIONS while ...


