Operating Instructions
Page 6
... operate the TV. If you carry the TV in a fire or an electric shock. MOISTURE Moisture and flammable objects s Do not use power-line operated sets near a swimming pool, etc. for example, near a bathtub, washbowl, kitchen sink, or laundry tub, in the TV are provided for necessary ventilation. s Hold the TV...
... operate the TV. If you carry the TV in a fire or an electric shock. MOISTURE Moisture and flammable objects s Do not use power-line operated sets near a swimming pool, etc. for example, near a bathtub, washbowl, kitchen sink, or laundry tub, in the TV are provided for necessary ventilation. s Hold the TV...
Operating Instructions
Page 9
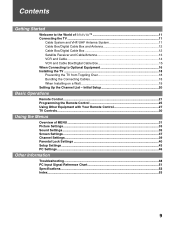
... Cable ...14 VCR and Cable Box/Digital Cable Box 15 When Connecting to the World of MENU ...31 Picture Settings...33 Sound Settings...35 Screen Settings ...37 Channel Settings...39 Parental Lock Settings 40 Setup Settings ...43 PC Settings ...46 Other Information Troubleshooting...48 PC Input Signal Reference Chart 51 Specifications ...52 Index ...53 9 Contents Getting Started Welcome...
... Cable ...14 VCR and Cable Box/Digital Cable Box 15 When Connecting to the World of MENU ...31 Picture Settings...33 Sound Settings...35 Screen Settings ...37 Channel Settings...39 Parental Lock Settings 40 Setup Settings ...43 PC Settings ...46 Other Information Troubleshooting...48 PC Input Signal Reference Chart 51 Specifications ...52 Index ...53 9 Contents Getting Started Welcome...

Operating Instructions
Page 12
... hookup if ❑ Your cable company scrambles some channels, such as premium channels. CATV cable Coaxial cable CABLE Rear of TV VHF/UHF ✍ To set up the TV remote control, see "Programming the Remote Control" on page 25. ✍ Press SAT/CABLE to channel 3 or 4 depending on the...to begin operating the cable box with the remote control (see page 27). Cable Box/Digital Cable Box z To change channels using the cable box, set up the TV remote control, see "Programming the Remote Control" on page 25. ✍ Press SAT/CABLE to hook up . 12 CATV cable IN...
... hookup if ❑ Your cable company scrambles some channels, such as premium channels. CATV cable Coaxial cable CABLE Rear of TV VHF/UHF ✍ To set up the TV remote control, see "Programming the Remote Control" on page 25. ✍ Press SAT/CABLE to channel 3 or 4 depending on the...to begin operating the cable box with the remote control (see page 27). Cable Box/Digital Cable Box z To change channels using the cable box, set up the TV remote control, see "Programming the Remote Control" on page 25. ✍ Press SAT/CABLE to hook up . 12 CATV cable IN...
Operating Instructions
Page 15
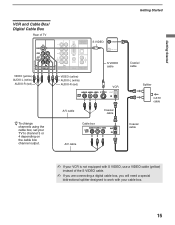
... CABLE VHF/UHF S VIDEO cable VIDEO (yellow) AUDIO-L (white) AUDIO-R (red) VIDEO (yellow) AUDIO-L (white) AUDIO-R (red) VCR z To change channels using the cable box, set your cable box. 15
... CABLE VHF/UHF S VIDEO cable VIDEO (yellow) AUDIO-L (white) AUDIO-R (red) VIDEO (yellow) AUDIO-L (white) AUDIO-R (red) VCR z To change channels using the cable box, set your cable box. 15

Operating Instructions
Page 16
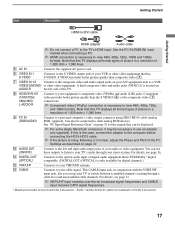
... 1 Headphones jack 2 VIDEO IN 2 R-AUDIOL (MONO)/VIDEO 3 HDMI IN 3 4 HDMI IN 7/8 HDMI AUDIO IN/ L-R Description Connects to your camcorder or other video equipment such as a set-top box, Blu-ray DiscTM Player, DVD player, and A/V receiver.
... 1 Headphones jack 2 VIDEO IN 2 R-AUDIOL (MONO)/VIDEO 3 HDMI IN 3 4 HDMI IN 7/8 HDMI AUDIO IN/ L-R Description Connects to your camcorder or other video equipment such as a set-top box, Blu-ray DiscTM Player, DVD player, and A/V receiver.
Operating Instructions
Page 17
... CABLE Connects to view 480i, 480p, 720p, 1080i and 1080p formats. This CABLE input jack, in conjunction with the VHF/UHF input jack, lets you set up your TV to your equipment's component video (YPBPR) and audio (L/R) jacks. Use the PC IN (RGB IN) input instead when connecting a PC. ... equipment that is PCM/Dolby* digital compatible. (DIGITAL OUT (OPTICAL) is noisy, flickering or not clear, adjust the Phase and Pitch of the PC Settings as a VCR VIDEO/L(MONO)- Note that this TV displays all format types of picture in a resolution of Dolby Laboratories. 17 A third composite video and...
... CABLE Connects to view 480i, 480p, 720p, 1080i and 1080p formats. This CABLE input jack, in conjunction with the VHF/UHF input jack, lets you set up your TV to your equipment's component video (YPBPR) and audio (L/R) jacks. Use the PC IN (RGB IN) input instead when connecting a PC. ... equipment that is PCM/Dolby* digital compatible. (DIGITAL OUT (OPTICAL) is noisy, flickering or not clear, adjust the Phase and Pitch of the PC Settings as a VCR VIDEO/L(MONO)- Note that this TV displays all format types of picture in a resolution of Dolby Laboratories. 17 A third composite video and...
Operating Instructions
Page 20
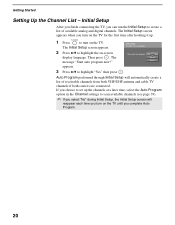
...the TV until you complete Auto Program. 20 Auto Program performed through Initial Setup will reappear each time you turn on the TV. Getting Started Setting Up the Channel List - The Initial Setup screen appears when you can run the Initial Setup to turn on -screen display language. If ...you choose to set up . 1 Press to create a list of receivable channels from both VHF/UHF antenna and cable TV channels if both sources are connected. The ...
...the TV until you complete Auto Program. 20 Auto Program performed through Initial Setup will reappear each time you turn on the TV. Getting Started Setting Up the Channel List - The Initial Setup screen appears when you can run the Initial Setup to turn on -screen display language. If ...you choose to set up . 1 Press to create a list of receivable channels from both VHF/UHF antenna and cable TV channels if both sources are connected. The ...
Operating Instructions
Page 21
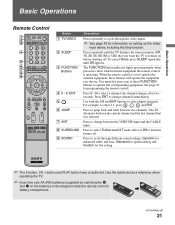
... 0 - 9, ENT 5 6 JUMP 7 ANT 8 SURROUND 9 SOUND Description Press repeatedly to cycle through the video inputs. ✍ See page 43 for information on setting up momentarily when pressed to turn this feature off . Use with the 0-9 and ENT buttons to enter 2.1, press 2 , , 1 and ENT. For example, to ...select digital channels. Press to select TruSurround XT audio effect or Off to show which external equipment the remote control is set to operate the external equipment, these FUNCTION buttons to the diagram inside the remote control's battery compartment. , (Continued) 21 Press...
... 0 - 9, ENT 5 6 JUMP 7 ANT 8 SURROUND 9 SOUND Description Press repeatedly to cycle through the video inputs. ✍ See page 43 for information on setting up momentarily when pressed to turn this feature off . Use with the 0-9 and ENT buttons to enter 2.1, press 2 , , 1 and ENT. For example, to ...select digital channels. Press to select TruSurround XT audio effect or Off to show which external equipment the remote control is set to operate the external equipment, these FUNCTION buttons to the diagram inside the remote control's battery compartment. , (Continued) 21 Press...

Operating Instructions
Page 22
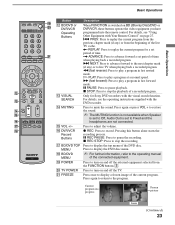
... allows you to select the channels from the station). Press to go back to the previous screen when displaying MENU items and settings. 22 Basic Operations Button 0 GUIDE qa RETURN Description Press to display the guide when you to customize the program... settings on the currently tuned channel. Using the Program Options Setting The program options setting allows you are watching analog or digital channels. Alternate Audio Each program has a main video and audio (...
... allows you to select the channels from the station). Press to go back to the previous screen when displaying MENU items and settings. 22 Basic Operations Button 0 GUIDE qa RETURN Description Press to display the guide when you to customize the program... settings on the currently tuned channel. Using the Program Options Setting The program options setting allows you are watching analog or digital channels. Alternate Audio Each program has a main video and audio (...
Operating Instructions
Page 23
...PAUSE: Press to adjust the volume. Only for a set to replay the current program for Sony DVD recorders with the DVD recorder. Press again or press VOL + to restore the sound. ✍ The MUTING function is not available when Speaker is set period of time. Current program in fast rewind mode.... Button qs BD/DVD or DVR/VCR Operating Buttons qd VISUAL SEARCH qf MUTING qg VOL +/- TV POWER wa FREEZE Description When FUNCTION is set period of the live TV when playing back a recorded program. ADVANCE: Press to replay the current program from the FUNCTION buttons 3. H ...
...PAUSE: Press to adjust the volume. Only for a set to replay the current program for Sony DVD recorders with the DVD recorder. Press again or press VOL + to restore the sound. ✍ The MUTING function is not available when Speaker is set period of time. Current program in fast rewind mode.... Button qs BD/DVD or DVR/VCR Operating Buttons qd VISUAL SEARCH qf MUTING qg VOL +/- TV POWER wa FREEZE Description When FUNCTION is set period of the live TV when playing back a recorded program. ADVANCE: Press to replay the current program from the FUNCTION buttons 3. H ...
Operating Instructions
Page 24
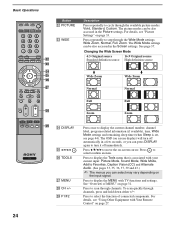
...Full, Zoom. wl F1/F2 Press once to display the current channel number, channel label, program-related information (if available), time, Wide Mode settings and remaining sleep time (when Sleep is associated with Your Remote Control" on the input signal. The OSD (on -screen cursor. To scan ... The picture modes can be also accessed in a few seconds, or you can press DISPLAY again to turn off automatically in the Picture settings. Basic Operations 24 Button ws PICTURE wd WIDE Description Press repeatedly to cycle through channels, press and hold down either +/-. Press to move...
...Full, Zoom. wl F1/F2 Press once to display the current channel number, channel label, program-related information (if available), time, Wide Mode settings and remaining sleep time (when Sleep is associated with Your Remote Control" on the input signal. The OSD (on -screen cursor. To scan ... The picture modes can be also accessed in a few seconds, or you can press DISPLAY again to turn off automatically in the Picture settings. Basic Operations 24 Button ws PICTURE wd WIDE Description Press repeatedly to cycle through channels, press and hold down either +/-. Press to move...

Operating Instructions
Page 25
... the BD/DVD or DVR/VCR or even the , SAT/CABLE but remember which button you have a DVD/VCR combo that you want to operate Sony brand video equipment. In such cases, use . If not, try entering from the code listed first. 1 Press and hold the , BD/DVD DVR/VCR or... is lit. Basic Operations LAY Basic Operations Programming the Remote Control The remote control is input, the remote control automatically goes back to the previous setting. ✍ In some cases, you may not be programmed to operate your TV's remote control to program your VCR. For example, BD/DVD button can...
... the BD/DVD or DVR/VCR or even the , SAT/CABLE but remember which button you have a DVD/VCR combo that you want to operate Sony brand video equipment. In such cases, use . If not, try entering from the code listed first. 1 Press and hold the , BD/DVD DVR/VCR or... is lit. Basic Operations LAY Basic Operations Programming the Remote Control The remote control is input, the remote control automatically goes back to the previous setting. ✍ In some cases, you may not be programmed to operate your TV's remote control to program your VCR. For example, BD/DVD button can...

Operating Instructions
Page 30
... the LED blinks in red continuously, this button serves as left/right buttons. 4 TV/VIDEO Press to display MENU with TV functions and settings (see contacting Sony information on . 9 (IR) Infrared Receiver/Light Sensor Receives IR signals from the remote control. Do not put anything near the sensor, as... a reference when operating the TV. 30 If you set a certain input to Skip in green when Picture Off is turned off the TV. 2...
... the LED blinks in red continuously, this button serves as left/right buttons. 4 TV/VIDEO Press to display MENU with TV functions and settings (see contacting Sony information on . 9 (IR) Infrared Receiver/Light Sensor Receives IR signals from the remote control. Do not put anything near the sensor, as... a reference when operating the TV. 30 If you set a certain input to Skip in green when Picture Off is turned off the TV. 2...
Operating Instructions
Page 31
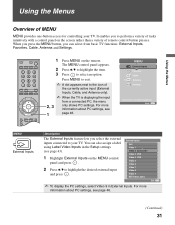
...Video 2 Camcorder Video 3 DVD Video 4 DVR Video 5 Video 6 Video 7 Video 8 Video 9 Edit Video Labels ✍ To display the PC settings, select Video 9 in the Setup settings (see page 46. The MENU control panel appears. 2 Press V/v to highlight the item. 3 Press to perform a variety of tasks intuitively with a control panel on ...43). 1 Highlight External Inputs on the MENU control panel and press . 2 Press V/v to your TV. For more information about PC settings, see page 46. When you press the MENU button, you to select an option. TV/VIDEO POWER TV POWER BD/DVD DVR/VCR SAT/CABLE TV...
...Video 2 Camcorder Video 3 DVD Video 4 DVR Video 5 Video 6 Video 7 Video 8 Video 9 Edit Video Labels ✍ To display the PC settings, select Video 9 in the Setup settings (see page 46. The MENU control panel appears. 2 Press V/v to highlight the item. 3 Press to perform a variety of tasks intuitively with a control panel on ...43). 1 Highlight External Inputs on the MENU control panel and press . 2 Press V/v to your TV. For more information about PC settings, see page 46. When you press the MENU button, you to select an option. TV/VIDEO POWER TV POWER BD/DVD DVR/VCR SAT/CABLE TV...
Operating Instructions
Page 32
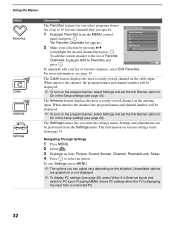
... more information, see page 46), select Video 9 in External Inputs and switch to PC input. Navigating Through Settings 1 Press MENU. 2 Select . 3 Highlight an item: Picture, Sound, Screen, Channel, Parental Lock, Setup. 4 Press to On in the Setup settings (see page 43). The Settings feature lets you specify....✍ To turn on the cable input. The Cable feature displays the most recently viewed channel on the program banner, select Settings and set the Info Banner option to select an option. The Favorite Channels list appears. 2 Make your list of Favorite Channels, highlight...
... more information, see page 46), select Video 9 in External Inputs and switch to PC input. Navigating Through Settings 1 Press MENU. 2 Select . 3 Highlight an item: Picture, Sound, Screen, Channel, Parental Lock, Setup. 4 Press to On in the Setup settings (see page 43). The Settings feature lets you specify....✍ To turn on the cable input. The Cable feature displays the most recently viewed channel on the program banner, select Settings and set the Info Banner option to select an option. The Favorite Channels list appears. 2 Make your list of Favorite Channels, highlight...
Operating Instructions
Page 33
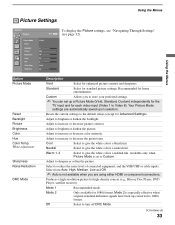
...Mode 2 Only available for high-density sources (e.g., Blu-ray Disc Player, DVD Player, satellite receiver). Using the Menus Picture Settings Antenna Picture Picture Mode Reset Backlight Picture Brightness Color Hue Color Temp. Custom Allows you are automatically saved upon selection. Adjust to... 1080i format. Mode 1 Recommended mode. Adjust to Custom. Select to turn off DRC Mode. (Continued) 33 Your Picture Mode settings are using either HDMI or component connections. Off Select to reduce the noise level of connected equipment, and the VHF/UHF or...
...Mode 2 Only available for high-density sources (e.g., Blu-ray Disc Player, DVD Player, satellite receiver). Using the Menus Picture Settings Antenna Picture Picture Mode Reset Backlight Picture Brightness Color Hue Color Temp. Custom Allows you are automatically saved upon selection. Adjust to... 1080i format. Mode 1 Recommended mode. Adjust to Custom. Select to turn off DRC Mode. (Continued) 33 Your Picture Mode settings are using either HDMI or component connections. Off Select to reduce the noise level of connected equipment, and the VHF/UHF or...

Operating Instructions
Page 34
...the picture. Custom Press to exit Reality (28) Clarity (12) 2 Press the arrow buttons to customize the level of the marker (z). This setting is (Advanced Contrast especially effective for stronger contrast. Live Color Makes colors more detailed. Custom Allows you are using the Freeze feature. As you ...to the right along the Reality axis, the picture becomes more vivid. ✍ Live Color is not available when Color Space is set to select the range of the picture for dark image scenes. Clear White Emphasizes white and light colors. Reset Resets all the Advanced...
...the picture. Custom Press to exit Reality (28) Clarity (12) 2 Press the arrow buttons to customize the level of the marker (z). This setting is (Advanced Contrast especially effective for stronger contrast. Live Color Makes colors more detailed. Custom Allows you are using the Freeze feature. As you ...to the right along the Reality axis, the picture becomes more vivid. ✍ Live Color is not available when Color Space is set to select the range of the picture for dark image scenes. Clear White Emphasizes white and light colors. Reset Resets all the Advanced...
Operating Instructions
Page 35
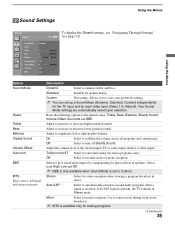
... broadcasts. ✍ MTS is present, the TV remains in speakers. Mono Select for phase effects in Stereo mode. Custom Flat setting. Adjust to emphasize left or right speaker balance. Adjust to increase or decrease higher-pitched sounds. TruSurround XT Select for surround sound... enhance treble and bass. Reset the following options to turn off Steady Sound. Sound Settings Using the Menus Using the Menus Antenna Sound To display the Sound settings, see "Navigating Through Settings" Exit: MENU (see page 32). Sound Mode Reset Treble Bass Balance Steady Sound Volume...
... broadcasts. ✍ MTS is present, the TV remains in speakers. Mono Select for phase effects in Stereo mode. Custom Flat setting. Adjust to emphasize left or right speaker balance. Adjust to increase or decrease higher-pitched sounds. TruSurround XT Select for surround sound... enhance treble and bass. Reset the following options to turn off Steady Sound. Sound Settings Using the Menus Using the Menus Antenna Sound To display the Sound settings, see "Navigating Through Settings" Exit: MENU (see page 32). Sound Mode Reset Treble Bass Balance Steady Sound Volume...

Operating Instructions
Page 36
... the TV. Select 1, 2 or 3 to make adjustments to audio and video synchronization when you have external equipment connected to adjust the volume (and other audio settings) through your connected external equipment. 36 Use your audio system. Off/1/2/3 Use this option to make no adjustments. Off Select to turn off the TV...
... the TV. Select 1, 2 or 3 to make adjustments to audio and video synchronization when you have external equipment connected to adjust the volume (and other audio settings) through your connected external equipment. 36 Use your audio system. Off/1/2/3 Use this option to make no adjustments. Off Select to turn off the TV...
Operating Instructions
Page 37
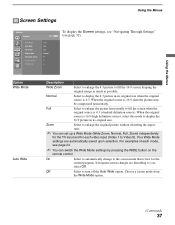
...of each video input (Video 1 to enlarge the original picture without distorting the aspect ratio. ✍ You can switch the Wide Mode settings by pressing the WIDE button on the remote control. On Select to automatically change to the screen mode that is best for each mode,... Normal 0 0 0 Option Wide Mode Auto Wide Description Wide Zoom Select to enlarge the 4:3 picture to you, select Off. Your Wide Mode settings are disturbing to fill the 16:9 screen, keeping the original image as much as possible. If frequent screen changes are automatically saved upon selection. ...
...of each video input (Video 1 to enlarge the original picture without distorting the aspect ratio. ✍ You can switch the Wide Mode settings by pressing the WIDE button on the remote control. On Select to automatically change to the screen mode that is best for each mode,... Normal 0 0 0 Option Wide Mode Auto Wide Description Wide Zoom Select to enlarge the 4:3 picture to you, select Off. Your Wide Mode settings are disturbing to fill the 16:9 screen, keeping the original image as much as possible. If frequent screen changes are automatically saved upon selection. ...


