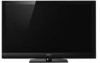
Child Safety: It Makes A Difference Where Your TV Stands
Page 1
...the Home Entertainment Support Safety Committee comprised of the home with furniture and television sets. 5 Avoid placing any items on top of TVs such as VCRs and remotes that may pique the children's curiosity. 6 Remember that is a Sector of the Electronic Industries Alliance... Many homes, in fact, have a television in your furniture to the wall (but never screw anything directly into the TV). 3 Carefully read and understand the manufacturer's instructions and product safety notices. 4 Don't allow children to making home entertainment enjoyable and safe...
Safety and Regulatory Booklet
Page 1
...same or equivalent type of batteries. Install in accordance with the same or similar characteristics as specified by Sony and to ensure proper air circulation. ☐ Never place the TV in contact with dangerous voltage points or short out parts that adequate replacement parts with the manufacturer's ..., unless proper ventilation is used . If the provided plug does not fit into the TV through the ventilation openings as audio and video) connected. ☐ Use only an original Sony AC power cord with one wider than the other similar surface where ventilation openings may be...
Additional Informatino for Using Sony® Wall-Mount Bracket (SU-WL500)
Page 1
... proper installation. Additional Information for Using Sony Wall-Mount Bracket (SU-WL500) A-DLR-100-11(1) Compatible TV models for this Wall-Mount Bracket information: KDL-60NX800/KDL-55HX701/KDL-46HX701/KDL-40HX701/KDL-60EX703/KDL-52EX703/ KDL-46EX703/KDL-40EX703/KDL-60EX701/KDL-52EX701/KDL-46EX701/KDL-60EX700/ KDL-52EX700/KDL-46EX700/KDL-40EX700/KDL-32EX700/KDL-32EX308 For product protection and safety reasons, Sony strongly recommends that you use the...
Additional Informatino for Using Sony® Wall-Mount Bracket (SU-WL500)
Page 2
... (except KDL-32EX*) (KDL-32EX* only) Screen center point Unit: inches (mm) Model Name KDL-60NX800 KDL-55HX701 KDL-46HX701 KDL-40HX701 KDL60EX70* KDL52EX70* KDL46EX70* KDL40EX70* KDL32EX70* KDL-32EX308 Display...6 7/8 (172) Length for all the required parts along with the Instructions. 2 Decide where you want to the TV installation dimensions table. Additional Information for Using Sony Wall-Mount Bracket (SU-WL500) − − Figures in the above table may differ slightly depending on the...
Additional Informatino for Using Sony® Wall-Mount Bracket (SU-WL500)
Page 3
...;*only Square hole Mounting Hook Screw (+PSW6 × 16) KDL-EX70* only Before installing, remove screws Square hole Mounting Hook Screw (+PSW6 × 16) Additional Information for SU-WL500. 4 Disconnect all the cables from the TV. 5 Secure the Mounting Hook to the "Screw and Hook ...should be installed on the wall. Refer to the rear of the TV. Refer to the rear of the TV. Refer to the Instructions for Using Sony Wall-Mount Bracket (SU-WL500) − − CAUTION The wall that the TV will be capable of supporting a weight of at least four times...
Additional Informatino for Using Sony® Wall-Mount Bracket (SU-WL500)
Page 4
...the original holes on a wall, remove the four screws installed in a safe place, keeping them away from the rear of the TV (KDL-EX70* and KDL-60NX800 only). * In the actual model names, the "" indicates numbers and/or characters specific to store the removed screws... TV on the rear of the TV. KDL-60NX800 only Remove the bottom cover and terminal cover. Before installing, remove screws Square hole Spacer Attach the Mounting Hook using the supplied four spacers and four M6 × 20 screws. Be sure to each model. Additional Information for Using Sony ...
Additional Informatino for Using Sony® Wall-Mount Bracket (SU-WL500)
Page 5
.../KDL-60EX70* e, j KDL-55HX701 d, g KDL-46HX701/KDL-40HX701 d, g KDL‑52EX70*/KDL‑46EX70*/ e, j KDL‑40EX70* KDL-32EX700 f, j KDL-32EX308 e, g * In the actual model names, the "" indicates numbers and/or characters specific to each model. Additional Information for Using Sony Wall-Mount Bracket (SU-WL500) − − d Hook Location When installing the TV onto the...
Additional Informatino for Using Sony® Wall-Mount Bracket (SU-WL500)
Page 6
... to each model. 8 Lift the TV off the stand. KDL‑32EX7*, KDL‑40EX7* only * In the actual model names, the ""...in securely. Remove the two screws from the arm base X of the Mounting Hook. Additional Information for Using Sony Wall-Mount Bracket (SU-WL500) − − Hexagon wrench ✍ • Be sure to adjust the ... arms to your fingers when adjusting the angle of the Mounting Hook. 7 Remove the screws from the TV. Make sure that you carry out this task with the Wall-Mount Bracket. Make sure that each arm...
Additional Informatino for Using Sony® Wall-Mount Bracket (SU-WL500)
Page 7
Refer to the Instructions for Using Sony Wall-Mount Bracket (SU-WL500) − − 9 Install the TV on a stable and level surface. Additional Information for SU-WL500. ✍ • When you put the TV back on the stand, reverse the above steps. • Remove the screws or install the Mounting Hook on the wall.
Setup Guide (Operating Instructions)
Page 1
LCD Digital Color TV Setup Guide (Operating Instructions) 4-178-827-13(1) Setting up your TV To watch TV Additional Information Sony Customer Support U.S.A.: www.sony.com/tvsupport Canada: www.sony.ca/support United States Canada 1.800.222.SONY 1.877.899.SONY Please Do Not Return the Product to the Store KDL-60EX700 / 60EX701 / 60EX703 / 52EX700 / 52EX701 / 52EX703 KDL-46EX700 / 46EX701 / 46EX703 / 40EX700 / 40EX703 / 32EX700
Setup Guide (Operating Instructions)
Page 2
... or A/V receiver from Dolby Laboratories. ENERGY STAR is protected by one or more of your HD experience, use this TV (i.e. The BRAVIA® Full HDTV Experience Thank you get the most out of the following United States patents 6,498,895; 6,850,693; 6,396,546... TV. "XMB" is a trademark of Sony Corporation and Sony Computer Entertainment Inc. Your BRAVIA TV is used in the "Home" mode. "PlayStation" is a registered trademark and "PS3" is a trademark of Sony Computer Entertainment Inc. Your new BRAVIA® TV opens the door to the "Full HDTV Experience." In Canada, TV ...
Setup Guide (Operating Instructions)
Page 3
... Specifications ...18 • Operating instructions are built into your BRAVIA TV. Table of Contents Checking the accessories...4 Inserting batteries into the remote control 4 Setting up your TV Attaching the Table-Top Stand...5 Connecting the TV...6 Securing the TV...10 Organizing the AC power cord ...11 Running initial setup ......11 Detaching the Table-Top Stand from the TV 12 Using a Wall-Mount Bracket ...13 Installing the TV Against a Wall or Enclosed Area 13 To watch TV To watch programs...14 To use the TV features ...14 To use i-Manual" for operation (page 15). ...
Setup Guide (Operating Instructions)
Page 4
... TV. • Make sure that they are blocking the path between the remote control and the IR sensor on the remote control. Refer to other leaflet to assemble the Table-Top Stand. *2 The Stand Rear Cover is attached to the TableTop Stand for KDL-60EX701/52EX701/46EX701 ... Table-Top Stand (M5 × 16) (4) (except KDL-60EX700/ 60EX701/60EX703 models) Assembling Screws for Table-Top Stand (M5 × 16) (4) (for KDL-40EX700/ 40EX703/32EX700 models) Remote control (1)*3 Size AAA batteries (2) USB Wireless LAN Adapter UWA-BR100 (1) (for 46, 52 and 60 inch models. *3 Please refer to open...
Setup Guide (Operating Instructions)
Page 5
...of the 32" and 40" models. Setting up your TV Some TV models are packaged with a detached Table-Top Stand so you will need to a warm area. This may cause moisture condensation. Attaching the Table-Top Stand (except KDL-60EX700/60EX701/ 60EX703 models) Refer to the Table-Top ...Stand. The 32" and 40" models must follow the above instructions. 5 larger size TVs require two or more people. • Correct hand placement while carrying the...
Setup Guide (Operating Instructions)
Page 6
Connecting the TV The following chart shows the high-definition (HD) and standard-definition (SD) video formats supported by your BRAVIA TV inputs. * For supported PC formats refer to the i-Manual. Recommendation of the F type plug Projection of the inner wire from the connection part must be less than 1.5 mm. 1.5 mm 6
Setup Guide (Operating Instructions)
Page 7
Setting up your TV Shown with a Set Top Box with HDMI connection Shown with a Set Top Box with COMPONENT connection Set Top Box Set Top Box Cable System or VHF/UHF Antenna System Cable or Antenna (Continued) 7
Setup Guide (Operating Instructions)
Page 8
Shown with HD Basic Connection with HD BRAVIA® Sync™ Basic Connection *Rear of TV Home Theater System Cable/ Antenna Cable/SAT (Dish) SD Cable Box or SD Satellite Receiver 8 or Blu-ray Disc/DVD Shown with Home Theater System Rear of TV AM SAT IN DVD IN VIDEO 2/BD IN OUT L L OPT... COMPONENT VIDEO OUT Y PB/CB DIGITAL OUT PCM/DTS/DOLBY DIGITAL COAXIAL OPTICAL S VIDEO PR/CR AUDIO OUT L 5.1CH OUTPUT FRONT REAR CENTER L R R WOOFER * Signifies a BRAVIA Sync capable device.
Setup Guide (Operating Instructions)
Page 9
Setting up your TV Shown with PC Connection with SD VCR/DVD Rear of TV Notebook PC or Splitter PC VCR VCR/DVD Combo DVD Cable/Antenna 9
Setup Guide (Operating Instructions)
Page 10
... children. Use two angle braces (not supplied) to secure the TV is no excess slack in property damage, serious bodily injury or even death. Securing the TV Sony strongly recommends taking measures to prevent the TV from Toppling • Secure the TV to a wall and/or stand. • Do not allow ...children to play or climb on furniture and TV sets. • Avoid placing or hanging items on the...
Setup Guide (Operating Instructions)
Page 11
... setting is ENERGY STAR compliant). 5 Select Continue to scan for wall mounting.) Be sure to remove the upper two screws prior to anchoring the TV on the TV. Organizing the AC power cord 4 Follow the instructions on the screen. ~ • The ENERGY SAVING SWITCH must be on the screen. Selecting Skip... will disable the TV Guide On Screen feature, which is only available when the TV's tuner is used. ~ • If you receive channels from a cable box or satellite receiver and do not wish to...