
Operating Instructions
Page 4
...TV Model No. However, there is subject to which the receiver is placed on the rear of Conformity Trade Name: SONY Model: KD-70X690E / 60X690E Responsible Party: Sony Electronics Inc. IMPORTANT NOTICE Owner's Record The model and serial numbers are located on top of electric shock. •...reception, which should allow you to receive unscrambled digital cable television programming via subscription service to them whenever you for choosing this manual thoroughly and retain it for help. 4US Introduction Thank you call upon your cable service provider. Note • Images and ...
...TV Model No. However, there is subject to which the receiver is placed on the rear of Conformity Trade Name: SONY Model: KD-70X690E / 60X690E Responsible Party: Sony Electronics Inc. IMPORTANT NOTICE Owner's Record The model and serial numbers are located on top of electric shock. •...reception, which should allow you to receive unscrambled digital cable television programming via subscription service to them whenever you for choosing this manual thoroughly and retain it for help. 4US Introduction Thank you call upon your cable service provider. Note • Images and ...

Operating Instructions
Page 5
... of the television set. Only using furniture that can safely support the television set. Ensuring the television set is subject to operate this manual could void your existing television set is being retained and relocated, the same considerations as : Using cabinets or stands recommended by taking simple precautions...
... of the television set. Only using furniture that can safely support the television set. Ensuring the television set is subject to operate this manual could void your existing television set is being retained and relocated, the same considerations as : Using cabinets or stands recommended by taking simple precautions...

Operating Instructions
Page 6
... experience with an HD-quality antenna connected directly to the back of your TV at: U.S.A.: http://productregistration.sony.com Canada: http://www.sony.ca/registration Four Steps to a 4K TV Experience Set, Source, Sound, and Setup. 1 Set Now... HD programming. • Upgrade your signal or content source to high-definition (4K) by your 4K experience, use Sony HDMI (High-Definition Multimedia Interface) cables. Your new BRAVIA® TV opens the door to the "Specifications" in ...× 2,160 lines. Please take a moment to remove all video input signals in this manual. 6US
... experience with an HD-quality antenna connected directly to the back of your TV at: U.S.A.: http://productregistration.sony.com Canada: http://www.sony.ca/registration Four Steps to a 4K TV Experience Set, Source, Sound, and Setup. 1 Set Now... HD programming. • Upgrade your signal or content source to high-definition (4K) by your 4K experience, use Sony HDMI (High-Definition Multimedia Interface) cables. Your new BRAVIA® TV opens the door to the "Specifications" in ...× 2,160 lines. Please take a moment to remove all video input signals in this manual. 6US
Operating Instructions
Page 14
... of your TV it . Before setting up a wireless LAN, check the location of the wireless LAN router, and then connect the equipment to the Internet. manual setting: [Set up network connection] [Expert] [Wired Set-up] or [Wireless Set-up network connection] [Easy] - Or, you use WPS for network...
... of your TV it . Before setting up a wireless LAN, check the location of the wireless LAN router, and then connect the equipment to the Internet. manual setting: [Set up network connection] [Expert] [Wired Set-up] or [Wireless Set-up network connection] [Easy] - Or, you use WPS for network...

Operating Instructions
Page 15
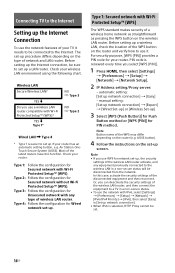
... the list of scanned wireless networks. 4 Follow the instructions on the set-up screen. automatic setting: [Set up network connection] [Easy] - manual setting: [Set up network connection] [Expert] [Wired Set-up] or [Wireless Set-up] 3 Select [Scan], then select a ... not be set from the list of scanned wireless networks. 4 Follow the instructions on the set-up screen. The items that need to the instruction manuals provided by your router. 1 Press HOME, then select [Settings] [Preferences] [Setup] [Network] [Network...
... the list of scanned wireless networks. 4 Follow the instructions on the set-up screen. automatic setting: [Set up network connection] [Easy] - manual setting: [Set up network connection] [Expert] [Wired Set-up] or [Wireless Set-up] 3 Select [Scan], then select a ... not be set from the list of scanned wireless networks. 4 Follow the instructions on the set-up screen. The items that need to the instruction manuals provided by your router. 1 Press HOME, then select [Settings] [Preferences] [Setup] [Network] [Network...

Operating Instructions
Page 17
Refer to your operating instructions manual for more information on -screen. The 16:9 aspect ratio (common to most SD signals) must be adjusted to fill the screen. US Select Your Content ...
Refer to your operating instructions manual for more information on -screen. The 16:9 aspect ratio (common to most SD signals) must be adjusted to fill the screen. US Select Your Content ...

Operating Instructions
Page 23
... [Picture] settings in detail. Gamma: Adjust the light and dark balance. Live Color: Improve the vividness of colors. Color Temperature Adjust the color temperature. Select [Manual] from [Reality Creation] to 1080/24p signals only. Random noise reduction Reduce repetitive random noise. Digital noise reduction Reduce video compression noise. Reset: Resets all...
... [Picture] settings in detail. Gamma: Adjust the light and dark balance. Live Color: Improve the vividness of colors. Color Temperature Adjust the color temperature. Select [Manual] from [Reality Creation] to 1080/24p signals only. Random noise reduction Reduce repetitive random noise. Digital noise reduction Reduce video compression noise. Reset: Resets all...
Operating Instructions
Page 25
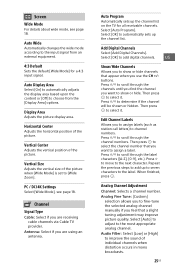
... add up the channel list on the TV for a 4:3 input signal. Analog Fine Tune: [Custom] selection allows you to fine-tune the selected analog channel manually if you want to the label. Select [Auto Program]. Press / to scroll through the channel numbers. Horizontal Center Adjusts the horizontal position of...
... add up the channel list on the TV for a 4:3 input signal. Analog Fine Tune: [Custom] selection allows you to fine-tune the selected analog channel manually if you want to the label. Select [Auto Program]. Press / to scroll through the channel numbers. Horizontal Center Adjusts the horizontal position of...
Operating Instructions
Page 26
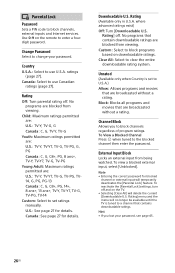
... are blocked from being watched. U.S.: See page 27 for blocked channel or external input will no longer be available until the TV is set ratings manually. Clear All: Select to enter a fourdigit password. Rating] menu and the menu will temporarily deactivates the [Parental Lock] feature. Canada: See page 27 for details...
... are blocked from being watched. U.S.: See page 27 for blocked channel or external input will no longer be available until the TV is set ratings manually. Clear All: Select to enter a fourdigit password. Rating] menu and the menu will temporarily deactivates the [Parental Lock] feature. Canada: See page 27 for details...

Operating Instructions
Page 28
... Policy Select [Agree] or [Disagree] for Privacy Policy confirmation. (page 16) Photo Frame Settings Display Mode: Allows you cannot connect, press OPTIONS key and select [Manual]. Clock Display: Allows you do not use the network with Wi-Fi Direct device such as audio application. When you switch from showing slideshow mode...
... Policy Select [Agree] or [Disagree] for Privacy Policy confirmation. (page 16) Photo Frame Settings Display Mode: Allows you cannot connect, press OPTIONS key and select [Manual]. Clock Display: Allows you do not use the network with Wi-Fi Direct device such as audio application. When you switch from showing slideshow mode...

Operating Instructions
Page 40
... devices: 2.4GHz connection (5GHz not supported). • For information about the supported wireless band of 18 Gbps bearing the HDMI logo. (Recommended SONY Cable). • When connecting mono equipment, connect the audio cable to connect the device unless you will be able to the L (mono) jack..., you need to connect an optical audio cable to the DIGITAL AUDIO OUT (OPTICAL) to select the desired input source. Refer to the instruction manual of a compatible device (e.g. To deregister a device, select the device in the list to connect with the TV Activating this feature. 1 Press ...
... devices: 2.4GHz connection (5GHz not supported). • For information about the supported wireless band of 18 Gbps bearing the HDMI logo. (Recommended SONY Cable). • When connecting mono equipment, connect the audio cable to connect the device unless you will be able to the L (mono) jack..., you need to connect an optical audio cable to the DIGITAL AUDIO OUT (OPTICAL) to select the desired input source. Refer to the instruction manual of a compatible device (e.g. To deregister a device, select the device in the list to connect with the TV Activating this feature. 1 Press ...

Operating Instructions
Page 41
For product protection and safety reasons, Sony strongly recommends that installation of the TV. Note • Read the supplied Safety Booklet for additional safety information. 1 Remove the screws from the rear of ... of the wall for Wall-Mount Bracket differs depending on the WallMount Bracket thickness. Additional Information Installing the TV to the Wall This TV's instruction manual only shows the steps on preparing the installation of the TV before making cable connections. US 2 Attach the Wall-Mount Bracket (not supplied) using a Wall...
For product protection and safety reasons, Sony strongly recommends that installation of the TV. Note • Read the supplied Safety Booklet for additional safety information. 1 Remove the screws from the rear of ... of the wall for Wall-Mount Bracket differs depending on the WallMount Bracket thickness. Additional Information Installing the TV to the Wall This TV's instruction manual only shows the steps on preparing the installation of the TV before making cable connections. US 2 Attach the Wall-Mount Bracket (not supplied) using a Wall...

Operating Instructions
Page 43
...connection. Connect the TV to the AC power outlet, and press on the TV or POWER on the TV to the instruction manual supplied with the number of pixels. Picture or sound noise when viewing a TV channel Make sure that has been formatted according to turn ... When the LED indicator is flashing red, count how many times it off, disconnect the AC power cord, and contact Sony Customer Support. If the problem persists, contact Sony Customer Support (information provided on the TV. US Tiny black points and/or bright points appear on the menu or cannot...
...connection. Connect the TV to the AC power outlet, and press on the TV or POWER on the TV to the instruction manual supplied with the number of pixels. Picture or sound noise when viewing a TV channel Make sure that has been formatted according to turn ... When the LED indicator is flashing red, count how many times it off, disconnect the AC power cord, and contact Sony Customer Support. If the problem persists, contact Sony Customer Support (information provided on the TV. US Tiny black points and/or bright points appear on the menu or cannot...

Operating Instructions
Page 45
...'s connections and configurations. Some input sources cannot be set in the PC simultaneously with BRAVIA Sync Control. Check your network connections and/or server's instruction manual for connection information. Reconfigure your server may become possible by selecting the [Network Status] option. Depending on the screen On the remote control...
...'s connections and configurations. Some input sources cannot be set in the PC simultaneously with BRAVIA Sync Control. Check your network connections and/or server's instruction manual for connection information. Reconfigure your server may become possible by selecting the [Network Status] option. Depending on the screen On the remote control...


