

Operating Instructions
Page 2
... network set-up 15 Preparing a Wired Network 16 Viewing the Network Status 16 If You Cannot Connect to the Internet 16 Privacy Policy 16 Watching TV Select Your Content Source 17 Adjust Screen Shape and Aspect Ratio 17 Customize Sound and Picture Quality 17 Changing the Viewing Style 18 Changing the... Wide Mode 18 Setting Scene Select 18 Navigating through Home Menu All Apps 19 Photo Sharing Plus 19 Using the TV as a Photo Frame Mode 20 Favorites 20 Media 21 Playback Photo/Music/Video via USB 21 Playback Photo/Music/Video via Home Network 22 ...
... network set-up 15 Preparing a Wired Network 16 Viewing the Network Status 16 If You Cannot Connect to the Internet 16 Privacy Policy 16 Watching TV Select Your Content Source 17 Adjust Screen Shape and Aspect Ratio 17 Customize Sound and Picture Quality 17 Changing the Viewing Style 18 Changing the... Wide Mode 18 Setting Scene Select 18 Navigating through Home Menu All Apps 19 Photo Sharing Plus 19 Using the TV as a Photo Frame Mode 20 Favorites 20 Media 21 Playback Photo/Music/Video via USB 21 Playback Photo/Music/Video via Home Network 22 ...
Operating Instructions
Page 3
Viewing Pictures from Connected Equipment Connection Diagram 34 Connecting the TV 35 Showing a Set Top Box with HDMI connection 35 Showing a Set Top Box with Component connection 36 Cable System or VHF/UHF Antenna US System ... 38 Showing PC Connection with SD VCR/DVD 39 Using Audio and Video Equipment 40 Using Screen Mirroring 40 Additional Information Installing the TV to the Wall 41 Installing the TV against a wall or enclosed area 42 Troubleshooting 43 Picture 43 Sound 44 Channels 44 Network 44 General 45 Specifications 46 3US
Viewing Pictures from Connected Equipment Connection Diagram 34 Connecting the TV 35 Showing a Set Top Box with HDMI connection 35 Showing a Set Top Box with Component connection 36 Cable System or VHF/UHF Antenna US System ... 38 Showing PC Connection with SD VCR/DVD 39 Using Audio and Video Equipment 40 Using Screen Mirroring 40 Additional Information Installing the TV to the Wall 41 Installing the TV against a wall or enclosed area 42 Troubleshooting 43 Picture 43 Sound 44 Channels 44 Network 44 General 45 Specifications 46 3US

Operating Instructions
Page 4
... the equipment into an outlet on top of programming and signal provided by one or more of Conformity Trade Name: SONY Model: KD-70X690E / 60X690E Responsible Party: Sony Electronics Inc. CAUTION To prevent electric shock and blade exposure, do not use strong solvents such as a thinner, alcohol... with the instructions, may not cause harmful interference, and (2) this equipment does cause harmful interference to comply with a solution of the TV. Telephone Number: 858-942-2230 This device complies with a soft cloth. • Stubborn stains may cause undesired operation. FCC Related ...
... the equipment into an outlet on top of programming and signal provided by one or more of Conformity Trade Name: SONY Model: KD-70X690E / 60X690E Responsible Party: Sony Electronics Inc. CAUTION To prevent electric shock and blade exposure, do not use strong solvents such as a thinner, alcohol... with the instructions, may not cause harmful interference, and (2) this equipment does cause harmful interference to comply with a solution of the TV. Telephone Number: 858-942-2230 This device complies with a soft cloth. • Stubborn stains may cause undesired operation. FCC Related ...

Operating Instructions
Page 6
... Set, Source, Sound, and Setup. 1 Set Now that you get the most out of the accessories from Sony. 4 Setup Install your TV and connect your TV. See page 34 for choosing Sony! The BRAVIA® 4K TV Experience Thank you need access to HD programming. • Upgrade your signal or content source to high-definition...
... Set, Source, Sound, and Setup. 1 Set Now that you get the most out of the accessories from Sony. 4 Setup Install your TV and connect your TV. See page 34 for choosing Sony! The BRAVIA® 4K TV Experience Thank you need access to HD programming. • Upgrade your signal or content source to high-definition...

Operating Instructions
Page 7
... and/or stand. • Do not allow moisture to a wall right away. This may cause moisture condensation. Getting Started Setting Up Your TV Some TV models are packaged with a detached Table-Top Stand so you will need to attach the Table-Top Stand. If you are not accessible to ... See page 41 (Installing the TV to the Wall) if you want to mount the TV to prevent the TV from the Stand (not supplied). You will need a Phillips screwdriver (not supplied) and the supplied screws to show poor picture and/or poor color. Securing the TV Sony strongly recommends taking measures to a...
... and/or stand. • Do not allow moisture to a wall right away. This may cause moisture condensation. Getting Started Setting Up Your TV Some TV models are packaged with a detached Table-Top Stand so you will need to attach the Table-Top Stand. If you are not accessible to ... See page 41 (Installing the TV to the Wall) if you want to mount the TV to prevent the TV from the Stand (not supplied). You will need a Phillips screwdriver (not supplied) and the supplied screws to show poor picture and/or poor color. Securing the TV Sony strongly recommends taking measures to a...
Operating Instructions
Page 8
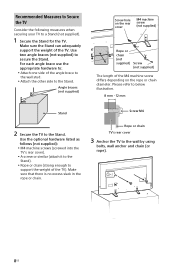
... to the wall stud. Attach the other side to : Attach one side of the TV). For each angle brace use the appropriate hardware to the Stand. Rope or chain TV's rear cover 3 Anchor the TV to secure the Stand. Use two angle braces (not supplied) to the wall by using bolts... (not supplied) Screw hole on the rope or chain diameter. Please refer to below illustration. 8 mm - 12 mm Stand Screw M4 2 Secure the TV to a Stand (not supplied). 1 Secure the Stand for the TV. Make sure that there is no excess slack in the rope or chain. Recommended Measures to Secure the...
... to the wall stud. Attach the other side to : Attach one side of the TV). For each angle brace use the appropriate hardware to the Stand. Rope or chain TV's rear cover 3 Anchor the TV to secure the Stand. Use two angle braces (not supplied) to the wall by using bolts... (not supplied) Screw hole on the rope or chain diameter. Please refer to below illustration. 8 mm - 12 mm Stand Screw M4 2 Secure the TV to a Stand (not supplied). 1 Secure the Stand for the TV. Make sure that there is no excess slack in the rope or chain. Recommended Measures to Secure the...
Operating Instructions
Page 9
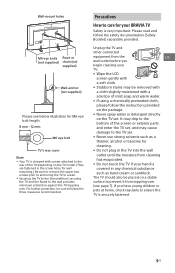
...(not supplied) Wall-anchor (not supplied) Please see below illustration for M6 eye bolt length. 8 mm - 12 mm M6 eye bolt TV's rear cover Note • Your TV is shipped with a solution of mild soap and warm water. • If using a chemically pretreated cloth, please follow the instruction provided... on the package. • Never spray water or detergent directly on the TV model. (They are fastened in any chemical substance such as a thinner, alcohol or benzine for cleaning. • Do not plug in the...
...(not supplied) Wall-anchor (not supplied) Please see below illustration for M6 eye bolt length. 8 mm - 12 mm M6 eye bolt TV's rear cover Note • Your TV is shipped with a solution of mild soap and warm water. • If using a chemically pretreated cloth, please follow the instruction provided... on the package. • Never spray water or detergent directly on the TV model. (They are fastened in any chemical substance such as a thinner, alcohol or benzine for cleaning. • Do not plug in the...
Operating Instructions
Page 10
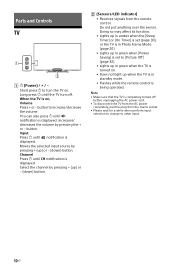
... + or - Doing so may affect its function. • Lights up in amber when the [Sleep Timer] or [On Timer] is set (page 30), or the TV is in Photo Frame Mode (page 20). • Lights up in green when [Power Saving] is set to increase/decrease the volume. Long press .... (Sensors/LED indicator) • Receives signals from the mains socket. • Please wait for a while when perform input selection to change to turn the TV on . • Does not light up in standby mode. • Flashes while the remote control is completely turned off . You can also press until...
... + or - Doing so may affect its function. • Lights up in amber when the [Sleep Timer] or [On Timer] is set (page 30), or the TV is in Photo Frame Mode (page 20). • Lights up in green when [Power Saving] is set to increase/decrease the volume. Long press .... (Sensors/LED indicator) • Receives signals from the mains socket. • Please wait for a while when perform input selection to change to turn the TV on . • Does not light up in standby mode. • Flashes while the remote control is completely turned off . You can also press until...

Operating Instructions
Page 11
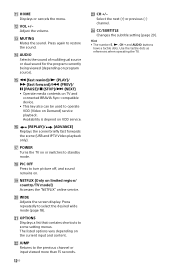
...min]/ [30 min]/[45 min]/[60 min]/[90 min]/ [120 min] that is compatible with 0-9 to select digital channels. Speakers: Select [TV Speakers] or [Audio System] to output the TV's sound from [Home (Menu)], [Options], [Content List] and [Power Off] to enter 2.1, press , , and . Color ...BRAVIA Sync Menu. Device Control: Use the [Device Control] to operate equipment that you are available). YouTube (Only on your region/country/TV model. INPUT Displays and selects the input source. SYNC MENU Press to remove the display from the [Home (Menu)] or ...
...min]/ [30 min]/[45 min]/[60 min]/[90 min]/ [120 min] that is compatible with 0-9 to select digital channels. Speakers: Select [TV Speakers] or [Audio System] to output the TV's sound from [Home (Menu)], [Options], [Content List] and [Power Off] to enter 2.1, press , , and . Color ...BRAVIA Sync Menu. Device Control: Use the [Device Control] to operate equipment that you are available). YouTube (Only on your region/country/TV model. INPUT Displays and selects the input source. SYNC MENU Press to remove the display from the [Home (Menu)] or ...
Operating Instructions
Page 12
... listed options vary depending on the current input and content. JUMP Returns to operate VOD (Video on TV and connected BRAVIA Sync-compatible device. • This key also can be used to the previous channel or input viewed more than 15 seconds....service. (REPLAY)/ (ADVANCE) Replays the scene/briefly fast forwards the scene (USB and IPTV Video playback only). POWER Turns the TV on limited region/ country/TV model) Accesses the "NETFLIX" online service. WIDE Adjusts the screen display. Press repeatedly to select the desired wide mode (page 18). &#...
... listed options vary depending on the current input and content. JUMP Returns to operate VOD (Video on TV and connected BRAVIA Sync-compatible device. • This key also can be used to the previous channel or input viewed more than 15 seconds....service. (REPLAY)/ (ADVANCE) Replays the scene/briefly fast forwards the scene (USB and IPTV Video playback only). POWER Turns the TV on limited region/ country/TV model) Accesses the "NETFLIX" online service. WIDE Adjusts the screen display. Press repeatedly to select the desired wide mode (page 18). &#...
Operating Instructions
Page 13
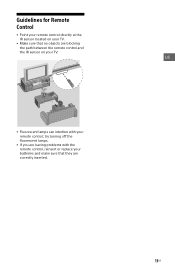
Guidelines for Remote Control • Point your remote control directly at the IR sensor located on your TV. • Make sure that they are blocking the path between the remote control and the IR sensor on your TV. US • Fluorescent lamps can interfere with the remote control, reinsert or replace your remote control; try turning off the fluorescent lamps. • If you are having problems with your batteries and make sure that no objects are correctly inserted. 13US
Guidelines for Remote Control • Point your remote control directly at the IR sensor located on your TV. • Make sure that they are blocking the path between the remote control and the IR sensor on your TV. US • Fluorescent lamps can interfere with the remote control, reinsert or replace your remote control; try turning off the fluorescent lamps. • If you are having problems with your batteries and make sure that no objects are correctly inserted. 13US
Operating Instructions
Page 14
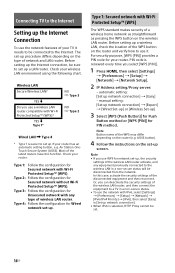
... security of a wireless home network as straightforward as pressing the WPS button on the type of network and LAN router. PIN code is easier to a TV in a non-secure status. • To use the network with Wi-Fi Protected Setup™ (WPS)? AOSS button). 4 Follow the instructions on ...Follow the configuration for Wired network set -up procedure differs depending on the wireless LAN router. Connecting TV to the Internet Setting up the Internet Connection To use the network features of your TV it needs to be connected to use it. Note Button name of the WPS may differ depending...
... security of a wireless home network as straightforward as pressing the WPS button on the type of network and LAN router. PIN code is easier to a TV in a non-secure status. • To use the network with Wi-Fi Protected Setup™ (WPS)? AOSS button). 4 Follow the instructions on ...Follow the configuration for Wired network set -up procedure differs depending on the wireless LAN router. Connecting TV to the Internet Setting up the Internet Connection To use the network features of your TV it needs to be connected to use it. Note Button name of the WPS may differ depending...

Operating Instructions
Page 16
...Network Setup]. 2 Select [Network Status]. 3 Select [Check Connection]. If you want to this case, if [On] is considered to be sent to Sony Corporation's global servers, which is selected at [Automatic Software Download] in Initial Setup or Setting Menu to confirm your network status. 1 Press HOME, then... the Privacy Policy. This may take several minutes. Preparing a Wired Network TV Internet Modem with router functions or Router Modem If You Cannot Connect to the Internet Use the diagnosis to Sony Corporation's global servers via the Internet. • Internet contents or other ...
...Network Setup]. 2 Select [Network Status]. 3 Select [Check Connection]. If you want to this case, if [On] is considered to be sent to Sony Corporation's global servers, which is selected at [Automatic Software Download] in Initial Setup or Setting Menu to confirm your network status. 1 Press HOME, then... the Privacy Policy. This may take several minutes. Preparing a Wired Network TV Internet Modem with router functions or Router Modem If You Cannot Connect to the Internet Use the diagnosis to Sony Corporation's global servers via the Internet. • Internet contents or other ...

Operating Instructions
Page 17
...(the width-to-height ratio of your content. playing a VCR, DVD or Blu-ray Disc; to select a TV channel. 4 Press VOL +/- US Select Your Content Source Whether you are displaying on your TV: • Press the remote control's HOME button, select [Settings] [Preferences], then select the [Picture]...to most SD signals) must be adjusted to most HD signals) looks perfect on your PC, you are watching cable, satellite or broadcast TV; The boxy 4:3 aspect ratio (common to fill the screen. Customize Sound and Picture Quality You can choose optimum sound and picture settings ...
...(the width-to-height ratio of your content. playing a VCR, DVD or Blu-ray Disc; to select a TV channel. 4 Press VOL +/- US Select Your Content Source Whether you are displaying on your TV: • Press the remote control's HOME button, select [Settings] [Preferences], then select the [Picture]...to most SD signals) must be adjusted to most HD signals) looks perfect on your PC, you are watching cable, satellite or broadcast TV; The boxy 4:3 aspect ratio (common to fill the screen. Customize Sound and Picture Quality You can choose optimum sound and picture settings ...
Operating Instructions
Page 19
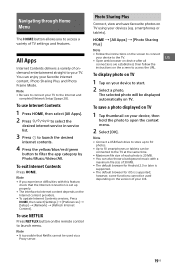
...NETFLIX Press NETFLIX button on the screen to open the context menu. 2 Select [OK]. Photo Sharing Plus Connect, view and save a photo displayed on TV 1 Tap thumbnail on the Internet content providers. • To update Internet Contents services, Press HOME, then select [Settings] [Preferences] ... complete [Network Setup] (page 28). HOME [All Apps] [Photo Sharing Plus] Note • Follow the instructions on TV. Note • Be sure to connect your devices (eg. Note • It is possible that the Internet connection is set up properly. ...
...NETFLIX Press NETFLIX button on the screen to open the context menu. 2 Select [OK]. Photo Sharing Plus Connect, view and save a photo displayed on TV 1 Tap thumbnail on the Internet content providers. • To update Internet Contents services, Press HOME, then select [Settings] [Preferences] ... complete [Network Setup] (page 28). HOME [All Apps] [Photo Sharing Plus] Note • Follow the instructions on TV. Note • Be sure to connect your devices (eg. Note • It is possible that the Internet connection is set up properly. ...
Operating Instructions
Page 20
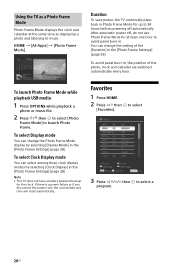
... clock. To select Clock Display mode You can change the setting of the photo, clock and calendar are switched automatically every hour. Note • This TV does not have a battery powered backup for at the same time as displaying a photo and listening to launch Photo Frame. Favorites 1 Press HOME. 2 Press &#...modes by selecting [Display Mode] in the [Photo Frame Settings] (page 28). HOME [All Apps] [Photo Frame Mode] Duration To save power, the TV continually plays back in the [Photo Frame Settings] (page 28). After automatic power off automatically.
... clock. To select Clock Display mode You can change the setting of the photo, clock and calendar are switched automatically every hour. Note • This TV does not have a battery powered backup for at the same time as displaying a photo and listening to launch Photo Frame. Favorites 1 Press HOME. 2 Press &#...modes by selecting [Display Mode] in the [Photo Frame Settings] (page 28). HOME [All Apps] [Photo Frame Mode] Duration To save power, the TV continually plays back in the [Photo Frame Settings] (page 28). After automatic power off automatically.

Operating Instructions
Page 21
...enjoy photo/music/video files stored in a Sony digital still camera/ camcorder/smartphone (depending on models)* through a USB cable or USB storage device on your digital camera. • Use a USB storage device that is compliant with your TV. 1 Connect a supported USB device to the TV. * Device needs to be in Media ... yellow color button in thumbnail view to display list of any damage to, or loss of, data on the USB device may be damaged. • Sony will not be played back. to select and adjust an To play a photo as a slideshow (Photo) 1 Press the blue button in thumbnail/ list...
...enjoy photo/music/video files stored in a Sony digital still camera/ camcorder/smartphone (depending on models)* through a USB cable or USB storage device on your digital camera. • Use a USB storage device that is compliant with your TV. 1 Connect a supported USB device to the TV. * Device needs to be in Media ... yellow color button in thumbnail view to display list of any damage to, or loss of, data on the USB device may be damaged. • Sony will not be played back. to select and adjust an To play a photo as a slideshow (Photo) 1 Press the blue button in thumbnail/ list...
Operating Instructions
Page 22
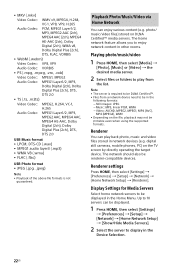
... still cameras, mobile phones, PC) on DLNA Certified™ media servers. Up to be in the Home Menu. photo/ music/video files) stored on the TV screen by directly operating the target device. • MKV (.mkv) Video Codec: WMV v9, MPEG4, H.264, VC-1, VP8, VP9, H.265 Audio Codec: PCM, MPEG1 Layer1...
... still cameras, mobile phones, PC) on DLNA Certified™ media servers. Up to be in the Home Menu. photo/ music/video files) stored on the TV screen by directly operating the target device. • MKV (.mkv) Video Codec: WMV v9, MPEG4, H.264, VC-1, VP8, VP9, H.265 Audio Codec: PCM, MPEG1 Layer1...
Operating Instructions
Page 24
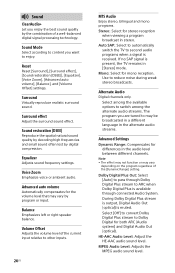
...] setting. Mono: Select for differences in [Stereo] mode. Equalizer Adjusts sound frequency settings. Auto SAP: Select to automatically switch the TV to other inputs. 24US MTS Audio Enjoy stereo, bilingual and mono programs. Stereo: Select for both ARC (Audio system) and Digital Audio...auto volume], [Balance], and [Volume Offset] settings. During Dolby Digital Plus stream is output, Digital Audio Out (optical) is present, the TV remains in the audio level between different channels. Note • The effect may not function or may be broadcasted in a different language in ...
...] setting. Mono: Select for differences in [Stereo] mode. Equalizer Adjusts sound frequency settings. Auto SAP: Select to automatically switch the TV to other inputs. 24US MTS Audio Enjoy stereo, bilingual and mono programs. Stereo: Select for both ARC (Audio system) and Digital Audio...auto volume], [Balance], and [Volume Offset] settings. During Dolby Digital Plus stream is output, Digital Audio Out (optical) is present, the TV remains in the audio level between different channels. Note • The effect may not function or may be broadcasted in a different language in ...
Operating Instructions
Page 25
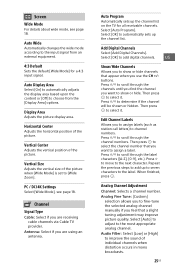
...Horizontal Center Adjusts the horizontal position of the picture. Channel Signal Type Cable: Select if you are receiving cable channels via Cable TV provider. Antenna: Select if you are using an antenna. Select [Auto Program]. US Show/Hide Channels Allows you to show or... through the label characters ([A-Z], [0-9], etc.). Analog Channel Adjustment Channel: Selects a channel number. Auto Program Automatically sets up the channel list on the TV for a 4:3 input signal. buttons. Screen Wide Mode For details about wide mode, see page 18. Select [OK] to add digital channels....
...Horizontal Center Adjusts the horizontal position of the picture. Channel Signal Type Cable: Select if you are receiving cable channels via Cable TV provider. Antenna: Select if you are using an antenna. Select [Auto Program]. US Show/Hide Channels Allows you to show or... through the label characters ([A-Z], [0-9], etc.). Analog Channel Adjustment Channel: Selects a channel number. Auto Program Automatically sets up the channel list on the TV for a 4:3 input signal. buttons. Screen Wide Mode For details about wide mode, see page 18. Select [OK] to add digital channels....


