
Operating Instructions
Page 1
Interchangeable Lens Digital Camera E-mount Instruction Manual 4-732-950-11(1) "Help Guide" (Web manual) Refer to "Help Guide" for in-depth instructions on the many functions of the camera. http://rd1.sony.net/help/ilc/1720/h_zz/ ILCE-7M3
Interchangeable Lens Digital Camera E-mount Instruction Manual 4-732-950-11(1) "Help Guide" (Web manual) Refer to "Help Guide" for in-depth instructions on the many functions of the camera. http://rd1.sony.net/help/ilc/1720/h_zz/ ILCE-7M3
Operating Instructions
Page 2
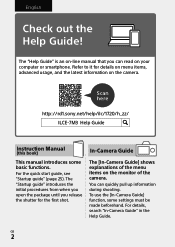
... package until you can quickly pull up information during shooting. To use the [In-Camera Guide] function, some basic functions. For details, search "In-Camera Guide" in the Help Guide. Scan here http://rd1.sony.net/help/ilc/1720/h_zz/ ILCE-7M3 Help Guide Instruction Manual (this book) This manual introduces some settings must be made...
... package until you can quickly pull up information during shooting. To use the [In-Camera Guide] function, some basic functions. For details, search "In-Camera Guide" in the Help Guide. Scan here http://rd1.sony.net/help/ilc/1720/h_zz/ ILCE-7M3 Help Guide Instruction Manual (this book) This manual introduces some settings must be made...

Operating Instructions
Page 3
...the Help Guide 2 Notes on using your camera 6 Preparations for shooting Checking the camera and the supplied items 11 Identifying parts 12 Front side 12 Rear side 13 Top side/Side view 15 Bottom 18 Lens FE 28-70 mm F3.5-5.6 OSS (Supplied with ILCE-7M3K)c 19 Basic operations 20 Using the... control wheel 20 Using the multi-selector 21 Using the Fn (Function) button 21 How to use the Quick Navi screen 22 Startup guide 25 Step 1: Inserting the battery pack into the camera...... 25 Step 2: Charging the battery...
...the Help Guide 2 Notes on using your camera 6 Preparations for shooting Checking the camera and the supplied items 11 Identifying parts 12 Front side 12 Rear side 13 Top side/Side view 15 Bottom 18 Lens FE 28-70 mm F3.5-5.6 OSS (Supplied with ILCE-7M3K)c 19 Basic operations 20 Using the... control wheel 20 Using the multi-selector 21 Using the Fn (Function) button 21 How to use the Quick Navi screen 22 Startup guide 25 Step 1: Inserting the battery pack into the camera...... 25 Step 2: Charging the battery...

Operating Instructions
Page 4
...-touch (NFC)/Bluetooth functions........ 52 Installing PlayMemories Mobile 52 Recording location information to captured images 53 Transferring images to the FTP server 53 Connecting the camera to a wireless access point 54 GB 4
...-touch (NFC)/Bluetooth functions........ 52 Installing PlayMemories Mobile 52 Recording location information to captured images 53 Transferring images to the FTP server 53 Connecting the camera to a wireless access point 54 GB 4

Operating Instructions
Page 5
... computer 56 Introduction to computer software 57 Image management software (PlayMemories Home 57 RAW processing/remote camera control software...... 58 MENU items/List of icons Using MENU items 59 List of MENU items 60 (Camera Settings 1 60 (Camera Settings 2 66 (Network 69 (Playback 70 (Setup 72 (My Menu 75 List of icons on...
... computer 56 Introduction to computer software 57 Image management software (PlayMemories Home 57 RAW processing/remote camera control software...... 58 MENU items/List of icons Using MENU items 59 List of MENU items 60 (Camera Settings 1 60 (Camera Settings 2 66 (Network 69 (Playback 70 (Setup 72 (My Menu 75 List of icons on...

Operating Instructions
Page 6
...malfunction. ••Do not look at sunlight or a strong light source through the lens when it may enter the focus inside the camera body or the lens. Screen language You can select the language displayed on the monitor and electronic viewfinder ••The monitor and ...electronic viewfinder are not using the camera. These are operational for effective use. Otherwise, the sunlight may still cause smoke or fire. ••Do not directly expose the ...
...malfunction. ••Do not look at sunlight or a strong light source through the lens when it may enter the focus inside the camera body or the lens. Screen language You can select the language displayed on the monitor and electronic viewfinder ••The monitor and ...electronic viewfinder are not using the camera. These are operational for effective use. Otherwise, the sunlight may still cause smoke or fire. ••Do not directly expose the ...
Operating Instructions
Page 7
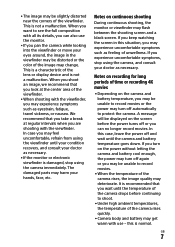
...••Depending on the screen before continuing to see the full composition with the viewfinder, you may feel uncomfortable, refrain from using the camera, and consult your hands, face, etc. If you keep watching the screen in the viewfinder may be unable to record movies or the power...you can also use the monitor. ••If you are shooting with use - Notes on recording for long periods of the camera rises quickly. ••Camera body and battery may get warm with the viewfinder. GB 7 In case you may experience symptoms such as necessary. It is ...
...••Depending on the screen before continuing to see the full composition with the viewfinder, you may feel uncomfortable, refrain from using the camera, and consult your hands, face, etc. If you keep watching the screen in the viewfinder may be unable to record movies or the power...you can also use the monitor. ••If you are shooting with use - Notes on recording for long periods of the camera rises quickly. ••Camera body and battery may get warm with the viewfinder. GB 7 In case you may experience symptoms such as necessary. It is ...
Operating Instructions
Page 8
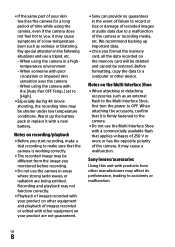
... Multi Interface Shoe with the [Auto Pwr OFF Temp.] set to the camera. ••Do not use a tripod, etc. --When using the camera in areas where strong radio waves or radiation are not guaranteed. ••Sony can provide no guarantees in the event of failure to record or loss ...replace it may be restored. ••If the same part of your skin touches the camera for a long period of time while using the camera, even if the camera does not feel hot to OFF. Sony lenses/accessories Using this unit with products from the image you start recording, make sure that ...
... Multi Interface Shoe with the [Auto Pwr OFF Temp.] set to the camera. ••Do not use a tripod, etc. --When using the camera in areas where strong radio waves or radiation are not guaranteed. ••Sony can provide no guarantees in the event of failure to record or loss ...replace it may be restored. ••If the same part of your skin touches the camera for a long period of time while using the camera, even if the camera does not feel hot to OFF. Sony lenses/accessories Using this unit with products from the image you start recording, make sure that ...

Operating Instructions
Page 9
... and using a battery pack that you delete the data completely using data deletion software. To prevent third parties from obtaining your camera is lost or stolen, Sony bears no responsibility for the loss or damage. Info. GB 9 Link Set.] to others , we recommend that you set ... wireless LAN to turn off all wireless network functions temporarily using [Airplane Mode]. Notes on the memory card. Warning on the camera. Unauthorized recording of such materials may be contrary to the provisions of the registered access point on copyright Television programs, films, ...
... and using a battery pack that you delete the data completely using data deletion software. To prevent third parties from obtaining your camera is lost or stolen, Sony bears no responsibility for the loss or damage. Info. GB 9 Link Set.] to others , we recommend that you set ... wireless LAN to turn off all wireless network functions temporarily using [Airplane Mode]. Notes on the memory card. Warning on the camera. Unauthorized recording of such materials may be contrary to the provisions of the registered access point on copyright Television programs, films, ...

Operating Instructions
Page 11
... number in some countries/ regions) * Multiple power cords may be supplied with all models ••Camera (1) ••AC Adaptor (1) The shape of your camera (page 10). The accessories supplied differ depending on the country/ region. ••Power cord (mains...Shoulder strap (1) ••Body cap (1) (Attached to the camera) ••Shoe cap (1) (Attached to the camera) ••Eyepiece cup (1) (Attached to the camera) ••Instruction Manual (1) (this manual) ••Reference Guide (1) ILCE-7M3K ••Zoom lens FE 28-70 mm F3.5- ...
... number in some countries/ regions) * Multiple power cords may be supplied with all models ••Camera (1) ••AC Adaptor (1) The shape of your camera (page 10). The accessories supplied differ depending on the country/ region. ••Power cord (mains...Shoulder strap (1) ••Body cap (1) (Attached to the camera) ••Shoe cap (1) (Attached to the camera) ••Eyepiece cup (1) (Attached to the camera) ••Instruction Manual (1) (this manual) ••Reference Guide (1) ILCE-7M3K ••Zoom lens FE 28-70 mm F3.5- ...

Operating Instructions
Page 13
Also, select MENU (Camera Settings 2) [FINDER/MONITOR], and then switch to an easily viewable angle and shoot from any position. Rear side Preparations for shooting Eyepiece cup ...
Also, select MENU (Camera Settings 2) [FINDER/MONITOR], and then switch to an easily viewable angle and shoot from any position. Rear side Preparations for shooting Eyepiece cup ...

Operating Instructions
Page 15
The mark shows the location of the lens, the focus cannot be confirmed. When you put enough distance between the camera and the subject, refer to the position of the horizontal line. ••If the subject is the sensor that converts light into an electric signal. Top side/Side view Preparations for shooting Image sensor position mark ••The image sensor is closer than the minimum shooting distance of the image sensor. Make sure you measure the exact distance between the subject and the camera. Speaker GB 15
The mark shows the location of the lens, the focus cannot be confirmed. When you put enough distance between the camera and the subject, refer to the position of the horizontal line. ••If the subject is the sensor that converts light into an electric signal. Top side/Side view Preparations for shooting Image sensor position mark ••The image sensor is closer than the minimum shooting distance of the image sensor. Make sure you measure the exact distance between the subject and the camera. Speaker GB 15

Operating Instructions
Page 16
... Exposure compensation dial Hooks for shoulder strap Attach both ends of the strap onto the camera. (N mark) (52) ••This mark indicates the touch point for connecting the camera and an NFC-enabled Smartphone. ••NFC (Near Field Communication) is an international standard... of the microphone is supplied by the camera. (Headphones) jack HDMI micro jack USB Type-C™ terminal (17, 55) Charge lamp ...
... Exposure compensation dial Hooks for shoulder strap Attach both ends of the strap onto the camera. (N mark) (52) ••This mark indicates the touch point for connecting the camera and an NFC-enabled Smartphone. ••NFC (Near Field Communication) is an international standard... of the microphone is supplied by the camera. (Headphones) jack HDMI micro jack USB Type-C™ terminal (17, 55) Charge lamp ...
Operating Instructions
Page 18
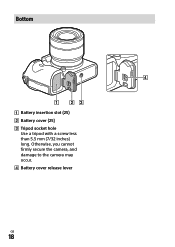
Bottom Battery insertion slot (25) Battery cover (25) Tripod socket hole Use a tripod with a screw less than 5.5 mm (7/32 inches) long. Otherwise, you cannot firmly secure the camera, and damage to the camera may occur. Battery cover release lever GB 18
Bottom Battery insertion slot (25) Battery cover (25) Tripod socket hole Use a tripod with a screw less than 5.5 mm (7/32 inches) long. Otherwise, you cannot firmly secure the camera, and damage to the camera may occur. Battery cover release lever GB 18
Operating Instructions
Page 22
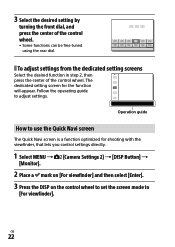
The dedicated setting screen for shooting with the viewfinder, that lets you control settings directly. 1 Select MENU (Camera Settings 2) [DISP Button] [Monitor]. 2 Place a mark on [For viewfinder] and then select [Enter]. 3 Press the DISP on the control wheel to set the ...
The dedicated setting screen for shooting with the viewfinder, that lets you control settings directly. 1 Select MENU (Camera Settings 2) [DISP Button] [Monitor]. 2 Place a mark on [For viewfinder] and then select [Enter]. 3 Press the DISP on the control wheel to set the ...

Operating Instructions
Page 25
Lock lever To remove the battery pack Make sure that the access lamp (page 14) is not lit, and turn off the camera. Then, slide the lock lever and remove the battery pack. Lock lever GB 25 Be careful not to drop the battery pack. Preparations for shooting Startup guide Step 1: Inserting the battery pack into the camera 1 Open the battery cover. 2 Insert the battery pack while pressing the lock lever with the tip of the battery until the battery locks into place. 3 Close the cover.
Lock lever To remove the battery pack Make sure that the access lamp (page 14) is not lit, and turn off the camera. Then, slide the lock lever and remove the battery pack. Lock lever GB 25 Be careful not to drop the battery pack. Preparations for shooting Startup guide Step 1: Inserting the battery pack into the camera 1 Open the battery cover. 2 Insert the battery pack while pressing the lock lever with the tip of the battery until the battery locks into place. 3 Close the cover.
Operating Instructions
Page 26
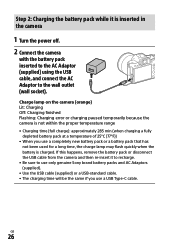
... Be sure to the wall outlet (wall socket). GB 26 If this happens, remove the battery pack or disconnect the USB cable from the camera and then re-insert it is not within the proper temperature range •• Charging time (full charge): approximately 285 min (when charging a...Charging error or charging paused temporarily because the camera is inserted in the camera 1 Turn the power off. 2 Connect the camera with the battery pack inserted to the AC Adaptor (supplied) using the USB cable, and connect the AC Adaptor to use only genuine Sony brand battery packs and AC Adaptors (supplied)....
... Be sure to the wall outlet (wall socket). GB 26 If this happens, remove the battery pack or disconnect the USB cable from the camera and then re-insert it is not within the proper temperature range •• Charging time (full charge): approximately 285 min (when charging a...Charging error or charging paused temporarily because the camera is inserted in the camera 1 Turn the power off. 2 Connect the camera with the battery pack inserted to the AC Adaptor (supplied) using the USB cable, and connect the AC Adaptor to use only genuine Sony brand battery packs and AC Adaptors (supplied)....
Operating Instructions
Page 27
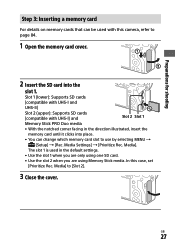
...; Use the slot 1 when you are only using one SD card. •• Use the slot 2 when you are using Memory Stick media. In this camera, refer to page 84. 1 Open the memory card cover. 2 Insert the SD card into place. •• You can be used in the direction illustrated...
...; Use the slot 1 when you are only using one SD card. •• Use the slot 2 when you are using Memory Stick media. In this camera, refer to page 84. 1 Open the memory card cover. 2 Insert the SD card into place. •• You can be used in the direction illustrated...

Operating Instructions
Page 28
... card (page 74). Media Settings]) (page 74). Note ••Do not insert a Memory Stick media into the slot 2, you format the card on the camera for the first time, it . GB 28 Make sure that the access lamp (page 14) is not lit, and then push in the memory card... in the default settings. If you do not intend to change the settings and will only use one memory card, use a memory card with the camera for more stable performance of image (still images/movies) to each memory card ([Recording Mode] under [Rec. It may cause a malfunction.
... card (page 74). Media Settings]) (page 74). Note ••Do not insert a Memory Stick media into the slot 2, you format the card on the camera for the first time, it . GB 28 Make sure that the access lamp (page 14) is not lit, and then push in the memory card... in the default settings. If you do not intend to change the settings and will only use one memory card, use a memory card with the camera for more stable performance of image (still images/movies) to each memory card ([Recording Mode] under [Rec. It may cause a malfunction.
Operating Instructions
Page 29
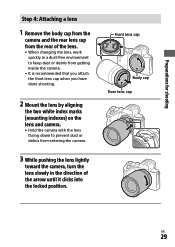
Front lens cap Body cap Rear lens cap GB 29 Preparations for shooting Step 4: Attaching a lens 1 Remove the body cap from the camera and the rear lens cap from the rear of the lens. •• When changing the lens, work quickly in a dust-free environment to keep ...dust or debris from getting inside the camera. •• It is recommended that you attach the front lens cap when you have done shooting. 2 Mount the lens by aligning the two white...
Front lens cap Body cap Rear lens cap GB 29 Preparations for shooting Step 4: Attaching a lens 1 Remove the body cap from the camera and the rear lens cap from the rear of the lens. •• When changing the lens, work quickly in a dust-free environment to keep ...dust or debris from getting inside the camera. •• It is recommended that you attach the front lens cap when you have done shooting. 2 Mount the lens by aligning the two white...


