
Help Guide Printable PDF
Page 3
...] About Scene Recognition [34] The advantages of automatic shooting [35] Program Auto [36] Sweep Panorama [37] Scene Selection [38] Shutter Priority [39] Aperture Priority [40] Manual Exposure [41] BULB [42] Memory recall [43] Movie/HFR [44] Shooting slow-motion movies (HFR Settings) [45] Using shooting functions Using the zoom Zoom [46...
...] About Scene Recognition [34] The advantages of automatic shooting [35] Program Auto [36] Sweep Panorama [37] Scene Selection [38] Shutter Priority [39] Aperture Priority [40] Manual Exposure [41] BULB [42] Memory recall [43] Movie/HFR [44] Shooting slow-motion movies (HFR Settings) [45] Using shooting functions Using the zoom Zoom [46...

Help Guide Printable PDF
Page 4
... scale [49] Zoom Ring Rotate [50] Using the flash Using flash [51] Notes on AF [68] AF Area Auto Clear [69] Focus-lock [70] Manual Focus [71] Direct manual focus (DMF) [72] Switch [59] Selecting still image size/image quality Image Size (still image) [60] Aspect Ratio (still image) [61] Quality (still...
... scale [49] Zoom Ring Rotate [50] Using the flash Using flash [51] Notes on AF [68] AF Area Auto Clear [69] Focus-lock [70] Manual Focus [71] Direct manual focus (DMF) [72] Switch [59] Selecting still image size/image quality Image Size (still image) [60] Aspect Ratio (still image) [61] Quality (still...
Help Guide Printable PDF
Page 19
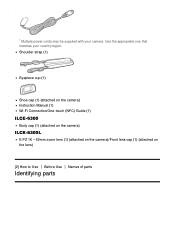
Shoulder strap (1) Eyepiece cup (1) Shoe cap (1) (attached on the camera) Instruction Manual (1) Wi-Fi Connection/One-touch (NFC) Guide (1) ILCE-6300 Body cap (1) (attached on the camera) ILCE-6300L E PZ 16 - 50mm zoom lens (1) (attached on the camera)/Front lens cap (1) (attached on the lens) [2] How to Use Before Use Names of parts Identifying parts * Multiple power cords may be supplied with your country/region. Use the appropriate one that matches your camera.
Shoulder strap (1) Eyepiece cup (1) Shoe cap (1) (attached on the camera) Instruction Manual (1) Wi-Fi Connection/One-touch (NFC) Guide (1) ILCE-6300 Body cap (1) (attached on the camera) ILCE-6300L E PZ 16 - 50mm zoom lens (1) (attached on the camera)/Front lens cap (1) (attached on the lens) [2] How to Use Before Use Names of parts Identifying parts * Multiple power cords may be supplied with your country/region. Use the appropriate one that matches your camera.

Help Guide Printable PDF
Page 30
Bracket indicator STBY Movie recording standby REC 0:12 Recording time of the movie (m:s) Control wheel function Control dial function Focus 1/250 Shutter speed F3.5 Aperture Value ±0.0 Metered Manual ±0.0 Exposure compensation ISO400 ISO sensitivity AE lock/FEL lock Shutter speed indicator Aperture indicator Histogram Digital level gauge Audio level
Bracket indicator STBY Movie recording standby REC 0:12 Recording time of the movie (m:s) Control wheel function Control dial function Focus 1/250 Shutter speed F3.5 Aperture Value ±0.0 Metered Manual ±0.0 Exposure compensation ISO400 ISO sensitivity AE lock/FEL lock Shutter speed indicator Aperture indicator Histogram Digital level gauge Audio level

Help Guide Printable PDF
Page 38
.... Before turning on the conditions of 25°C (77°F). Using the lens E PZ 16-50mm F3.5-5.6 OSS Using Sony Memory Stick PRO Duo (Mark2) media (sold separately) [Viewfinder Bright.]: [Manual][±0] [Monitor Brightness]: [Manual][±0] Proper operation cannot be guaranteed with a custom-built computer, modified computer, or a computer connected through a USB hub...
.... Before turning on the conditions of 25°C (77°F). Using the lens E PZ 16-50mm F3.5-5.6 OSS Using Sony Memory Stick PRO Duo (Mark2) media (sold separately) [Viewfinder Bright.]: [Manual][±0] [Monitor Brightness]: [Manual][±0] Proper operation cannot be guaranteed with a custom-built computer, modified computer, or a computer connected through a USB hub...

Help Guide Printable PDF
Page 46
... camera with the Mount Adaptor. Note Do not press the lens release button when attaching a lens. When using the Mount Adaptor, refer to the operating manual supplied with a lens attached, hold the part of the lens that is required to use an A-mount lens (sold separately) is extended for zoom or...
... camera with the Mount Adaptor. Note Do not press the lens release button when attaching a lens. When using the Mount Adaptor, refer to the operating manual supplied with a lens attached, hold the part of the lens that is required to use an A-mount lens (sold separately) is extended for zoom or...

Help Guide Printable PDF
Page 57
... the aperture and shoot when you want to blur the background, etc. (Shutter Priority): Allows you to shoot fast-moving subjects etc., by manually adjusting the shutter speed. (Manual Exposure): Allows you to shoot still images with the desired exposure by compositing the images. Available functions (Auto Mode): Allows you to shoot...
... the aperture and shoot when you want to blur the background, etc. (Shutter Priority): Allows you to shoot fast-moving subjects etc., by manually adjusting the shutter speed. (Manual Exposure): Allows you to shoot still images with the desired exposure by compositing the images. Available functions (Auto Mode): Allows you to shoot...

Help Guide Printable PDF
Page 67
...shooting screen blinks. Set the mode dial to put the subject in sharp focus and blur objects in focus. 3. This allows you to M (Manual Exposure). 2. Adjust the focus and shoot the subject. Hint Smaller F-value (opening the aperture) narrows the range that is automatically adjusted to ...Use Shooting Selecting a shooting mode Manual Exposure You can be obtained after setup, the shutter speed on the screen may differ from the actual image being shot. [41] How...
...shooting screen blinks. Set the mode dial to put the subject in sharp focus and blur objects in focus. 3. This allows you to M (Manual Exposure). 2. Adjust the focus and shoot the subject. Hint Smaller F-value (opening the aperture) narrows the range that is automatically adjusted to ...Use Shooting Selecting a shooting mode Manual Exposure You can be obtained after setup, the shutter speed on the screen may differ from the actual image being shot. [41] How...

Help Guide Printable PDF
Page 68
... become darker. 0: Appropriate exposure analyzed by turning the control dial. Note When [ISO] is set to other than [ISO AUTO], use MM (Metered Manual) to [ISO AUTO]. When the amount of ambient light exceeds the metering range of the shooting. BULB is indicated. 3. Press the bottom side of light..., such as the shutter button is set to check the exposure value. The Metered Manual indicator does not appear when [ISO] is set to [ISO AUTO], the ISO value automatically changes to set . Turn the control wheel counterclockwise ...
... become darker. 0: Appropriate exposure analyzed by turning the control dial. Note When [ISO] is set to other than [ISO AUTO], use MM (Metered Manual) to [ISO AUTO]. When the amount of ambient light exceeds the metering range of the shooting. BULB is indicated. 3. Press the bottom side of light..., such as the shutter button is set to check the exposure value. The Metered Manual indicator does not appear when [ISO] is set to [ISO AUTO], the ISO value automatically changes to set . Turn the control wheel counterclockwise ...

Help Guide Printable PDF
Page 70
... you have changed the position of the mode dial. 3. Aperture Priority/ Aperture Priority: Allows you to shoot after adjusting the shutter speed manually. You can also check the image angle before shooting. [44] How to Use Shooting Selecting a shooting mode Movie/HFR You can select... the desired settings after you to shoot after adjusting the aperture value manually. Press the MOVIE (movie) button to stop recording. Manual Exposure/ Manual Exposure: Allows you to shoot after adjusting the exposure (both the shutter speed and the aperture value...
... you have changed the position of the mode dial. 3. Aperture Priority/ Aperture Priority: Allows you to shoot after adjusting the shutter speed manually. You can also check the image angle before shooting. [44] How to Use Shooting Selecting a shooting mode Movie/HFR You can select... the desired settings after you to shoot after adjusting the aperture value manually. Press the MOVIE (movie) button to stop recording. Manual Exposure/ Manual Exposure: Allows you to shoot after adjusting the exposure (both the shutter speed and the aperture value...

Help Guide Printable PDF
Page 86
... from the top to the bottom. [65] How to Use Using shooting functions Adjusting the focus Focus Mode Selects the focus method to use manual focus and auto focus in motion. During continuous shooting, the product automatically shoots with Continuous AF from the left . Use this when the subject...when the focus adjustment is pressed halfway down . Sets the direction to the top. Use [Single-shot AF] when the subject is in combination. (Manual Focus): Menu item details Right: Pan the camera from the second shot. (Continuous AF): The product continues to focus while the shutter button is ...
... from the top to the bottom. [65] How to Use Using shooting functions Adjusting the focus Focus Mode Selects the focus method to use manual focus and auto focus in motion. During continuous shooting, the product automatically shoots with Continuous AF from the left . Use this when the subject...when the focus adjustment is pressed halfway down . Sets the direction to the top. Use [Single-shot AF] when the subject is in combination. (Manual Focus): Menu item details Right: Pan the camera from the second shot. (Continuous AF): The product continues to focus while the shutter button is ...

Help Guide Printable PDF
Page 87
... movies when [Focus Mode] is set to Use Using shooting functions Adjusting the focus Focus Area Selects the focusing area. Consult your Sony dealer or local authorized Sony service facility on a subject in Scene Selection and when the subject is difficult to [Single-shot AF] or [DMF], the [...lens you cannot focus on which to both still images and movies. 1. Wipe the lens with a soft cloth, etc. If you use manual focus. Adjusts the focus manually. Zone: Select a zone on the monitor on the intended subject using a lens that is [Wide] or [Zone], the focus range ...
... movies when [Focus Mode] is set to Use Using shooting functions Adjusting the focus Focus Area Selects the focusing area. Consult your Sony dealer or local authorized Sony service facility on a subject in Scene Selection and when the subject is difficult to [Single-shot AF] or [DMF], the [...lens you cannot focus on which to both still images and movies. 1. Wipe the lens with a soft cloth, etc. If you use manual focus. Adjusts the focus manually. Zone: Select a zone on the monitor on the intended subject using a lens that is [Wide] or [Zone], the focus range ...

Help Guide Printable PDF
Page 90
The subject is poor. The contrast between the subject and the background is too small, or too large. When shooting in Manual Focus mode When using the digital zoom When [ Record Setting] is achieved. 1. During High Frame Rate shooting The camera may not function very well in ...
The subject is poor. The contrast between the subject and the background is too small, or too large. When shooting in Manual Focus mode When using the digital zoom When [ Record Setting] is achieved. 1. During High Frame Rate shooting The camera may not function very well in ...

Help Guide Printable PDF
Page 91
... back in the original position to get the proper focus in auto focus mode. 1. Note When the subject is moving, you can adjust the focus manually. Rotate the focus ring to take the picture. Press the shutter button down . MENU → AF]. (Camera Settings) → [Focus Mode] → [Single-shot ... you cannot lock the focus even if [Focus Mode] has been set to [Automatic AF]. [71] How to Use Using shooting functions Adjusting the focus Manual Focus When it is displayed all the time. [70] How to both still images and movies. 1. Off: The focus area is difficult to re-compose...
... back in the original position to get the proper focus in auto focus mode. 1. Note When the subject is moving, you can adjust the focus manually. Rotate the focus ring to take the picture. Press the shutter button down . MENU → AF]. (Camera Settings) → [Focus Mode] → [Single-shot ... you cannot lock the focus even if [Focus Mode] has been set to [Automatic AF]. [71] How to Use Using shooting functions Adjusting the focus Manual Focus When it is displayed all the time. [70] How to both still images and movies. 1. Off: The focus area is difficult to re-compose...

Help Guide Printable PDF
Page 92
... to achieve a sharper focus. Press the shutter button fully down to Use Using shooting functions Adjusting the focus Direct manual focus (DMF) You can quickly focus on a subject rather than using the manual focus from the beginning. When you rotate the focus ring, the focus distance is displayed on the screen. This...
... to achieve a sharper focus. Press the shutter button fully down to Use Using shooting functions Adjusting the focus Direct manual focus (DMF) You can quickly focus on a subject rather than using the manual focus from the beginning. When you rotate the focus ring, the focus distance is displayed on the screen. This...

Help Guide Printable PDF
Page 93
... Adjusting the focus Focus Magnifier You can check the focus by selecting MENU → (Custom Settings) → [Focus Magnif. Turn the focus ring to make manual focusing easier. MENU → (Custom Settings) → [ MF Assist] → [On]. 2. Press the shutter button fully down /left/right side of the control wheel. on...
... Adjusting the focus Focus Magnifier You can check the focus by selecting MENU → (Custom Settings) → [Focus Magnif. Turn the focus ring to make manual focusing easier. MENU → (Custom Settings) → [ MF Assist] → [On]. 2. Press the shutter button fully down /left/right side of the control wheel. on...

Help Guide Printable PDF
Page 94
... for the third time, the focus magnifier closes and the normal shooting display is enlarged, but the product records a full-display image. Hint When focusing manually, you press the shutter button. When the shutter button is pressed halfway down to [On]: Auto-focusing is performed again. You can record images while...
... for the third time, the focus magnifier closes and the normal shooting display is enlarged, but the product records a full-display image. Hint When focusing manually, you press the shutter button. When the shutter button is pressed halfway down to [On]: Auto-focusing is performed again. You can record images while...

Help Guide Printable PDF
Page 96
... and movies. 1. Off: Does not use the peaking function. Note Since the product recognizes sharp areas as in focus, the effect of in Manual Focus or Direct Manual Focus shooting. The setting applies to middle. Menu item details High: Sets the peaking level to low. Low: Sets the peaking level to high...
... and movies. 1. Off: Does not use the peaking function. Note Since the product recognizes sharp areas as in focus, the effect of in Manual Focus or Direct Manual Focus shooting. The setting applies to middle. Menu item details High: Sets the peaking level to low. Low: Sets the peaking level to high...

Help Guide Printable PDF
Page 97
... outlines in white. [79] How to Use Using shooting functions Adjusting the focus Peaking Color Sets the color used for the peaking function in Manual Focus or Direct Manual Focus shooting. The setting applies to Use Using shooting functions Adjusting the focus Note [ Pre-AF] is available only when an E-mount lens...
... outlines in white. [79] How to Use Using shooting functions Adjusting the focus Peaking Color Sets the color used for the peaking function in Manual Focus or Direct Manual Focus shooting. The setting applies to Use Using shooting functions Adjusting the focus Note [ Pre-AF] is available only when an E-mount lens...

Help Guide Printable PDF
Page 98
... , and MENU → (Custom Settings) → [ Eye-Start AF] → desired setting. Hint [ Eye-Start AF] is held down the AF/MF button. During manual focus: Temporarily switches the focusing mode to both still images and movies. 1. Adjust the focus by turning the focus ring (A) while holding position. Menu item... are attached. [81] How to Use Using shooting functions Adjusting the focus AF/MF control You can easily switch the focusing mode from auto to manual. Switch the AF/MF/AEL switch lever to the AF/MF position, then press the AF/MF button. Eye-Start AF (still image) Sets ...
... , and MENU → (Custom Settings) → [ Eye-Start AF] → desired setting. Hint [ Eye-Start AF] is held down the AF/MF button. During manual focus: Temporarily switches the focusing mode to both still images and movies. 1. Adjust the focus by turning the focus ring (A) while holding position. Menu item... are attached. [81] How to Use Using shooting functions Adjusting the focus AF/MF control You can easily switch the focusing mode from auto to manual. Switch the AF/MF/AEL switch lever to the AF/MF position, then press the AF/MF button. Eye-Start AF (still image) Sets ...


