
Operation Guide
Page 2
HVR-HD1000U/HD1000N Serial No. ACSerial No. Carefully observe all warnings, precautions and instructions on the bottom. This plug will fit into the power outlet only one described in the literature accompanying the appliance. Never spill liquid of any kind into the outlet, try ...not sure of the type of important operating and maintenance (servicing) instructions in the operating instructions and adhere to your home, consult your Sony dealer regarding this product. This is intended to alert the user to have a suitable outlet installed. Overloading Do not overload wall outlets...
HVR-HD1000U/HD1000N Serial No. ACSerial No. Carefully observe all warnings, precautions and instructions on the bottom. This plug will fit into the power outlet only one described in the literature accompanying the appliance. Never spill liquid of any kind into the outlet, try ...not sure of the type of important operating and maintenance (servicing) instructions in the operating instructions and adhere to your home, consult your Sony dealer regarding this product. This is intended to alert the user to have a suitable outlet installed. Overloading Do not overload wall outlets...
Operation Guide
Page 3
...other similar surface. - Safety Check Upon completion of the set, and to protect it is left unattended and unused for necessary ventilation. Power-Cord Protection Route the power cord so that are specified in fire, electric shock, or other materials. - To ensure reliable operation of any service or repairs to...) to determine that the set is not likely to be walked on an unstable cart, stand, tripod, bracket, or table. Do not use power-line operated sets near or over a radiator or heat register, or where it from the appliance. Service Damage Requiring Service Unplug the set from...
...other similar surface. - Safety Check Upon completion of the set, and to protect it is left unattended and unused for necessary ventilation. Power-Cord Protection Route the power cord so that are specified in fire, electric shock, or other materials. - To ensure reliable operation of any service or repairs to...) to determine that the set is not likely to be walked on an unstable cart, stand, tripod, bracket, or table. Do not use power-line operated sets near or over a radiator or heat register, or where it from the appliance. Service Damage Requiring Service Unplug the set from...
Operation Guide
Page 9
... items ..... 12 Step 2: Attaching the supplied microphone, eyecup and the lens hood 13 Step 3: Charging the battery pack 15 Step 4: Turning the power on and setting the date and time 18 Changing the language setting ......18 Step 5: Making setting adjustments before recording 19 Step 6: Inserting a tape or... (wide) or 4:3 TV 33 Using the Menu Using the menu items .......... 36 Menu items 37 CAMERA SET menu 39 Settings to adjust your camcorder to a "Memory Stick Duo 67 Deleting recorded pictures from a tape to the recording conditions MEMORY SET menu 46 Settings for the "Memory Stick...
... items ..... 12 Step 2: Attaching the supplied microphone, eyecup and the lens hood 13 Step 3: Charging the battery pack 15 Step 4: Turning the power on and setting the date and time 18 Changing the language setting ......18 Step 5: Making setting adjustments before recording 19 Step 6: Inserting a tape or... (wide) or 4:3 TV 33 Using the Menu Using the menu items .......... 36 Menu items 37 CAMERA SET menu 39 Settings to adjust your camcorder to a "Memory Stick Duo 67 Deleting recorded pictures from a tape to the recording conditions MEMORY SET menu 46 Settings for the "Memory Stick...

Operation Guide
Page 12
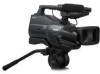
AC Adaptor (1) (p. 15) Lens cap (1) Wind screen (1) (p. 13) Microphone (1) (p. 13) Power cord (mains lead) (1) (p. 15) A/V connecting cable (1) (p. 31, 62) Eye cup (1) CD-ROM "Manuals for Digital HD Video Camera Recorder"(1) Operating Guide (This manual) (1) To attach the lens cap to the camcorder again. Then attach the grip belt to the grip belt Remove... 1: Checking supplied items Make sure that item supplied. The number in the parentheses indicates the number of that you have following items supplied with your camcorder.
AC Adaptor (1) (p. 15) Lens cap (1) Wind screen (1) (p. 13) Microphone (1) (p. 13) Power cord (mains lead) (1) (p. 15) A/V connecting cable (1) (p. 31, 62) Eye cup (1) CD-ROM "Manuals for Digital HD Video Camera Recorder"(1) Operating Guide (This manual) (1) To attach the lens cap to the camcorder again. Then attach the grip belt to the grip belt Remove... 1: Checking supplied items Make sure that item supplied. The number in the parentheses indicates the number of that you have following items supplied with your camcorder.

Operation Guide
Page 15
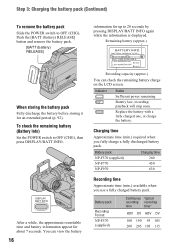
..." battery pack (L series) (p. 92) after attaching it clicks. 2 Slide the POWER switch to OFF (CHG). 3 Connect the AC Adaptor to the DC IN jack of the arrow while pressing it until it to your camcorder. The CHG (charge) lamp turns off when the battery is facing to the ...sure that the v mark on your camcorder. Step 3: Charging the battery pack Getting Started 1 2 Battery pack 3 To the wall outlet (wall socket) DC plug 4 AC Adaptor Power cord (Mains lead) DC IN jack POWER switch CHG (charge) lamp You can operate your camcorder connected to a power source such as a wall outlet ...
..." battery pack (L series) (p. 92) after attaching it clicks. 2 Slide the POWER switch to OFF (CHG). 3 Connect the AC Adaptor to the DC IN jack of the arrow while pressing it until it to your camcorder. The CHG (charge) lamp turns off when the battery is facing to the ...sure that the v mark on your camcorder. Step 3: Charging the battery pack Getting Started 1 2 Battery pack 3 To the wall outlet (wall socket) DC plug 4 AC Adaptor Power cord (Mains lead) DC IN jack POWER switch CHG (charge) lamp You can operate your camcorder connected to a power source such as a wall outlet ...
Operation Guide
Page 16
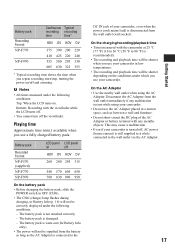
... time time* HDV DV HDV DV 180 190 95 105 200 205 105 115 To check the remaining battery (Battery Info) Set the POWER switch to 20 seconds by pressing DISPLAY/BATT INFO again while the information is displayed. You can check the remaining battery charge on the ...60 65 Recording capacity (approx.) You can view the battery 16 information for up to OFF (CHG), then press DISPLAY/BATT INFO. Indicator Status Sufficient power remaining Battery low, recording/ playback will stop soon. Replace the battery with a fully charged one, or charge the battery. Battery pack Charging time NP...
... time time* HDV DV HDV DV 180 190 95 105 200 205 105 115 To check the remaining battery (Battery Info) Set the POWER switch to 20 seconds by pressing DISPLAY/BATT INFO again while the information is displayed. You can check the remaining battery charge on the ...60 65 Recording capacity (approx.) You can view the battery 16 information for up to OFF (CHG), then press DISPLAY/BATT INFO. Indicator Status Sufficient power remaining Battery low, recording/ playback will stop soon. Replace the battery with a fully charged one, or charge the battery. Battery pack Charging time NP...
Operation Guide
Page 17
...a wall and furniture. • Do not short-circuit the DC plug of your camcorder, even when the power cord (mains lead) is recommended). • The recording and playback time will be shorter when you use your camcorder in a narrow space, such as the AC Adaptor is connected to the DC IN...which you use a fully charged battery pack. This may cause a malfunction. • Even if your camcorder. Bottom: Recording with the viewfinder while the LCD turns off. • You cannot turn off , AC power (house current) is still supplied to it while connected to the wall outlet via the AC Adaptor...
...a wall and furniture. • Do not short-circuit the DC plug of your camcorder, even when the power cord (mains lead) is recommended). • The recording and playback time will be shorter when you use your camcorder in a narrow space, such as the AC Adaptor is connected to the DC IN...which you use a fully charged battery pack. This may cause a malfunction. • Even if your camcorder. Bottom: Recording with the viewfinder while the LCD turns off. • You cannot turn off , AC power (house current) is still supplied to it while connected to the wall outlet via the AC Adaptor...
Operation Guide
Page 18
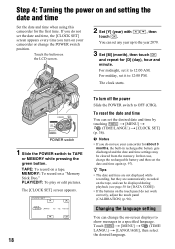
... can set it to OFF (CHG). z Tips • The date and time are not displayed while recording, but they are automatically recorded on your camcorder for about 3 months, the built-in a specified language. CLOCK SET DATE 2007Y JAN M 1D 12: 00 AM OK 18 To turn on the tape...). POWER switch 1 Slide the POWER switch to show messages in rechargeable battery gets discharged and the date and time settings may be displayed during playback (see page 58 for [DATA CODE]). • If the buttons on and setting the date and time Set the date and time when using this camcorder for...
... can set it to OFF (CHG). z Tips • The date and time are not displayed while recording, but they are automatically recorded on your camcorder for about 3 months, the built-in a specified language. CLOCK SET DATE 2007Y JAN M 1D 12: 00 AM OK 18 To turn on the tape...). POWER switch 1 Slide the POWER switch to show messages in rechargeable battery gets discharged and the date and time settings may be displayed during playback (see page 58 for [DATA CODE]). • If the buttons on and setting the date and time Set the date and time when using this camcorder for...

Operation Guide
Page 21
Do not shake or knock your camcorder is lit or flashing, your camcorder, turn the power off, eject the "Memory Stick Duo," or remove the battery pack. Getting Started 1 Open the jack cover. 2 Insert the "Memory Stick Duo" into the slot ...
Do not shake or knock your camcorder is lit or flashing, your camcorder, turn the power off, eject the "Memory Stick Duo," or remove the battery pack. Getting Started 1 Open the jack cover. 2 Insert the "Memory Stick Duo" into the slot ...

Operation Guide
Page 22
z Tips • The pictures are recorded on the LOCK switch When you slide the LOCK switch to the lock position (the POWER switch side), the POWER switch can no longer be set to MEMORY accidentally. (The LOCK switch is set to TAPE while pressing the green button. Recording/Playback Recording ... format in the default setting (p. 54). [REC] 22 Note on a tape. Remove the lens cap by pressing both knobs on its sides. Slide the POWER switch to the unlock position at the time of purchase.) LOCK UNLOCK LOCK switch Press START/STOP A (or B). 60min STBY 60min 60min REC 60min P-MENU...
z Tips • The pictures are recorded on the LOCK switch When you slide the LOCK switch to the lock position (the POWER switch side), the POWER switch can no longer be set to MEMORY accidentally. (The LOCK switch is set to TAPE while pressing the green button. Recording/Playback Recording ... format in the default setting (p. 54). [REC] 22 Note on a tape. Remove the lens cap by pressing both knobs on its sides. Slide the POWER switch to the unlock position at the time of purchase.) LOCK UNLOCK LOCK switch Press START/STOP A (or B). 60min STBY 60min 60min REC 60min P-MENU...

Operation Guide
Page 23
... up A shutter sound is heard. Continued , 23 To check the latest recording on the "Memory Stick Duo." To delete the picture, touch t [YES]. Slide the POWER switch to record. When disappears, the image has been recorded. To record high quality still images during tape recording (Dual Rec) See page 24 for...
... up A shutter sound is heard. Continued , 23 To check the latest recording on the "Memory Stick Duo." To delete the picture, touch t [YES]. Slide the POWER switch to record. When disappears, the image has been recorded. To record high quality still images during tape recording (Dual Rec) See page 24 for...
Operation Guide
Page 24
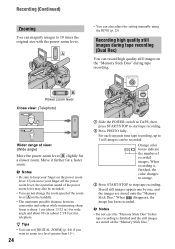
...(Telephoto) Wider range of recorded images. Move it further for telephoto. Orange color boxes indicate the number of view: (Wide angle) Move the power zoom lever B slightly for a slower zoom. When recording is finished, the color changes to orange. 3 Press START/STOP to 10 times the ...Zooming You can be recorded. • You can record high quality still images on the handdle. • The minimum possible distance between camcorder and subject while maintaining sharp focus is finished and the still images are stored onto the "Memory Stick Duo." For each separate time tape ...
...(Telephoto) Wider range of recorded images. Move it further for telephoto. Orange color boxes indicate the number of view: (Wide angle) Move the power zoom lever B slightly for a slower zoom. When recording is finished, the color changes to orange. 3 Press START/STOP to 10 times the ...Zooming You can be recorded. • You can record high quality still images on the handdle. • The minimum possible distance between camcorder and subject while maintaining sharp focus is finished and the still images are stored onto the "Memory Stick Duo." For each separate time tape ...
Operation Guide
Page 25
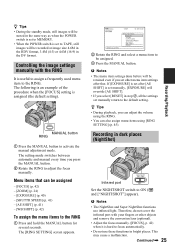
z Tips • During the standby mode, still images will be stored in the same way as when the POWER switch is set to MEMORY. • When the POWER switch is set to TAPE, still images will override [AE SHIFT]. • If you select [RESET] in step 2, all the settings set manually return to...
z Tips • During the standby mode, still images will be stored in the same way as when the POWER switch is set to MEMORY. • When the POWER switch is set to TAPE, still images will override [AE SHIFT]. • If you select [RESET] in step 2, all the settings set manually return to...

Operation Guide
Page 27
Toggles Play or Pause as you cannot find [VOLUME] in various modes ([ VAR.SPD PB], p. 52). Playback Slide the POWER switch to the desired scene, then touch playback. when a "Memory Stick Duo" with recorded images is not being played. z Tips • If you touch* 60min ...
Toggles Play or Pause as you cannot find [VOLUME] in various modes ([ VAR.SPD PB], p. 52). Playback Slide the POWER switch to the desired scene, then touch playback. when a "Memory Stick Duo" with recorded images is not being played. z Tips • If you touch* 60min ...

Operation Guide
Page 29
To cancel, touch [END]. The i.LINK output will not be adjusted with the power zoom lever. 1 Play back the picture you want to magnify. 2 Magnify the picture with T (Telephoto). 3 Touch the screen at the point you want to display ...
To cancel, touch [END]. The i.LINK output will not be adjusted with the power zoom lever. 1 Play back the picture you want to magnify. 2 Magnify the picture with T (Telephoto). 3 Touch the screen at the point you want to display ...

Operation Guide
Page 30
Then, your camcorder is set to TAPE. Touch t . 6 0 min 1 END SEARCH EXECUTING 0:00:00 CANCEL Touch here to standby. Make sure that the POWER switch is set to PLAY/EDIT. Make sure that the POWER switch is a blank section between recorded sections on the tape. b Notes • END SEARCH... 2 seconds (approx.) of the most recently recorded scene are played back. z Tips • You can view about 5 seconds, and the camcorder enters the standby mode at the point where the last recording has finished. The last scene of the most recent recording is set to cancel...
Then, your camcorder is set to TAPE. Touch t . 6 0 min 1 END SEARCH EXECUTING 0:00:00 CANCEL Touch here to standby. Make sure that the POWER switch is set to PLAY/EDIT. Make sure that the POWER switch is a blank section between recorded sections on the tape. b Notes • END SEARCH... 2 seconds (approx.) of the most recently recorded scene are played back. z Tips • You can view about 5 seconds, and the camcorder enters the standby mode at the point where the last recording has finished. The last scene of the most recent recording is set to cancel...

Operation Guide
Page 31
...CONV] setting is connected and connectors used. b Notes • Make all menu settings on your camcorder Open the jack cover in the direction of the arrow. Jacks on your camcorder were connected with the device to be connected. Playing the picture on a TV Connection methods and image...adjusted on the TV when playing back. Continued , 31 Recording/Playback Lift up the bottom of TV is changed after the TV and your camcorder before connecting. Use the supplied AC Adaptor as SD (standard definition) images regardless of the connection. • When recording, set [X.V.COLOR]...
...CONV] setting is connected and connectors used. b Notes • Make all menu settings on your camcorder Open the jack cover in the direction of the arrow. Jacks on your camcorder were connected with the device to be connected. Playing the picture on a TV Connection methods and image...adjusted on the TV when playing back. Continued , 31 Recording/Playback Lift up the bottom of TV is changed after the TV and your camcorder before connecting. Use the supplied AC Adaptor as SD (standard definition) images regardless of the connection. • When recording, set [X.V.COLOR]...

Operation Guide
Page 36
... return to select the menu item. Touch / to Personal Menu. 1 Touch t [MENU]. 2 Select the desired menu. Using the Menu Using the menu items 1 Slide the POWER switch to hide the menu screen. Unavailable items will be grayed out. ZEBRA 2 Touch the desired item. After finishing the settings, touch t (close) to the...
... return to select the menu item. Touch / to Personal Menu. 1 Touch t [MENU]. 2 Select the desired menu. Using the Menu Using the menu items 1 Slide the POWER switch to hide the menu screen. Unavailable items will be grayed out. ZEBRA 2 Touch the desired item. After finishing the settings, touch t (close) to the...

Operation Guide
Page 41
...sharpness of the subject. Continued , 41 Using the Menu Depending on the shutter speed, you set between 1/4 and 1/500 second when the POWER switch is slowed down automatically to readjust the white balance. 3 Touch [ ]. SHARPNESS You can make the subject look still, or emphasize ... • Set [WHITE BAL.] to 1/10000 second, still images cannot be set. • When [ONE PUSH] was selected, or taken your camcorder outdoors after touching , set [WHITE BAL.] to [AUTO]. • If you set to adjust the shutter speed automatically. Adjust the focus manually, using / ...
...sharpness of the subject. Continued , 41 Using the Menu Depending on the shutter speed, you set between 1/4 and 1/500 second when the POWER switch is slowed down automatically to readjust the white balance. 3 Touch [ ]. SHARPNESS You can make the subject look still, or emphasize ... • Set [WHITE BAL.] to 1/10000 second, still images cannot be set. • When [ONE PUSH] was selected, or taken your camcorder outdoors after touching , set [WHITE BAL.] to [AUTO]. • If you set to adjust the shutter speed automatically. Adjust the focus manually, using / ...

Operation Guide
Page 42
... be adjusted farther away. 3 Touch . b Notes • If you want to record a subject at close subjects)/ (focusing on close range, move the power zoom lever to W (wide angle), then adjust the focus. • You can select and adjust the focal point to a subject not located in step 1.... b Notes • The minimum possible distance between camcorder and subject while maintaining sharp focus is about 1 cm (about 13/32 in step 1. appears when [CAMERA COLOR] is anything other than the default...
... be adjusted farther away. 3 Touch . b Notes • If you want to record a subject at close subjects)/ (focusing on close range, move the power zoom lever to W (wide angle), then adjust the focus. • You can select and adjust the focal point to a subject not located in step 1.... b Notes • The minimum possible distance between camcorder and subject while maintaining sharp focus is about 1 cm (about 13/32 in step 1. appears when [CAMERA COLOR] is anything other than the default...

