Operation Guide
Page 6
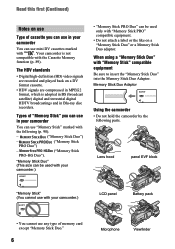
...Memory Stick PRO Duo") - ("Memory Stick PRO-HG Duo"). Lens hood panel EVF block "Memory Stick" (You cannot use with your camcorder You can use mini DV cassettes marked with . The HDV standards • Digital high-definition (HD) video signals are recorded and played back on a DV format cassette. •... "Memory Stick Duo" or a Memory Stick Duo adaptor. Types of "Memory Stick" you can use in your camcorder.) • "Memory Stick PRO Duo" can be used with your camcorder You can use any type of cassette you can be used only with the Cassette Memory function (p. 89). "Memory ...
...Memory Stick PRO Duo") - ("Memory Stick PRO-HG Duo"). Lens hood panel EVF block "Memory Stick" (You cannot use with your camcorder You can use mini DV cassettes marked with . The HDV standards • Digital high-definition (HD) video signals are recorded and played back on a DV format cassette. •... "Memory Stick Duo" or a Memory Stick Duo adaptor. Types of "Memory Stick" you can use in your camcorder.) • "Memory Stick PRO Duo" can be used with your camcorder You can use any type of cassette you can be used only with the Cassette Memory function (p. 89). "Memory ...
Operation Guide
Page 7
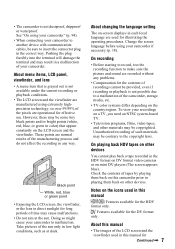
... effective use. Unauthorized recording of such materials may result in this camcorder prior to direct sunlight for the HDV format only. Notes on the country/region. • The camcorder is not possible due to a malfunction of the camcorder, storage media, etc. • TV color systems differ depending ...the viewfinder used for the DV format only. Doing so might cause your camcorder. On recording • Before starting to record, test the recording function to the copyright laws. On playing back HDV tapes on other materials may be provided, even if recording or playback is ...
... effective use. Unauthorized recording of such materials may result in this camcorder prior to direct sunlight for the HDV format only. Notes on the country/region. • The camcorder is not possible due to a malfunction of the camcorder, storage media, etc. • TV color systems differ depending ...the viewfinder used for the DV format only. Doing so might cause your camcorder. On recording • Before starting to record, test the recording function to the copyright laws. On playing back HDV tapes on other materials may be provided, even if recording or playback is ...
Operation Guide
Page 16
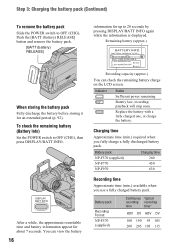
Battery pack Recording Format NP-F570 (supplied) Continuous Typical recording recording time time* HDV DV HDV DV 180 190 95 105 200 205 105 115 Replace the battery with a fully charged one, or charge the battery. You can check the remaining ...
Battery pack Recording Format NP-F570 (supplied) Continuous Typical recording recording time time* HDV DV HDV DV 180 190 95 105 200 205 105 115 Replace the battery with a fully charged one, or charge the battery. You can check the remaining ...
Operation Guide
Page 17
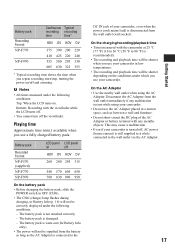
...the AC Adaptor. 17 Getting Started The battery pack is not attached correctly. - Playing time Approximate time (min.) available when you use your camcorder. The battery pack is damaged. - Disconnect the AC Adaptor from the wall outlet immediately if any metallic objects. The battery pack is recommended...8226; All times measured under the following conditions. - Battery pack Recording Format NP-F770 NP-F970 Continuous Typical recording recording time time* HDV DV HDV DV 375 390 200 220 410 425 220 240 555 580 295 330 605 630 325 355 * Typical recording time shows the time ...
...the AC Adaptor. 17 Getting Started The battery pack is not attached correctly. - Playing time Approximate time (min.) available when you use your camcorder. The battery pack is damaged. - Disconnect the AC Adaptor from the wall outlet immediately if any metallic objects. The battery pack is recommended...8226; All times measured under the following conditions. - Battery pack Recording Format NP-F770 NP-F970 Continuous Typical recording recording time time* HDV DV HDV DV 375 390 200 220 410 425 220 240 555 580 295 330 605 630 325 355 * Typical recording time shows the time ...

Operation Guide
Page 22
... switch is set to TAPE while pressing the green button. Recording/Playback Recording START/STOP B PHOTO START/STOP A Recording movies Movies are recorded in the HDV format in the default setting (p. 54). [REC] 22 Remove the lens cap by pressing both knobs on a tape. z Tips • The pictures are recorded on...
... switch is set to TAPE while pressing the green button. Recording/Playback Recording START/STOP B PHOTO START/STOP A Recording movies Movies are recorded in the HDV format in the default setting (p. 54). [REC] 22 Remove the lens cap by pressing both knobs on a tape. z Tips • The pictures are recorded on...
Operation Guide
Page 25
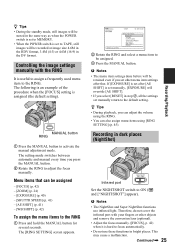
... items using [RING SETTING] (p. 45). MANUAL button RING 1 Press the MANUAL button to TAPE, still images will be recorded at image size 4.6M in the HDV format, 3.4M (4:3) or 4.6M (16:9) in the DV format. Therefore, do not cover the infrared port with the RING It is useful to assign a frequently...
... items using [RING SETTING] (p. 45). MANUAL button RING 1 Press the MANUAL button to TAPE, still images will be recorded at image size 4.6M in the HDV format, 3.4M (4:3) or 4.6M (16:9) in the DV format. Therefore, do not cover the infrared port with the RING It is useful to assign a frequently...

Operation Guide
Page 31
...Playing the picture on a TV Connection methods and image quality differ depending on what type of TV is changed after the TV and your camcorder Open the jack cover in the direction of the arrow and connect the cable. The TV may need to be adjusted on the TV ...) images regardless of the connection. • When recording, set [X.V.COLOR] to [ON] to play back on your camcorder before connecting. Some settings may not recognize the video signal properly if the [VCR HDV/DV] or [i.LINK CONV] setting is connected and connectors used. Continued , 31 b Notes • Make all menu...
...Playing the picture on a TV Connection methods and image quality differ depending on what type of TV is changed after the TV and your camcorder Open the jack cover in the direction of the arrow and connect the cable. The TV may need to be adjusted on the TV ...) images regardless of the connection. • When recording, set [X.V.COLOR] to [ON] to play back on your camcorder before connecting. Some settings may not recognize the video signal properly if the [VCR HDV/DV] or [i.LINK CONV] setting is connected and connectors used. Continued , 31 b Notes • Make all menu...

Operation Guide
Page 32
... audio signals. COMPONENT IN AUDIO HDMI i.LINK (for HDV1080i) A B C Type Camcorder Cable A Component video cable (optional) (Green) Y (Blue) PB/CB (Red) PR/CR A/V connecting cable (supplied) (White) (Red) : Signal flow, ( ): Reference pages TV Menu Setting (STANDARD SET) [VCR HDV/DV] t [AUTO] (53) [COMPONENT] t [1080i/480i] (56) (Yellow) • An A/V connecting cable is (SD...
... audio signals. COMPONENT IN AUDIO HDMI i.LINK (for HDV1080i) A B C Type Camcorder Cable A Component video cable (optional) (Green) Y (Blue) PB/CB (Red) PR/CR A/V connecting cable (supplied) (White) (Red) : Signal flow, ( ): Reference pages TV Menu Setting (STANDARD SET) [VCR HDV/DV] t [AUTO] (53) [COMPONENT] t [1080i/480i] (56) (Yellow) • An A/V connecting cable is (SD...

Operation Guide
Page 33
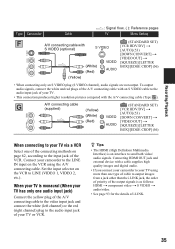
... of your TV. C i.LINK cable (optional) (STANDARD SET) [VCR HDV/DV] t [AUTO] (53) [DOWN CONVERT] t [i.LINK CONV] t [OFF] (56) • Your TV needs to the camcorder via i.LINK cable (p. 65) cannot be set so that the camcorder is connected. Connecting to a 16:9 (wide) or 4:3 TV SD (...standard definition) image quality • An HDV formatted picture is down converted to DV format (SD image quality) and...
... of your TV. C i.LINK cable (optional) (STANDARD SET) [VCR HDV/DV] t [AUTO] (53) [DOWN CONVERT] t [i.LINK CONV] t [OFF] (56) • Your TV needs to the camcorder via i.LINK cable (p. 65) cannot be set so that the camcorder is connected. Connecting to a 16:9 (wide) or 4:3 TV SD (...standard definition) image quality • An HDV formatted picture is down converted to DV format (SD image quality) and...

Operation Guide
Page 34
...WIDE SELECT] to [4:3] on your TV. Playing the picture on a TV (Continued) To set so that it recognizes that the camcorder is also needed to the audio input jack of your TV. 34 Connect the white and red plugs of the A/V connecting cable ... recording a picture (p. 54). : Signal flow, ( ): Reference pages Type Camcorder Cable TV Menu Setting D Component video cable (optional) (Green) Y (Blue) PB/CB (Red) PR/CR A/V connecting cable (supplied) (White) (Red) (STANDARD SET) [VCR HDV/DV] t [AUTO] (53) [COMPONENT] t [480i] (56) [DOWN CONVERT] t [VIDEO OUT] t [SQUEEZE]/[LETTER BOX]/[...
...WIDE SELECT] to [4:3] on your TV. Playing the picture on a TV (Continued) To set so that it recognizes that the camcorder is also needed to the audio input jack of your TV. 34 Connect the white and red plugs of the A/V connecting cable ... recording a picture (p. 54). : Signal flow, ( ): Reference pages Type Camcorder Cable TV Menu Setting D Component video cable (optional) (Green) Y (Blue) PB/CB (Red) PR/CR A/V connecting cable (supplied) (White) (Red) (STANDARD SET) [VCR HDV/DV] t [AUTO] (53) [COMPONENT] t [480i] (56) [DOWN CONVERT] t [VIDEO OUT] t [SQUEEZE]/[LETTER BOX]/[...
Operation Guide
Page 35
...; This connection produces higher resolution pictures compared with a cable supplies high quality images and digital audio. • If you connect your camcorder to your TV using the A/V connecting cable. Set the input selector on the VCR to send both video/ audio signals. z Tips... cable (supplied) (Yellow) (White) (Red) (STANDARD SET) [VCR HDV/DV] t [AUTO] (53) [DOWN CONVERT] t [VIDEO OUT] t [SQUEEZE]/[LETTER BOX]/[EDGE CROP] (56) When connecting to your TV or VCR. Recording/Playback Type Camcorder Cable : Signal flow, ( ): Reference pages TV Menu Setting A/V connecting cable...
...; This connection produces higher resolution pictures compared with a cable supplies high quality images and digital audio. • If you connect your camcorder to your TV using the A/V connecting cable. Set the input selector on the VCR to send both video/ audio signals. z Tips... cable (supplied) (Yellow) (White) (Red) (STANDARD SET) [VCR HDV/DV] t [AUTO] (53) [DOWN CONVERT] t [VIDEO OUT] t [SQUEEZE]/[LETTER BOX]/[EDGE CROP] (56) When connecting to your TV or VCR. Recording/Playback Type Camcorder Cable : Signal flow, ( ): Reference pages TV Menu Setting A/V connecting cable...

Operation Guide
Page 38
z z z z z - z - z z z - - - - z - z z - z z z z z z - z - - z z z z z z z z z z z - PLAY/EDIT z - z - - - z - Menu items (Continued) Position USB SELECT EDIT/PLAY menu (p. 52) VAR.SPD PB REC CTRL END SEARCH STANDARD SET menu (p. 53) VCR HDV/DV REC FORMAT DV SET VOLUME MIC LEVEL AU.LVL DISP LCD/VF SET COMPONENT DOWN CONVERT STATUS CHECK GUIDEFRAME COLOR BAR DATA CODE REMAINING ...
z z z z z - z - z z z - - - - z - z z - z z z z z z - z - - z z z z z z z z z z z - PLAY/EDIT z - z - - - z - Menu items (Continued) Position USB SELECT EDIT/PLAY menu (p. 52) VAR.SPD PB REC CTRL END SEARCH STANDARD SET menu (p. 53) VCR HDV/DV REC FORMAT DV SET VOLUME MIC LEVEL AU.LVL DISP LCD/VF SET COMPONENT DOWN CONVERT STATUS CHECK GUIDEFRAME COLOR BAR DATA CODE REMAINING ...

Operation Guide
Page 47
... 48000 60000 30000 115000 115000 * [ IMAGE SIZE] is fixed to [ 1.2M] in HDV format, [ 0.2M] in DV format (16:9) and [VGA (0.3M)] in the folder. • Do not do any of Sony's ClearVid CMOS sensor and image processing system (new Enhanced Imaging Processor) allows for still image ..., and does not require formatting at the following while [ Formatting...] is selected for image quality. • When using a "Memory Stick Duo" made by Sony Corporation. b Notes • Do not do any of the following settings: Top: [FINE] is displayed: - FILE NO. RESET Resets the file number ...
... 48000 60000 30000 115000 115000 * [ IMAGE SIZE] is fixed to [ 1.2M] in HDV format, [ 0.2M] in DV format (16:9) and [VGA (0.3M)] in the folder. • Do not do any of Sony's ClearVid CMOS sensor and image processing system (new Enhanced Imaging Processor) allows for still image ..., and does not require formatting at the following while [ Formatting...] is selected for image quality. • When using a "Memory Stick Duo" made by Sony Corporation. b Notes • Do not do any of the following settings: Top: [FINE] is displayed: - FILE NO. RESET Resets the file number ...

Operation Guide
Page 50
... in step 1. FLASH (flash motion) Records/plays back a movie with / before touching [START]. TRAIL When recording/playback, trailing after images are not output via the HDV/DV Interface (i.LINK).
... in step 1. FLASH (flash motion) Records/plays back a movie with / before touching [START]. TRAIL When recording/playback, trailing after images are not output via the HDV/DV Interface (i.LINK).

Operation Guide
Page 51
..., when recording is displayed. Sounds are recorded while [Recording···] is finished. NEG.ART The color and brightness are not output via the HDV/DV Interface (i.LINK). This is useful to the playback pictures are reversed. SKINTONE* Makes skin texture look more smoother and more appealing. SMTH SLW REC...
..., when recording is displayed. Sounds are recorded while [Recording···] is finished. NEG.ART The color and brightness are not output via the HDV/DV Interface (i.LINK). This is useful to the playback pictures are reversed. SKINTONE* Makes skin texture look more smoother and more appealing. SMTH SLW REC...

Operation Guide
Page 52
...; The image quality of [SMTH SLW REC] is not a malfunction. **Pictures output from the HDV/DV Interface (i.LINK) when they are paused or played back in any mode other than normal recording. You can also connect the camcorder to the normal playback mode, touch (Play/Pause) twice (once from frame playback). To...
...; The image quality of [SMTH SLW REC] is not a malfunction. **Pictures output from the HDV/DV Interface (i.LINK) when they are paused or played back in any mode other than normal recording. You can also connect the camcorder to the normal playback mode, touch (Play/Pause) twice (once from frame playback). To...

Operation Guide
Page 53
- CANCEL Stops [END SEARCH]. The indicators in HDV format. The selected signal is played back for details on the tape. You can also select this when connecting the camcorder to the reverse direction are not available in parentheses appear when the items are marked with B. ... can also select this when connecting the camcorder to input/output from the HDV/DV Interface (i.LINK). With an i.LINK connection, inputs/outputs only HDV formatted signals from the HDV/DV Interface (i.LINK), and records/ plays back. When your camcorder is connected to another device using an ...
- CANCEL Stops [END SEARCH]. The indicators in HDV format. The selected signal is played back for details on the tape. You can also select this when connecting the camcorder to the reverse direction are not available in parentheses appear when the items are marked with B. ... can also select this when connecting the camcorder to input/output from the HDV/DV Interface (i.LINK). With an i.LINK connection, inputs/outputs only HDV formatted signals from the HDV/DV Interface (i.LINK), and records/ plays back. When your camcorder is connected to another device using an ...

Operation Guide
Page 54
... ( ) Records in the DV format. b Notes • When recording in DV format. REC FORMAT You can monitor the sound recorded by other camcorders or VCRs. • When you can select a recording format. LP (LP) Increases the recording time to the DV format and output; at [AUTO... HDV signal is set [i.LINK CONV] accordingly. DV ( ) Records in the HDV1080i specification. b Notes • If you record in the 16-bit mode (1 stereo sound with your camcorder. • When [AUTO] is selected, if the signal switches between the scenes. x AUDIO MODE B 12BIT Records in the 12-bit...
... ( ) Records in the DV format. b Notes • When recording in DV format. REC FORMAT You can monitor the sound recorded by other camcorders or VCRs. • When you can select a recording format. LP (LP) Increases the recording time to the DV format and output; at [AUTO... HDV signal is set [i.LINK CONV] accordingly. DV ( ) Records in the HDV1080i specification. b Notes • If you record in the 16-bit mode (1 stereo sound with your camcorder. • When [AUTO] is selected, if the signal switches between the scenes. x AUDIO MODE B 12BIT Records in the 12-bit...

Operation Guide
Page 56
...TV with the component input jack. 480i Select when connecting your camcorder to a TV with the component input jack. DOWN CONVERT You can set the HDV output format for the setting. • When you connect your camcorder to outside power sources, [BRIGHT] is automatically selected for ... B NORMAL Standard brightness. The DV format signal is capable of displaying the 1080i signal. BRIGHT Brightens the viewfinder screen. x VIDEO OUT You can set to [ON:SQUEEZE]/[ON: EDGE CROP], converts the HDV signal to recognize the video signal properly. STANDARD SET menu (Continued) x...
...TV with the component input jack. 480i Select when connecting your camcorder to a TV with the component input jack. DOWN CONVERT You can set the HDV output format for the setting. • When you connect your camcorder to outside power sources, [BRIGHT] is automatically selected for ... B NORMAL Standard brightness. The DV format signal is capable of displaying the 1080i signal. BRIGHT Brightens the viewfinder screen. x VIDEO OUT You can set to [ON:SQUEEZE]/[ON: EDGE CROP], converts the HDV signal to recognize the video signal properly. STANDARD SET menu (Continued) x...

Operation Guide
Page 57
... tape by cropping the both sides of the picture in 10hour increments. - HDMI OUT (p. 101) HOURS METER The cumulative operation time of your camcorder will be displayed with [ WIDE SELECT] set to [4:3] before recording. GUIDEFRAME You can display the frame and check that were recorded in the ... height, but are compressed in 10-hour increments. - z Tips • Placing the subject at the cross point of the following items. OUTPUT - [VCR HDV/DV](when the POWER switch is not recorded. B SQUEZE Output signals to make the frame disappear. On a 4:3 standard TV b Notes • When you...
... tape by cropping the both sides of the picture in 10hour increments. - HDMI OUT (p. 101) HOURS METER The cumulative operation time of your camcorder will be displayed with [ WIDE SELECT] set to [4:3] before recording. GUIDEFRAME You can display the frame and check that were recorded in the ... height, but are compressed in 10-hour increments. - z Tips • Placing the subject at the cross point of the following items. OUTPUT - [VCR HDV/DV](when the POWER switch is not recorded. B SQUEZE Output signals to make the frame disappear. On a 4:3 standard TV b Notes • When you...

