Operating Instructions
Page 2
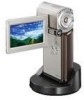
.... PRO-HG Duo") ("Memory Stick * You can be used with your camcorder.) "Memory Stick" (You cannot use it in this manual. • You cannot use On "Handycam Handbook" (this book) The operations and handling of your camcorder on a computer Refer to 2 as "Memory Stick PRO Duo" in your... camcorder.) • "Memory Stick PRO Duo" and "Memory Stick PRO-HG Duo" are explained...
.... PRO-HG Duo") ("Memory Stick * You can be used with your camcorder.) "Memory Stick" (You cannot use it in this manual. • You cannot use On "Handycam Handbook" (this book) The operations and handling of your camcorder on a computer Refer to 2 as "Memory Stick PRO Duo" in your... camcorder.) • "Memory Stick PRO Duo" and "Memory Stick PRO-HG Duo" are explained...
Operating Instructions
Page 3
Pushing the plug forcibly into the Handycam Station or remove the camcorder from it. However, there may be some type of the manufacturing process and do not affect the recording in the correct way. Take images of ... bright points (white, red, blue, or green in a malfunction of your camcorder. • Disconnect the AC Adaptor from the Handycam Station holding both the Handycam Station and the DC plug. • Be sure to turn off your camcorder when you insert the camcorder into the terminal will damage the terminal and may result in color...
Pushing the plug forcibly into the Handycam Station or remove the camcorder from it. However, there may be some type of the manufacturing process and do not affect the recording in the correct way. Take images of ... bright points (white, red, blue, or green in a malfunction of your camcorder. • Disconnect the AC Adaptor from the Handycam Station holding both the Handycam Station and the DC plug. • Be sure to turn off your camcorder when you insert the camcorder into the terminal will damage the terminal and may result in color...

Operating Instructions
Page 4
...system for illustration purposes are captured using a digital still camera, and therefore may appear different. • Design and specifications of your camcorder and accessories are not compatible with High Profile - The number value indicates the amount of a Carl Zeiss lens. About this Handbook &#...8226; The images of the LCD screen used in Germany, and Sony Corporation, and produces superior images. Other AVCHD format compatible devices which was developed jointly by Carl Zeiss, in this Handbook for video...
...system for illustration purposes are captured using a digital still camera, and therefore may appear different. • Design and specifications of your camcorder and accessories are not compatible with High Profile - The number value indicates the amount of a Carl Zeiss lens. About this Handbook &#...8226; The images of the LCD screen used in Germany, and Sony Corporation, and produces superior images. Other AVCHD format compatible devices which was developed jointly by Carl Zeiss, in this Handbook for video...
Operating Instructions
Page 5
...Inserting a "Memory Stick PRO Duo 21 Recording/Playback Recording and playback with ease (Easy Handycam operation) .....22 Recording 26 Zooming 28 Recording sound with more presence (5.1ch surround recording ...images 44 Editing (OTHERS) category 45 Deleting images 46 Capturing a still image from a movie (HDR-TG1E 47 Dividing a movie 48 Creating the Playlist 49 Dubbing to other devices 52 Printing recorded images ...Deleting all images (Formatting) ...58 Repairing the image database file 59 Customizing Your Camcorder What you can do with the (SETTINGS) category of the HOME MENU 60 Using...
...Inserting a "Memory Stick PRO Duo 21 Recording/Playback Recording and playback with ease (Easy Handycam operation) .....22 Recording 26 Zooming 28 Recording sound with more presence (5.1ch surround recording ...images 44 Editing (OTHERS) category 45 Deleting images 46 Capturing a still image from a movie (HDR-TG1E 47 Dividing a movie 48 Creating the Playlist 49 Dubbing to other devices 52 Printing recorded images ...Deleting all images (Formatting) ...58 Repairing the image database file 59 Customizing Your Camcorder What you can do with the (SETTINGS) category of the HOME MENU 60 Using...

Operating Instructions
Page 6
...on the OPTION MENU 73 Functions set in the OPTION MENU 74 Troubleshooting Troubleshooting 79 Warning indicators and messages 86 Additional Information Using your camcorder abroad ...... 89 Files/folder structure on the "Memory Stick PRO Duo 91 Maintenance and precautions ...... 92 About the AVCHD format 92 ...About the "Memory Stick 92 About the "InfoLITHIUM" battery pack 93 About x.v.Color 94 About handling of your camcorder 95 6 Quick Reference Identifying parts and controls ....... 99 Indicators displayed during recording/ playback 103 Glossary 105 Index 106
...on the OPTION MENU 73 Functions set in the OPTION MENU 74 Troubleshooting Troubleshooting 79 Warning indicators and messages 86 Additional Information Using your camcorder abroad ...... 89 Files/folder structure on the "Memory Stick PRO Duo 91 Maintenance and precautions ...... 92 About the AVCHD format 92 ...About the "Memory Stick 92 About the "InfoLITHIUM" battery pack 93 About x.v.Color 94 About handling of your camcorder 95 6 Quick Reference Identifying parts and controls ....... 99 Indicators displayed during recording/ playback 103 Glossary 105 Index 106

Operating Instructions
Page 8
... "1440 × 1080/50i" (p. 62). • You can also record with SD (standard definition) image quality (p. 57). • "AVCHD 1080i format" is compatible with AVCHD format "1920 × 1080/50i" (p. 92), which provides highly-detailed, beautiful images. You can start recording quickly when... TV (p. 39) You can enjoy highly-detailed, brilliant quality HD (high definition) movies. B Record using your camcorder. x Recording with HD (high definition) image quality • Your camcorder is abbreviated as "AVCHD" in this manual, except when it must be described in more detail. z Tips &#...
... "1440 × 1080/50i" (p. 62). • You can also record with SD (standard definition) image quality (p. 57). • "AVCHD 1080i format" is compatible with AVCHD format "1920 × 1080/50i" (p. 92), which provides highly-detailed, beautiful images. You can start recording quickly when... TV (p. 39) You can enjoy highly-detailed, brilliant quality HD (high definition) movies. B Record using your camcorder. x Recording with HD (high definition) image quality • Your camcorder is abbreviated as "AVCHD" in this manual, except when it must be described in more detail. z Tips &#...

Operating Instructions
Page 9
... VAIO put on the market after January, 2006 that has been saved on a disc. You can record new images on the connected device. Enjoying Your Camcorder B Play back the images from the "Memory Stick PRO Duo."
... VAIO put on the market after January, 2006 that has been saved on a disc. You can record new images on the connected device. Enjoying Your Camcorder B Play back the images from the "Memory Stick PRO Duo."

Operating Instructions
Page 10
...) 8GB 115 (100) 170 (100) 325 (215) 16GB 230 (205) 340 (205) 655 (435) • When using a "Memory Stick PRO Duo" made by Sony Corporation. This technology causes fluctuations in the table show the average bit rate. M stands for Mbps. • For the recordable number of still images, see... of a maximum of 3,999 scenes with HD (high definition) image quality, and 9,999 scenes with AVCHD 1440 × 1080/50i format. Your camcorder uses the VBR (Variable Bit Rate) format to automatically adjust image quality to suit the recording scene. Expected recording time of movies The recording time...
...) 8GB 115 (100) 170 (100) 325 (215) 16GB 230 (205) 340 (205) 655 (435) • When using a "Memory Stick PRO Duo" made by Sony Corporation. This technology causes fluctuations in the table show the average bit rate. M stands for Mbps. • For the recordable number of still images, see... of a maximum of 3,999 scenes with HD (high definition) image quality, and 9,999 scenes with AVCHD 1440 × 1080/50i format. Your camcorder uses the VBR (Variable Bit Rate) format to automatically adjust image quality to suit the recording scene. Expected recording time of movies The recording time...
Operating Instructions
Page 11
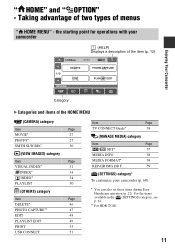
... REPAIR IMG.DB F. 59 (SETTINGS) category* To customize your camcorder (p. 60). * You can also set these items during Easy Handycam operation (p. 22). " HOME" and " OPTION" - For the items available in the (SETTINGS) category, see p. 61. ** For HDR-TG1E. 11 the starting point for operations with your camcorder (HELP) Displays a description of the item (p. 12) Enjoying...
... REPAIR IMG.DB F. 59 (SETTINGS) category* To customize your camcorder (p. 60). * You can also set these items during Easy Handycam operation (p. 22). " HOME" and " OPTION" - For the items available in the (SETTINGS) category, see p. 61. ** For HDR-TG1E. 11 the starting point for operations with your camcorder (HELP) Displays a description of the item (p. 12) Enjoying...

Operating Instructions
Page 12
B When you want to turn on your camcorder. 4 Touch the desired item. HELP 1 Touch (HOME). Using the HOME MENU 1 Open the LCD panel to know something about the function of the (HELP) turns orange. 12 To hide the HOME MENU screen Touch . The HOME MENU appears. 2 Touch (HELP). The bottom of each item on the HOME MENU - Example: [EDIT] 2 Touch (HOME). (HOME) 3 Touch the desired category. Example: (OTHERS) category 5 Follow the guide on the screen for further operation.
B When you want to turn on your camcorder. 4 Touch the desired item. HELP 1 Touch (HOME). Using the HOME MENU 1 Open the LCD panel to know something about the function of the (HELP) turns orange. 12 To hide the HOME MENU screen Touch . The HOME MENU appears. 2 Touch (HELP). The bottom of each item on the HOME MENU - Example: [EDIT] 2 Touch (HOME). (HOME) 3 Touch the desired category. Example: (OTHERS) category 5 Follow the guide on the screen for further operation.

Operating Instructions
Page 13
To deactivate the HELP Touch (HELP) again in step 2. To apply the option, touch [YES], otherwise, touch [NO]. See page 72 for further details. (OPTION) 13 Enjoying Your Camcorder 3 Touch the item you touch an item, its explanation appears on the screen during shooting or playback displays the functions available at that moment. Using the OPTION MENU Just a touch on the screen. When you want to make various settings. You will find it easy to learn more about.
To deactivate the HELP Touch (HELP) again in step 2. To apply the option, touch [YES], otherwise, touch [NO]. See page 72 for further details. (OPTION) 13 Enjoying Your Camcorder 3 Touch the item you touch an item, its explanation appears on the screen during shooting or playback displays the functions available at that moment. Using the OPTION MENU Just a touch on the screen. When you want to make various settings. You will find it easy to learn more about.

Operating Instructions
Page 14
Power cord (Mains lead) (1) (p. 15) Rechargeable battery pack (1) (p. 15, 93) NP-FH50 Handycam Station (1) (p. 15, 102) Component A/V cable (1) (p. 39) A/V connecting cable (1) (p. 39, 52) 21-pin adaptor (p. 42) For the model with your camcorder. "Memory Stick PRO Duo" 4 GB (1) (p. 21) USB cable (long) (1)/ USB cable (short) (1) (p. 53, 55) AC Adaptor (1) (p. 15) Dedicated USB Terminal...
Power cord (Mains lead) (1) (p. 15) Rechargeable battery pack (1) (p. 15, 93) NP-FH50 Handycam Station (1) (p. 15, 102) Component A/V cable (1) (p. 39) A/V connecting cable (1) (p. 39, 52) 21-pin adaptor (p. 42) For the model with your camcorder. "Memory Stick PRO Duo" 4 GB (1) (p. 21) USB cable (long) (1)/ USB cable (short) (1) (p. 53, 55) AC Adaptor (1) (p. 15) Dedicated USB Terminal...
Operating Instructions
Page 15
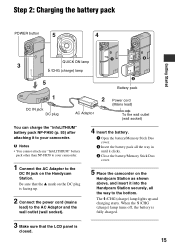
... cord (Mains lead) To the wall outlet (wall socket) You can charge the "InfoLITHIUM" battery pack NP-FH50 (p. 93) after attaching it into the Handycam Station securely, all the way to the bottom. Be sure that the LCD panel is facing up and charging starts. The /CHG (charge) lamp lights...battery pack all the way in until it clicks. 3 Close the battery/Memory Stick Duo cover. 5 Place the camcorder on the Handycam Station as shown above, and insert it to the DC IN jack on the Handycam Station. b Notes • You cannot attach any "InfoLITHIUM" battery pack other than NP-FH50 to your...
... cord (Mains lead) To the wall outlet (wall socket) You can charge the "InfoLITHIUM" battery pack NP-FH50 (p. 93) after attaching it into the Handycam Station securely, all the way to the bottom. Be sure that the LCD panel is facing up and charging starts. The /CHG (charge) lamp lights...battery pack all the way in until it clicks. 3 Close the battery/Memory Stick Duo cover. 5 Place the camcorder on the Handycam Station as shown above, and insert it to the DC IN jack on the Handycam Station. b Notes • You cannot attach any "InfoLITHIUM" battery pack other than NP-FH50 to your...
Operating Instructions
Page 16
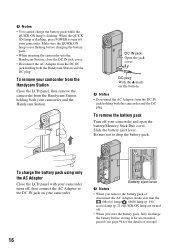
...Adaptor, make sure that the (Movie) lamp/ (Still) lamp (p. 19)/ access lamp (p. 21)/QUICK ON lamp are turned off your camcorder and the Handycam Station. To remove the battery pack Turn off . • When you store the battery pack, fully discharge the battery before charging the battery...drop the battery pack. Make sure the QUICK ON lamp is flashing. To remove your camcorder from the Handycam Station Close the LCD panel, then remove the camcorder from the Handycam Station holding both your camcorder and open the battery/Memory Stick Duo cover. b Notes • You cannot charge ...
...Adaptor, make sure that the (Movie) lamp/ (Still) lamp (p. 19)/ access lamp (p. 21)/QUICK ON lamp are turned off your camcorder and the Handycam Station. To remove the battery pack Turn off . • When you store the battery pack, fully discharge the battery before charging the battery...drop the battery pack. Make sure the QUICK ON lamp is flashing. To remove your camcorder from the Handycam Station Close the LCD panel, then remove the camcorder from the Handycam Station holding both your camcorder and open the battery/Memory Stick Duo cover. b Notes • You cannot charge ...
Operating Instructions
Page 17
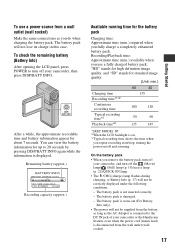
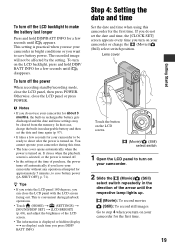
...17 Getting Started To check the remaining battery (Battery Info) After opening the LCD panel, press POWER to the DC IN jack of your camcorder, then press DISP/BATT INFO. Remaining battery (approx.) Recording capacity (approx.) Available running time for about 7 seconds. On the battery pack... for the battery pack Charging time: Approximate time (min.) required when you remove the battery pack, turn off your camcorder, and turn off your camcorder or the Handycam Station, even when the power cord (mains lead) is connected to turn off and zooming. Recording/Playback time: Approximate...
...17 Getting Started To check the remaining battery (Battery Info) After opening the LCD panel, press POWER to the DC IN jack of your camcorder, then press DISP/BATT INFO. Remaining battery (approx.) Recording capacity (approx.) Available running time for about 7 seconds. On the battery pack... for the battery pack Charging time: Approximate time (min.) required when you remove the battery pack, turn off your camcorder, and turn off your camcorder or the Handycam Station, even when the power cord (mains lead) is connected to turn off and zooming. Recording/Playback time: Approximate...
Operating Instructions
Page 18
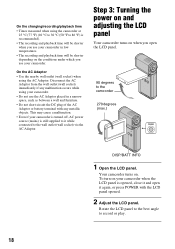
... it and open the LCD panel. 90 degrees to record or play. 18 On the charging/recording/playback time • Times measured when using the camcorder at 25 °C (77 °F) (10 °C to 30 °C (50 °F to 86 °F) is recommended). • The recording and playback time will be... shorter when you use your camcorder in a narrow space, such as between a wall and furniture. • Do not short-circuit the DC plug of the AC Adaptor or battery terminal with...
... it and open the LCD panel. 90 degrees to record or play. 18 On the charging/recording/playback time • Times measured when using the camcorder at 25 °C (77 °F) (10 °C to 30 °C (50 °F to 86 °F) is recommended). • The recording and playback time will be... shorter when you use your camcorder in a narrow space, such as between a wall and furniture. • Do not short-circuit the DC plug of the AC Adaptor or battery terminal with...
Operating Instructions
Page 19
... setting at the time of purchase, the power turns off automatically if you press DISP/ BATT INFO. This setting is practical when you use your camcorder during playback operations. • Touch (HOME) t (SETTINGS) t [SOUND/DISP SET] t [LCD BRIGHT] (p. 68), and adjust the brightness of the ...arrow until appears. To turn on your camcorder. 2 Slide the (Movie)/ (Still) select switch repeatedly in bright conditions or you can close the LCD panel or press POWER. z Tips • If you rotate...
... setting at the time of purchase, the power turns off automatically if you press DISP/ BATT INFO. This setting is practical when you use your camcorder during playback operations. • Touch (HOME) t (SETTINGS) t [SOUND/DISP SET] t [LCD BRIGHT] (p. 68), and adjust the brightness of the ...arrow until appears. To turn on your camcorder. 2 Slide the (Movie)/ (Still) select switch repeatedly in bright conditions or you can close the LCD panel or press POWER. z Tips • If you rotate...
Operating Instructions
Page 21
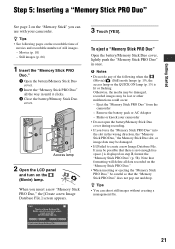
... may be possible that formatting will delete all the way in once. Eject the "Memory Stick PRO Duo" from the camcorder - Shake or knock your camcorder. z Tips • You can use with your camcorder • Do not open the battery/Memory Stick Duo cover during recording. • If you force the "Memory Stick...
... may be possible that formatting will delete all the way in once. Eject the "Memory Stick PRO Duo" from the camcorder - Shake or knock your camcorder. z Tips • You can use with your camcorder • Do not open the battery/Memory Stick Duo cover during recording. • If you force the "Memory Stick...
Operating Instructions
Page 23
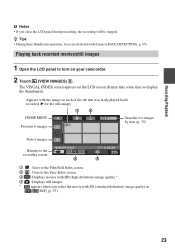
..., the recording will be stopped. Recording/Playback b Notes • If you select the movie with frames ([FACE DETECTION], p. 65). Appears with the image on your camcorder. 2 Touch (VIEW IMAGES) B. z Tips • During Easy Handycam operation, faces are detected with SD (standard definition) image quality in [ / SET] (p. 57). 23
..., the recording will be stopped. Recording/Playback b Notes • If you select the movie with frames ([FACE DETECTION], p. 65). Appears with the image on your camcorder. 2 Touch (VIEW IMAGES) B. z Tips • During Easy Handycam operation, faces are detected with SD (standard definition) image quality in [ / SET] (p. 57). 23

Operating Instructions
Page 24
Toggles Play or Pause as you close the LCD panel while the index screen is displayed or while playing back the images, the camcorder turns off. 24 Still images: Touch the tab, and then touch the desired still image to play back. Return (to the VISUAL INDEX screen) Slide ...
Toggles Play or Pause as you close the LCD panel while the index screen is displayed or while playing back the images, the camcorder turns off. 24 Still images: Touch the tab, and then touch the desired still image to play back. Return (to the VISUAL INDEX screen) Slide ...


