Operating Guide
Page 5
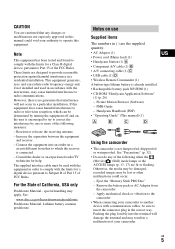
For the State of your camcorder. Notes on use Supplied items The numbers in ( ) are the supplied quantity. • AC Adaptor (1) • Power cord (Mains lead) (1) • Handycam Station (1) A • Component A/V cable (1) B • A/V connecting cable (1) C • USB cable (1) D ... of California, USA only Perchlorate Material - Picture Motion Browser (Software) - Handycam Handbook (PDF) • "Operating Guide" (This manual) (1) US A B C D Using the camcorder • The camcorder is already installed. • Rechargeable battery pack NP-FH60 (1) • CD-ROM...
For the State of your camcorder. Notes on use Supplied items The numbers in ( ) are the supplied quantity. • AC Adaptor (1) • Power cord (Mains lead) (1) • Handycam Station (1) A • Component A/V cable (1) B • A/V connecting cable (1) C • USB cable (1) D ... of California, USA only Perchlorate Material - Picture Motion Browser (Software) - Handycam Handbook (PDF) • "Operating Guide" (This manual) (1) US A B C D Using the camcorder • The camcorder is already installed. • Rechargeable battery pack NP-FH60 (1) • CD-ROM...
Operating Guide
Page 6
... then perform [MEDIA FORMAT]*. • Fasten the grip belt and hold your camcorder attached to the Handycam Station. In this camcorder. However, there may not be stopped. • When the temperature of the camcorder becomes extremely high or extremely low, you repeat recording/deleting images for effective use... rotate it is more than 3,000 meters (9,800 feet). Do not connect the cables to both the Handycam Station and your camcorder. • Do not apply shock or vibration to your camcorder may not be recognized, or recording may be possible. • Do not use . If the drop...
... then perform [MEDIA FORMAT]*. • Fasten the grip belt and hold your camcorder attached to the Handycam Station. In this camcorder. However, there may not be stopped. • When the temperature of the camcorder becomes extremely high or extremely low, you repeat recording/deleting images for effective use... rotate it is more than 3,000 meters (9,800 feet). Do not connect the cables to both the Handycam Station and your camcorder. • Do not apply shock or vibration to your camcorder may not be recognized, or recording may be possible. • Do not use . If the drop...
Operating Guide
Page 7
... recording or playback is connected to a computer • Do not try to format the hard disk of the camcorder using a computer. When the camcorder is not possible due to "Handycam Handbook" (PDF) and "PMB Guide." About language setting • The on the country/region. Change the screen... captured using your data. On playing back recorded images on the operating system of the computer. * Refer also to a malfunction of the camcorder, recording media, etc. • TV color systems differ depending on -screen displays in this manual. Therefore, you cannot play back images ...
... recording or playback is connected to a computer • Do not try to format the hard disk of the camcorder using a computer. When the camcorder is not possible due to "Handycam Handbook" (PDF) and "PMB Guide." About language setting • The on the country/region. Change the screen... captured using your data. On playing back recorded images on the operating system of the computer. * Refer also to a malfunction of the camcorder, recording media, etc. • TV color systems differ depending on -screen displays in this manual. Therefore, you cannot play back images ...
Operating Guide
Page 9
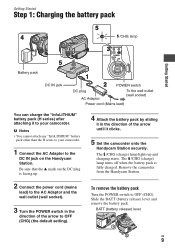
...outlet (wall socket) Power cord (Mains lead) You can charge the "InfoLITHIUM" battery pack (H series) after attaching it clicks. 5 Set the camcorder onto the Handycam Station securely. The /CHG (charge) lamp turns off when the battery pack is facing up and charging starts. b Notes • You cannot...by sliding it in the direction of the arrow until it to your camcorder. 1 Connect the AC Adaptor to your camcorder. Slide the BATT (battery release) lever and remove the battery pack. Remove the camcorder from the Handycam Station. 2 Connect the power cord (mains lead) to the AC ...
...outlet (wall socket) Power cord (Mains lead) You can charge the "InfoLITHIUM" battery pack (H series) after attaching it clicks. 5 Set the camcorder onto the Handycam Station securely. The /CHG (charge) lamp turns off when the battery pack is facing up and charging starts. b Notes • You cannot...by sliding it in the direction of the arrow until it to your camcorder. 1 Connect the AC Adaptor to your camcorder. Slide the BATT (battery release) lever and remove the battery pack. Remove the camcorder from the Handycam Station. 2 Connect the power cord (mains lead) to the AC ...
Operating Guide
Page 10
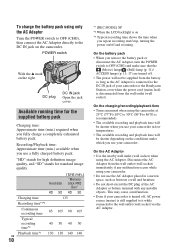
...: Approximate time (min.) required when you fully charge a completely exhausted battery pack. On the charging/recording/playback time • Times measured when using the camcorder at 25°C (77°F) (10°C to 30°C (50°F to the DC IN jack on the conditions under which you use...will be supplied from the battery as long as between a wall and furniture. • Do not short-circuit the DC plug of your camcorder or the Handycam Station, even when the power cord (mains lead) is disconnected from the wall outlet (wall socket) immediately if any metallic objects. To ...
...: Approximate time (min.) required when you fully charge a completely exhausted battery pack. On the charging/recording/playback time • Times measured when using the camcorder at 25°C (77°F) (10°C to 30°C (50°F to the DC IN jack on the conditions under which you use...will be supplied from the battery as long as between a wall and furniture. • Do not short-circuit the DC plug of your camcorder or the Handycam Station, even when the power cord (mains lead) is disconnected from the wall outlet (wall socket) immediately if any metallic objects. To ...
Operating Guide
Page 11
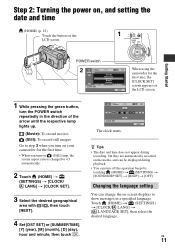
... the arrow until the respective lamp lights up. (Movie): To record movies (Still): To record still images Go to step 3 when you turn on your camcorder for the first time. • When you turn off the operation beeps by touching (HOME) t (SETTINGS) t [SOUND/DISP SET] t [BEEP] t [OFF]. US 11 ... Started POWER switch 60min STBY AREA SET Chicago Mexico City New York Bogota Santiago JAN 1 2008 CLOCK SET 12:00:00AM NEXT When using the camcorder for the first time, the [CLOCK SET] screen appears on the LCD screen. 1 While pressing the green button, turn the POWER switch repeatedly in...
... the arrow until the respective lamp lights up. (Movie): To record movies (Still): To record still images Go to step 3 when you turn on your camcorder for the first time. • When you turn off the operation beeps by touching (HOME) t (SETTINGS) t [SOUND/DISP SET] t [BEEP] t [OFF]. US 11 ... Started POWER switch 60min STBY AREA SET Chicago Mexico City New York Bogota Santiago JAN 1 2008 CLOCK SET 12:00:00AM NEXT When using the camcorder for the first time, the [CLOCK SET] screen appears on the LCD screen. 1 While pressing the green button, turn the POWER switch repeatedly in...
Operating Guide
Page 12
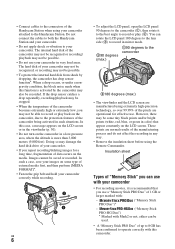
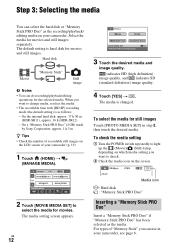
...editing operations for movies and still images separately. On the internal hard disk: approx. 17 h 50 m (HDR-SR11), approx. 36 h (HDR-SR12) - The media is hard disk for still images Touch [PHOTO MEDIA SET] in your camcorder, see page 6. US 12 Media icon : Hard disk : "Memory Stick PRO Duo" Inserting a "... for movies. When you can select the hard disk or "Memory Stick PRO Duo" as the media. On a "Memory Stick PRO Duo" (4 GB) made by Sony Corporation: approx. 1 h 5 m z Tips • Check the number of recordable still images on the LCD screen of "Memory Stick" you want to check....
...editing operations for movies and still images separately. On the internal hard disk: approx. 17 h 50 m (HDR-SR11), approx. 36 h (HDR-SR12) - The media is hard disk for still images Touch [PHOTO MEDIA SET] in your camcorder, see page 6. US 12 Media icon : Hard disk : "Memory Stick PRO Duo" Inserting a "... for movies. When you can select the hard disk or "Memory Stick PRO Duo" as the media. On a "Memory Stick PRO Duo" (4 GB) made by Sony Corporation: approx. 1 h 5 m z Tips • Check the number of recordable still images on the LCD screen of "Memory Stick" you want to check....
Operating Guide
Page 15
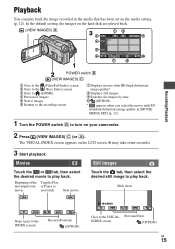
... some seconds). 3 Start playback. Playback You can play back the image recorded in [MOVIE MEDIA SET] (p. 12). 1 Turn the POWER switch B to turn on your camcorder. 2 Press (VIEW IMAGES) C (or A). In the default setting, the images on the hard disk are played back. (VIEW IMAGES) A Recording/Playback POWER switch B (VIEW IMAGES...
... some seconds). 3 Start playback. Playback You can play back the image recorded in [MOVIE MEDIA SET] (p. 12). 1 Turn the POWER switch B to turn on your camcorder. 2 Press (VIEW IMAGES) C (or A). In the default setting, the images on the hard disk are played back. (VIEW IMAGES) A Recording/Playback POWER switch B (VIEW IMAGES...
Operating Guide
Page 16
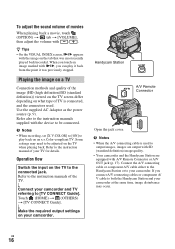
... is connected, and the connectors used to output images, images are output with SD (standard definition) image quality. • Your camcorder and the Handycam Station are equipped with i/B, you connect A/V connecting cables or component A/ V cable to be connected. US 16 r Make the ...required output settings on the tab that was previously stopped. r Connect your camcorder and TV referring to your camcorder. Handycam Station A/V Remote Connector Open the jack cover. Playing the image on a TV Connection methods and quality of the image...
... is connected, and the connectors used to output images, images are output with SD (standard definition) image quality. • Your camcorder and the Handycam Station are equipped with i/B, you connect A/V connecting cables or component A/ V cable to be connected. US 16 r Make the ...required output settings on the tab that was previously stopped. r Connect your camcorder and TV referring to your camcorder. Handycam Station A/V Remote Connector Open the jack cover. Playing the image on a TV Connection methods and quality of the image...

Operating Guide
Page 17
... image is writing/reading data. 7 Hook for a shoulder belt Attach the shoulder belt (optional). Your camcorder returns to start recording next time. wa ws wd wf wg wj wh wk wl qj Handycam Station wg qs qa Recording/Playback 1 Power zoom lever Move the power zoom lever slightly for a faster... zoom. The viewfinder is useful when you do not operate your camcorder for a certain period during sleep mode. qd Speaker qf ...
... image is writing/reading data. 7 Hook for a shoulder belt Attach the shoulder belt (optional). Your camcorder returns to start recording next time. wa ws wd wf wg wj wh wk wl qj Handycam Station wg qs qa Recording/Playback 1 Power zoom lever Move the power zoom lever slightly for a faster... zoom. The viewfinder is useful when you do not operate your camcorder for a certain period during sleep mode. qd Speaker qf ...
Operating Guide
Page 18
...or off as a video light, a flash, or a microphone. for adjusting the exposure for easy recording/playback. wg Interface connector Connect your camcorder. qg Zoom buttons Press for zooming in the default setting. wd Remote sensor/Infrared port Receives the signal from about 1.1 to a computer, ...(p. 28). When you press while the POWER switch is converted to OFF (CHG), you touched will flash automatically depending on your camcorder and the Handycam Station. wa Built-in microphone Sound picked up in the center of the settings are set to 5.1ch surround sound and recorded...
...or off as a video light, a flash, or a microphone. for adjusting the exposure for easy recording/playback. wg Interface connector Connect your camcorder. qg Zoom buttons Press for zooming in the default setting. wd Remote sensor/Infrared port Receives the signal from about 1.1 to a computer, ...(p. 28). When you press while the POWER switch is converted to OFF (CHG), you touched will flash automatically depending on your camcorder and the Handycam Station. wa Built-in microphone Sound picked up in the center of the settings are set to 5.1ch surround sound and recorded...
Operating Guide
Page 20
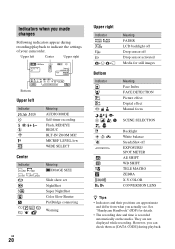
... Slide show set NightShot Super NightShot Color Slow Shutter PictBridge connecting Warning US 20 Upper right Indicator Bottom Indicator 9 . See "Handycam Handbook" (PDF) for still images Meaning Face Index FACE DETECTION Picture effect Digital effect Manual focus SCENE SELECTION Backlight White balance SteadyShot...what you actually see. Indicators when you can check them as [DATA CODE] during recording/playback to indicate the settings of your camcorder. n Meaning FADER LCD backlight off Drop sensor off Drop sensor activated Media for details. • The recording date and time ...
... Slide show set NightShot Super NightShot Color Slow Shutter PictBridge connecting Warning US 20 Upper right Indicator Bottom Indicator 9 . See "Handycam Handbook" (PDF) for still images Meaning Face Index FACE DETECTION Picture effect Digital effect Manual focus SCENE SELECTION Backlight White balance SteadyShot...what you actually see. Indicators when you can check them as [DATA CODE] during recording/playback to indicate the settings of your camcorder. n Meaning FADER LCD backlight off Drop sensor off Drop sensor activated Media for details. • The recording date and time ...
Operating Guide
Page 24
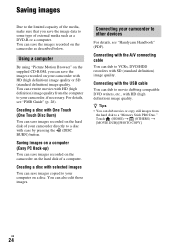
...For details, see "Handycam Handbook" (PDF). You can save images recorded on the camcorder on a computer (Easy PC Back-up) You can also edit those images. Saving images on the hard disk of a computer. Using a computer By using "Picture Motion Browser" on a disc. Connecting your camcorder to a "Memory Stick...you save the image data to some type of external media such as described below. z Tips • You can save images recorded on the camcorder as a DVD-R or a computer. You can dub movies or copy still images from the computer to a disc with HD (high definition) ...
...For details, see "Handycam Handbook" (PDF). You can save images recorded on the camcorder on a computer (Easy PC Back-up) You can also edit those images. Saving images on the hard disk of a computer. Using a computer By using "Picture Motion Browser" on a disc. Connecting your camcorder to a "Memory Stick...you save the image data to some type of external media such as described below. z Tips • You can save images recorded on the camcorder as a DVD-R or a computer. You can dub movies or copy still images from the computer to a disc with HD (high definition) ...
Operating Guide
Page 26
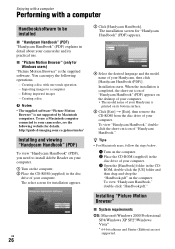
...*/Windows Vista* * 64-bit editions and Starter (Edition) are not supported. http://guide.d-imaging.sony.co.jp/mac/ms/us/ Installing and viewing "Handycam Handbook" (PDF) To view "Handycam Handbook" (PDF), you need to install Adobe Reader on your computer. 1 Turn on its ... x "Picture Motion Browser" (only for installation appears. Creating a disc with a computer Handbook/software to be installed x "Handycam Handbook" (PDF) "Handycam Handbook" (PDF) explains in detail about your camcorder and its bottom surface. 5 Click [Exit] t [Exit], then remove the CD-ROM from the disc drive of your...
...*/Windows Vista* * 64-bit editions and Starter (Edition) are not supported. http://guide.d-imaging.sony.co.jp/mac/ms/us/ Installing and viewing "Handycam Handbook" (PDF) To view "Handycam Handbook" (PDF), you need to install Adobe Reader on your computer. 1 Turn on its ... x "Picture Motion Browser" (only for installation appears. Creating a disc with a computer Handbook/software to be installed x "Handycam Handbook" (PDF) "Handycam Handbook" (PDF) explains in detail about your camcorder and its bottom surface. 5 Click [Exit] t [Exit], then remove the CD-ROM from the disc drive of your...
Operating Guide
Page 27
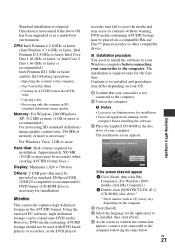
...024 × 768 dots Others: USB port (this must be installed and procedures may differ depending on your OS. 1 Confirm that your camcorder is necessary. x Installation procedure You need to install the software to your Windows computer before installing the software. 3 Place the supplied CD-ROM... enclosed PC software, high definition footage can be used with a computer Contents to be provided as an Administrator for installation) Attention This camcorder captures high definition footage in SD (standard definition) image quality Memory: For Windows 2000/Windows XP: 512 MB or more (1 GB ...
...024 × 768 dots Others: USB port (this must be installed and procedures may differ depending on your OS. 1 Confirm that your camcorder is necessary. x Installation procedure You need to install the software to your Windows computer before installing the software. 3 Place the supplied CD-ROM... enclosed PC software, high definition footage can be used with a computer Contents to be provided as an Administrator for installation) Attention This camcorder captures high definition footage in SD (standard definition) image quality Memory: For Windows 2000/Windows XP: 512 MB or more (1 GB ...
Operating Guide
Page 28
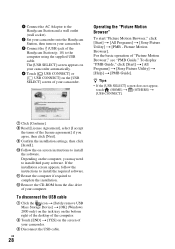
...on your camcorder automatically. 4 Touch [ USB CONNECT] or [ USB CONNECT] on the [USB SELECT] screen of the Handycam Station (p. 18) to the computer using the supplied USB cable. Operating the "Picture Motion Browser" To start "Picture Motion Browser," click [Start] t [All Programs] t [Sony Picture Utility... t [YES] on the screen of your camcorder. 3 Connect the (USB) jack of your computer. 1 Connect the AC Adaptor to the Handycam Station and a wall outlet (wall socket). 2 Set your camcorder onto the Handycam Station, then turn on your camcorder. 3 Disconnect the USB cable. Depending on ...
...on your camcorder automatically. 4 Touch [ USB CONNECT] or [ USB CONNECT] on the [USB SELECT] screen of the Handycam Station (p. 18) to the computer using the supplied USB cable. Operating the "Picture Motion Browser" To start "Picture Motion Browser," click [Start] t [All Programs] t [Sony Picture Utility... t [YES] on the screen of your camcorder. 3 Connect the (USB) jack of your computer. 1 Connect the AC Adaptor to the Handycam Station and a wall outlet (wall socket). 2 Set your camcorder onto the Handycam Station, then turn on your camcorder. 3 Disconnect the USB cable. Depending on ...
Operating Guide
Page 29
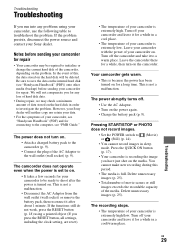
... • During repair, we may be ready to shoot after about 1 minute. Notes before sending your camcorder for repair • Your camcorder may check a minimum amount of your camcorder, see "Handycam Handbook" (PDF) and for a while in sleep mode. In the event of this period. •...a cool place. • The temperature of your Sony dealer. Pressing START/STOP or PHOTO does not record images. • Set the POWER switch to the computer, see "Handycam Handbook" (PDF)) onto other media (backup) before sending your camcorder and leave it after the power is extremely low....
... • During repair, we may be ready to shoot after about 1 minute. Notes before sending your camcorder for repair • Your camcorder may check a minimum amount of your camcorder, see "Handycam Handbook" (PDF) and for a while in sleep mode. In the event of this period. •...a cool place. • The temperature of your Sony dealer. Pressing START/STOP or PHOTO does not record images. • Set the POWER switch to the computer, see "Handycam Handbook" (PDF)) onto other media (backup) before sending your camcorder and leave it after the power is extremely low....
Operating Guide
Page 30
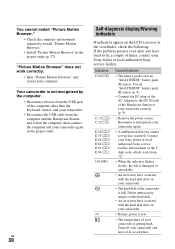
... or in the proper order (p. 27). Turn off your computer. Contact your camcorder again in your camcorder. • The hard disk of the Handycam Station or your camcorder is low. • The temperature of times, contact your Sony dealer or local authorized Sony service facility. US 30 Self-diagnosis display/Warning indicators If indicators appear on...
... or in the proper order (p. 27). Turn off your computer. Contact your camcorder again in your camcorder. • The hard disk of the Handycam Station or your camcorder is low. • The temperature of times, contact your Sony dealer or local authorized Sony service facility. US 30 Self-diagnosis display/Warning indicators If indicators appear on...
Operating Guide
Page 31
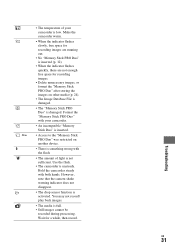
... with both hands. However, note that the camera-shake warning indicator does not disappear. • The drop sensor function is damaged. Make the camcorder warm. • When the indicator flashes slowly, free space for recording images are running out. • No "Memory Stick PRO Duo" is... flash. • The amount of light is not sufficient. Troubleshooting US 31 Format the "Memory Stick PRO Duo" with your camcorder is low. • The temperature of your camcorder. • An incompatible "Memory Stick Duo" is inserted. - • Access to the "Memory Stick PRO Duo" was...
... with both hands. However, note that the camera-shake warning indicator does not disappear. • The drop sensor function is damaged. Make the camcorder warm. • When the indicator flashes slowly, free space for recording images are running out. • No "Memory Stick PRO Duo" is... flash. • The amount of light is not sufficient. Troubleshooting US 31 Format the "Memory Stick PRO Duo" with your camcorder is low. • The temperature of your camcorder. • An incompatible "Memory Stick Duo" is inserted. - • Access to the "Memory Stick PRO Duo" was...
Operating Guide
Page 32
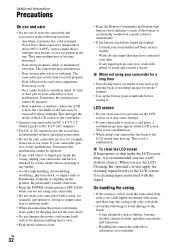
...or in a car parked in a cold place, a residual image may heat up the battery pack completely before operating it . This is soiled, clean the camcorder body with a soft cloth lightly moistened with water, and then wipe the casing with a dry soft cloth. • Avoid the following locations: - Use ... plenty of the lens. • Keep the POWER switch setting to OFF (CHG) when you use or store the camcorder and accessories in your local authorized Sony service facility. - Near windows or outdoors, where the LCD screen, the viewfinder or the lens may not be repaired. - If any solid...
...or in a car parked in a cold place, a residual image may heat up the battery pack completely before operating it . This is soiled, clean the camcorder body with a soft cloth lightly moistened with water, and then wipe the casing with a dry soft cloth. • Avoid the following locations: - Use ... plenty of the lens. • Keep the POWER switch setting to OFF (CHG) when you use or store the camcorder and accessories in your local authorized Sony service facility. - Near windows or outdoors, where the LCD screen, the viewfinder or the lens may not be repaired. - If any solid...


