Operating Instructions
Page 5
... which the receiver is already installed. • Rechargeable battery pack NP-FH60 (1) • CD-ROM "Handycam Application Software" (1) (p. 24) - The internal hard disk of the camcorder may not be recognized or recording/ playback may apply, See www.dtsc.ca.gov/hazardouswaste/perchlorate Perchlorate Material:... on some type of California, USA only Perchlorate Material - Images cannot be sure to your camcorder. • Connect cables to the Handycam Station. In such a case, save your camcorder. • If you may result in such situations. Doing so may damage the hard disk...
... which the receiver is already installed. • Rechargeable battery pack NP-FH60 (1) • CD-ROM "Handycam Application Software" (1) (p. 24) - The internal hard disk of the camcorder may not be recognized or recording/ playback may apply, See www.dtsc.ca.gov/hazardouswaste/perchlorate Perchlorate Material:... on some type of California, USA only Perchlorate Material - Images cannot be sure to your camcorder. • Connect cables to the Handycam Station. In such a case, save your camcorder. • If you may result in such situations. Doing so may damage the hard disk...
Operating Instructions
Page 6
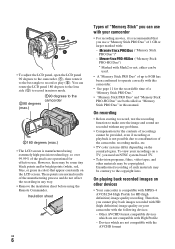
...back images recorded with HD (high definition) image quality on your recordings on the country/region. PRO Duo")* ("Memory Stick - Unauthorized recording of the camcorder, recording media, etc. • TV color systems differ depending on a TV, you need an NTSC system-based TV. • Television programs, ...Stick PRO Duo." • "Memory Stick PRO Duo" and "Memory Stick PRO-HG Duo" are not compatible with : - To view your camcorder with MPEG-4 AVC/H.264 High Profile for the contents of recordings cannot be provided, even if recording or playback is not possible due to a malfunction...
...back images recorded with HD (high definition) image quality on your recordings on the country/region. PRO Duo")* ("Memory Stick - Unauthorized recording of the camcorder, recording media, etc. • TV color systems differ depending on a TV, you need an NTSC system-based TV. • Television programs, ...Stick PRO Duo." • "Memory Stick PRO Duo" and "Memory Stick PRO-HG Duo" are not compatible with : - To view your camcorder with MPEG-4 AVC/H.264 High Profile for the contents of recordings cannot be provided, even if recording or playback is not possible due to a malfunction...
Operating Instructions
Page 7
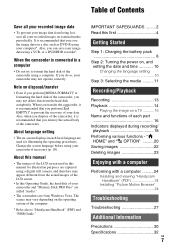
...* Refer also to format the hard disk of the camcorder using a computer. " HOME" and " OPTION" ..........20 Saving images 22 Deleting images 23 Enjoying with a computer Performing with a computer ..........24 Installing and viewing "Handycam Handbook" (PDF 24 Installing "Picture Motion Browser 24 ... data on external media periodically. When you transfer the camcorder, it is recommended that you perform [ EMPTY]* to prevent the recovery of your data. It is connected to a computer • Do not try to "Handycam Handbook" (PDF) and "PMB Guide." About language setting...
...* Refer also to format the hard disk of the camcorder using a computer. " HOME" and " OPTION" ..........20 Saving images 22 Deleting images 23 Enjoying with a computer Performing with a computer ..........24 Installing and viewing "Handycam Handbook" (PDF 24 Installing "Picture Motion Browser 24 ... data on external media periodically. When you transfer the camcorder, it is recommended that you perform [ EMPTY]* to prevent the recovery of your data. It is connected to a computer • Do not try to "Handycam Handbook" (PDF) and "PMB Guide." About language setting...
Operating Instructions
Page 8
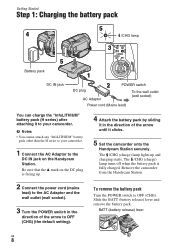
...in the direction of the arrow until it clicks. 5 Set the camcorder onto the Handycam Station securely. b Notes • You cannot attach any "InfoLITHIUM" battery pack other than the H series to your camcorder. Remove the camcorder from the Handycam Station. 2 Connect the power cord (mains lead) to the ... IN jack on the DC plug is fully charged. BATT (battery release) lever US 8 To remove the battery pack Turn the POWER switch to your camcorder. 1 Connect the AC Adaptor to OFF (CHG) (the default setting). Getting Started Step 1: Charging the battery pack 5 4 /CHG lamp 3 5 ...
...in the direction of the arrow until it clicks. 5 Set the camcorder onto the Handycam Station securely. b Notes • You cannot attach any "InfoLITHIUM" battery pack other than the H series to your camcorder. Remove the camcorder from the Handycam Station. 2 Connect the power cord (mains lead) to the ... IN jack on the DC plug is fully charged. BATT (battery release) lever US 8 To remove the battery pack Turn the POWER switch to your camcorder. 1 Connect the AC Adaptor to OFF (CHG) (the default setting). Getting Started Step 1: Charging the battery pack 5 4 /CHG lamp 3 5 ...
Operating Instructions
Page 9
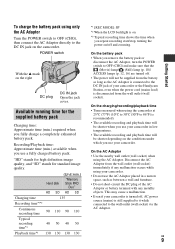
...Recording/Playback time: Approximate time (min.) available when you use a fully charged battery pack. This may cause a malfunction. • Even if your camcorder is turned off, AC power source (mains) is still supplied to it while connected to 86°F) is recommended). • The available recording and ... the AC Adaptor directly to the DC IN jack of the AC Adaptor or battery terminal with any malfunction occurs while using your camcorder or the Handycam Station, even when the power cord (mains lead) is disconnected from the wall outlet (wall socket). On the battery pack •...
...Recording/Playback time: Approximate time (min.) available when you use a fully charged battery pack. This may cause a malfunction. • Even if your camcorder is turned off, AC power source (mains) is still supplied to it while connected to 86°F) is recommended). • The available recording and ... the AC Adaptor directly to the DC IN jack of the AC Adaptor or battery terminal with any malfunction occurs while using your camcorder or the Handycam Station, even when the power cord (mains lead) is disconnected from the wall outlet (wall socket). On the battery pack •...
Operating Instructions
Page 10
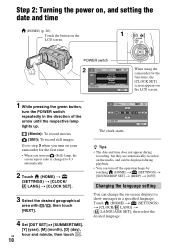
... AREA SET Chicago Mexico City New York Bogota Santiago JAN 1 2008 CLOCK SET 12:00:00AM NEXT When using the camcorder for the first time, the [CLOCK SET] screen appears on your camcorder for the first time. • When you turn off the operation beeps by touching (HOME) t (SETTINGS) t [SOUND/DISP SET...
... AREA SET Chicago Mexico City New York Bogota Santiago JAN 1 2008 CLOCK SET 12:00:00AM NEXT When using the camcorder for the first time, the [CLOCK SET] screen appears on your camcorder for the first time. • When you turn off the operation beeps by touching (HOME) t (SETTINGS) t [SOUND/DISP SET...
Operating Instructions
Page 11
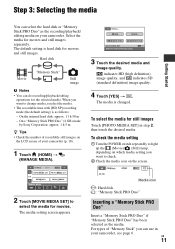
... disk Movie "Memory Stick" Still image b Notes • You can do recording/playback/editing operations for still images Touch [PHOTO MEDIA SET] in your camcorder, see page 6. indicates HD (high definition) image quality, and indicates SD (standard definition) image quality. 4 Touch [YES] t . Media icon :...has been selected as the media. On a "Memory Stick PRO Duo" (4 GB) made by Sony Corporation: approx. 1 h 5 m z Tips • Check the number of recordable still images on your camcorder. To select the media for the selected media. To check the media setting 1 Turn the POWER...
... disk Movie "Memory Stick" Still image b Notes • You can do recording/playback/editing operations for still images Touch [PHOTO MEDIA SET] in your camcorder, see page 6. indicates HD (high definition) image quality, and indicates SD (standard definition) image quality. 4 Touch [YES] t . Media icon :...has been selected as the media. On a "Memory Stick PRO Duo" (4 GB) made by Sony Corporation: approx. 1 h 5 m z Tips • Check the number of recordable still images on your camcorder. To select the media for the selected media. To check the media setting 1 Turn the POWER...
Operating Instructions
Page 14
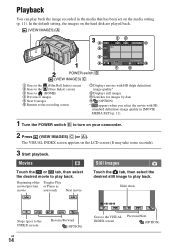
The VISUAL INDEX screen appears on your camcorder. 2 Press (VIEW IMAGES) C (or A). In the default setting, the images on the hard disk are played back. (VIEW IMAGES) A POWER switch B (VIEW IMAGES) C 1 Goes to ...
The VISUAL INDEX screen appears on your camcorder. 2 Press (VIEW IMAGES) C (or A). In the default setting, the images on the hard disk are played back. (VIEW IMAGES) A POWER switch B (VIEW IMAGES) C 1 Goes to ...
Operating Instructions
Page 15
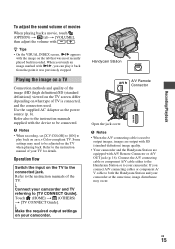
...Switch the input on the TV to the instruction manuals of the TV. Refer to the connected jack. r Connect your camcorder and TV referring to both the Handycam Station and your camcorder. b Notes • When the A/V connecting cable is connected, and the connectors used to output images, images are... output with SD (standard definition) image quality. • Your camcorder and the Handycam Station are equipped with i/B, you can play back on the TV when playing back. US 15 Use the supplied AC Adaptor as the power...
...Switch the input on the TV to the instruction manuals of the TV. Refer to the connected jack. r Connect your camcorder and TV referring to both the Handycam Station and your camcorder. b Notes • When the A/V connecting cable is connected, and the connectors used to output images, images are... output with SD (standard definition) image quality. • Your camcorder and the Handycam Station are equipped with i/B, you can play back on the TV when playing back. US 15 Use the supplied AC Adaptor as the power...
Operating Instructions
Page 16
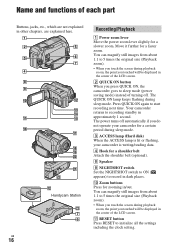
... the NIGHTSHOT switch to ON ( appears) to start recording next time. qa RESET button Press RESET to recording standby in /out. wa ws qs Handycam Station ws 7 6 Recording/Playback 1 Power zoom lever Move the power zoom lever slightly for a faster zoom. The QUICK ON lamp keeps flashing during... sleep mode. 3 ACCESS lamp (Hard disk) When the ACCESS lamp is lit or flashing, your camcorder is writing/reading data. 4 Hook for zooming in approximately 1 second. The power turns off . Move it further for a slower zoom. Press QUICK ON ...
... the NIGHTSHOT switch to ON ( appears) to start recording next time. qa RESET button Press RESET to recording standby in /out. wa ws qs Handycam Station ws 7 6 Recording/Playback 1 Power zoom lever Move the power zoom lever slightly for a faster zoom. The QUICK ON lamp keeps flashing during... sleep mode. 3 ACCESS lamp (Hard disk) When the ACCESS lamp is lit or flashing, your camcorder is writing/reading data. 4 Hook for zooming in approximately 1 second. The power turns off . Move it further for a slower zoom. Press QUICK ON ...
Operating Instructions
Page 17
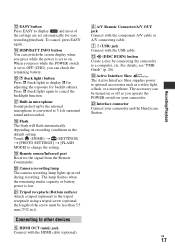
... the signal from the Remote Commander. for adjusting the exposure for easy recording/playback. ws Interface connector Connect your camcorder. qk Flash The flash will flash automatically depending on your camcorder and the Handycam Station. Press . (back light) again to change the setting. The lamp flashes when the remaining media capacity or battery...
... the signal from the Remote Commander. for adjusting the exposure for easy recording/playback. ws Interface connector Connect your camcorder. qk Flash The flash will flash automatically depending on your camcorder and the Handycam Station. Press . (back light) again to change the setting. The lamp flashes when the remaining media capacity or battery...
Operating Instructions
Page 19
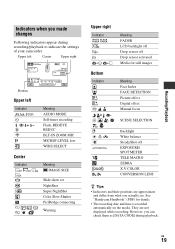
... playback. They are approximate and differ from what you can check them as [DATA CODE] during recording/playback to indicate the settings of your camcorder. US 19 See "Handycam Handbook" (PDF) for still images Meaning Face Index FACE DETECTION Picture effect Digital effect Manual focus SCENE SELECTION Backlight White balance SteadyShot off...
... playback. They are approximate and differ from what you can check them as [DATA CODE] during recording/playback to indicate the settings of your camcorder. US 19 See "Handycam Handbook" (PDF) for still images Meaning Face Index FACE DETECTION Picture effect Digital effect Manual focus SCENE SELECTION Backlight White balance SteadyShot off...
Operating Instructions
Page 22
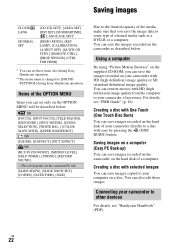
...HD (high definition) image quality or SD (standard definition) image quality. US 22 For details, see "Handycam Handbook" (PDF). You can also edit those images. Items of a computer. Connecting your camcorder, if necessary. Using a computer By using "Picture Motion Browser" on the supplied CD-ROM, you can...with HD (high definition) image quality from the computer to your camcorder to [SOUND SETTINGS] during Easy Handycam operation. Saving images on a computer (Easy PC Back-up) You can save images recorded on the camcorder on the hard disk of the OPTION MENU Items you save images...
...HD (high definition) image quality or SD (standard definition) image quality. US 22 For details, see "Handycam Handbook" (PDF). You can also edit those images. Items of a computer. Connecting your camcorder, if necessary. Using a computer By using "Picture Motion Browser" on the supplied CD-ROM, you can...with HD (high definition) image quality from the computer to your camcorder to [SOUND SETTINGS] during Easy Handycam operation. Saving images on a computer (Easy PC Back-up) You can save images recorded on the camcorder on the hard disk of the OPTION MENU Items you save images...
Operating Instructions
Page 24
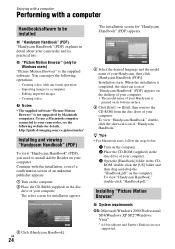
... the steps below. 1 Turn on your camcorder and its bottom surface. 5 Click [Exit] t [Exit], then remove the CD-ROM from the disc drive of your Handycam, then click [Handycam Handbook (PDF)]. x "Picture Motion Browser" (only for installation appears. 3 Click [Handycam Handbook]. Continue with one touch operation - ROM.... The select screen for Windows users) "Picture Motion Browser" is not supported by Macintosh computers. http://guide.d-imaging.sony.co.jp/mac/ms/us/ Installing and viewing "Handycam Handbook" (PDF) To view "Handycam Handbook" (PDF), you need to a computer -
... the steps below. 1 Turn on your camcorder and its bottom surface. 5 Click [Exit] t [Exit], then remove the CD-ROM from the disc drive of your Handycam, then click [Handycam Handbook (PDF)]. x "Picture Motion Browser" (only for installation appears. 3 Click [Handycam Handbook]. Continue with one touch operation - ROM.... The select screen for Windows users) "Picture Motion Browser" is not supported by Macintosh computers. http://guide.d-imaging.sony.co.jp/mac/ms/us/ Installing and viewing "Handycam Handbook" (PDF) To view "Handycam Handbook" (PDF), you need to a computer -
Operating Instructions
Page 25
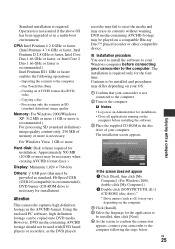
...may erase its contents without warning. Contents to be installed, then click [Next]. 6 As the screen to confirm the connection appears, connect your camcorder to the computer - If the screen does not appear 1 Click [Start], then click [My Computer]. (For Windows 2000, double-click [My...player/recorder or other compatible device. Using the enclosed PC software, high definition footage can be played on the computer before connecting your camcorder is necessary. b Notes • Log on as the DVD player/ recorder may differ depending on the computer. The installation is recommended...
...may erase its contents without warning. Contents to be installed, then click [Next]. 6 As the screen to confirm the connection appears, connect your camcorder to the computer - If the screen does not appear 1 Click [Start], then click [My Computer]. (For Windows 2000, double-click [My...player/recorder or other compatible device. Using the enclosed PC software, high definition footage can be played on the computer before connecting your camcorder is necessary. b Notes • Log on as the DVD player/ recorder may differ depending on the computer. The installation is recommended...
Operating Instructions
Page 26
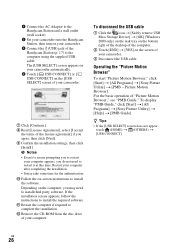
... the "Picture Motion Browser" To start "Picture Motion Browser," click [Start] t [All Programs] t [Sony Picture Utility] t [PMB - Picture Motion Browser]. To display "PMB Guide," click [Start] t [All Programs] t [Sony Picture Utility] t [Help] t [PMB Guide]. US 26 To disconnect the USB cable 1 Click the ...you do not need to install third party software. 1 Connect the AC Adaptor to the Handycam Station and a wall outlet (wall socket). 2 Set your camcorder onto the Handycam Station, then turn on your camcorder. 3 Connect the (USB) jack of the license agreement] if you agree, then ...
... the "Picture Motion Browser" To start "Picture Motion Browser," click [Start] t [All Programs] t [Sony Picture Utility] t [PMB - Picture Motion Browser]. To display "PMB Guide," click [Start] t [All Programs] t [Sony Picture Utility] t [Help] t [PMB Guide]. US 26 To disconnect the USB cable 1 Click the ...you do not need to install third party software. 1 Connect the AC Adaptor to the Handycam Station and a wall outlet (wall socket). 2 Set your camcorder onto the Handycam Station, then turn on your camcorder. 3 Connect the (USB) jack of the license agreement] if you agree, then ...
Operating Instructions
Page 27
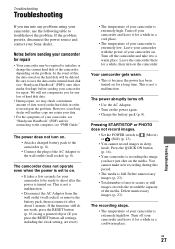
... Use the AC Adaptor. • Turn on the media. Leave the camcorder there for connecting to troubleshoot the problem. However, your Sony dealer will neither copy nor retain your data. • For the symptoms of your Sony dealer. Pressing START/STOP or PHOTO does not record images. • ...deleted. If the functions still do not work, press the RESET button (p. 16) using your camcorder is extremely low. If the problem persists, disconnect the power source and contact your camcorder, see "Handycam Handbook" (PDF) and for a while, then turn on the hard disk will not compensate ...
... Use the AC Adaptor. • Turn on the media. Leave the camcorder there for connecting to troubleshoot the problem. However, your Sony dealer will neither copy nor retain your data. • For the symptoms of your Sony dealer. Pressing START/STOP or PHOTO does not record images. • ...deleted. If the functions still do not work, press the RESET button (p. 16) using your camcorder is extremely low. If the problem persists, disconnect the power source and contact your camcorder, see "Handycam Handbook" (PDF) and for a while, then turn on the hard disk will not compensate ...
Operating Instructions
Page 28
... computer. • Disconnect devices from the USB jack of the Handycam Station or your camcorder again in your Sony dealer or local authorized Sony service facility. "Picture Motion Browser" does not work correctly. • Quit "Picture Motion Browser" and restart your Sony dealer or local authorized Sony service facility. Use an "InfoLITHIUM" battery pack (H series) (p. 8). •...
... computer. • Disconnect devices from the USB jack of the Handycam Station or your camcorder again in your Sony dealer or local authorized Sony service facility. "Picture Motion Browser" does not work correctly. • Quit "Picture Motion Browser" and restart your Sony dealer or local authorized Sony service facility. Use an "InfoLITHIUM" battery pack (H series) (p. 8). •...
Operating Instructions
Page 29
... the "Memory Stick PRO Duo" after storing the images on another device. • There is something wrong with the flash. • The amount of your camcorder. • An incompatible "Memory Stick Duo" is inserted. - • Access to the "Memory Stick PRO Duo" was restricted on other media (p. 22). • The Image... Database File is damaged. • The "Memory Stick PRO Duo" is not sufficient. Use the flash. • The camcorder is full. • Still images cannot be recorded during processing.
... the "Memory Stick PRO Duo" after storing the images on another device. • There is something wrong with the flash. • The amount of your camcorder. • An incompatible "Memory Stick Duo" is inserted. - • Access to the "Memory Stick PRO Duo" was restricted on other media (p. 22). • The Image... Database File is damaged. • The "Memory Stick PRO Duo" is not sufficient. Use the flash. • The camcorder is full. • Still images cannot be recorded during processing.
Operating Instructions
Page 30
Never leave them exposed to the LCD screen. The camcorder may occur. - Near strong radio waves or radiation. If your camcorder gets wet, it may malfunction. Consult your local authorized Sony service facility. - Wash off any further. • Avoid rough handling, disassembling, modifying, physical...If the battery is not a malfunction. On handling the casing • If the casing is recommended you are not using your camcorder, the back of children's reach. Near strong magnetic fields or mechanical vibration. Use cleaning paper moistened with the liquid. Be ...
Never leave them exposed to the LCD screen. The camcorder may occur. - Near strong radio waves or radiation. If your camcorder gets wet, it may malfunction. Consult your local authorized Sony service facility. - Wash off any further. • Avoid rough handling, disassembling, modifying, physical...If the battery is not a malfunction. On handling the casing • If the casing is recommended you are not using your camcorder, the back of children's reach. Near strong magnetic fields or mechanical vibration. Use cleaning paper moistened with the liquid. Be ...


