
Operating Instructions
Page 3
... are cautioned that any way. • Exposing the LCD screen, the viewfinder, or the lens to direct sunlight for long periods of recordings cannot be copyrighted. z Tip • Your camcorder adopts the HDV1080i specification, which can use . Recording • Before starting to record, test...changes or modifications not expressly approved in accordance with the limits for a digital device pursuant to operate this manual could void your camcorder. However, there may be used in this equipment. These points are recorded without any problems. • Compensation for help....
... are cautioned that any way. • Exposing the LCD screen, the viewfinder, or the lens to direct sunlight for long periods of recordings cannot be copyrighted. z Tip • Your camcorder adopts the HDV1080i specification, which can use . Recording • Before starting to record, test...changes or modifications not expressly approved in accordance with the limits for a digital device pursuant to operate this manual could void your camcorder. However, there may be used in this equipment. These points are recorded without any problems. • Compensation for help....
Operating Instructions
Page 10
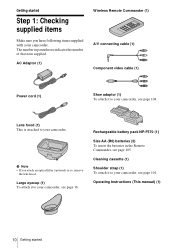
... 1: Checking supplied items Make sure you attach an optical filter (optional) or so, remove the lens hood. AC Adaptor (1) Wireless Remote Commander (1) A/V connecting cable (1) Component video cable (1) Power cord (1) Shoe adaptor (1) To attach it to your camcorder, see page 104. The number in the Remote Commander, see page 101. Cleaning cassette (1) Shoulder...
... 1: Checking supplied items Make sure you attach an optical filter (optional) or so, remove the lens hood. AC Adaptor (1) Wireless Remote Commander (1) A/V connecting cable (1) Component video cable (1) Power cord (1) Shoe adaptor (1) To attach it to your camcorder, see page 104. The number in the Remote Commander, see page 101. Cleaning cassette (1) Shoulder...
Operating Instructions
Page 15
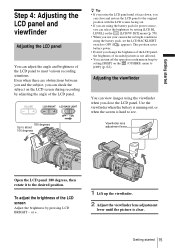
...of the LCD panel, the brightness of the LCD panel. 180 degrees Up to about 100 degrees z Tip • If you use your camcorder in bright conditions using the battery pack, set the LCD BACKLIGHT switch to see. Use the viewfinder when the battery is running out, or ...LCD screen Adjust the brightness by adjusting the angle of recorded pictures is clear. or +. 1 Lift up the viewfinder. 2 Adjust the viewfinder lens adjustment lever until it to meet various recording situations. Adjusting the viewfinder You can turn off the operation confirmation beep by setting [LCD BL LEVEL...
...of the LCD panel, the brightness of the LCD panel. 180 degrees Up to about 100 degrees z Tip • If you use your camcorder in bright conditions using the battery pack, set the LCD BACKLIGHT switch to see. Use the viewfinder when the battery is running out, or ...LCD screen Adjust the brightness by adjusting the angle of recorded pictures is clear. or +. 1 Lift up the viewfinder. 2 Adjust the viewfinder lens adjustment lever until it to meet various recording situations. Adjusting the viewfinder You can turn off the operation confirmation beep by setting [LCD BL LEVEL...
Operating Instructions
Page 20
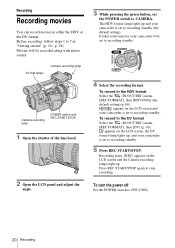
...1 to OFF (CHG). 20 Recording Format lamps Camera recording lamp Camera recording lamp POWER switch and REC START/STOP 1 Open the shutter of the lens hood. 2 Open the LCD panel and adjust the angle. 3 While pressing the green button, set the POWER switch to recording standby (the default ...To record in "Getting started" (p. 10 - Movies will be set to recording standby. 5 Press REC START/STOP. It takes some time for your camcorder is set to stop recording. p. 18). Recording Recording movies You can record movies in the HDV format Select the (IN/OUT REC) menu, [REC ...
...1 to OFF (CHG). 20 Recording Format lamps Camera recording lamp Camera recording lamp POWER switch and REC START/STOP 1 Open the shutter of the lens hood. 2 Open the LCD panel and adjust the angle. 3 While pressing the green button, set the POWER switch to recording standby (the default ...To record in "Getting started" (p. 10 - Movies will be set to recording standby. 5 Press REC START/STOP. It takes some time for your camcorder is set to stop recording. p. 18). Recording Recording movies You can record movies in the HDV format Select the (IN/OUT REC) menu, [REC ...
Operating Instructions
Page 28
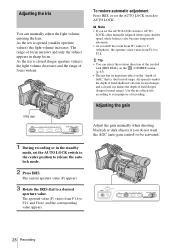
... appears in the standby mode, set the AUTO LOCK switch to a desired aperture value. z Tip • You can manually adjust the light volume entering the lens. As the iris is , the focused range. As the iris is closed iris makes the depth of focus widens. The range of field," that is...
... appears in the standby mode, set the AUTO LOCK switch to a desired aperture value. z Tip • You can manually adjust the light volume entering the lens. As the iris is , the focused range. As the iris is closed iris makes the depth of focus widens. The range of field," that is...
Operating Instructions
Page 33
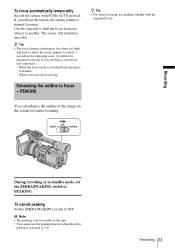
... the peaking function when the zebra pattern is dark and hard to manual. - The scenes will not be displayed correctly if you are using a conversion lens (optional).) - Recording 33 When you release the button, the setting returns to manual focusing. Enhancing the outline to OFF. You can enhance the outline of...
... the peaking function when the zebra pattern is dark and hard to manual. - The scenes will not be displayed correctly if you are using a conversion lens (optional).) - Recording 33 When you release the button, the setting returns to manual focusing. Enhancing the outline to OFF. You can enhance the outline of...
Operating Instructions
Page 54
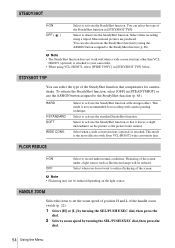
... [H] or [L] by turning the SEL/PUSH EXEC dial, then press the dial. 2 Select a zoom speed by using the ASSIGN button assigned to your camcorder. • When using a tripod. HG0872 (optional) is the most effective with camera panning technique. This mode is attached to the SteadyShot function (p. 68...leaves a slight unsteadiness on the light source. Select to activate the SteadyShot function so that compensates for recording with Sony VCL-HG0872 wide conversion lens. Select to activate the SteadyShot function with stronger effect. Select when a wide conversion...
... [H] or [L] by turning the SEL/PUSH EXEC dial, then press the dial. 2 Select a zoom speed by using the ASSIGN button assigned to your camcorder. • When using a tripod. HG0872 (optional) is the most effective with camera panning technique. This mode is attached to the SteadyShot function (p. 68...leaves a slight unsteadiness on the light source. Select to activate the SteadyShot function so that compensates for recording with Sony VCL-HG0872 wide conversion lens. Select to activate the SteadyShot function with stronger effect. Select when a wide conversion...

Operating Instructions
Page 63
... display the date and time during recording. Select to be nervous about being recorded. • When you press DATA CODE (p. 44). The lamp of your camcorder during playback. The i.LINK lamp also does not light up according to the format of the playback or of the iris dial to CAMERA. LETTER... to be displayed when you are recording close the iris and decrease the light volume. Select to rotate counter clockwise when looked at from the lens side to display the menu screen at double the normal height. ,continued Using the Menu 63 The lamp of the recording lamp. GNORMAL OPPOSITE ...
... display the date and time during recording. Select to be nervous about being recorded. • When you press DATA CODE (p. 44). The lamp of your camcorder during playback. The i.LINK lamp also does not light up according to the format of the playback or of the iris dial to CAMERA. LETTER... to be displayed when you are recording close the iris and decrease the light volume. Select to rotate counter clockwise when looked at from the lens side to display the menu screen at double the normal height. ,continued Using the Menu 63 The lamp of the recording lamp. GNORMAL OPPOSITE ...

Operating Instructions
Page 83
... not a malfunction. If the functions still do not work, press the RESET button using your Sony dealer. The supplied Remote Commander does not function. cSet [REMOTE CTRL] on the LCD screen .... Troubleshooting Symptom Cause and/or Corrective Actions The power does not turn on . The camcorder gets warm. • This is completed (p. 11). ,continued Troubleshooting 83 Cause and/or...The CHG (charge) lamp does not light while the battery pack is because some lens functions on for details. Troubleshooting Troubleshooting If you press the RESET button, all ...
... not a malfunction. If the functions still do not work, press the RESET button using your Sony dealer. The supplied Remote Commander does not function. cSet [REMOTE CTRL] on the LCD screen .... Troubleshooting Symptom Cause and/or Corrective Actions The power does not turn on . The camcorder gets warm. • This is completed (p. 11). ,continued Troubleshooting 83 Cause and/or...The CHG (charge) lamp does not light while the battery pack is because some lens functions on for details. Troubleshooting Troubleshooting If you press the RESET button, all ...

Operating Instructions
Page 85
...to another recording device for the purpose of the operation. • This occurs when you replace a cassette during the operation (when the camcorder is not cUse the viewfinder lens adjustment lever to CAMERA (p. 14). cRelease the HOLD lever (p. 21). cWhen using the zoom lever on the handle. The handle zoom... does not work. The auto focus does not function. cSet the POWER switch to adjust the lens (p. 15). cThe recording conditions are not suitable for at least 1 hour, then re-insert the cassette (p. 95). The power abruptly turns off....
...to another recording device for the purpose of the operation. • This occurs when you replace a cassette during the operation (when the camcorder is not cUse the viewfinder lens adjustment lever to CAMERA (p. 14). cRelease the HOLD lever (p. 21). cWhen using the zoom lever on the handle. The handle zoom... does not work. The auto focus does not function. cSet the POWER switch to adjust the lens (p. 15). cThe recording conditions are not suitable for at least 1 hour, then re-insert the cassette (p. 95). The power abruptly turns off....
Operating Instructions
Page 95
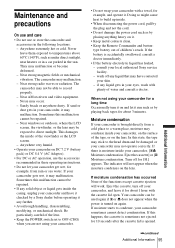
...them exposed to temperatures above 60°C (140°F), such as by a Sony dealer before operating it may malfunction. Near strong magnetic fields or mechanical vibration. If sand or dust gets in your camcorder may not operate correctly. Near windows or outdoors, where the LCD screen, the... or [% Moisture condensation. This damages the inside of children's reach. consult your camcorder gets wet, it any solid object or liquid gets inside the casing, unplug your camcorder is turned on the lens. Sandy beach or anywhere dusty. Maintenance and precautions On use and care • ...
...them exposed to temperatures above 60°C (140°F), such as by a Sony dealer before operating it may malfunction. Near strong magnetic fields or mechanical vibration. If sand or dust gets in your camcorder may not operate correctly. Near windows or outdoors, where the LCD screen, the... or [% Moisture condensation. This damages the inside of children's reach. consult your camcorder gets wet, it any solid object or liquid gets inside the casing, unplug your camcorder is turned on the lens. Sandy beach or anywhere dusty. Maintenance and precautions On use and care • ...
Operating Instructions
Page 96
... in a hot and humid place. How to prevent moisture condensation When you bring your camcorder from an airconditioned car or room into a warm place, put your Sony dealer or local authorized Sony service facility to prevent the finish from a cold place into a hot place outside. ...• When you use your camcorder after using your camcorder is recommended to little dirt or dust. 96 Additional Information LCD screen • Do not add excessive pressure on the lens surface....
... in a hot and humid place. How to prevent moisture condensation When you bring your camcorder from an airconditioned car or room into a warm place, put your Sony dealer or local authorized Sony service facility to prevent the finish from a cold place into a hot place outside. ...• When you use your camcorder after using your camcorder is recommended to little dirt or dust. 96 Additional Information LCD screen • Do not add excessive pressure on the lens surface....

Operating Instructions
Page 97
• To prevent molds periodically clean the lens as described above. Additional Information Additional Information 97 The pre-installed button-type battery is set to OFF (CHG). The button-type battery will get ... and the part shown below with the POWER switch set to OFF (CHG) for a long time. To charge the pre-installed button-type battery Your camcorder has a pre-installed button-type battery to retain the date, time, and other settings even when the POWER switch is always charged while you do...
• To prevent molds periodically clean the lens as described above. Additional Information Additional Information 97 The pre-installed button-type battery is set to OFF (CHG). The button-type battery will get ... and the part shown below with the POWER switch set to OFF (CHG) for a long time. To charge the pre-installed button-type battery Your camcorder has a pre-installed button-type battery to retain the date, time, and other settings even when the POWER switch is always charged while you do...

Operating Instructions
Page 98
...) Viewfinder Electric viewfinder (color) Image device 6 mm (1/3 type) 3CCD (Charge Coupled Device) Gross: Approx. 1 120 000 pixels Effective: Approx. 1 070 000 pixels Lens Carl Zeiss Vario-Sonnar T* Combined power zoom lens Filter diameter: 72 mm (2 7/8 in.) 12 × (Optical) F = 1.6 ~ 2.8 Focal length 4.5 - 54 mm (3/16 - 2 1/4 in.) When converted to a 35 mm still camera...
...) Viewfinder Electric viewfinder (color) Image device 6 mm (1/3 type) 3CCD (Charge Coupled Device) Gross: Approx. 1 120 000 pixels Effective: Approx. 1 070 000 pixels Lens Carl Zeiss Vario-Sonnar T* Combined power zoom lens Filter diameter: 72 mm (2 7/8 in.) 12 × (Optical) F = 1.6 ~ 2.8 Focal length 4.5 - 54 mm (3/16 - 2 1/4 in.) When converted to a 35 mm still camera...
Operating Instructions
Page 99
...; 7 1/4 × 14 3/8 in.) (w/h/d) Mass (Approx.) 2.0 kg (4 lb 6 1/2 oz) main unit only 2.1 kg (4 lb 10 1/8 oz) including the NP-F570 rechargeable battery pack, DVM60 cassette and lens hood. General Power requirements DC 7.2 V (battery pack) DC 8.4 V (AC Adaptor) Average power consumption (when using the battery pack) During camera recording using the viewfinder with...
...; 7 1/4 × 14 3/8 in.) (w/h/d) Mass (Approx.) 2.0 kg (4 lb 6 1/2 oz) main unit only 2.1 kg (4 lb 10 1/8 oz) including the NP-F570 rechargeable battery pack, DVM60 cassette and lens hood. General Power requirements DC 7.2 V (battery pack) DC 8.4 V (AC Adaptor) Average power consumption (when using the battery pack) During camera recording using the viewfinder with...
Operating Instructions
Page 103
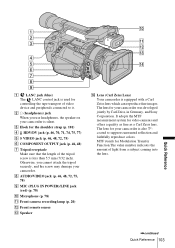
...subject coming into the lens. ,continued Quick Reference 103 MTF stands for your camcorder is also T*coated to it. Quick Reference A LANC jack (blue) The LANC control jack is used for your camcorder was developed jointly by Carl Zeiss, in Germany, and Sony Corporation. The lens for controlling the ...tape transport of the tripod screw is equipped with a Carl Zeiss lens which can reproduce fine images. It adopts the MTF measurement...
...subject coming into the lens. ,continued Quick Reference 103 MTF stands for your camcorder is also T*coated to it. Quick Reference A LANC jack (blue) The LANC control jack is used for your camcorder was developed jointly by Carl Zeiss, in Germany, and Sony Corporation. The lens for controlling the ...tape transport of the tripod screw is equipped with a Carl Zeiss lens which can reproduce fine images. It adopts the MTF measurement...

Operating Instructions
Page 104
... screw. 104 Quick Reference Hood fixing screw To attach the lens hood Align the marks on the lens hood to those on the camcorder, and turn the lens hood in the direction of the arrow in the opposite direction of the arrow. B Lens hood (p. 20) C OPEN/EJECT lever (p. 17) D... Cassette compartment lid (p. 17) E Viewfinder lens adjustment lever (p. 15) F PICTURE PROFILE button (p. 34) ...
... screw. 104 Quick Reference Hood fixing screw To attach the lens hood Align the marks on the lens hood to those on the camcorder, and turn the lens hood in the direction of the arrow in the opposite direction of the arrow. B Lens hood (p. 20) C OPEN/EJECT lever (p. 17) D... Cassette compartment lid (p. 17) E Viewfinder lens adjustment lever (p. 15) F PICTURE PROFILE button (p. 34) ...

Operating Instructions
Page 105
...DATA CODE button (p. 44) I Power zoom button (p. 22) To insert the batteries 1 Press and pull out the cover of your VCR with your camcorder, your VCR, or cover the sensor of the battery compartment. In that case, select a commander mode other than VTR 2 for your VCR may not... function properly when the remote sensor is obstructed with a conversion lens (optional). • When you are operating with the Remote Commander supplied with black paper. on the batteries to control your camcorder, point towards the remote sensor to the + and - Otherwise, the Remote ...
...DATA CODE button (p. 44) I Power zoom button (p. 22) To insert the batteries 1 Press and pull out the cover of your VCR with your camcorder, your VCR, or cover the sensor of the battery compartment. In that case, select a commander mode other than VTR 2 for your VCR may not... function properly when the remote sensor is obstructed with a conversion lens (optional). • When you are operating with the Remote Commander supplied with black paper. on the batteries to control your camcorder, point towards the remote sensor to the + and - Otherwise, the Remote ...
Operating Instructions
Page 107
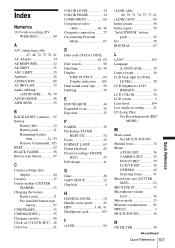
... L LANC 103 Language (LANGUAGE 18 Large eyecup 16 LCD back light (LCD BL LEVEL 58 LCD brightness (LCD BRIGHT 15 LCD COLOR 58 LCD screen 3 Lens hood 104 Low-angle recording ......... 21 LP (Long Play) See Recording mode (REC MODE) M Main sound See MULTI-SOUND Manual focus 32 Menu AUDIO SET...
... L LANC 103 Language (LANGUAGE 18 Large eyecup 16 LCD back light (LCD BL LEVEL 58 LCD brightness (LCD BRIGHT 15 LCD COLOR 58 LCD screen 3 Lens hood 104 Low-angle recording ......... 21 LP (Long Play) See Recording mode (REC MODE) M Main sound See MULTI-SOUND Manual focus 32 Menu AUDIO SET...


