Operating Guide
Page 8
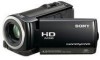
... be able to record or play movies and photos. Do not use the camcorder in very loud areas. Unauthorized recording of the camcorder, recording media, etc. TV color systems differ depending on some tiny black points and/or bright points (white, red, blue, or ... player/ recorder may fail to eject the media and may be used for a long time, fragmentation of the camcorder. If you cannot play movies and photos. When connecting the camcorder to make sure the image and sound are lit or flashing. On recording Before starting to record, ...
... be able to record or play movies and photos. Do not use the camcorder in very loud areas. Unauthorized recording of the camcorder, recording media, etc. TV color systems differ depending on some tiny black points and/or bright points (white, red, blue, or ... player/ recorder may fail to eject the media and may be used for a long time, fragmentation of the camcorder. If you cannot play movies and photos. When connecting the camcorder to make sure the image and sound are lit or flashing. On recording Before starting to record, ...

Operating Guide
Page 10
...) You can free recording space by deleting movies and photos that you have saved on other media, from the your camcorder (p. 21) Playing movies and photos on a connected TV (p. 24) Saving movies and photos on a disc Saving movies and photos with a computer (p. 26) You can change the recording media selected, and the image...
...) You can free recording space by deleting movies and photos that you have saved on other media, from the your camcorder (p. 21) Playing movies and photos on a connected TV (p. 24) Saving movies and photos on a disc Saving movies and photos with a computer (p. 26) You can change the recording media selected, and the image...
Operating Guide
Page 11
... date and time 15 Changing the language setting 16 Recording Recording 17 Recording and playing movies and photos easily (Easy Handycam operation 20 Playback Playback on the camcorder 21 Playing images on a TV 24 Saving movies and photos with a computer Preparing a computer (Windows 26 When using a Macintosh 27 Selecting the method for creating a disc...
... date and time 15 Changing the language setting 16 Recording Recording 17 Recording and playing movies and photos easily (Easy Handycam operation 20 Playback Playback on the camcorder 21 Playing images on a TV 24 Saving movies and photos with a computer Preparing a computer (Windows 26 When using a Macintosh 27 Selecting the method for creating a disc...
Operating Guide
Page 12
... Creating a standard definition image quality (SD) disc with a recorder, etc. (A/V connecting cable connection 40 Making good use of your camcorder Deleting movies and photos 42 Changing the recording media 43 To check the recording media settings 43 Dubbing or copying movies and... photos from the internal memory to "Memory Stick PRO Duo" media 44 Customizing your camcorder with menus 45 Using the HELP function 45 Getting detailed information from the "Handycam Handbook 51 Additional information Troubleshooting 52 Precautions 54 ...
... Creating a standard definition image quality (SD) disc with a recorder, etc. (A/V connecting cable connection 40 Making good use of your camcorder Deleting movies and photos 42 Changing the recording media 43 To check the recording media settings 43 Dubbing or copying movies and... photos from the internal memory to "Memory Stick PRO Duo" media 44 Customizing your camcorder with menus 45 Using the HELP function 45 Getting detailed information from the "Handycam Handbook 51 Additional information Troubleshooting 52 Precautions 54 ...

Operating Guide
Page 14
... power turns off automatically if you remove the battery pack or disconnect the AC Adaptor, close the LCD screen and make sure that the (Movie)/ (Photo) lamps (p. 15) are turned off. Do not short-circuit the DC plug of remaining battery power with any operation for about 5 minutes, to ... metallic objects. To remove the battery pack Close the LCD screen. Notes on the battery pack and the AC Adaptor When you leave your camcorder within the AC 100 V - 240 V, 50 Hz/60 Hz range. Do not use a wall outlet (wall socket) as a power source Make the same ...
... power turns off automatically if you remove the battery pack or disconnect the AC Adaptor, close the LCD screen and make sure that the (Movie)/ (Photo) lamps (p. 15) are turned off. Do not short-circuit the DC plug of remaining battery power with any operation for about 5 minutes, to ... metallic objects. To remove the battery pack Close the LCD screen. Notes on the battery pack and the AC Adaptor When you leave your camcorder within the AC 100 V - 240 V, 50 Hz/60 Hz range. Do not use a wall outlet (wall socket) as a power source Make the same ...

Operating Guide
Page 15
... playback. Getting started Step 2: Turning the power on, and setting the date and time 1 Open the LCD screen of your camcorder when the LCD screen is open, press POWER. Your camcorder is not on the LCD screen. To set [DST SET] or [SUMMERTIME] to [ON], the clock advances 1... (SETTINGS) [SOUND/DISP SET] [BEEP] [OFF US 15 When an item is turned on the recording media, and can turn on your camcorder. The clock starts. If you set the date and time again, touch (HOME) (SETTINGS) [CLOCK/ LANG] [CLOCK SET]. ...
... playback. Getting started Step 2: Turning the power on, and setting the date and time 1 Open the LCD screen of your camcorder when the LCD screen is open, press POWER. Your camcorder is not on the LCD screen. To set [DST SET] or [SUMMERTIME] to [ON], the clock advances 1... (SETTINGS) [SOUND/DISP SET] [BEEP] [OFF US 15 When an item is turned on the recording media, and can turn on your camcorder. The clock starts. If you set the date and time again, touch (HOME) (SETTINGS) [CLOCK/ LANG] [CLOCK SET]. ...

Operating Guide
Page 18
... can change the recording media and the image quality (p. 43, 48). You can record movies/photos in mirror mode. 90 degrees (max.) 180 degrees (max.) 90 degrees to the camcorder (), and then adjust the angle (). Press START/STOP to [ON] in the ...default setting. To adjust the angle of a person during recording, the camcorder stops recording. See page 57 on the side of the LCD screen by mistake. In the default setting, a photo is set to start recording. If you rotate the LCD panel 180 degrees to ...
... can change the recording media and the image quality (p. 43, 48). You can record movies/photos in mirror mode. 90 degrees (max.) 180 degrees (max.) 90 degrees to the camcorder (), and then adjust the angle (). Press START/STOP to [ON] in the ...default setting. To adjust the angle of a person during recording, the camcorder stops recording. See page 57 on the side of the LCD screen by mistake. In the default setting, a photo is set to start recording. If you rotate the LCD panel 180 degrees to ...
Operating Guide
Page 19
... movies with the x.v.Color function. Your camcorder is already open, press POWER (p. 15). Press MODE to turn on your camcorder. Refer to the instruction manuals of the screen becomes 4:3. US 19 Shooting photos In the default setting, photos are recorded on the internal memory (p. 43...). Open the lens cover. Open the LCD screen of your camcorder when the LCD screen is turned on. To turn on the (Photo) lamp. Recording You can increase the zooming level by touching (HOME) (SETTINGS) ...
... movies with the x.v.Color function. Your camcorder is already open, press POWER (p. 15). Press MODE to turn on your camcorder. Refer to the instruction manuals of the screen becomes 4:3. US 19 Shooting photos In the default setting, photos are recorded on the internal memory (p. 43...). Open the lens cover. Open the LCD screen of your camcorder when the LCD screen is turned on. To turn on the (Photo) lamp. Recording You can increase the zooming level by touching (HOME) (SETTINGS) ...

Operating Guide
Page 20
...it further for a slower zoom. US 20 During Easy Handycam operation, you finish recording, or menu operations. Recording and playing movies and photos easily (Easy Handycam operation) Simply press EASY. Press PHOTO lightly to the default settings automatically. (Some menu items ...retain the settings that were made before Easy Handycam operation.) appears during movie recording by pressing PHOTO. To cancel Easy Handycam operation, press EASY again after you can record photos during Easy Handycam operation mode. Power zoom lever Wide Telephoto Flashes ...
...it further for a slower zoom. US 20 During Easy Handycam operation, you finish recording, or menu operations. Recording and playing movies and photos easily (Easy Handycam operation) Simply press EASY. Press PHOTO lightly to the default settings automatically. (Some menu items ...retain the settings that were made before Easy Handycam operation.) appears during movie recording by pressing PHOTO. To cancel Easy Handycam operation, press EASY again after you can record photos during Easy Handycam operation mode. Power zoom lever Wide Telephoto Flashes ...

Operating Guide
Page 21
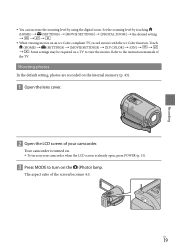
... Playback on the camcorder In the default setting, movies and photos on the "Memory Stick PRO Duo" media.) US 21 Your camcorder is already open, press POWER (p. 15). Press (VIEW IMAGES). To the index screen of scenes by pressing (VIEW IMAGES) on your camcorder. Playback The VISUAL... INDEX screen appears after some seconds. You can continue playback from the previous time. ( appears on the photo recorded on the internal memory are played (p. 43, 48). If you...
... Playback on the camcorder In the default setting, movies and photos on the "Memory Stick PRO Duo" media.) US 21 Your camcorder is already open, press POWER (p. 15). Press (VIEW IMAGES). To the index screen of scenes by pressing (VIEW IMAGES) on your camcorder. Playback The VISUAL... INDEX screen appears after some seconds. You can continue playback from the previous time. ( appears on the photo recorded on the internal memory are played (p. 43, 48). If you...

Operating Guide
Page 22
Viewing photos Touch the (Photo) tab () a desired photo () on the panel behind the LCD panel. The recording date, time, and shooting conditions are recorded automatically during playback, movies are played as ... pause to play When playback from the OPTION MENU (p. 45). This information is not displayed during recording, but you repeat touching / during recording. Your camcorder starts playing the selected movie.
Viewing photos Touch the (Photo) tab () a desired photo () on the panel behind the LCD panel. The recording date, time, and shooting conditions are recorded automatically during playback, movies are played as ... pause to play When playback from the OPTION MENU (p. 45). This information is not displayed during recording, but you repeat touching / during recording. Your camcorder starts playing the selected movie.

Operating Guide
Page 23
Your camcorder displays the selected photo. Playback US 23 If you touch a point in the PB ZOOM frame, the point comes to the center in the photo by moving the power zoom lever while viewing photos (PB ZOOM). Previous To the VISUAL INDEX screen To start/stop slide show Next OPTION MENU You can zoom in the frame. When viewing photos recorded on "Memory Stick PRO Duo" media, (playback folder) appears on the screen.
Your camcorder displays the selected photo. Playback US 23 If you touch a point in the PB ZOOM frame, the point comes to the center in the photo by moving the power zoom lever while viewing photos (PB ZOOM). Previous To the VISUAL INDEX screen To start/stop slide show Next OPTION MENU You can zoom in the frame. When viewing photos recorded on "Memory Stick PRO Duo" media, (playback folder) appears on the screen.
Operating Guide
Page 24
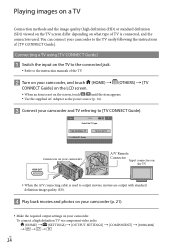
... movies, movies are output with standard definition image quality (SD). Play back movies and photos on your camcorder (p. 21). Make the required output settings on your camcorder. Playing images on a TV Connection methods and the image quality (high definition (HD) or standard...]. To connect a high definition TV via component video jacks: (HOME) (SETTINGS) [OUTPUT SETTINGS] [COMPONENT] [1080i/480i] US 24 Connecting a TV using [TV CONNECT Guide] Switch the input on the TV to the connected jack....
... movies, movies are output with standard definition image quality (SD). Play back movies and photos on your camcorder (p. 21). Make the required output settings on your camcorder. Playing images on a TV Connection methods and the image quality (high definition (HD) or standard...]. To connect a high definition TV via component video jacks: (HOME) (SETTINGS) [OUTPUT SETTINGS] [COMPONENT] [1080i/480i] US 24 Connecting a TV using [TV CONNECT Guide] Switch the input on the TV to the connected jack....
Operating Guide
Page 25
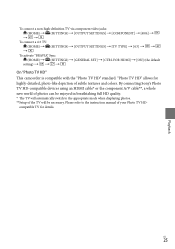
By connecting Sony's Photo TV HD-compatible devices using an HDMI cable* or the component A/V cable**, a whole new world of photos can be enjoyed in breathtaking full HD quality. * The TV will automatically switch to the instruction manual of your Photo TV HD- Please refer to the appropriate mode when displaying photos. **Setup of subtle...] [TV TYPE] [4:3 To activate "BRAVIA" Sync: (HOME) (SETTINGS) [GENERAL SET] [CTRL FOR HDMI] [ON] (the default setting On "Photo TV HD" This camcorder is compatible with the "Photo TV HD" standard.
By connecting Sony's Photo TV HD-compatible devices using an HDMI cable* or the component A/V cable**, a whole new world of photos can be enjoyed in breathtaking full HD quality. * The TV will automatically switch to the instruction manual of your Photo TV HD- Please refer to the appropriate mode when displaying photos. **Setup of subtle...] [TV TYPE] [4:3 To activate "BRAVIA" Sync: (HOME) (SETTINGS) [GENERAL SET] [CTRL FOR HDMI] [ON] (the default setting On "Photo TV HD" This camcorder is compatible with the "Photo TV HD" standard.
Operating Guide
Page 26
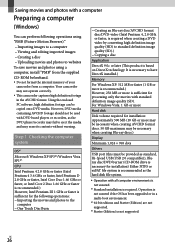
... images to a computer Viewing and editing imported images Creating a disc Uploading movies and photos to eject the media and may not operate correctly. This camcorder captures high definition footage in a multi-boot environment. *2 64-bit editions and Starter (Edition) are not.../recorder may fail to websites To save movies and photos using a computer, install "PMB" from the supplied CD-ROM beforehand. Do not format the internal memory of your camcorder from a computer. Saving movies and photos with a computer Preparing a computer (Windows) You ...
... images to a computer Viewing and editing imported images Creating a disc Uploading movies and photos to eject the media and may not operate correctly. This camcorder captures high definition footage in a multi-boot environment. *2 64-bit editions and Starter (Edition) are not.../recorder may fail to websites To save movies and photos using a computer, install "PMB" from the supplied CD-ROM beforehand. Do not format the internal memory of your camcorder from a computer. Saving movies and photos with a computer Preparing a computer (Windows) You ...
Operating Guide
Page 27
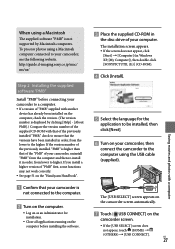
...ROM in order, from lower to your computer. To process photos using a Macintosh computer connected to higher. The [USB SELECT] screen appears on the camcorder screen automatically. Touch [ USB CONNECT] on the "Handycam Handbook". Confirm that the versions have been installed ... version number of the supplied CD-ROM with a computer http://guide.d-imaging.sony.co.jp/mac/ ms/us/ Step 2 Installing the supplied software "PMB" Install "PMB" before connecting your camcorder, then connect the camcorder to the higher. If you install a higher version of "PMB" supplied...
...ROM in order, from lower to your computer. To process photos using a Macintosh computer connected to higher. The [USB SELECT] screen appears on the camcorder screen automatically. Touch [ USB CONNECT] on the "Handycam Handbook". Confirm that the versions have been installed ... version number of the supplied CD-ROM with a computer http://guide.d-imaging.sony.co.jp/mac/ ms/us/ Step 2 Installing the supplied software "PMB" Install "PMB" before connecting your camcorder, then connect the camcorder to the higher. If you install a higher version of "PMB" supplied...
Operating Guide
Page 29
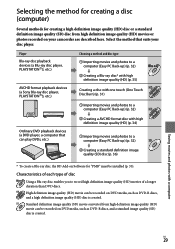
...31) Ordinary DVD playback devices (a DVD player, a computer that suits your camcorder are described here. SD Standard definition image quality (SD) movie converted from high definition image quality (HD) movies or photos recorded on DVD media, such as DVD-R discs, and a standard image ...disc playback devices (a Blu-ray disc player, PLAYSTATION3, etc.) AVCHD format playback devices (a Sony Blu-ray disc player, PLAYSTATION3, etc.) Choosing a method and disc type Importing movies and photos to a computer (Easy PC Back-up ) (p. 32) HD Creating ...
...31) Ordinary DVD playback devices (a DVD player, a computer that suits your camcorder are described here. SD Standard definition image quality (SD) movie converted from high definition image quality (HD) movies or photos recorded on DVD media, such as DVD-R discs, and a standard image ...disc playback devices (a Blu-ray disc player, PLAYSTATION3, etc.) AVCHD format playback devices (a Sony Blu-ray disc player, PLAYSTATION3, etc.) Choosing a method and disc type Importing movies and photos to a computer (Easy PC Back-up ) (p. 32) HD Creating ...
Operating Guide
Page 31
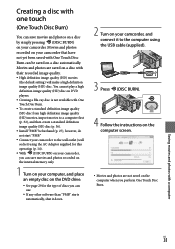
..." beforehand (p. 27), however, do not start "PMB." Connect your camcorder to the computer using the AC Adaptor supplied for this operation (p. 14). With (DISC BURN) on your camcorder, you can save movies and photos on a disc by simply pressing (DISC BURN) on a disc automatically. Saving ...movies and photos with One Touch Disc Burn can be saved on your camcorder. Creating a disc with one touch (One Touch Disc...
..." beforehand (p. 27), however, do not start "PMB." Connect your camcorder to the computer using the AC Adaptor supplied for this operation (p. 14). With (DISC BURN) on your camcorder, you can save movies and photos on a disc by simply pressing (DISC BURN) on a disc automatically. Saving ...movies and photos with One Touch Disc Burn can be saved on your camcorder. Creating a disc with one touch (One Touch Disc...
Operating Guide
Page 32
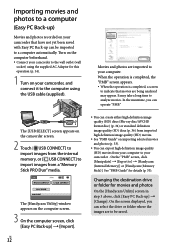
...appear. The [Handycam Utility] window appears on the computer beforehand. Connect your camcorder to the wall outlet (wall socket) using the USB cable (supplied). Changing the destination drive or folder for details (p. 33). Movies and photos are imported to your camcorder that movies are... to be imported to a computer automatically. The [USB SELECT] screen appears on the camcorder screen. 2 Touch [ USB CONNECT] to import images from the internal...
...appear. The [Handycam Utility] window appears on the computer beforehand. Connect your camcorder to the wall outlet (wall socket) using the USB cable (supplied). Changing the destination drive or folder for details (p. 33). Movies and photos are imported to your camcorder that movies are... to be imported to a computer automatically. The [USB SELECT] screen appears on the camcorder screen. 2 Touch [ USB CONNECT] to import images from the internal...

Operating Guide
Page 33
...also open the "PMB Guide." If the icon is not displayed on the computer screen, click [Start] [All Programs] [Sony Picture Utility] [PMB] to start "PMB." Double-click the "PMB Guide" short-cut icon on the computer screen. If the icon...For details on the computer screen, click [Start] [All Programs] [Sony Picture Utility] [Help] [PMB Guide]. You can view, edit, or create discs of "PMB." US 33 Saving movies and photos with a computer Starting PMB (Picture Motion Browser) Double-click the "PMB" short-cut icon...
...also open the "PMB Guide." If the icon is not displayed on the computer screen, click [Start] [All Programs] [Sony Picture Utility] [PMB] to start "PMB." Double-click the "PMB Guide" short-cut icon on the computer screen. If the icon...For details on the computer screen, click [Start] [All Programs] [Sony Picture Utility] [Help] [PMB Guide]. You can view, edit, or create discs of "PMB." US 33 Saving movies and photos with a computer Starting PMB (Picture Motion Browser) Double-click the "PMB" short-cut icon...


