
Operating Guide
Page 13
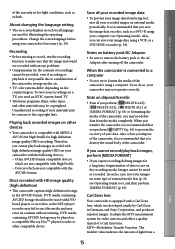
... sliding it clicks. 3 Connect the AC Adaptor and the power cord (mains lead) to your camcorder. 1 Turn off when the battery pack is fully charged. 4 When the battery is facing right. US 13 The CHG (charge) lamp lights up and charging starts. Getting started Getting started Step 1: Charging the battery pack 1 3 CHG...
... sliding it clicks. 3 Connect the AC Adaptor and the power cord (mains lead) to your camcorder. 1 Turn off when the battery pack is fully charged. 4 When the battery is facing right. US 13 The CHG (charge) lamp lights up and charging starts. Getting started Getting started Step 1: Charging the battery pack 1 3 CHG...

Operating Guide
Page 20
...zoom. US 20 Recording and playing movies and photos easily (Easy Handycam operation) Simply press EASY. During Easy Handycam operation, you finish recording, or menu operations. Move it fully. Press PHOTO lightly to the default settings automatically. (Some menu items retain the settings... that were made before Easy Handycam operation.) appears during movie recording by pressing PHOTO. To cancel Easy Handycam operation, press EASY again after you can ...
...zoom. US 20 Recording and playing movies and photos easily (Easy Handycam operation) Simply press EASY. During Easy Handycam operation, you finish recording, or menu operations. Move it fully. Press PHOTO lightly to the default settings automatically. (Some menu items retain the settings... that were made before Easy Handycam operation.) appears during movie recording by pressing PHOTO. To cancel Easy Handycam operation, press EASY again after you can ...
Operating Guide
Page 43
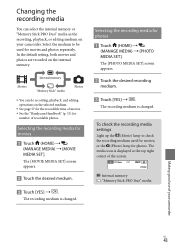
..., and editing operations on the selected medium. See page 57 for the recordable time of movies. See the "Handycam Handbook" (p. 51) for number of your camcorder. Selecting the recording media for movies Touch (HOME) (MANAGE MEDIA) [MOVIE MEDIA SET]. The media... : "Memory Stick PRO Duo" media Making good use of recordable photos. The recording medium is changed . To check the recording media settings Light up the (Movie) lamp to be used for movies, or the (Photo) lamp for photos. In the default setting, both movies and photos...
..., and editing operations on the selected medium. See page 57 for the recordable time of movies. See the "Handycam Handbook" (p. 51) for number of your camcorder. Selecting the recording media for movies Touch (HOME) (MANAGE MEDIA) [MOVIE MEDIA SET]. The media... : "Memory Stick PRO Duo" media Making good use of recordable photos. The recording medium is changed . To check the recording media settings Light up the (Movie) lamp to be used for movies, or the (Photo) lamp for photos. In the default setting, both movies and photos...

Operating Guide
Page 44
...media) * Marked with Mark2 or not, either can be used. "Memory Stick PRO Duo" media of "Memory Stick" media you can use with your camcorder For recording movies, it clicks. If you insert new "Memory Stick PRO Duo" media while the (Movie) lamp is displayed in once. &#...58320; If [Failed to create a new Image Database File. To eject the "Memory Stick PRO Duo" media Open the "Memory Stick Duo" media cover and lightly push the "Memory Stick PRO Duo" media in step 2, format the "Memory Stick PRO Duo" media (p. 42). Dubbing or copying movies and photos from the...
...media) * Marked with Mark2 or not, either can be used. "Memory Stick PRO Duo" media of "Memory Stick" media you can use with your camcorder For recording movies, it clicks. If you insert new "Memory Stick PRO Duo" media while the (Movie) lamp is displayed in once. &#...58320; If [Failed to create a new Image Database File. To eject the "Memory Stick PRO Duo" media Open the "Memory Stick Duo" media cover and lightly push the "Memory Stick PRO Duo" media in step 2, format the "Memory Stick PRO Duo" media (p. 42). Dubbing or copying movies and photos from the...
Operating Guide
Page 48
.... Adjusts the exposure for backlit subjects automatically. FILE NO Sets how to record movies. Adjusts the exposure for backlit subjects automatically. AUTO BACK LIGHT......... CONVERSION LENS....... AUTO BACK LIGHT......... SETTING....... VIEW IMAGES SET / SET Sets image quality for recording, playback, or editing movies. Optimizes the Steadyshot function and focus according to the...
.... Adjusts the exposure for backlit subjects automatically. FILE NO Sets how to record movies. Adjusts the exposure for backlit subjects automatically. AUTO BACK LIGHT......... CONVERSION LENS....... AUTO BACK LIGHT......... SETTING....... VIEW IMAGES SET / SET Sets image quality for recording, playback, or editing movies. Optimizes the Steadyshot function and focus according to the...
Operating Guide
Page 54
...or damaged battery pack. Keep metal contacts clean. If the battery electrolytic liquid has leaked: Consult your local authorized Sony service facility. Wash off when you use a soft cloth to record properly. Near AM receivers and video equipment. This ...malfunction. Precautions On use and care Do not use or store the camcorder and accessories in your camcorder, it may malfunction. This is soiled, clean the camcorder body with a soft cloth lightly moistened with water, and then wipe the casing with the liquid. When not ...
...or damaged battery pack. Keep metal contacts clean. If the battery electrolytic liquid has leaked: Consult your local authorized Sony service facility. Wash off when you use a soft cloth to record properly. Near AM receivers and video equipment. This ...malfunction. Precautions On use and care Do not use or store the camcorder and accessories in your camcorder, it may malfunction. This is soiled, clean the camcorder body with a soft cloth lightly moistened with water, and then wipe the casing with the liquid. When not ...

Handycam® Handbook
Page 6
... techniques Checking your golf swing SMTH SLW REC 33 Getting a good shot of a ski slope or beach AUTO BACK LIGHT 69 BEACH 86 SNOW 86 Capturing photos during movie recording Dual Rec 32 Capturing smiles automatically SMILE SHUTTER... 73 A child on the stage under a spot light Flowers in close-up SPOTLIGHT 86 PORTRAIT 86 FOCUS 85 TELE MACRO 84 Fireworks with all its splendor ...
... techniques Checking your golf swing SMTH SLW REC 33 Getting a good shot of a ski slope or beach AUTO BACK LIGHT 69 BEACH 86 SNOW 86 Capturing photos during movie recording Dual Rec 32 Capturing smiles automatically SMILE SHUTTER... 73 A child on the stage under a spot light Flowers in close-up SPOTLIGHT 86 PORTRAIT 86 FOCUS 85 TELE MACRO 84 Fireworks with all its splendor ...
Handycam® Handbook
Page 12
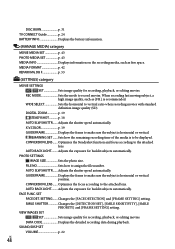
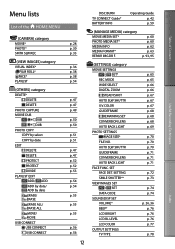
... p. 59 (MANAGE MEDIA) category MOVIE MEDIA SET* PHOTO MEDIA SET* MEDIA INFO MEDIA FORMAT* REPAIR IMG.DB F. AUTO SLW SHUTTR GUIDEFRAME CONVERSION LENS AUTO BACK LIGHT FACE FUNC. p. 60 p. 60 p. 62 p. 63 p. 93, 95 (SETTINGS) category MOVIE SETTINGS / SET* REC MODE WIDE SELECT DIGITAL ZOOM STEADYSHOT AUTO SLW SHUTTR X.V.COLOR GUIDEFRAME...
... p. 59 (MANAGE MEDIA) category MOVIE MEDIA SET* PHOTO MEDIA SET* MEDIA INFO MEDIA FORMAT* REPAIR IMG.DB F. AUTO SLW SHUTTR GUIDEFRAME CONVERSION LENS AUTO BACK LIGHT FACE FUNC. p. 60 p. 60 p. 62 p. 63 p. 93, 95 (SETTINGS) category MOVIE SETTINGS / SET* REC MODE WIDE SELECT DIGITAL ZOOM STEADYSHOT AUTO SLW SHUTTR X.V.COLOR GUIDEFRAME...
Handycam® Handbook
Page 15
... AVCHD format compatible devices which are not compatible with High Profile Devices which was developed jointly by Carl Zeiss, in Germany, and Sony Corporation, and produces superior images. Notes on battery pack/AC Adaptor Be sure to make sure that you can save the image ... your recorded images on the country/region. Carl Zeiss lens Your camcorder is recommended that the image and sound are used with MPEG-4 AVC/H.264 High Profile for video cameras and offers a quality typical of light from the media completely. It adopts the MTF measurement system for ...
... AVCHD format compatible devices which are not compatible with High Profile Devices which was developed jointly by Carl Zeiss, in Germany, and Sony Corporation, and produces superior images. Notes on battery pack/AC Adaptor Be sure to make sure that you can save the image ... your recorded images on the country/region. Carl Zeiss lens Your camcorder is recommended that the image and sound are used with MPEG-4 AVC/H.264 High Profile for video cameras and offers a quality typical of light from the media completely. It adopts the MTF measurement system for ...

Handycam® Handbook
Page 17
...; You cannot attach any "InfoLITHIUM" battery pack other than the H series to your camcorder is facing right. The CHG (charge) lamp lights up and charging starts. The CHG (charge) lamp turns off your camcorder by closing the LCD screen. 2 Attach the battery pack by sliding it in the direction ...can charge the "InfoLITHIUM" battery pack (H series) after attaching it clicks. 3 Connect the AC Adaptor and the power cord (mains lead) to your camcorder. 1 Turn off when the battery pack is fully charged. 4 When the battery is charged, disconnect the AC Adaptor from the DC IN jack of ...
...; You cannot attach any "InfoLITHIUM" battery pack other than the H series to your camcorder is facing right. The CHG (charge) lamp lights up and charging starts. The CHG (charge) lamp turns off your camcorder by closing the LCD screen. 2 Attach the battery pack by sliding it in the direction ...can charge the "InfoLITHIUM" battery pack (H series) after attaching it clicks. 3 Connect the AC Adaptor and the power cord (mains lead) to your camcorder. 1 Turn off when the battery pack is fully charged. 4 When the battery is charged, disconnect the AC Adaptor from the DC IN jack of ...
Handycam® Handbook
Page 21
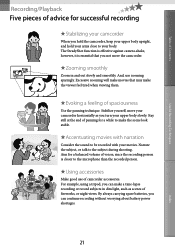
...Accentuating movies with your movies. Table of Contents Useful Recording Techniques Recording/Playback Five pieces of advice for successful recording Stabilizing your camcorder When you not move your upper body slowly. Evoking a feeling of voices, since the recording person is essential that may ...technique. Stabilize yourself, move the camcorder. For example, using a tripod, you can continue recording without worrying about battery power shortages. 21 Index Stay still at the end of fireworks, or night views. Zooming smoothly Zoom in dim light, such as you can make ...
...Accentuating movies with your movies. Table of Contents Useful Recording Techniques Recording/Playback Five pieces of advice for successful recording Stabilizing your camcorder When you not move your upper body slowly. Evoking a feeling of voices, since the recording person is essential that may ...technique. Stabilize yourself, move the camcorder. For example, using a tripod, you can continue recording without worrying about battery power shortages. 21 Index Stay still at the end of fireworks, or night views. Zooming smoothly Zoom in dim light, such as you can make ...
Handycam® Handbook
Page 25
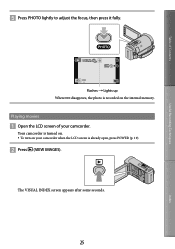
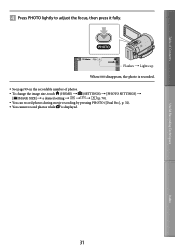
Playing movies Open the LCD screen of Contents Useful Recording Techniques When Flashes Lights up disappears, the photo is recorded on your camcorder. Your camcorder is already open, press POWER (p. 19). Press (VIEW IMAGES). The VISUAL INDEX screen appears after some seconds. 25 Index Press PHOTO lightly to adjust the focus, then press it fully. Table of your camcorder when the LCD screen is turned on. To turn on the internal memory.
Playing movies Open the LCD screen of Contents Useful Recording Techniques When Flashes Lights up disappears, the photo is recorded on your camcorder. Your camcorder is already open, press POWER (p. 19). Press (VIEW IMAGES). The VISUAL INDEX screen appears after some seconds. 25 Index Press PHOTO lightly to adjust the focus, then press it fully. Table of your camcorder when the LCD screen is turned on. To turn on the internal memory.
Handycam® Handbook
Page 31
Flashes Lights up When disappears, the photo is recorded. See page 99 on the recordable number of Contents Useful Recording Techniques Press PHOTO lightly to adjust the focus, then press it fully. Table of photos. To change the image size, touch (HOME) (SETTINGS) [PHOTO SETTINGS] [ IMAGE SIZE] a desired setting p. 70). You can record photos during movie recording by pressing PHOTO ([Dual Rec], p. 32). You cannot record photos while is displayed. 31 Index
Flashes Lights up When disappears, the photo is recorded. See page 99 on the recordable number of Contents Useful Recording Techniques Press PHOTO lightly to adjust the focus, then press it fully. Table of photos. To change the image size, touch (HOME) (SETTINGS) [PHOTO SETTINGS] [ IMAGE SIZE] a desired setting p. 70). You can record photos during movie recording by pressing PHOTO ([Dual Rec], p. 32). You cannot record photos while is displayed. 31 Index

Handycam® Handbook
Page 60
...58371; Touch [YES] . Internal memory Movies "Memory Stick" media Photos You can do recording, playback, and editing operations on your camcorder For recording movies, it is displayed at the top right corner of the screen. : Internal memory : "Memory Stick PRO Duo" media Inserting ...58320; Set the recording medium to [MEMORY STICK] to record movies and/or photos on the internal memory. To check the recording media settings Light up the (Movie) lamp to be used for movies, or the (Photo) lamp for photos. Selecting the recording media for movies ...
...58371; Touch [YES] . Internal memory Movies "Memory Stick" media Photos You can do recording, playback, and editing operations on your camcorder For recording movies, it is displayed at the top right corner of the screen. : Internal memory : "Memory Stick PRO Duo" media Inserting ...58320; Set the recording medium to [MEMORY STICK] to record movies and/or photos on the internal memory. To check the recording media settings Light up the (Movie) lamp to be used for movies, or the (Photo) lamp for photos. Selecting the recording media for movies ...

Handycam® Handbook
Page 61
... cover after inserting the "Memory Stick PRO Duo" media. To eject the "Memory Stick PRO Duo" media Open the "Memory Stick Duo" media cover and lightly push the "Memory Stick PRO Duo" media in once. Do not open the "Memory Stick Duo" media cover during recording. When inserting or... [Failed to create a new Image Database File. "Memory Stick PRO Duo"media/"Memory Stick PRO-HG Duo" media (This size can be used with your camcorder.) "Memory Stick"media (You cannot use any type of memory card other than those mentioned above. "Memory Stick PRO Duo" media can be used...
... cover after inserting the "Memory Stick PRO Duo" media. To eject the "Memory Stick PRO Duo" media Open the "Memory Stick Duo" media cover and lightly push the "Memory Stick PRO Duo" media in once. Do not open the "Memory Stick Duo" media cover during recording. When inserting or... [Failed to create a new Image Database File. "Memory Stick PRO Duo"media/"Memory Stick PRO-HG Duo" media (This size can be used with your camcorder.) "Memory Stick"media (You cannot use any type of memory card other than those mentioned above. "Memory Stick PRO Duo" media can be used...
Handycam® Handbook
Page 68
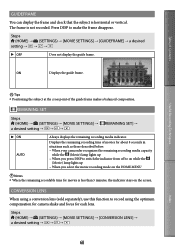
...for movies is not recorded. Table of the guide frame makes a balanced composition. Press DISP to on while the (Movie) lamp lights up When you press DISP to switch the indicator from off to make the frame disappear. Displays the remaining recording time ...of movies for about 8 seconds in situations such as those described below. When your camcorder recognizes the remaining recording media capacity while the (Movie) lamp lights up When you select the movie recording mode on the screen. Steps (HOME) (SETTINGS) ...
...for movies is not recorded. Table of the guide frame makes a balanced composition. Press DISP to on while the (Movie) lamp lights up When you press DISP to switch the indicator from off to make the frame disappear. Displays the remaining recording time ...of movies for about 8 seconds in situations such as those described below. When your camcorder recognizes the remaining recording media capacity while the (Movie) lamp lights up When you select the movie recording mode on the screen. Steps (HOME) (SETTINGS) ...

Handycam® Handbook
Page 69
... the exposure for backlit subjects automatically. Table of Contents OFF WIDE CONVERSION () TELE CONVERSION () Select this when you use a tele-conversion lens. AUTO BACK LIGHT Your camcorder adjusts the exposure for backlight subjects. Useful Recording Techniques Index 69 Steps (HOME) (SETTINGS) [MOVIE SETTINGS] [AUTO BACK...
... the exposure for backlit subjects automatically. Table of Contents OFF WIDE CONVERSION () TELE CONVERSION () Select this when you use a tele-conversion lens. AUTO BACK LIGHT Your camcorder adjusts the exposure for backlight subjects. Useful Recording Techniques Index 69 Steps (HOME) (SETTINGS) [MOVIE SETTINGS] [AUTO BACK...
Handycam® Handbook
Page 71
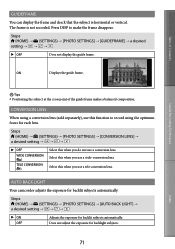
... use this when you use a tele-conversion lens. Select this when you use a wide-conversion lens. ON Displays the guide frame. AUTO BACK LIGHT Your camcorder adjusts the exposure for backlight subjects. 71 Index Steps (HOME) (SETTINGS) [PHOTO SETTINGS] [GUIDEFRAME] ... subjects automatically. The frame is horizontal or vertical. Steps (HOME) (SETTINGS) [PHOTO SETTINGS] [AUTO BACK LIGHT] a desired setting ON OFF Adjusts the exposure for each lens. Press DISP to record...
... use this when you use a tele-conversion lens. Select this when you use a wide-conversion lens. ON Displays the guide frame. AUTO BACK LIGHT Your camcorder adjusts the exposure for backlight subjects. 71 Index Steps (HOME) (SETTINGS) [PHOTO SETTINGS] [GUIDEFRAME] ... subjects automatically. The frame is horizontal or vertical. Steps (HOME) (SETTINGS) [PHOTO SETTINGS] [AUTO BACK LIGHT] a desired setting ON OFF Adjusts the exposure for each lens. Press DISP to record...

Handycam® Handbook
Page 76
... ON OFF A melody sounds when you select [BRIGHT], battery life is slightly reduced during recording. 76 Index LCD BL LEVEL (LCD back light level) You can adjust the brightness of the LCD screen. Steps (HOME) (SETTINGS) [SOUND/DISP SET] [LCD BL LEVEL...; When you start/stop recording, or operate the touch panel. Brightens the LCD screen. Notes When you connect your camcorder to adjust the sound and the screen) The default settings are marked with . VOLUME You can adjust the brightness of the LCD screen...
... ON OFF A melody sounds when you select [BRIGHT], battery life is slightly reduced during recording. 76 Index LCD BL LEVEL (LCD back light level) You can adjust the brightness of the LCD screen. Steps (HOME) (SETTINGS) [SOUND/DISP SET] [LCD BL LEVEL...; When you start/stop recording, or operate the touch panel. Brightens the LCD screen. Notes When you connect your camcorder to adjust the sound and the screen) The default settings are marked with . VOLUME You can adjust the brightness of the LCD screen...

Handycam® Handbook
Page 86
... * Adjusted to focus on subjects farther away only. ** Adjusted not to focus on glass or metal mesh in windows between the camcorder and the subject. Brings out the subject such as sunsets or () sunrises. Index 86 Table of the ocean or a lake....the darkening atmosphere of scenes such as people or flowers while creating a soft background. This setting also prevents your camcorder from appearing excessively white when subjects are lit by strong light. SPOTLIGHT**( ) Prevents people's faces from focusing on subjects a short distance away. Notes ...
... * Adjusted to focus on subjects farther away only. ** Adjusted not to focus on glass or metal mesh in windows between the camcorder and the subject. Brings out the subject such as sunsets or () sunrises. Index 86 Table of the ocean or a lake....the darkening atmosphere of scenes such as people or flowers while creating a soft background. This setting also prevents your camcorder from appearing excessively white when subjects are lit by strong light. SPOTLIGHT**( ) Prevents people's faces from focusing on subjects a short distance away. Notes ...


