Operating Instructions
Page 5
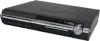
Other Operations Controlling the TV with the Supplied Remote 72 Using the THEATRE SYNC Function 73 Using the Sound Effect 75 Using the Sleep Timer 75 Changing the Brightness of the Front Panel Display ... appear in the display) Specifications 101 Glossary 103 Language Code List 107 Index to Parts and Controls 108 Guide to the Control Menu Display ... 111 DVD Setup Display List 114 System Menu List 115 Index 116 5US
Other Operations Controlling the TV with the Supplied Remote 72 Using the THEATRE SYNC Function 73 Using the Sound Effect 75 Using the Sleep Timer 75 Changing the Brightness of the Front Panel Display ... appear in the display) Specifications 101 Glossary 103 Language Code List 107 Index to Parts and Controls 108 Guide to the Control Menu Display ... 111 DVD Setup Display List 114 System Menu List 115 Index 116 5US
Operating Instructions
Page 6
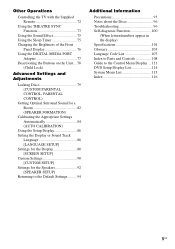
... instructions in the following symbols are for DATA DVDs (DVD-ROMs/DVD-Rs/ DVD-RWs/DVD+Rs/DVD+RWs) containing MP3* audio tracks and JPEG image files * MP3 (MPEG1 Audio Layer 3) is a standard format defined by ISO/MPEG which compresses audio data. 6US This System Can Play the Following Discs Format of format...DAV-HDX501W. Any difference in operation is the model used for example, "DAV-HDX500 only." • The Control Menu items may vary depending on the area. • "DVD" may be used as those on the remote. • The instructions in this manual describe the controls on the unit ...
... instructions in the following symbols are for DATA DVDs (DVD-ROMs/DVD-Rs/ DVD-RWs/DVD+Rs/DVD+RWs) containing MP3* audio tracks and JPEG image files * MP3 (MPEG1 Audio Layer 3) is a standard format defined by ISO/MPEG which compresses audio data. 6US This System Can Play the Following Discs Format of format...DAV-HDX501W. Any difference in operation is the model used for example, "DAV-HDX500 only." • The Control Menu items may vary depending on the area. • "DVD" may be used as those on the remote. • The instructions in this manual describe the controls on the unit ...

Operating Instructions
Page 9
...; Do not use a new battery with an old one. • Do not drop any foreign object into the remote You can control the system using the supplied remote. Note • Do not leave the remote in Specifications, page 101. Attaching the foot pads to the subwoofer Attach the supplied foot pads to the bottom...
...; Do not use a new battery with an old one. • Do not drop any foreign object into the remote You can control the system using the supplied remote. Note • Do not leave the remote in Specifications, page 101. Attaching the foot pads to the subwoofer Attach the supplied foot pads to the bottom...

Operating Instructions
Page 27
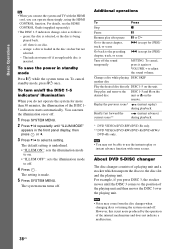
... to "DEMO OFF." 27US after performing "COLD RESET" (page 94)), you can turn off , then press "/1 on the remote. ADVANCED - Turning off the Demonstration "/1 X/x/c, SYSTEM MENU Setting the demonstration mode to off, the system saves power in the front panel display. The setting is underlined. • "DEMO ON": sets the demonstration mode to...
... to "DEMO OFF." 27US after performing "COLD RESET" (page 94)), you can turn off , then press "/1 on the remote. ADVANCED - Turning off the Demonstration "/1 X/x/c, SYSTEM MENU Setting the demonstration mode to off, the system saves power in the front panel display. The setting is underlined. • "DEMO ON": sets the demonstration mode to...
Operating Instructions
Page 37
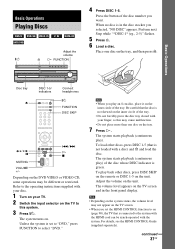
... is connected to select "DVD." Note • Depending on the system status, the volume level may not appear on the unit. Basic Operations Disc tray Z DISC 1-5/ indicators Connect headphones "/1 FUNCTION DISC SKIP / X ./> H x MUTING VOLUME +/- The system turns on the unit. To load other discs, press DISC SKIP on the remote or DISC 1-5 on the...
... is connected to select "DVD." Note • Depending on the system status, the volume level may not appear on the unit. Basic Operations Disc tray Z DISC 1-5/ indicators Connect headphones "/1 FUNCTION DISC SKIP / X ./> H x MUTING VOLUME +/- The system turns on the unit. To load other discs, press DISC SKIP on the remote or DISC 1-5 on the...
Operating Instructions
Page 38
... being played back. - Replay the previous scene* (instant replay) during playback. * DVD VIDEOs/DVD-RWs/DVD-Rs only. ** DVD VIDEOs/DVD-RWs/DVD-Rs/DVD+RWs/ DVD+Rs only. Note • You may come from the disc changer when changing discs or turning the system on the remote. Change a disc while playing DISC SKIP another disc Play the desired disc...
... being played back. - Replay the previous scene* (instant replay) during playback. * DVD VIDEOs/DVD-RWs/DVD-Rs only. ** DVD VIDEOs/DVD-RWs/DVD-Rs/DVD+RWs/ DVD+Rs only. Note • You may come from the disc changer when changing discs or turning the system on the remote. Change a disc while playing DISC SKIP another disc Play the desired disc...

Operating Instructions
Page 72
... adjusting the remote signal, you can control your TV's manufacturer's code (see the table) using following buttons. Reset the appropriate code number. Select the TV channel. TV Manufacturer Code number SONY/AIWA 501 (default) DAEWOO 503, 506, 515, 544 FISHER 508, 545 GRUNDIG 533 HITACHI 503, 514, 515... 826, 827 To control the TV You can control the TV by using the number buttons. Return to the default (SONY) setting. Code numbers of the TV. 72US Adjust the TV volume. Controlling TVs with the remote Press and hold TV [/1 while entering your TV with the supplied...
... adjusting the remote signal, you can control your TV's manufacturer's code (see the table) using following buttons. Reset the appropriate code number. Select the TV channel. TV Manufacturer Code number SONY/AIWA 501 (default) DAEWOO 503, 506, 515, 544 FISHER 508, 545 GRUNDIG 533 HITACHI 503, 514, 515... 826, 827 To control the TV You can control the TV by using the number buttons. Return to the default (SONY) setting. Code numbers of the TV. 72US Adjust the TV volume. Controlling TVs with the remote Press and hold TV [/1 while entering your TV with the supplied...
Operating Instructions
Page 73
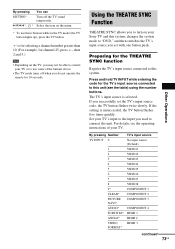
...* Turn off when you do not operate the remote for 10 seconds. Preparing for the THEATRE SYNC ...4 VIDEO4 5 VIDEO5 6 VIDEO6 7 VIDEO7 8 VIDEO8 9* COMPONENT 1 CLEAR* COMPONENT 2 PICTURE NAVI* COMPONENT 3 AUDIO* COMPONENT 4 SUBTITLE* HDMI 1 ANGLE* HDMI 2 VIDEO HDMI 3 FORMAT* continued 73US Set your Sony TV and this system. If the setting is selected. Using the THEATRE SYNC Function ... than 10. (For example, for the TV's input source connected to this system, changes the system mode to "DVD," and then switches the TV's input source you used to use these buttons ...
...* Turn off when you do not operate the remote for 10 seconds. Preparing for the THEATRE SYNC ...4 VIDEO4 5 VIDEO5 6 VIDEO6 7 VIDEO7 8 VIDEO8 9* COMPONENT 1 CLEAR* COMPONENT 2 PICTURE NAVI* COMPONENT 3 AUDIO* COMPONENT 4 SUBTITLE* HDMI 1 ANGLE* HDMI 2 VIDEO HDMI 3 FORMAT* continued 73US Set your Sony TV and this system. If the setting is selected. Using the THEATRE SYNC Function ... than 10. (For example, for the TV's input source connected to this system, changes the system mode to "DVD," and then switches the TV's input source you used to use these buttons ...

Operating Instructions
Page 74
... flashes twice slowly. If the setting is too far, this unit while entering the code. 74US Install the unit near the TV. • Keep the remote pointed in the direction of the TV and this unit, then press THEATRE SYNC once. By pressing Number TV CH + 1 2 3 4 5 6 7 8 Transmit time 0.5... (Default) 1 1.5 2 3 4 5 6 Note • This function is flashing. • Keep the remote pointed in the direction of TV and this unit while the TV button is only for Sony TVs. (This function may not work. To change the transmit time. The transmit time varies depending on...
... flashes twice slowly. If the setting is too far, this unit while entering the code. 74US Install the unit near the TV. • Keep the remote pointed in the direction of the TV and this unit, then press THEATRE SYNC once. By pressing Number TV CH + 1 2 3 4 5 6 7 8 Transmit time 0.5... (Default) 1 1.5 2 3 4 5 6 Note • This function is flashing. • Keep the remote pointed in the direction of TV and this unit while the TV button is only for Sony TVs. (This function may not work. To change the transmit time. The transmit time varies depending on...
Operating Instructions
Page 77
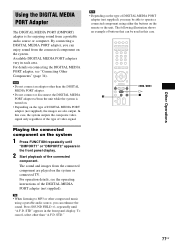
...details on connecting the DIGITAL MEDIA PORT adapter, see the operating instructions of the DIGITAL MEDIA PORT adapter (not supplied). Playing the connected component on the system 1 Press FUNCTION repeatedly until "A.F.D. In this case. ./> H X x 77US Tip • When listening to MP3 or other than...connect or disconnect the DIGITAL MEDIA PORT adapter to operate a connected component using a portable audio source, you can enhance the sound. To cancel, select other compressed music using either the buttons on the remote or the unit. Note • Do not connect an adaptor ...
...details on connecting the DIGITAL MEDIA PORT adapter, see the operating instructions of the DIGITAL MEDIA PORT adapter (not supplied). Playing the connected component on the system 1 Press FUNCTION repeatedly until "A.F.D. In this case. ./> H X x 77US Tip • When listening to MP3 or other than...connect or disconnect the DIGITAL MEDIA PORT adapter to operate a connected component using a portable audio source, you can enhance the sound. To cancel, select other compressed music using either the buttons on the remote or the unit. Note • Do not connect an adaptor ...
Operating Instructions
Page 78
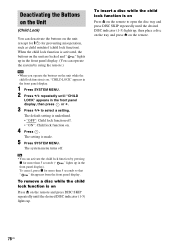
...on the unit are locked and " " lights up , then place a disc on the tray and press Z on the remote. 78US Deactivating the Buttons on the Unit (Child Lock) You can operate the system by pressing x for more than 5 seconds (" " lights up . The default setting is on Press Z on the unit ...(except for "/1) for more than 5 seconds so that " " disappears from the front panel display. The system menu turns off . • "ON": Child lock function on. 4 Press . To remove a disc while the child lock function is underlined. • "OFF": ...
...on the unit are locked and " " lights up , then place a disc on the tray and press Z on the remote. 78US Deactivating the Buttons on the Unit (Child Lock) You can operate the system by pressing x for more than 5 seconds (" " lights up . The default setting is on Press Z on the unit ...(except for "/1) for more than 5 seconds so that " " disappears from the front panel display. The system menu turns off . • "ON": Child lock function on. 4 Press . To remove a disc while the child lock function is underlined. • "OFF": ...
Operating Instructions
Page 93
... the input stream, the [DISTANCE] setting may not be set from 0.00 to 7.00 set the distance using the test tone 1 Press DISPLAY when the system is emitted from the listening position can (appears when you perform the Quick Setup (page 24), the default settings are changed. 2)0.00 to change the.... [L/R] Surround speaker distance 3.00 m/10 ft1)3) from each speaker in sequence while adjusting level. When you select one time Turn the VOLUME control on the remote. When you set [SURROUND] to meters2) (0 to select [SETUP], then press .
... the input stream, the [DISTANCE] setting may not be set from 0.00 to 7.00 set the distance using the test tone 1 Press DISPLAY when the system is emitted from the listening position can (appears when you perform the Quick Setup (page 24), the default settings are changed. 2)0.00 to change the.... [L/R] Surround speaker distance 3.00 m/10 ft1)3) from each speaker in sequence while adjusting level. When you select one time Turn the VOLUME control on the remote. When you set [SURROUND] to meters2) (0 to select [SETUP], then press .
Operating Instructions
Page 97
... is not connected securely. • Press MUTING on the remote if "MUTING ON" is displayed in the front panel display. • The system is performed. Wipe them with a cloth slightly moistened with ...PROGRESSIVE" using a video jack other than the HDMI OUT, and switch the TV's input to some DVD programs could affect picture quality. Press H to return to normal play mode. • Check the ...page 110. • If the HDMI OUT jack is heard. • Check that the speakers and components are connected securely. • Check that the connecting cords are away from a transformer or motor, ...
... is not connected securely. • Press MUTING on the remote if "MUTING ON" is displayed in the front panel display. • The system is performed. Wipe them with a cloth slightly moistened with ...PROGRESSIVE" using a video jack other than the HDMI OUT, and switch the TV's input to some DVD programs could affect picture quality. Press H to return to normal play mode. • Check the ...page 110. • If the HDMI OUT jack is heard. • Check that the speakers and components are connected securely. • Check that the connecting cords are away from a transformer or motor, ...
Operating Instructions
Page 98
... the unit is too far. • The remote is not pointed at the remote sensor on the unit. • The batteries in an MP3 format that conforms to ISO 9660 Level 1/Level 2, or Joliet. • The DATA DVD is skewed on the disc tray. • The system cannot play CD-ROMs, etc. (page 6). ... the speaker connections and settings (page 19, 92). • Make sure the sound field function is on (page 42). • Depending on the DVD does not match the system. • Moisture has condensed inside the unit and may be less noticeable. • A 2 channel source is being played. No sound or only ...
... the unit is too far. • The remote is not pointed at the remote sensor on the unit. • The batteries in an MP3 format that conforms to ISO 9660 Level 1/Level 2, or Joliet. • The DATA DVD is skewed on the disc tray. • The system cannot play CD-ROMs, etc. (page 6). ... the speaker connections and settings (page 19, 92). • Make sure the sound field function is on (page 42). • Depending on the DVD does not match the system. • Moisture has condensed inside the unit and may be less noticeable. • A 2 channel source is being played. No sound or only ...
Operating Instructions
Page 99
...DVD features an auto playback function. Messages do not appear on the TV screen in the language you cannot change the [MODE (MP3, JPEG)] setting, re-load the disc or turn the system off, then on. The subtitle cannot be changed . • Multilingual subtitles are not recorded on the unit or the remote... Sony dealer or local authorized Sony service facility. [Data error] appears on the TV screen when playing a DATA CD or DATA DVD....• The system can only display numbers and letters of the connected component is connected securely. • Check the connected component's setting for ...
...DVD features an auto playback function. Messages do not appear on the TV screen in the language you cannot change the [MODE (MP3, JPEG)] setting, re-load the disc or turn the system off, then on. The subtitle cannot be changed . • Multilingual subtitles are not recorded on the unit or the remote... Sony dealer or local authorized Sony service facility. [Data error] appears on the TV screen when playing a DATA CD or DATA DVD....• The system can only display numbers and letters of the connected component is connected securely. • Check the connected component's setting for ...
Operating Instructions
Page 103
...of a music piece or an image on a DVD. All six channels in this format, the surround...• FM wire antenna (aerial) (1) • Speaker cords (6, red/white/green/gray/blue/purple) • Video Cord (1) • Remote Commander (remote) (1) • R6 (size AA) batteries (2) • Calibration mic (1) • Foot pads (1 set up, Digital Direct Twin Drive... notice. Dolby Digital This movie theater sound format is more advanced than Dolby Surround Pro Logic. Digital Cinema Auto Calibration Digital Cinema Auto Calibration was developed by Sony to automatically measure and adjusts the...
...of a music piece or an image on a DVD. All six channels in this format, the surround...• FM wire antenna (aerial) (1) • Speaker cords (6, red/white/green/gray/blue/purple) • Video Cord (1) • Remote Commander (remote) (1) • R6 (size AA) batteries (2) • Calibration mic (1) • Foot pads (1 set up, Digital Direct Twin Drive... notice. Dolby Digital This movie theater sound format is more advanced than Dolby Surround Pro Logic. Digital Cinema Auto Calibration Digital Cinema Auto Calibration was developed by Sony to automatically measure and adjusts the...

Operating Instructions
Page 108
Front panel A "/1 (on/standby) (37) B A (open/close) (37) C Disc operation (37) D FUNCTION (37) E Front panel display (110) F (remote sensor) (9) G PHONES jack (37) H VOLUME control (37) I AUDIO IN/A.CAL MIC jack (24, 34) J DISC 1-5 buttons/indicators (37) K Disc tray (37) 108US Index to Parts and Controls For more information, refer to the pages indicated in parentheses.
Front panel A "/1 (on/standby) (37) B A (open/close) (37) C Disc operation (37) D FUNCTION (37) E Front panel display (110) F (remote sensor) (9) G PHONES jack (37) H VOLUME control (37) I AUDIO IN/A.CAL MIC jack (24, 34) J DISC 1-5 buttons/indicators (37) K Disc tray (37) 108US Index to Parts and Controls For more information, refer to the pages indicated in parentheses.

Operating Instructions
Page 115
Additional Information 115US System menu MEMORY1) FM MODE2) NAME IN3) SLEEP DIMMER ILLUM MODE DEMO ATTENUATE4) SL SR REV5) CHILD LOCK MEMORY 1-20 (FM), MEMORY 1-10 (AM), MEMORY 1-30 (...," "TUNER AM," or "XM" only. 2)Appears during "TUNER FM" only. 3)Appears during "TUNER FM" or "TUNER AM" only. 4)"ATTENUATE" may not appear, depending on the remote. System Menu List You can set the following items with SYSTEM MENU on the selected function. 5)Appears when the wireless kit WAHT-SD1 is installed.
Additional Information 115US System menu MEMORY1) FM MODE2) NAME IN3) SLEEP DIMMER ILLUM MODE DEMO ATTENUATE4) SL SR REV5) CHILD LOCK MEMORY 1-20 (FM), MEMORY 1-10 (AM), MEMORY 1-30 (...," "TUNER AM," or "XM" only. 2)Appears during "TUNER FM" only. 3)Appears during "TUNER FM" or "TUNER AM" only. 4)"ATTENUATE" may not appear, depending on the remote. System Menu List You can set the following items with SYSTEM MENU on the selected function. 5)Appears when the wireless kit WAHT-SD1 is installed.

Operating Instructions
Page 117
R Radio 66 Radio Stations 65 Rear Panel 109 Region Code 8, 105 Remote 9, 72 Repeat Play 51 RESET 87 Resume Play 47 S S VIDEO 31 Scan 45 SCENE 46 Scene 105 SCREEN SAVER 89 SCREEN SETUP 88 Searching 45 ... Field 42 SPEAKER FORMATION 82 SPEAKER SETUP 92 CONNECTION 92 DISTANCE 92, 93 LEVEL 93 STB SYNCHRO 90 SUBTITLE 57, 88 SYSTEM MENU 27, 38, 39, 66, 75, 76, 78 System menu list 115 T TEST TONE 93 THEATRE SYNC 73 TIME/TEXT 46 TITLE 46 Title 105 TRACK 46 Track 105 TRACK...
R Radio 66 Radio Stations 65 Rear Panel 109 Region Code 8, 105 Remote 9, 72 Repeat Play 51 RESET 87 Resume Play 47 S S VIDEO 31 Scan 45 SCENE 46 Scene 105 SCREEN SAVER 89 SCREEN SETUP 88 Searching 45 ... Field 42 SPEAKER FORMATION 82 SPEAKER SETUP 92 CONNECTION 92 DISTANCE 92, 93 LEVEL 93 STB SYNCHRO 90 SUBTITLE 57, 88 SYSTEM MENU 27, 38, 39, 66, 75, 76, 78 System menu list 115 T TEST TONE 93 THEATRE SYNC 73 TIME/TEXT 46 TITLE 46 Title 105 TRACK 46 Track 105 TRACK...
Operating Instructions
Page 119
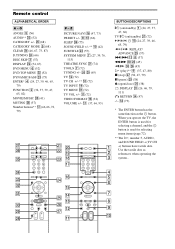
...) PRESET +/- 8 qd (66) SLEEP eh (75) SOUND FIELD +/-** 0 (42) SUBTITLE wf (57) SYSTEM MENU 7 (27, 39, 76, 115) THEATRE SYNC wa (74) TOOLS 7 (72) TUNING +/- qa ... wg (37) ./> qd 8 (37) m/M e; ef (73) * The ENTER button has the same function as references when operating the system.. wh e; (65) TV qs (72) TV CH +/-** 0 (72) TV INPUT ql (72) TV MENU ea (72) TV VOL...DVD TOP MENU es (52) DYNAMIC BASS wd (75) ENTER* 4 (24, 27, 39, 46, 65, 79) FUNCTION 2 (32, 37, 39, 47, 65, 82) MOVIE/MUSIC eg (41) MUTING wk (37) Number buttons** qj (46, 66, 72, 79) P - Use the tactile dots as the button. Remote...
...) PRESET +/- 8 qd (66) SLEEP eh (75) SOUND FIELD +/-** 0 (42) SUBTITLE wf (57) SYSTEM MENU 7 (27, 39, 76, 115) THEATRE SYNC wa (74) TOOLS 7 (72) TUNING +/- qa ... wg (37) ./> qd 8 (37) m/M e; ef (73) * The ENTER button has the same function as references when operating the system.. wh e; (65) TV qs (72) TV CH +/-** 0 (72) TV INPUT ql (72) TV MENU ea (72) TV VOL...DVD TOP MENU es (52) DYNAMIC BASS wd (75) ENTER* 4 (24, 27, 39, 46, 65, 79) FUNCTION 2 (32, 37, 39, 47, 65, 82) MOVIE/MUSIC eg (41) MUTING wk (37) Number buttons** qj (46, 66, 72, 79) P - Use the tactile dots as the button. Remote...


