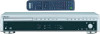

M-Crew Operating Instructions
Page 3
... requirements 5 Preparation Installing the software 6 Installing M-crew for HAR-D1000 6 Uninstalling the software 9 Connections 10 Verifying the status of the installed device 11 Basic Operations 13 Starting up the software 13 Listening to a CD 13 Listening to the HDD 14 Recording from a CD to the HDD (Synchro-Recording 14 Quitting the software 15 Additional Information Using...
... requirements 5 Preparation Installing the software 6 Installing M-crew for HAR-D1000 6 Uninstalling the software 9 Connections 10 Verifying the status of the installed device 11 Basic Operations 13 Starting up the software 13 Listening to a CD 13 Listening to the HDD 14 Recording from a CD to the HDD (Synchro-Recording 14 Quitting the software 15 Additional Information Using...

M-Crew Operating Instructions
Page 4
...related data are service marks of Gracenote. Gracenote is the industry standard in the Disc Library. • Access related websites while enjoying tracks. Gracenote is a registered trademark... played tracks in music recognition technology and related content delivery. CD and music related data from a CD to the HDD through easy drag-and-drop operations. Patents...HAR-D1000 equipped with a USB connector. Gracenote CDDB Client Software 2000, 2001 Gracenote. Getting started Overview M-crew for HAR-D1000 allows you can use this software, you to www.gracenote.com. Recording...
...related data are service marks of Gracenote. Gracenote is the industry standard in the Disc Library. • Access related websites while enjoying tracks. Gracenote is a registered trademark... played tracks in music recognition technology and related content delivery. CD and music related data from a CD to the HDD through easy drag-and-drop operations. Patents...HAR-D1000 equipped with a USB connector. Gracenote CDDB Client Software 2000, 2001 Gracenote. Getting started Overview M-crew for HAR-D1000 allows you can use this software, you to www.gracenote.com. Recording...
M-Crew Operating Instructions
Page 5
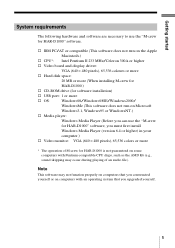
... and display driver: VGA (640 × 480 pixels), 65,536 colours or more s Hard disk space: 20 MB or more (When installing M-crew for HAR-D1000.) s CD-ROM drive (for software installation) s USB port: 1 or more * The operation of an audio file). s IBM PC/AT or compatible (This software does not run on Microsoft Windows3...
... and display driver: VGA (640 × 480 pixels), 65,536 colours or more s Hard disk space: 20 MB or more (When installing M-crew for HAR-D1000.) s CD-ROM drive (for software installation) s USB port: 1 or more * The operation of an audio file). s IBM PC/AT or compatible (This software does not run on Microsoft Windows3...

M-Crew Operating Instructions
Page 6
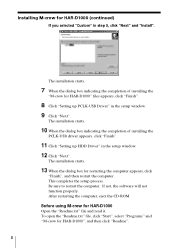
...If this happens, click "Restart" to restart your computer, do not remove the CD-ROM. Notes • Be sure to install this software before connecting the HAR-D1000 to your computer's hard disk. Preparation Installing the software Use this procedure to install a software onto your...log on through the administrator's account to install a software. (for Windows2000) Installing M-crew for HAR-D1000 1 Load the supplied "M-crew for HAR-D1000. Be sure to install M-crew for HAR-D1000" CD-ROM into the CD-ROM drive of your computer, the following window appears. The setup window appears. 3 Click "...
...If this happens, click "Restart" to restart your computer, do not remove the CD-ROM. Notes • Be sure to install this software before connecting the HAR-D1000 to your computer's hard disk. Preparation Installing the software Use this procedure to install a software onto your...log on through the administrator's account to install a software. (for Windows2000) Installing M-crew for HAR-D1000 1 Load the supplied "M-crew for HAR-D1000. Be sure to install M-crew for HAR-D1000" CD-ROM into the CD-ROM drive of your computer, the following window appears. The setup window appears. 3 Click "...
M-Crew Operating Instructions
Page 8
...CD-ROM. Before using M-crew for HAR-D1000", and then click "Readme". 8 This completes the setup process. If not, the software will not function properly. To open the "Readme.txt" file, click "Start", select "Programs" and "M-crew for HAR-D1000 Open the "Readme.txt" file and read it. Installing M-crew for HAR-D1000... 11 Click "Setting up PCLK-USB Driver" in step 5, click "Next" and "Install". The installation starts. 13 When the dialog box for HAR-D1000" files appears, click "Finish". 8 Click "Setting up HDD Driver" in the setup window. 12 Click "Next". Be sure to restart the ...
...CD-ROM. Before using M-crew for HAR-D1000", and then click "Readme". 8 This completes the setup process. If not, the software will not function properly. To open the "Readme.txt" file, click "Start", select "Programs" and "M-crew for HAR-D1000 Open the "Readme.txt" file and read it. Installing M-crew for HAR-D1000... 11 Click "Setting up PCLK-USB Driver" in step 5, click "Next" and "Install". The installation starts. 13 When the dialog box for HAR-D1000" files appears, click "Finish". 8 Click "Setting up HDD Driver" in the setup window. 12 Click "Next". Be sure to restart the ...

M-Crew Operating Instructions
Page 10
...loaded with a USB cable connected, a warning message may appear in . If Synchro-Recording from a CD changer, etc.). If you insert it. Connections Connecting your personal computer with the HAR-D1000 Use a USB cable to connect your personal computer with no more than one computer in... which the software has been installed, HAR-D1000 data may not be properly read in the display. • Some HAR-D1000 functions are not supported by M-crew for HAR-D1000 (e.g., Synchro-Recording from a CD changer is started on the HAR-D1000 while "M-crew for HAR-D1000" software. Notes • Be sure ...
...loaded with a USB cable connected, a warning message may appear in . If Synchro-Recording from a CD changer, etc.). If you insert it. Connections Connecting your personal computer with the HAR-D1000 Use a USB cable to connect your personal computer with no more than one computer in... which the software has been installed, HAR-D1000 data may not be properly read in the display. • Some HAR-D1000 functions are not supported by M-crew for HAR-D1000 (e.g., Synchro-Recording from a CD changer is started on the HAR-D1000 while "M-crew for HAR-D1000" software. Notes • Be sure ...
M-Crew Operating Instructions
Page 13
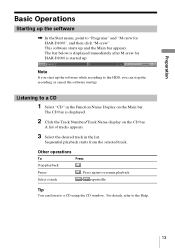
... in the Function Name Display on the CD bar. Select a track / repeatedly. The bar below is displayed immediately after M-crew for HAR-D1000", and then click "M-crew". This software starts up the software while recording to "Programs" and "M-crew for HAR-D1000 is displayed. 2 Click the Track Number.../Track Name display on the Main bar. Press again to the Help. 13 Note If you can listen to a CD 1 Select "CD" in the list. Sequential ...
... in the Function Name Display on the CD bar. Select a track / repeatedly. The bar below is displayed immediately after M-crew for HAR-D1000", and then click "M-crew". This software starts up the software while recording to "Programs" and "M-crew for HAR-D1000 is displayed. 2 Click the Track Number.../Track Name display on the Main bar. Press again to the Help. 13 Note If you can listen to a CD 1 Select "CD" in the list. Sequential ...
M-Crew Operating Instructions
Page 14
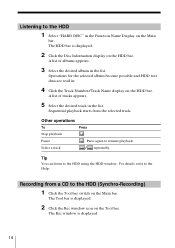
...Stop playback . Tip You can listen to the Help. Recording from the selected track. Operations for the selected album become possible and HDD text data are read in the list. Pause . Listening to the HDD 1 Select "HARD DISC" in the list. A list of albums appears. ...3 Select the desired album in . 4 Click the Track Number/Track Name display on the HDD bar. For details, refer to the HDD using the HDD window. Sequential playback starts from a CD to resume playback. Press again to the HDD (Synchro-Recording...
...Stop playback . Tip You can listen to the Help. Recording from the selected track. Operations for the selected album become possible and HDD text data are read in the list. Pause . Listening to the HDD 1 Select "HARD DISC" in the list. A list of albums appears. ...3 Select the desired album in . 4 Click the Track Number/Track Name display on the HDD bar. For details, refer to the HDD using the HDD window. Sequential playback starts from a CD to resume playback. Press again to the HDD (Synchro-Recording...

M-Crew Operating Instructions
Page 15
...'s Track Name display onto the HDD window's Track Name or Disc Information display. A dialog box for HAR-D1000 ends. 15 For details, refer to be recorded. 8 Click the REC button in the CD window's Track Name display. 7 To record all tracks on the Main bar. To record a desired track, drag and drop the desired track number from...
...'s Track Name display onto the HDD window's Track Name or Disc Information display. A dialog box for HAR-D1000 ends. 15 For details, refer to be recorded. 8 Click the REC button in the CD window's Track Name display. 7 To record all tracks on the Main bar. To record a desired track, drag and drop the desired track number from...

M-Crew Operating Instructions
Page 17
... displayed CD name differs from that the USB cable is connected properly. The installed devices are not set properly. Please also refer to your nearest Sony dealer. The USB cable is installed in the folder which the "M-crew for HAR-D1000. t Try disconnecting the USB cable from the HAR-D1000 and ... hard disk with the software. Should the problem persist, the data in the Start menu. t Refer to the USB port on the computer or the USB connector on the HAR-D1000, and then restart M-crew for HAR-D1000" software is not properly connected to the "Readme.txt" file in the Disc ...
... displayed CD name differs from that the USB cable is connected properly. The installed devices are not set properly. Please also refer to your nearest Sony dealer. The USB cable is installed in the folder which the "M-crew for HAR-D1000. t Try disconnecting the USB cable from the HAR-D1000 and ... hard disk with the software. Should the problem persist, the data in the Start menu. t Refer to the USB port on the computer or the USB connector on the HAR-D1000, and then restart M-crew for HAR-D1000" software is not properly connected to the "Readme.txt" file in the Disc ...

Primary User Manual
Page 3
... 30 Additional Information Precautions 32 Notes on CDs 32 Notes on recording 12 Recording a CD to the HDD -- Marking track numbers/Smart Space/ Adjusting the recording level 15 Playing the HDD Playing the HDD -- Move Function 26 Assigning a title or artist name to HDD Notes on handling the hard disc .......... 33 Troubleshooting 33 Display Messages 34 Setup...
... 30 Additional Information Precautions 32 Notes on CDs 32 Notes on recording 12 Recording a CD to the HDD -- Marking track numbers/Smart Space/ Adjusting the recording level 15 Playing the HDD Playing the HDD -- Move Function 26 Assigning a title or artist name to HDD Notes on handling the hard disc .......... 33 Troubleshooting 33 Display Messages 34 Setup...

Primary User Manual
Page 4
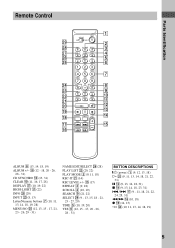
...wd ws wa w;ql qkqj qh ALBUM dial qk (12 - 18, 20 - 27, 29 - 31) CD SYNC qf (13, 31) CD H 4 (9, 11, 14) CD X 5 (9) CD x 6 (8, 9, 13, 14) CD l/L 8 (9, 10. 11) CLEAR qj (8, 16, 17, 28) Disc tray wf (9) DISPLAY w; (10, 19, 22) Display wd (10, 19, 21) HDD indicator 7 (... 20 - 31) BUTTON DESCRIPTIONS @/1 (power) 1 (9, 12, 13, 18) Rear Panel ANALOG IN OUT L DIGITAL OPTICAL IN CD CHANGER CONTROL USB R 12 3 4 5 6 ANALOG IN L/R jacks 1 (8) ANALOG OUT L/R jacks 2 (7, 30) CD CHANGER CONTROL jack 4 (30) DIGITAL OPTICAL IN connector 3 (7, 30) Power cord 6 (7) USB connector 5 (8) 4 Refer to...
...wd ws wa w;ql qkqj qh ALBUM dial qk (12 - 18, 20 - 27, 29 - 31) CD SYNC qf (13, 31) CD H 4 (9, 11, 14) CD X 5 (9) CD x 6 (8, 9, 13, 14) CD l/L 8 (9, 10. 11) CLEAR qj (8, 16, 17, 28) Disc tray wf (9) DISPLAY w; (10, 19, 22) Display wd (10, 19, 21) HDD indicator 7 (... 20 - 31) BUTTON DESCRIPTIONS @/1 (power) 1 (9, 12, 13, 18) Rear Panel ANALOG IN OUT L DIGITAL OPTICAL IN CD CHANGER CONTROL USB R 12 3 4 5 6 ANALOG IN L/R jacks 1 (8) ANALOG OUT L/R jacks 2 (7, 30) CD CHANGER CONTROL jack 4 (30) DIGITAL OPTICAL IN connector 3 (7, 30) Power cord 6 (7) USB connector 5 (8) 4 Refer to...
Primary User Manual
Page 5
.../NO / SELECT YES `-/, ABC DEF 123 GHI JKL MNO 456 PQRS TUV WXYZ 789 ALBUM >10 10/0 INPUT SEARCH CLEAR HIGHREC-IT PLAY LIST LIGHT CD SYNCHRO ALBUM - < ALBUM + > REC LEVEL 1 2 3 4 5 6 7 8 9 q; Parts Identification Remote Control wl wk wj wh wg wf wd ws wa w; qg (17) REPEAT 3 (9, 18) SCROLL 4 (10, 19... wf (10, 11, 13, 14, 18, 19) 5 qa qs qd qf qg ALBUM 8 (13, 14, 18, 19) ALBUM +/- qk (12 - 18, 20 - 26, 28 - 31) CD SYNCHRO qd (13, 31) CLEAR 0 (11, 16, 17, 28) DISPLAY wj (10, 19, 22) HIGH-LIGHT qa (22) INFO wk (20) INPUT wd (8, 13) Letter...
.../NO / SELECT YES `-/, ABC DEF 123 GHI JKL MNO 456 PQRS TUV WXYZ 789 ALBUM >10 10/0 INPUT SEARCH CLEAR HIGHREC-IT PLAY LIST LIGHT CD SYNCHRO ALBUM - < ALBUM + > REC LEVEL 1 2 3 4 5 6 7 8 9 q; Parts Identification Remote Control wl wk wj wh wg wf wd ws wa w; qg (17) REPEAT 3 (9, 18) SCROLL 4 (10, 19... wf (10, 11, 13, 14, 18, 19) 5 qa qs qd qf qg ALBUM 8 (13, 14, 18, 19) ALBUM +/- qk (12 - 18, 20 - 26, 28 - 31) CD SYNCHRO qd (13, 31) CLEAR 0 (11, 16, 17, 28) DISPLAY wj (10, 19, 22) HIGH-LIGHT qa (22) INFO wk (20) INPUT wd (8, 13) Letter...
Primary User Manual
Page 6
.... 6 Notes • The recorded music is being performed. Gracenote is a registered trademark of storing audio data. These sounds are produced by Gracenote CDDB" logo are not abnormal. • You may be created on the HDD. CD and music related data from your...HAR-D1000 software, you can access CDDB2* from Gracenote CDDB Music Recognition ServiceSM 2000, 2001 Gracenote. CDDB is CDDB, Inc. Overview This recorder, with each play an HDD track, record to the HDD, etc. Be sure to retain the original sound source as the recorder access the hard disc...
.... 6 Notes • The recorded music is being performed. Gracenote is a registered trademark of storing audio data. These sounds are produced by Gracenote CDDB" logo are not abnormal. • You may be created on the HDD. CD and music related data from your...HAR-D1000 software, you can access CDDB2* from Gracenote CDDB Music Recognition ServiceSM 2000, 2001 Gracenote. CDDB is CDDB, Inc. Overview This recorder, with each play an HDD track, record to the HDD, etc. Be sure to retain the original sound source as the recorder access the hard disc...
Primary User Manual
Page 7
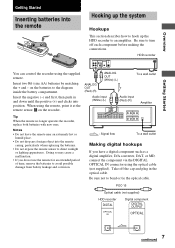
... IN OUT L DIGITAL OPTICAL IN CD CHANGER CONTROL USB R You can control the recorder using the remote, point it at the remote sensor on the batteries to direct sunlight or lighting apparatuses. on the recorder. Doing so may cause a malfunction. • If you ...the supplied remote. ANALOG OUT (Red) (R) ANALOG OUT (White) (L) To a wall outlet Audio input (White) (L) Audio input (Red) (R) Amplifier Tip When the remote no longer operates the recorder, replace both batteries with new ones. Overview Getting Started Getting Started Inserting batteries into the remote ...
... IN OUT L DIGITAL OPTICAL IN CD CHANGER CONTROL USB R You can control the recorder using the remote, point it at the remote sensor on the batteries to direct sunlight or lighting apparatuses. on the recorder. Doing so may cause a malfunction. • If you ...the supplied remote. ANALOG OUT (Red) (R) ANALOG OUT (White) (L) To a wall outlet Audio input (White) (L) Audio input (Red) (R) Amplifier Tip When the remote no longer operates the recorder, replace both batteries with new ones. Overview Getting Started Getting Started Inserting batteries into the remote ...

Primary User Manual
Page 8
... via the DIGITAL OPTICAL IN connector is stopped for HAR-D1000 Operating Instructions". Demonstration mode When you disconnect the power cord of the recorder. To deactivate the demonstration mode, press any button on the recorder or on the recorder and there is no CD in the display, recording via the ANALOG IN jacks with "ANLG" selected by...
... via the DIGITAL OPTICAL IN connector is stopped for HAR-D1000 Operating Instructions". Demonstration mode When you disconnect the power cord of the recorder. To deactivate the demonstration mode, press any button on the recorder or on the recorder and there is no CD in the display, recording via the ANALOG IN jacks with "ANLG" selected by...

Primary User Manual
Page 9
... SHUFFLE. Other Operations To Stop playback Pause Select a track Do this recorder. 2 Press @/1 to turn on the recorder. To play a CD single (8 cm CD), load it on the inner circle of the tray. 5 Press OPEN/CLOSE A again to close the disc tray. To Repeat all tracks Repeat only one track Cancel Repeat Play Select REPEAT...
... SHUFFLE. Other Operations To Stop playback Pause Select a track Do this recorder. 2 Press @/1 to turn on the recorder. To play a CD single (8 cm CD), load it on the inner circle of the tray. 5 Press OPEN/CLOSE A again to close the disc tray. To Repeat all tracks Repeat only one track Cancel Repeat Play Select REPEAT...

Primary User Manual
Page 10
... of tracks Total playing time The information also appears when you load a CD containing CD TEXT data, "CD TEXT" lights up in the display. • When the detailed display is selected, the disc name appears while the recorder is stopped and the track name appears while a track is selected, the... holding down m on the remote, or press CD l repeatedly to CD. Press 10/0 for a CD containing 99 tracks 1 Press >10. When using the display. Changing the display Press DISPLAY while the recorder is playing. If the CD has no CD in the recorder, "No Disc" appears in the display. Note If you press...
... of tracks Total playing time The information also appears when you load a CD containing CD TEXT data, "CD TEXT" lights up in the display. • When the detailed display is selected, the disc name appears while the recorder is stopped and the track name appears while a track is selected, the... holding down m on the remote, or press CD l repeatedly to CD. Press 10/0 for a CD containing 99 tracks 1 Press >10. When using the display. Changing the display Press DISPLAY while the recorder is playing. If the CD has no CD in the recorder, "No Disc" appears in the display. Note If you press...
Primary User Manual
Page 11
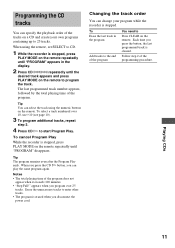
...The total playing time of the programming procedure. Changing the track order You can select the track using the remote, set SELECT to CD. 1 While the recorder is stopped, press PLAY MODE on the remote repeatedly until the desired track appears and press PLAY MODE on the remote to 25...program does not appear when it exceeds 100 minutes. • "Step Full!" Playing CDs 11 Programming the CD tracks You can specify the playback order of the tracks on a CD and create your program while the recorder is stopped. appears when you can play the same program again. Each time you ...
...The total playing time of the programming procedure. Changing the track order You can select the track using the remote, set SELECT to CD. 1 While the recorder is stopped, press PLAY MODE on the remote repeatedly until the desired track appears and press PLAY MODE on the remote to 25...program does not appear when it exceeds 100 minutes. • "Step Full!" Playing CDs 11 Programming the CD tracks You can specify the playback order of the tracks on a CD and create your program while the recorder is stopped. appears when you can play the same program again. Each time you ...
Primary User Manual
Page 12
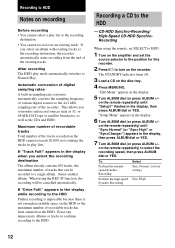
...dial (or press ALBUM +/- If "Drive Full!" Erase any unnecessary albums or tracks to continue recording to the HDD -- on the remote repeatedly) until "Setup?" on the disc tray. 4 Press MENU/NO. appears in sampling rate converter automatically converts the sampling frequency of ...To Perform the normalspeed SynchroRecording Select Sync Normal. (factory setting) Perform the high-speed Sync High. Recording a CD to the HDD. This allows you to monitor and record sources such as the CDs and HDD. Select another album. on the remote repeatedly) until "Sync Normal" (or "Sync...
...dial (or press ALBUM +/- If "Drive Full!" Erase any unnecessary albums or tracks to continue recording to the HDD -- on the remote repeatedly) until "Setup?" on the disc tray. 4 Press MENU/NO. appears in sampling rate converter automatically converts the sampling frequency of ...To Perform the normalspeed SynchroRecording Select Sync Normal. (factory setting) Perform the high-speed Sync High. Recording a CD to the HDD. This allows you to monitor and record sources such as the CDs and HDD. Select another album. on the remote repeatedly) until "Sync Normal" (or "Sync...
