
Operating Instructions
Page 2
... a particular installation. For customers in the U.S.A Owner's Record The model and serial numbers are designed to direct sunlight, excessive dust, or mechanical shock. 2 Record the serial number in the space provided below. On placement • Place the recorder in a location with the instructions, may be sure to comply with this occur, the recorder may condense on the laser protective housing inside the recorder. Note...
... a particular installation. For customers in the U.S.A Owner's Record The model and serial numbers are designed to direct sunlight, excessive dust, or mechanical shock. 2 Record the serial number in the space provided below. On placement • Place the recorder in a location with the instructions, may be sure to comply with this occur, the recorder may condense on the laser protective housing inside the recorder. Note...

Operating Instructions
Page 6
...33 Playback 35 Playing Discs 35 Playback Options 36 Playing a Title From the Title List 39 Searching for a Title/Chapter/Track, etc 40 Playing MP3 Audio Tracks and JPEG Image Files 41 Displaying the Playing Time and Play Information 44 Recording 46 Before Recording 46 Recording From Connected Equipment Without the Timer 47 Timer Recording From Connected Equipment 49 Recording From Connected Equipment With a Timer (Synchro Rec 51 Changing or Canceling Timer Settings (Timer List 53 Recording From a VCR or Similar Device 54 Editing 56 Before Editing 56 Editing a Title 57 Changing...
...33 Playback 35 Playing Discs 35 Playback Options 36 Playing a Title From the Title List 39 Searching for a Title/Chapter/Track, etc 40 Playing MP3 Audio Tracks and JPEG Image Files 41 Displaying the Playing Time and Play Information 44 Recording 46 Before Recording 46 Recording From Connected Equipment Without the Timer 47 Timer Recording From Connected Equipment 49 Recording From Connected Equipment With a Timer (Synchro Rec 51 Changing or Canceling Timer Settings (Timer List 53 Recording From a VCR or Similar Device 54 Editing 56 Before Editing 56 Editing a Title 57 Changing...

Operating Instructions
Page 10
Once you become familiar with the basic operations, you will find the recorder easy to operate this recorder. How to Use the On-Screen Menus The following three displays are mainly used to use. SYSTEM MENU 123 456 789 0 O RETURN M/m/
Once you become familiar with the basic operations, you will find the recorder easy to operate this recorder. How to Use the On-Screen Menus The following three displays are mainly used to use. SYSTEM MENU 123 456 789 0 O RETURN M/m/

Operating Instructions
Page 12
... recorder are turned on this recorder to your cable service or satellite service company to see if they can use the cable box/satellite receiver control function, you reach "Connecting the Power Cord" on this recorder to control a cable box or satellite receiver via the supplied set top box controller (page 13). - To record TV programs on . cable with a compatible cable box or satellite receiver. In the cases above, contact your VCR using your VCR connected to : - Set the brand code number and the recorder's input...
... recorder are turned on this recorder to your cable service or satellite service company to see if they can use the cable box/satellite receiver control function, you reach "Connecting the Power Cord" on this recorder to control a cable box or satellite receiver via the supplied set top box controller (page 13). - To record TV programs on . cable with a compatible cable box or satellite receiver. In the cases above, contact your VCR using your VCR connected to : - Set the brand code number and the recorder's input...

Operating Instructions
Page 13
... watch cable or satellite programs, you can record any channel on the recorder (L1) to the input jack connected to LINE 1 IN DVD recorder SETTOP HDMI OUT BOX CONTROL AUDIO OUT COMPONENT VIDEO OUT S VIDEO OUT LINE 1 IN LINE OUT L Y VIDEO VIDEO R PB L PR OPTICAL COAXIAL DIGITAL AUDIO OUT R AUDIO AUDIO AUDIO : Signal flow About AV path through The recorder automatically sends the input signal from a cable box or satellite receiver on . Wall Set top box controller (supplied) Cable box/ satellite receiver AUDIO OUT R L VIDEO OUT...
... watch cable or satellite programs, you can record any channel on the recorder (L1) to the input jack connected to LINE 1 IN DVD recorder SETTOP HDMI OUT BOX CONTROL AUDIO OUT COMPONENT VIDEO OUT S VIDEO OUT LINE 1 IN LINE OUT L Y VIDEO VIDEO R PB L PR OPTICAL COAXIAL DIGITAL AUDIO OUT R AUDIO AUDIO AUDIO : Signal flow About AV path through The recorder automatically sends the input signal from a cable box or satellite receiver on . Wall Set top box controller (supplied) Cable box/ satellite receiver AUDIO OUT R L VIDEO OUT...
Operating Instructions
Page 15
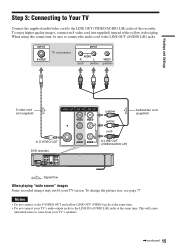
... projector INPUT AUDIO R L (red) (white) VIDEO (yellow) S video cord (not supplied) S VIDEO OUT LINE 1 IN LINE OUT VIDEO VIDEO L (yellow) (white) (red) to S VIDEO OUT DVD recorder SETTOP HDMI OUT BOX CONTROL AUDIO OUT COMPONENT VIDEO OUT S VIDEO OUT LINE 1 IN LINE OUT L Y VIDEO VIDEO R PB L PR OPTICAL COAXIAL DIGITAL AUDIO OUT R AUDIO AUDIO R AUDIO AUDIO to LINE OUT (VIDEO/AUDIO L/R) Audio/video cord (supplied) : Signal flow When playing "wide screen" images Some recorded images may not fit your TV's speakers. ,continued 15 To change the picture size...
... projector INPUT AUDIO R L (red) (white) VIDEO (yellow) S video cord (not supplied) S VIDEO OUT LINE 1 IN LINE OUT VIDEO VIDEO L (yellow) (white) (red) to S VIDEO OUT DVD recorder SETTOP HDMI OUT BOX CONTROL AUDIO OUT COMPONENT VIDEO OUT S VIDEO OUT LINE 1 IN LINE OUT L Y VIDEO VIDEO R PB L PR OPTICAL COAXIAL DIGITAL AUDIO OUT R AUDIO AUDIO R AUDIO AUDIO to LINE OUT (VIDEO/AUDIO L/R) Audio/video cord (supplied) : Signal flow When playing "wide screen" images Some recorded images may not fit your TV's speakers. ,continued 15 To change the picture size...
Operating Instructions
Page 16
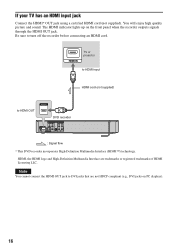
... will enjoy high quality picture and sound. Note You cannot connect the HDMI OUT jack to HDMI OUT HDMI OUT DVD recorder SETTOP HDMI OUT BOX CONTROL AUDIO OUT COMPONENT VIDEO OUT S VIDEO OUT LINE 1 IN LINE OUT L Y VIDEO VIDEO R PB L PR OPTICAL COAXIAL DIGITAL AUDIO OUT R AUDIO AUDIO : Signal flow * This DVD recorder incorporates High-Definition Multimedia Interface (HDMI™) technology. Be sure to turn off the recorder before connecting an HDMI cord. HDMI, the HDMI logo and High-Definition...
... will enjoy high quality picture and sound. Note You cannot connect the HDMI OUT jack to HDMI OUT HDMI OUT DVD recorder SETTOP HDMI OUT BOX CONTROL AUDIO OUT COMPONENT VIDEO OUT S VIDEO OUT LINE 1 IN LINE OUT L Y VIDEO VIDEO R PB L PR OPTICAL COAXIAL DIGITAL AUDIO OUT R AUDIO AUDIO : Signal flow * This DVD recorder incorporates High-Definition Multimedia Interface (HDMI™) technology. Be sure to turn off the recorder before connecting an HDMI cord. HDMI, the HDMI logo and High-Definition...
Operating Instructions
Page 20
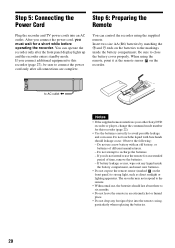
...; With normal use, the batteries should leakage occur. You can operate the recorder only after all connections are complete. LINE OUT VIDEO L R AUDIO to AC outlet < Notes • If the supplied remote interferes your other Sony DVD recorder or player, change the command mode number for this recorder (page 27), be sure to connect the power cord only after the front panel display lights up and the recorder enters standby mode. Observe the...
...; With normal use, the batteries should leakage occur. You can operate the recorder only after all connections are complete. LINE OUT VIDEO L R AUDIO to AC outlet < Notes • If the supplied remote interferes your other Sony DVD recorder or player, change the command mode number for this recorder (page 27), be sure to connect the power cord only after the front panel display lights up and the recorder enters standby mode. Observe the...

Operating Instructions
Page 22
The default command mode setting for this recorder and the supplied remote is DVD 3. SYSTEM MENU 123 456 789 0 O RETURN M/m/ Manufacturer Sampo Samsung Sanyo Scott Sears Sharp Sylvania Teknika Toshiba Wards Yorx Zenith Code number 12 03, 04, 12, 20 11, 14 12 07... If you have a Sony DVD player or more than one Sony DVD recorder If the supplied remote interferes with your other Sony DVD recorder or player, set the command mode number for this recorder and the supplied remote to one that differs from the other Sony DVD recorder or player after you have completed "Step 7: Easy Setup."
The default command mode setting for this recorder and the supplied remote is DVD 3. SYSTEM MENU 123 456 789 0 O RETURN M/m/ Manufacturer Sampo Samsung Sanyo Scott Sears Sharp Sylvania Teknika Toshiba Wards Yorx Zenith Code number 12 03, 04, 12, 20 11, 14 12 07... If you have a Sony DVD player or more than one Sony DVD recorder If the supplied remote interferes with your other Sony DVD recorder or player, set the command mode number for this recorder and the supplied remote to one that differs from the other Sony DVD recorder or player after you have completed "Step 7: Easy Setup."
Operating Instructions
Page 24
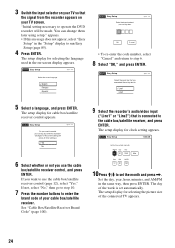
.... 7 Press the number buttons to the current setting will be made. 3 Switch the input selector on your TV so that the signal from the recorder appears on -screen display appears. appears. • If this recorder? (Changes to enter the brand code of the week is connected to step 6. 8 Select "OK," and press ENTER. No Disc Easy Setup Do you use the cable box/satellite receiver control (page 12), select "Yes." The...
.... 7 Press the number buttons to the current setting will be made. 3 Switch the input selector on your TV so that the signal from the recorder appears on -screen display appears. appears. • If this recorder? (Changes to enter the brand code of the week is connected to step 6. 8 Select "OK," and press ENTER. No Disc Easy Setup Do you use the cable box/satellite receiver control (page 12), select "Yes." The...

Operating Instructions
Page 49
... recording of "Features" in "DVD Auto Chapter" of a program. Timer Recording From Connected Equipment +RW -RWVR -RWVideo +R -RVR -RVideo You can use the Synchro Rec function (page 51). The information display appears. Z OPEN/ CLOSE SYSTEM MENU 123 456 789 0 TIMER M/m/ Press TIME/TEXT repeatedly to one month in a title The recorder will not be recorded. Creating chapters in advance. Note that has a timer function, you do not want to change the display. Press the button repeatedly to divide titles, select...
... recording of "Features" in "DVD Auto Chapter" of a program. Timer Recording From Connected Equipment +RW -RWVR -RWVideo +R -RVR -RVideo You can use the Synchro Rec function (page 51). The information display appears. Z OPEN/ CLOSE SYSTEM MENU 123 456 789 0 TIMER M/m/ Press TIME/TEXT repeatedly to one month in a title The recorder will not be recorded. Creating chapters in advance. Note that has a timer function, you do not want to change the display. Press the button repeatedly to divide titles, select...
Operating Instructions
Page 61
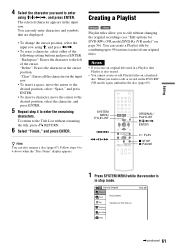
Editing 4 Select the character you want to enter using M/m/
Editing 4 Select the character you want to enter using M/m/
Operating Instructions
Page 72
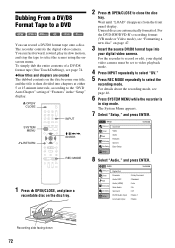
... chapters at either 5 or 15-minute intervals, according to select the scenes using the onscreen menu. You can record a DV/D8 format tape onto a disc. The recorder controls the digital video camera. Dubbing From a DV/D8 Format Tape to a DVD +RW -RWVR -RWVideo +R -RVR -RVideo You can fast forward, rewind, play in slow motion, and stop the tape to the "DVD Auto Chapter" setting of "Features" in the "Setup" display. Z OPEN/ CLOSE SYSTEM MENU 123 456 789 0 O RETURN INPUT...
... chapters at either 5 or 15-minute intervals, according to select the scenes using the onscreen menu. You can record a DV/D8 format tape onto a disc. The recorder controls the digital video camera. Dubbing From a DV/D8 Format Tape to a DVD +RW -RWVR -RWVideo +R -RVR -RVideo You can fast forward, rewind, play in slow motion, and stop the tape to the "DVD Auto Chapter" setting of "Features" in the "Setup" display. Z OPEN/ CLOSE SYSTEM MENU 123 456 789 0 O RETURN INPUT...
Operating Instructions
Page 73
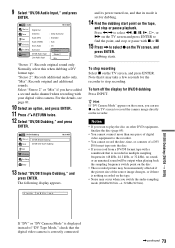
... its power turned on, and that its mode is set for dubbing. 14 Find the dubbing start point on the tape, and stop or pause playback. "Mix": Records original and additional sounds. Select "Stereo 2" or "Mix" if you have added a second audio channel when recording with your digital video camera. "Stereo 2": Records additional audio only. Audio 10:10 AM Title List Timer Edit DV/D8 Dubbing Disc Setting Setup Digital Out Downmix Audio DRC Audio (HDMI) Scan Audio Surround DV/D8 Audio Input Line Audio Input : Dolby Surround : Standard : Auto : On...
... its power turned on, and that its mode is set for dubbing. 14 Find the dubbing start point on the tape, and stop or pause playback. "Mix": Records original and additional sounds. Select "Stereo 2" or "Mix" if you have added a second audio channel when recording with your digital video camera. "Stereo 2": Records additional audio only. Audio 10:10 AM Title List Timer Edit DV/D8 Dubbing Disc Setting Setup Digital Out Downmix Audio DRC Audio (HDMI) Scan Audio Surround DV/D8 Audio Input Line Audio Input : Dolby Surround : Standard : Auto : On...

Operating Instructions
Page 75
Note Playback settings stored on the disc take priority over the setup display settings, and not all of the functions described may work. SYSTEM MENU 123 456 789 0 O RETURN M/m/ Settings and Adjustments Using the Setup Displays By using the setup displays, you can make various adjustments to items such as picture and sound, as well as select a language for the subtitles. The setup displays are used in the following way.
Note Playback settings stored on the disc take priority over the setup display settings, and not all of the functions described may work. SYSTEM MENU 123 456 789 0 O RETURN M/m/ Settings and Adjustments Using the Setup Displays By using the setup displays, you can make various adjustments to items such as picture and sound, as well as select a language for the subtitles. The setup displays are used in the following way.
Operating Instructions
Page 79
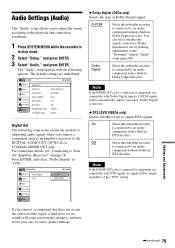
... connection details, see "Connecting to output DTS signals. If you connect a component that does not accept the selected audio signal, a loud noise (or no signal will be output, regardless of the "DTS" setting. Audio 10:10 AM Title List Timer Edit DV/D8 Dubbing Disc Setting Setup Digital Out Downmix Audio DRC Audio (HDMI) Scan Audio Surround DV/D8 Audio Input Line Audio Input : Dolby Surround : Standard : Auto : On : Off : Stereo 1 : Stereo Digital Out The following options. Off Select this when the recorder is connected to...
... connection details, see "Connecting to output DTS signals. If you connect a component that does not accept the selected audio signal, a loud noise (or no signal will be output, regardless of the "DTS" setting. Audio 10:10 AM Title List Timer Edit DV/D8 Dubbing Disc Setting Setup Digital Out Downmix Audio DRC Audio (HDMI) Scan Audio Surround DV/D8 Audio Input Line Audio Input : Dolby Surround : Standard : Auto : On : Off : Stereo 1 : Stereo Digital Out The following options. Off Select this when the recorder is connected to...
Operating Instructions
Page 84
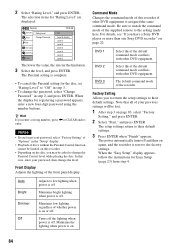
...-digit password using the number buttons. The Parental setting is off . DVD 1 DVD 2 DVD 3 Select this recorder if other DVD equipment. Turns off the lighting when power is complete. • To cancel the Parental setting for "Rating Level" are displayed. Note that all of "Options" in step 2, and press ENTER. The power automatically turns off and then on page 83, select "Factory Setting," and press ENTER. 2 Select "Start," and press ENTER. Parental Title List Timer Rating Level Change Password Edit DV/D8 Dubbing Disc Setting Setup...
...-digit password using the number buttons. The Parental setting is off . DVD 1 DVD 2 DVD 3 Select this recorder if other DVD equipment. Turns off the lighting when power is complete. • To cancel the Parental setting for "Rating Level" are displayed. Note that all of "Options" in step 2, and press ENTER. The power automatically turns off and then on page 83, select "Factory Setting," and press ENTER. 2 Select "Start," and press ENTER. Parental Title List Timer Rating Level Change Password Edit DV/D8 Dubbing Disc Setting Setup...

Operating Instructions
Page 86
... -screen displays. Should any of the following difficulties while using a video jack other options. , The recorder is connected to help remedy the problem before requesting repairs. Picture There is no picture or the picture noise appears when connected to some DVD programs could affect picture quality. Connect the TV and the recorder using the recorder, use this case, set to HDMI. Check the "Set Top Box Control" settings in the "Video" setup, and switch the TV's input back to "On." Picture noise appears. , Check...
... -screen displays. Should any of the following difficulties while using a video jack other options. , The recorder is connected to help remedy the problem before requesting repairs. Picture There is no picture or the picture noise appears when connected to some DVD programs could affect picture quality. Connect the TV and the recorder using the recorder, use this case, set to HDMI. Check the "Set Top Box Control" settings in the "Video" setup, and switch the TV's input back to "On." Picture noise appears. , Check...

Operating Instructions
Page 87
... start playback from the beginning. , Resume play was not finalized (page 69). Use the menu to "Wide Range" (page 80). , If the playback picture output from a DVD player, VCR, or tuner goes through the DIGITAL AUDIO OUT (OPTICAL or COAXIAL) jack, check the "Audio" setup settings (page 79). Sound There is no sound. , Re-connect all connections securely. , The connecting cord is damaged. , The input source setting on another recorder, the recorder cannot play the disc if it directly to fit the aspect ratio...
... start playback from the beginning. , Resume play was not finalized (page 69). Use the menu to "Wide Range" (page 80). , If the playback picture output from a DVD player, VCR, or tuner goes through the DIGITAL AUDIO OUT (OPTICAL or COAXIAL) jack, check the "Audio" setup settings (page 79). Sound There is no sound. , Re-connect all connections securely. , The connecting cord is damaged. , The input source setting on another recorder, the recorder cannot play the disc if it directly to fit the aspect ratio...

Operating Instructions
Page 105
..., 65 ADVANCE 36 ANGLE 36 AUDIO 36 "Audio" 83 "Audio (HDMI)" 80 Audio cords 18 "Audio DRC" 80 Audio settings 79 B Batteries 20 "Black Level" 77 "Brand Code" 82 C Cable box 13 Cable box brand 100 Cable box brand code 100 "Ch. Digit lock" 82 Changing or canceling timer settings (Timer List) 53 Chapter 97 "Chapter Erase" 58 "Check" 63 Child Lock 38 Cleaning discs 90 Clock Set settings 76 "Combine Titles" 64 "Command Mode" 22, 84 COMPONENT VIDEO OUT 17 Connecting the cable box/satellite receiver 12 to your AV...
..., 65 ADVANCE 36 ANGLE 36 AUDIO 36 "Audio" 83 "Audio (HDMI)" 80 Audio cords 18 "Audio DRC" 80 Audio settings 79 B Batteries 20 "Black Level" 77 "Brand Code" 82 C Cable box 13 Cable box brand 100 Cable box brand code 100 "Ch. Digit lock" 82 Changing or canceling timer settings (Timer List) 53 Chapter 97 "Chapter Erase" 58 "Check" 63 Child Lock 38 Cleaning discs 90 Clock Set settings 76 "Combine Titles" 64 "Command Mode" 22, 84 COMPONENT VIDEO OUT 17 Connecting the cable box/satellite receiver 12 to your AV...


