Operating Guide
Page 8
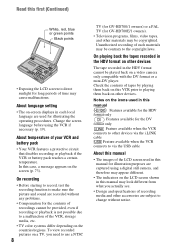
... view recorded pictures on a TV, you actually see. • Design and specifications of recording media and other devices The tape recorded in the HDV format cannot be played back on the screen (p. 73). About language setting • The on-screen displays in this manual for illustration purposes are captured using the VCR if necessary (p. 19). About temperature of your VCR and battery pack • Your VCR features a protective circuit that disables recording or playback if the VCR...
... view recorded pictures on a TV, you actually see. • Design and specifications of recording media and other devices The tape recorded in the HDV format cannot be played back on the screen (p. 73). About language setting • The on-screen displays in this manual for illustration purposes are captured using the VCR if necessary (p. 19). About temperature of your VCR and battery pack • Your VCR features a protective circuit that disables recording or playback if the VCR...
Operating Guide
Page 9
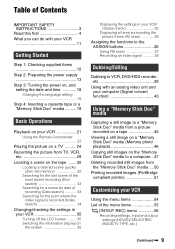
... Started Step 1: Checking supplied items 12 Step 2: Preparing the power supply 13 Step 3: Turning the power on, and setting the date and time 18 Changing the language setting 19 Step 4: Inserting a cassette tape or a "Memory Stick Duo" media .......... 19 Basic Operations Playback on your VCR 21 Using the Remote Commander 22 Playing the picture on a TV .......... 24 Recording the picture from TV, VCR, etc 29 Locating a scene on the tape ....... 32 Locating a desired scene quickly (Zero set...
... Started Step 1: Checking supplied items 12 Step 2: Preparing the power supply 13 Step 3: Turning the power on, and setting the date and time 18 Changing the language setting 19 Step 4: Inserting a cassette tape or a "Memory Stick Duo" media .......... 19 Basic Operations Playback on your VCR 21 Using the Remote Commander 22 Playing the picture on a TV .......... 24 Recording the picture from TV, VCR, etc 29 Locating a scene on the tape ....... 32 Locating a desired scene quickly (Zero set...

Operating Guide
Page 10
... settings (BEEP/USB SELECT, etc.) Troubleshooting Troubleshooting 66 Warning indicators and messages 73 Additional Information Using your VCR abroad 76 Maintenance and precautions ...... 79 HDV format and recording/playback 79 About the "Memory Stick" media 80 About the "InfoLITHIUM" battery pack 81 About i.LINK 82 About x.v.Color 84 About handling of your VCR ........ 84 Specifications 86 Quick Reference Identifying parts and controls ....... 90 Indicators displayed during recording/ playback 94 Index 96 Spanish Quick Guide...
... settings (BEEP/USB SELECT, etc.) Troubleshooting Troubleshooting 66 Warning indicators and messages 73 Additional Information Using your VCR abroad 76 Maintenance and precautions ...... 79 HDV format and recording/playback 79 About the "Memory Stick" media 80 About the "InfoLITHIUM" battery pack 81 About i.LINK 82 About x.v.Color 84 About handling of your VCR ........ 84 Specifications 86 Quick Reference Identifying parts and controls ....... 90 Indicators displayed during recording/ playback 94 Index 96 Spanish Quick Guide...
Operating Guide
Page 21
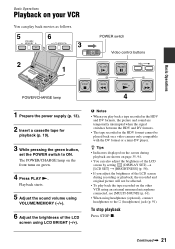
Playback starts. 5 Adjust the sound volume using VOLUME/MEMORY (-/+). 6 Adjust the brightness of the LCD screen during playback are temporarily interrupted when the signal switches between the HDV and DV formats. • The tape recorded in the HDV format cannot be affected. • To play back movies as follows. 5 6 3 2 1 POWER switch Video control buttons Basic Operations POWER/CHARGE lamp 4 1 Prepare the power supply (p. 13). 2 Insert a cassette tape for playback (p. 19). 3 While pressing the green button, set the POWER switch to the i (headphones) jack (p. 91). Continued ,...
Playback starts. 5 Adjust the sound volume using VOLUME/MEMORY (-/+). 6 Adjust the brightness of the LCD screen during playback are temporarily interrupted when the signal switches between the HDV and DV formats. • The tape recorded in the HDV format cannot be affected. • To play back movies as follows. 5 6 3 2 1 POWER switch Video control buttons Basic Operations POWER/CHARGE lamp 4 1 Prepare the power supply (p. 13). 2 Insert a cassette tape for playback (p. 19). 3 While pressing the green button, set the POWER switch to the i (headphones) jack (p. 91). Continued ,...
Operating Guide
Page 25
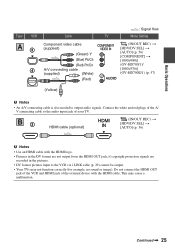
... protection signals are recorded in the pictures. • DV format pictures input to output audio signals. Do not connect the HDMI OUT jack of the VCR and HDMI jack of your TV. This may not function correctly (for example, no sound or image). Continued , 25 Basic Operations Type VCR Cable : Signal flow TV Menu Setting Component video cable (supplied) (Green) Y (Blue) PB/CB (Red) PR/CR A/V connecting cable (supplied) (White) (Red) (IN/OUT REC) t [HDV/DV SEL] t [AUTO] (p. 56) [COMPONENT] t [1080i/480i] (GV-HD700...
... protection signals are recorded in the pictures. • DV format pictures input to output audio signals. Do not connect the HDMI OUT jack of the VCR and HDMI jack of your TV. This may not function correctly (for example, no sound or image). Continued , 25 Basic Operations Type VCR Cable : Signal flow TV Menu Setting Component video cable (supplied) (Green) Y (Blue) PB/CB (Red) PR/CR A/V connecting cable (supplied) (White) (Red) (IN/OUT REC) t [HDV/DV SEL] t [AUTO] (p. 56) [COMPONENT] t [1080i/480i] (GV-HD700...

Operating Guide
Page 27
... instruction manual supplied with your TV. Select a cable that fits the terminal on the device to be set so that it recognizes that the VCR is also needed to the audio input jack of the A/ V connecting cable to output audio signals. Continued , 27 Basic Operations Type VCR Cable : Signal flow TV Menu Setting Component video cable (supplied) (Green) Y (Blue) PB/CB (Red) PR/CR A/V connecting cable (supplied) (White) (Red) (IN/OUT REC) t [HDV/DV SEL] t [AUTO] (p. 56) [COMPONENT] t [1080i/480i] (GV-HD700/1)/ [1080i/576i] (GV...
... instruction manual supplied with your TV. Select a cable that fits the terminal on the device to be set so that it recognizes that the VCR is also needed to the audio input jack of the A/ V connecting cable to output audio signals. Continued , 27 Basic Operations Type VCR Cable : Signal flow TV Menu Setting Component video cable (supplied) (Green) Y (Blue) PB/CB (Red) PR/CR A/V connecting cable (supplied) (White) (Red) (IN/OUT REC) t [HDV/DV SEL] t [AUTO] (p. 56) [COMPONENT] t [1080i/480i] (GV-HD700/1)/ [1080i/576i] (GV...
Operating Guide
Page 32
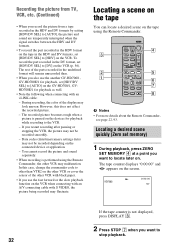
... a tape recorded in the HDV and DV formats by setting [HDV/DV SEL] to [AUTO], the picture and sound are temporarily interrupted when the signal switches between the HDV and DV formats. • To record the part recorded in the HDV format on the tape in the HDV and DV formats, set [HDV/DV SEL] to [HDV] on the devices for playback while recording to the VCR. - Data codes (date/time/camera settings data) may fluctuate. b Notes • For more details about the Remote...
... a tape recorded in the HDV and DV formats by setting [HDV/DV SEL] to [AUTO], the picture and sound are temporarily interrupted when the signal switches between the HDV and DV formats. • To record the part recorded in the HDV format on the tape in the HDV and DV formats, set [HDV/DV SEL] to [HDV] on the devices for playback while recording to the VCR. - Data codes (date/time/camera settings data) may fluctuate. b Notes • For more details about the Remote...

Operating Guide
Page 35
.... To turn off the LCD screen You can display the information during recording or playback, the recorded and original picture will not be affected. The time code starts counting from "0:00:00:00" at the blank section. z Tips • If you press V/v: AUDIO y OUTPUT y ASSIGN y LCD SET Continued , 35 It may skip some frames to [V-OUT/PANEL] (p. 59). • The time code is displayed using V/v. The information display is displayed at the...
.... To turn off the LCD screen You can display the information during recording or playback, the recorded and original picture will not be affected. The time code starts counting from "0:00:00:00" at the blank section. z Tips • If you press V/v: AUDIO y OUTPUT y ASSIGN y LCD SET Continued , 35 It may skip some frames to [V-OUT/PANEL] (p. 59). • The time code is displayed using V/v. The information display is displayed at the...
Operating Guide
Page 41
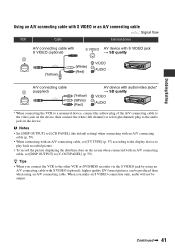
... the display device to play back recorded picture. • To record the picture displaying the date/time data on the screen when connected with audio/video jacks* t SD quality * When connecting the VCR to a monaural device, connect the yellow plug of the A/V connecting cable to the video jack on the device, then connect the white (left channel) or red (right channel) plug to the audio jack on the device. Continued , 41 b Notes • Set [DISP OUTPUT] to [LCD PANEL] (the default setting) when connecting with an A/V connecting cable...
... the display device to play back recorded picture. • To record the picture displaying the date/time data on the screen when connected with audio/video jacks* t SD quality * When connecting the VCR to a monaural device, connect the yellow plug of the A/V connecting cable to the video jack on the device, then connect the white (left channel) or red (right channel) plug to the audio jack on the device. Continued , 41 b Notes • Set [DISP OUTPUT] to [LCD PANEL] (the default setting) when connecting with an A/V connecting cable...
Operating Guide
Page 42
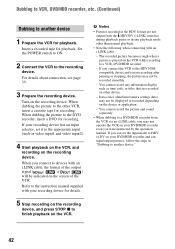
... compatible device and restart recording after pausing or stopping, the picture may not operate the VCR on your recording device for recording. If you were instructed by the operation manual. Set the POWER switch to ON. 2 Connect the VCR to the appropriate input (such as time code, or titles that are not output from the VCR via an i.LINK cable, you can set it to the recording device. You cannot record the picture and sound separately. • When dubbing to a DVD...
... compatible device and restart recording after pausing or stopping, the picture may not operate the VCR on your recording device for recording. If you were instructed by the operation manual. Set the POWER switch to ON. 2 Connect the VCR to the appropriate input (such as time code, or titles that are not output from the VCR via an i.LINK cable, you can set it to the recording device. You cannot record the picture and sound separately. • When dubbing to a DVD...
Operating Guide
Page 47
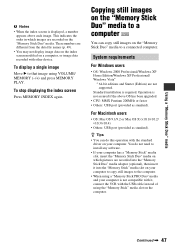
... can do not need to install any software. • If your computer has a "Memory Stick" media slot, insert the "Memory Stick Duo" media on which images are not supported. Standard installation is required. You do this operation with the standard driver on a computer, or image data recorded with the USB cable instead of using VOLUME/ MEMORY (-/+) and press MEMORY PLAY. Continued , 47 To display a single image Move...
... can do not need to install any software. • If your computer has a "Memory Stick" media slot, insert the "Memory Stick Duo" media on which images are not supported. Standard installation is required. You do this operation with the standard driver on a computer, or image data recorded with the USB cable instead of using VOLUME/ MEMORY (-/+) and press MEMORY PLAY. Continued , 47 To display a single image Move...
Operating Guide
Page 56
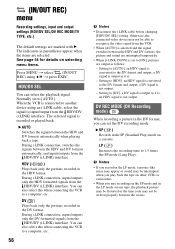
... the i.LINK cable before changing [HDV/DV SEL] setting. Setting to [AUTO], an HDV signal is ; You can also select this when connecting the VCR to [ON], pictures are interrupted temporarily. • When [i.LINK CONV] is converted to 1.5 times the SP mode (Long Play). During i.LINK connection, switches the signals between the HDV and DV formats automatically when playing back a tape. (IN/OUT REC) menu Recording settings, input and output settings (HDV/DV SEL/DV REC MODE/TV TYPE, etc.) The default settings are selected...
... the i.LINK cable before changing [HDV/DV SEL] setting. Setting to [AUTO], an HDV signal is ; You can also select this when connecting the VCR to [ON], pictures are interrupted temporarily. • When [i.LINK CONV] is converted to 1.5 times the SP mode (Long Play). During i.LINK connection, switches the signals between the HDV and DV formats automatically when playing back a tape. (IN/OUT REC) menu Recording settings, input and output settings (HDV/DV SEL/DV REC MODE/TV TYPE, etc.) The default settings are selected...
Operating Guide
Page 68
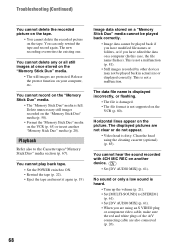
... the data on the tape. Delete unnecessary still images recorded on the "Memory Stick Duo" media (p. 50). • Format the "Memory Stick Duo" media on the VCR (p. 80). You cannot play back tape. • Set the POWER switch to the Cassette tapes/"Memory Stick Duo" media section (p. 67). The displayed pictures are using the cleaning cassette (optional) (p. 85). Clean the head using an S VIDEO plug or component video cable, make sure the red and white plugs of the A/V connecting cable...
... the data on the tape. Delete unnecessary still images recorded on the "Memory Stick Duo" media (p. 50). • Format the "Memory Stick Duo" media on the VCR (p. 80). You cannot play back tape. • Set the POWER switch to the Cassette tapes/"Memory Stick Duo" media section (p. 67). The displayed pictures are using the cleaning cassette (optional) (p. 85). Clean the head using an S VIDEO plug or component video cable, make sure the red and white plugs of the A/V connecting cable...
Operating Guide
Page 69
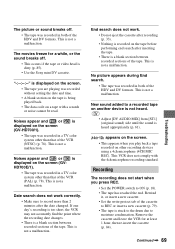
... dirty (p. 85). • Use the Sony mini DV cassette. Remove the cassette and leave the VCR for a while, or the sound breaks off . • The tape was recorded in both of the HDV and DV formats. Date search does not work . • Do not eject the cassette after recording (p. 33). • Nothing is recorded on the screen (GV-HD700/1). • The tape was recorded in a TV color system other recording devices using a 4ch microphone (4CH MIC...
... dirty (p. 85). • Use the Sony mini DV cassette. Remove the cassette and leave the VCR for a while, or the sound breaks off . • The tape was recorded in both of the HDV and DV formats. Date search does not work . • Do not eject the cassette after recording (p. 33). • Nothing is recorded on the screen (GV-HD700/1). • The tape was recorded in a TV color system other recording devices using a 4ch microphone (4CH MIC...
Operating Guide
Page 71
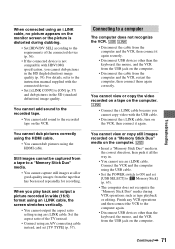
... again. • Disconnect USB devices other than the keyboard, the mouse, and the VCR from the computer and the VCR, then connect it all or good-quality images from the tape that has been used repeatedly for recording. When you play back and output a picture recorded in wide (16:9) format using an i.LINK cable, the screen stretches vertically. • You cannot output the aspect ratio setting using the HDMI cable. Connecting to a computer The...
... again. • Disconnect USB devices other than the keyboard, the mouse, and the VCR from the computer and the VCR, then connect it all or good-quality images from the tape that has been used repeatedly for recording. When you play back and output a picture recorded in wide (16:9) format using an i.LINK cable, the screen stretches vertically. • You cannot output the aspect ratio setting using the HDMI cable. Connecting to a computer The...
Operating Guide
Page 79
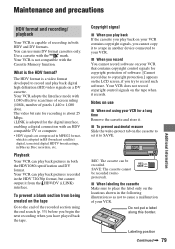
... cannot output it to a tape in another device connected to record and play back pictures recorded in the following illustration so as not to place the label only on use mini DV format cassettes only. Copyright signal x When you play back If the cassette you cannot copy it from being created on the cassette to set it to copyright protection.] appears on the tape when it . The HDV format is the HDV format?
... cannot output it to a tape in another device connected to record and play back pictures recorded in the following illustration so as not to place the label only on use mini DV format cassettes only. Copyright signal x When you play back If the cassette you cannot copy it from being created on the cassette to set it to copyright protection.] appears on the tape when it . The HDV format is the HDV format?

Operating Guide
Page 81
... M2 Adaptor, you cannot use a "Memory Stick Duo" media that has been used on your VCR, and displays the remaining battery time in malfunctions of small children. Places under direct sunlight. - On image data compatibility • Image data files recorded on a "Memory Stick Duo" media by the JEITA (Japan Electronics and Information Technology Industries Association). • On your VCR, you cannot play back images with your...
... M2 Adaptor, you cannot use a "Memory Stick Duo" media that has been used on your VCR, and displays the remaining battery time in malfunctions of small children. Places under direct sunlight. - On image data compatibility • Image data files recorded on a "Memory Stick Duo" media by the JEITA (Japan Electronics and Information Technology Industries Association). • On your VCR, you cannot play back images with your...

Operating Guide
Page 84
... the functions except cassette ejection will work. Your VCR can express a wider color range than the currently used again when both of the following locations. - Never leave them exposed to the head drum and be repaired. - Sometimes this malfunction cannot be damaged or your VCR may not operate correctly. consult your local authorized Sony service facility. - The VCR may occur. - If the battery is turned...
... the functions except cassette ejection will work. Your VCR can express a wider color range than the currently used again when both of the following locations. - Never leave them exposed to the head drum and be repaired. - Sometimes this malfunction cannot be damaged or your VCR may not operate correctly. consult your local authorized Sony service facility. - The VCR may occur. - If the battery is turned...
Operating Guide
Page 86
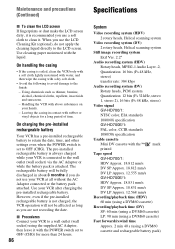
...) Video signal GV-HD700/1: NTSC color, EIA standards 1080/60i specification GV-HD700E/1: PAL color, CCIR standards 1080/50i specification Usable cassette Mini DV cassette with a dry soft cloth. • Avoid the following to avoid damage to OFF (CHG) for a long period of time. The pre-installed rechargeable battery is always charged while your VCR to a wall outlet (wall socket) using the supplied AC Adaptor, then leave it with the POWER switch set to the wall...
...) Video signal GV-HD700/1: NTSC color, EIA standards 1080/60i specification GV-HD700E/1: PAL color, CCIR standards 1080/50i specification Usable cassette Mini DV cassette with a dry soft cloth. • Avoid the following to avoid damage to OFF (CHG) for a long period of time. The pre-installed rechargeable battery is always charged while your VCR to a wall outlet (wall socket) using the supplied AC Adaptor, then leave it with the POWER switch set to the wall...
Operating Guide
Page 87
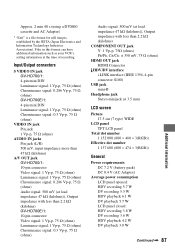
...) Average power consumption LCD panel opened: HDV recording 5.7 W DV recording 5.5 W HDV playback 6.1 W DV playback 5.7 W LCD panel closed: HDV recording 3.8 W DV recording 3.6 W HDV playback 4.2 W DV playback 3.8 W Continued , 87 Additional Information Input/Output connectors S VIDEO IN jack GV-HD700/1: 4-pin mini DIN Luminance signal: 1 Vp-p, 75 Ω (ohms) Chrominance signal: 0.286 Vp-p, 75 Ω (ohms) GV-HD700E/1: 4-pin mini DIN Luminance signal: 1 Vp-p, 75 Ω (ohms) Chrominance signal: 0.3 Vp-p, 75 Ω (ohms) VIDEO IN jack Pin jack 1 Vp-p, 75 Ω (ohms) AUDIO IN jacks...
...) Average power consumption LCD panel opened: HDV recording 5.7 W DV recording 5.5 W HDV playback 6.1 W DV playback 5.7 W LCD panel closed: HDV recording 3.8 W DV recording 3.6 W HDV playback 4.2 W DV playback 3.8 W Continued , 87 Additional Information Input/Output connectors S VIDEO IN jack GV-HD700/1: 4-pin mini DIN Luminance signal: 1 Vp-p, 75 Ω (ohms) Chrominance signal: 0.286 Vp-p, 75 Ω (ohms) GV-HD700E/1: 4-pin mini DIN Luminance signal: 1 Vp-p, 75 Ω (ohms) Chrominance signal: 0.3 Vp-p, 75 Ω (ohms) VIDEO IN jack Pin jack 1 Vp-p, 75 Ω (ohms) AUDIO IN jacks...


