
Help Guide
Page 3
... Getting started...1 Checking the supplied items 1 Supplied items 24 Attaching the lens hood 26 Power source preparations 2 Attaching the battery pack 26 Charging the battery pack using the AC Adaptor 27 Charging the battery pack using your computer 28 Turning the power on 29 Using this product supplying power from a wall outlet (wall...
... Getting started...1 Checking the supplied items 1 Supplied items 24 Attaching the lens hood 26 Power source preparations 2 Attaching the battery pack 26 Charging the battery pack using the AC Adaptor 27 Charging the battery pack using your computer 28 Turning the power on 29 Using this product supplying power from a wall outlet (wall...

Help Guide
Page 8
... Info 127 Format...127 Repair Img. DB F 128 File Number 128 Data Code 129 Volume...130 Download Music (HDR-CX900/FDR-AX100 131 Empty Music (HDR-CX900/FDR-AX100 131 WPS Push 131 Access point settings 132 Edit Device Name 133 Disp MAC Address 133 SSID/PW Reset 134 Network Info Reset......138 Monitor Brightness 139 Display Setting 139 Airplane Mode 140 REC Lamp 140 Remote Ctrl 141 Language Setting 141 24p Mode (HDR-CX900E/FDR-AX100E 141 Cancel 24p Mode (HDR-CX900E/FDR-AX100E 142 Calibration 142 Battery Info 143 Power Save 143 Initialize 144 Date & Time Setting 144 TOC-6
... Info 127 Format...127 Repair Img. DB F 128 File Number 128 Data Code 129 Volume...130 Download Music (HDR-CX900/FDR-AX100 131 Empty Music (HDR-CX900/FDR-AX100 131 WPS Push 131 Access point settings 132 Edit Device Name 133 Disp MAC Address 133 SSID/PW Reset 134 Network Info Reset......138 Monitor Brightness 139 Display Setting 139 Airplane Mode 140 REC Lamp 140 Remote Ctrl 141 Language Setting 141 24p Mode (HDR-CX900E/FDR-AX100E 141 Cancel 24p Mode (HDR-CX900E/FDR-AX100E 142 Calibration 142 Battery Info 143 Power Save 143 Initialize 144 Date & Time Setting 144 TOC-6

Help Guide
Page 9
... photos 9 Check the charging time 9 Charging time 145 Expected recording and playback times for individual batteries 10 Expected recording time with each battery pack 146 Expected playback time with each battery pack 148 Expected movie recording time and number of recordable photos for memory cards 10 Notes on ... pixels and aspect ratio 153 Additional information...10 Precautions...10 About the AVCHD format 154 About the memory card 154 About the InfoLITHIUM battery pack 156 Handling of this product 10 On use and care 158 On connecting to a computer or accessory etc 161 Notes on ...
... photos 9 Check the charging time 9 Charging time 145 Expected recording and playback times for individual batteries 10 Expected recording time with each battery pack 146 Expected playback time with each battery pack 148 Expected movie recording time and number of recordable photos for memory cards 10 Notes on ... pixels and aspect ratio 153 Additional information...10 Precautions...10 About the AVCHD format 154 About the memory card 154 About the InfoLITHIUM battery pack 156 Handling of this product 10 On use and care 158 On connecting to a computer or accessory etc 161 Notes on ...

Help Guide
Page 10
... the power is set to on...171 The menu settings have been changed automatically 171 This product gets warm 172 Intelligent Auto is canceled 172 Batteries/power sources 12 The power abruptly turns off 173 The POWER/CHG (charge) lamp does not light while the... is being charged 173 The POWER/CHG (charge) lamp flashes while the batterypack is being charged 173 The remaining battery power is not displayed correctly 174 The battery pack is quickly discharged 174 Monitor...12 Menu items are grayed out 174 The buttons do not appear on the LCD monitor 174 The...
... the power is set to on...171 The menu settings have been changed automatically 171 This product gets warm 172 Intelligent Auto is canceled 172 Batteries/power sources 12 The power abruptly turns off 173 The POWER/CHG (charge) lamp does not light while the... is being charged 173 The POWER/CHG (charge) lamp flashes while the batterypack is being charged 173 The remaining battery power is not displayed correctly 174 The battery pack is quickly discharged 174 Monitor...12 Menu items are grayed out 174 The buttons do not appear on the LCD monitor 174 The...

Help Guide
Page 14
Attaching the lens hood Power source preparations Attaching the battery pack Charging the battery pack using the AC Adaptor Charging the battery pack using your computer Turning the power on Using this product supplying power from a wall outlet (wall socket) Initial setup Setting the language, date and ...
Attaching the lens hood Power source preparations Attaching the battery pack Charging the battery pack using the AC Adaptor Charging the battery pack using your computer Turning the power on Using this product supplying power from a wall outlet (wall socket) Initial setup Setting the language, date and ...

Help Guide
Page 21
Disp MAC Address SSID/PW Reset Network Info Reset TV Type HDMI Resolution CTRL FOR HDMI USB Connect USB Connect Setting USB Power Supply USB LUN Setting Beep Monitor Brightness Display Setting Airplane Mode REC Lamp Remote Ctrl Language Setting 24p Mode (HDR-CX900E/FDR-AX100E) Cancel 24p Mode (HDR-CX900E/FDR-AX100E) Calibration Battery Info Power Save Initialize Date & Time Setting Area Setting Charging time/recording time of movies/number of recordable photos Check the charging time Charging time 9
Disp MAC Address SSID/PW Reset Network Info Reset TV Type HDMI Resolution CTRL FOR HDMI USB Connect USB Connect Setting USB Power Supply USB LUN Setting Beep Monitor Brightness Display Setting Airplane Mode REC Lamp Remote Ctrl Language Setting 24p Mode (HDR-CX900E/FDR-AX100E) Cancel 24p Mode (HDR-CX900E/FDR-AX100E) Calibration Battery Info Power Save Initialize Date & Time Setting Area Setting Charging time/recording time of movies/number of recordable photos Check the charging time Charging time 9

Help Guide
Page 22
Expected recording and playback times for individual batteries Expected recording time with each battery pack Expected playback time with each battery pack Expected movie recording time and number of recordable photos for memory cards Notes on recording Expected recording time of movies ...each image size of photos Recording pixels and aspect ratio Additional information Precautions About the AVCHD format About the memory card About the InfoLITHIUM battery pack Handling of the memory card Notes on disposal/transfer of this product On use and care On connecting to a computer or accessory ...
Expected recording and playback times for individual batteries Expected recording time with each battery pack Expected playback time with each battery pack Expected movie recording time and number of recordable photos for memory cards Notes on recording Expected recording time of movies ...each image size of photos Recording pixels and aspect ratio Additional information Precautions About the AVCHD format About the memory card About the InfoLITHIUM battery pack Handling of the memory card Notes on disposal/transfer of this product On use and care On connecting to a computer or accessory ...

Help Guide
Page 24
... monitor. Viewfinder The image in the viewfinder is no-longer displayed. This product gets warm. The POWER/CHG (charge) lamp flashes while the battery pack is quickly discharged. The backlight of a grid on the monitor. Memory card Operations using the memory card cannot be played back or the... memory card is not clear. Wireless Remote Commander 12 The battery pack is being charged. There are grayed out. Images cannot be performed. The remaining battery power is being charged. The buttons do not appear on the touch panel do not work ...
... monitor. Viewfinder The image in the viewfinder is no-longer displayed. This product gets warm. The POWER/CHG (charge) lamp flashes while the battery pack is quickly discharged. The backlight of a grid on the monitor. Memory card Operations using the memory card cannot be played back or the... memory card is not clear. Wireless Remote Commander 12 The battery pack is being charged. There are grayed out. Images cannot be performed. The remaining battery power is being charged. The buttons do not appear on the touch panel do not work ...

Help Guide
Page 31
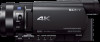
... mm (7/32 in the viewfinder appear blurred, adjust the viewfinder lens adjustment dial. 5. You can close the LCD monitor with the screen facing out. Battery pack 6. DC IN jack 11. 1. Viewfinder lens adjustment dial If the indications in .)). Eye sensor When the LCD monitor is pulled out. 3. ... attach in USB Cable 10. START/STOP button 9. Built-in the proper direction. 12. This is convenient during playback operations. 2. BATT (battery) release lever To fasten the grip belt 19 LCD monitor/Touch panel If you rotate the LCD panel 180 degrees, you can view the subject...
... mm (7/32 in the viewfinder appear blurred, adjust the viewfinder lens adjustment dial. 5. You can close the LCD monitor with the screen facing out. Battery pack 6. DC IN jack 11. 1. Viewfinder lens adjustment dial If the indications in .)). Eye sensor When the LCD monitor is pulled out. 3. ... attach in USB Cable 10. START/STOP button 9. Built-in the proper direction. 12. This is convenient during playback operations. 2. BATT (battery) release lever To fasten the grip belt 19 LCD monitor/Touch panel If you rotate the LCD panel 180 degrees, you can view the subject...

Help Guide
Page 34
... Frame rate (30p/60p/50p/60i/50i/24p/25p), recording mode (PS/FX/FH/HQ/LP) and movie size Dual Video REC 60 min Remaining battery Recording/playback/editing media 0:00:00 Counter (hour:minute:second) 00min Estimated recording time 9999 20.0M/14.2M Approximate number of recordable photos and...
... Frame rate (30p/60p/50p/60i/50i/24p/25p), recording mode (PS/FX/FH/HQ/LP) and movie size Dual Video REC 60 min Remaining battery Recording/playback/editing media 0:00:00 Counter (hour:minute:second) 00min Estimated recording time 9999 20.0M/14.2M Approximate number of recordable photos and...

Help Guide
Page 37
Wireless Remote Commander (1) Operating Guide (1) Only for FDR-AX100/FDR-AX100E Rechargeable battery pack NP-FV70 (1) Only for HDR-CX900/HDR-CX900E Rechargeable battery pack NP-FV50 (1) Hint The USB connection support cable is too short for use with the red point on the lens hood with this product ...
Wireless Remote Commander (1) Operating Guide (1) Only for FDR-AX100/FDR-AX100E Rechargeable battery pack NP-FV70 (1) Only for HDR-CX900/HDR-CX900E Rechargeable battery pack NP-FV50 (1) Hint The USB connection support cable is too short for use with the red point on the lens hood with this product ...

Help Guide
Page 38
... the lens mount and rotate it clockwise until the lens hood clicks into place. Note You cannot use the NP-FV30 InfoLITHIUM battery pack with this product. 26 In the default setting, the power turns off this product and projection on the... battery pack, then slide the battery pack upwards. Slide the battery release lever ( ) and remove the battery pack ( ). How to Use Getting started Power source preparations Attaching the battery pack Attach the battery pack to this product. 1. You cannot use any
... the lens mount and rotate it clockwise until the lens hood clicks into place. Note You cannot use the NP-FV30 InfoLITHIUM battery pack with this product. 26 In the default setting, the power turns off this product and projection on the... battery pack, then slide the battery pack upwards. Slide the battery release lever ( ) and remove the battery pack ( ). How to Use Getting started Power source preparations Attaching the battery pack Attach the battery pack to this product. 1. You cannot use any

Help Guide
Page 39
...the power cord (mains lead) to Use Getting started Power source preparations Charging the battery pack using the AC Adaptor Charge the battery pack using the AC Adaptor. 27 The POWER/CHG (charge) lamp turns off when the battery pack is pulled out, retract it. 2. How to this product. A: AC Adaptor... B: Power cord (mains lead) C: DC IN jack D: Align the mark on the DC plug Note Be aware of this product and a wall outlet (wall socket). operation for about 2 minutes, to save battery power (Power...
...the power cord (mains lead) to Use Getting started Power source preparations Charging the battery pack using the AC Adaptor Charge the battery pack using the AC Adaptor. 27 The POWER/CHG (charge) lamp turns off when the battery pack is pulled out, retract it. 2. How to this product. A: AC Adaptor... B: Power cord (mains lead) C: DC IN jack D: Align the mark on the DC plug Note Be aware of this product and a wall outlet (wall socket). operation for about 2 minutes, to save battery power (Power...

Help Guide
Page 40
...using this product. The POWER/CHG (charge) lamp turns off when the battery pack is recommended that you charge the battery in a temperature range of the AC Adaptor or battery terminal with the Built-in USB Cable. Attach the battery pack in the pocket on the grip belt. If the Built-in ... of 10 °C to 30 °C (50 °F to 86 °F). Use a nearby wall outlet (wall socket) when using your computer Charge the battery pack by connecting this product and your computer with any malfunction occurs while using the Built-in USB Cable. Connect this product. 3. Do not use...
...using this product. The POWER/CHG (charge) lamp turns off when the battery pack is recommended that you charge the battery in a temperature range of the AC Adaptor or battery terminal with the Built-in USB Cable. Attach the battery pack in the pocket on the grip belt. If the Built-in ... of 10 °C to 30 °C (50 °F to 86 °F). Use a nearby wall outlet (wall socket) when using your computer Charge the battery pack by connecting this product and your computer with any malfunction occurs while using the Built-in USB Cable. Connect this product. 3. Do not use...

Help Guide
Page 41
Open the LCD monitor of 10 °C to 30 °C (50 °F to Use Getting started Power source preparations Turning the power on Turn on the grip belt after use. : Built-in USB Cable : To a wall outlet (wall socket) To put the Built-in USB Cable away Put the Built-in USB Cable back in a temperature range of this product by pressing POWER or by pulling out the viewfinder. 29 To turn the power on this product and turn off the power You can also turn on . How to 86 °F). Hint It is recommended that you charge the battery in the pocket on this product. 1.
Open the LCD monitor of 10 °C to 30 °C (50 °F to Use Getting started Power source preparations Turning the power on Turn on the grip belt after use. : Built-in USB Cable : To a wall outlet (wall socket) To put the Built-in USB Cable away Put the Built-in USB Cable back in a temperature range of this product by pressing POWER or by pulling out the viewfinder. 29 To turn the power on this product and turn off the power You can also turn on . How to 86 °F). Hint It is recommended that you charge the battery in the pocket on this product. 1.

Help Guide
Page 42
...off using the LCD monitor or the viewfinder The power of this product is turned on the status of this product. 30 Even if the battery pack is retracted to the original position. LCD monitor: Open, Viewfinder: Retracted Power On LCD monitor: Open, Viewfinder: Pulled out Power On ... not turned off this product using the AC Adaptor" to this product by pressing POWER. Make the same connections as shown in "Charging the battery pack using the AC Adaptor. 1. How to Use Getting started Power source preparations Using this product supplying power from a wall outlet (wall socket...
...off using the LCD monitor or the viewfinder The power of this product is turned on the status of this product. 30 Even if the battery pack is retracted to the original position. LCD monitor: Open, Viewfinder: Retracted Power On LCD monitor: Open, Viewfinder: Pulled out Power On ... not turned off this product using the AC Adaptor" to this product by pressing POWER. Make the same connections as shown in "Charging the battery pack using the AC Adaptor. 1. How to Use Getting started Power source preparations Using this product supplying power from a wall outlet (wall socket...

Help Guide
Page 48
... is lit or flashing The media icon in the upper right of the LCD monitor is set to turn on this product, or remove the battery pack or AC Adaptor. Only the on the LCD monitor. Open the LCD monitor of this product can display recording images across the entire monitor...
... is lit or flashing The media icon in the upper right of the LCD monitor is set to turn on this product, or remove the battery pack or AC Adaptor. Only the on the LCD monitor. Open the LCD monitor of this product can display recording images across the entire monitor...

Help Guide
Page 49
... properly, the AE/AF lock indicator appears on the LCD monitor. Press PHOTO lightly to the manual operation mode. During this product, or remove the battery pack or AC Adaptor. Access lamp is lit or flashing Capturing a photo from a movie (models with the USB IN/OUT jacks) or creating a photo How...
... properly, the AE/AF lock indicator appears on the LCD monitor. Press PHOTO lightly to the manual operation mode. During this product, or remove the battery pack or AC Adaptor. Access lamp is lit or flashing Capturing a photo from a movie (models with the USB IN/OUT jacks) or creating a photo How...

Help Guide
Page 64
... switch movie format (XAVC S/AVCHD/MP4) The displayed icon differs depending on the [ File Format] setting. 8. To close the index screen 3. Last played image 7. Remaining battery 7. Events 9. To the next event 5. To switch between the movie/photo playback screen (VISUAL INDEX) 52 Select the image type ( MOVIE, PHOTO, MOVIE/PHOTO) you...
... switch movie format (XAVC S/AVCHD/MP4) The displayed icon differs depending on the [ File Format] setting. 8. To close the index screen 3. Last played image 7. Remaining battery 7. Events 9. To the next event 5. To switch between the movie/photo playback screen (VISUAL INDEX) 52 Select the image type ( MOVIE, PHOTO, MOVIE/PHOTO) you...

Help Guide
Page 69
... deleting. Doing so may appear instead of a movie to enter the playback mode. 2. The format of and the movie playback format. Do not remove the battery pack or the AC Adaptor from the playback screen Deleting the selected images Select and delete unnecessary images. 1. If you delete or divide movies that...
... deleting. Doing so may appear instead of a movie to enter the playback mode. 2. The format of and the movie playback format. Do not remove the battery pack or the AC Adaptor from the playback screen Deleting the selected images Select and delete unnecessary images. 1. If you delete or divide movies that...


