

Operating Instructions
Page 3
... ... 76 Using your own titles 114 Labeling a cassette 116 Erasing the cassette memory data 118 Customizing Your Camcorder Advanced Recording Operations Changing the menu settings 120 Shooting with digital effects ......... 84 Step 1 Installing the microphone 7 Step 2 Preparing the power supply 8 Step 3 Inserting ... by date - Index search 77 Maintenance information and precautions ... 172 Specifications 176 Quick Reference Searching the boundaries of DVCAM and Using the fader function 67 DV formats 156 Using special effects - Title search 79 Quick Function Guide 191 ...
... ... 76 Using your own titles 114 Labeling a cassette 116 Erasing the cassette memory data 118 Customizing Your Camcorder Advanced Recording Operations Changing the menu settings 120 Shooting with digital effects ......... 84 Step 1 Installing the microphone 7 Step 2 Preparing the power supply 8 Step 3 Inserting ... by date - Index search 77 Maintenance information and precautions ... 172 Specifications 176 Quick Reference Searching the boundaries of DVCAM and Using the fader function 67 DV formats 156 Using special effects - Title search 79 Quick Function Guide 191 ...
Operating Instructions
Page 4
...ON. Tapes with (Cassette Memory). 4 For details, see this manual, buttons and settings on the DVCAM/DV format. The functions which require different operations depending on cassette memory Your camcorder is being carried out. end search (p. 29, 33) •Searching a recording by title -...•Searching the boundaries of recorded tape by index - title search (p. 79) •Superimposing a title (p. 110) •Making your camcorder are marked with cassette memory are shown in the introduction of the recording - index search (p. 77) •Searching a recording by date -...
...ON. Tapes with (Cassette Memory). 4 For details, see this manual, buttons and settings on the DVCAM/DV format. The functions which require different operations depending on cassette memory Your camcorder is being carried out. end search (p. 29, 33) •Searching a recording by title -...•Searching the boundaries of recorded tape by index - title search (p. 79) •Superimposing a title (p. 110) •Making your camcorder are marked with cassette memory are shown in the introduction of the recording - index search (p. 77) •Searching a recording by date -...
Operating Instructions
Page 13
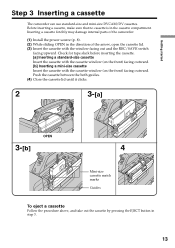
Getting started Step 3 Inserting a cassette The camcorder can use standard-size and mini-size DVCAM/DV cassettes. Check for tape slack before inserting the cassette. [a] Inserting a standard-size cassette Insert the cassette with the cassette window (on the ... procedure above, and take out the cassette by pressing the EJECT button in the cassette compartment. Inserting a cassette forcibly may damage internal parts of the camcorder. (1) Install the power source (p. 8). (2) While sliding OPEN in the direction of the arrow, open the cassette lid. (3) Insert the cassette with the cassette...
Getting started Step 3 Inserting a cassette The camcorder can use standard-size and mini-size DVCAM/DV cassettes. Check for tape slack before inserting the cassette. [a] Inserting a standard-size cassette Insert the cassette with the cassette window (on the ... procedure above, and take out the cassette by pressing the EJECT button in the cassette compartment. Inserting a cassette forcibly may damage internal parts of the camcorder. (1) Install the power source (p. 8). (2) While sliding OPEN in the direction of the arrow, open the cassette lid. (3) Insert the cassette with the cassette...
Operating Instructions
Page 15
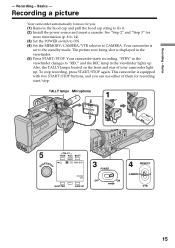
... viewfinder lights up . See "Step 2" and "Step 3" for you can use either of your camcorder light up . The picture now being shot is set to CAMERA. Recording a picture Your camcorder automatically focuses for more information (p. 8 to 14). (3) Set the POWER switch to ON. (4)... Set the MEMORY/CAMERA/VTR selector to the standby mode. Your camcorder starts recording. To stop . Recording - TALLY lamps Microphone 1 S 5 TART/STO TALLY TAKE REC BATT Li REC 00:00:00:01 SHUTTER DVCAM 32K GAIN UP 3 POWER OFF ON 4 MEMORY CAMERA VTR 15 Recording - Basics...
... viewfinder lights up . See "Step 2" and "Step 3" for you can use either of your camcorder light up . The picture now being shot is set to CAMERA. Recording a picture Your camcorder automatically focuses for more information (p. 8 to 14). (3) Set the POWER switch to ON. (4)... Set the MEMORY/CAMERA/VTR selector to the standby mode. Your camcorder starts recording. To stop . Recording - TALLY lamps Microphone 1 S 5 TART/STO TALLY TAKE REC BATT Li REC 00:00:00:01 SHUTTER DVCAM 32K GAIN UP 3 POWER OFF ON 4 MEMORY CAMERA VTR 15 Recording - Basics...

Operating Instructions
Page 16
...malfunction. 16 Note on the progressive mode If you intend to use the images on your camcorder in the DVCAM format and the DV format on one tape. We recommend that you set PROG. It may...play the images back as you do not eject the cassette even if you turn off your camcorder. To enable smooth transition Transition between scenes when you change the battery pack, set the POWER...OFF. •Do not mix recordings in standby mode for five minutes The head drum of the camcorder automatically stops rotating. The picture quality improves in DV format, the transition of a tape may take...
...malfunction. 16 Note on the progressive mode If you intend to use the images on your camcorder in the DVCAM format and the DV format on one tape. We recommend that you set PROG. It may...play the images back as you do not eject the cassette even if you turn off your camcorder. To enable smooth transition Transition between scenes when you change the battery pack, set the POWER...OFF. •Do not mix recordings in standby mode for five minutes The head drum of the camcorder automatically stops rotating. The picture quality improves in DV format, the transition of a tape may take...
Operating Instructions
Page 18
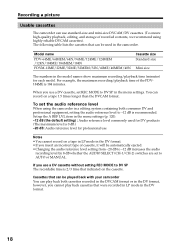
... cassettes. (To ensure high-quality playback, editing, and storage of recorded contents, we recommend using the camcorder in a editing system containing both cassettes recorded in the DVCAM format or in the DV format, however, you cannot play back cassettes that were recorded in LP mode in the DV format. 18 For ...on a tape in LP mode in the DV format. •If you insert an incorrect type of cassette, it will be played back with your camcorder You can play back both consumer DV and professional equipment, setting the audio reference level to DV SP in the menu settings. To set to...
... cassettes. (To ensure high-quality playback, editing, and storage of recorded contents, we recommend using the camcorder in a editing system containing both cassettes recorded in the DVCAM format or in the DV format, however, you cannot play back cassettes that were recorded in LP mode in the DV format. 18 For ...on a tape in LP mode in the DV format. •If you insert an incorrect type of cassette, it will be played back with your camcorder You can play back both consumer DV and professional equipment, setting the audio reference level to DV SP in the menu settings. To set to...
Operating Instructions
Page 26
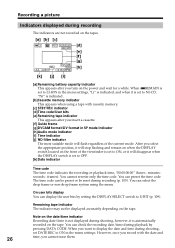
...check the recording date/time during recording The indicators are not recorded on the tapes. [a] [b] [c] Li REC 00:00:00:01 [d] 45min [e] [f] [g] DVCAM ND1 32K JUL 4 2001 12:05:56PM [h] [k] [j] [i] [a] Remaining battery capacity indicator This appears after you select the appropriate position, it will stop ...switch to NI-CD, "Ni" is indicated. [b]Cassette memory indicator This appears when using the menu. After you insert a cassette. [f] Guide frame [g]DVCAM format/DV format in the menu settings, "Li" is indicated, and when it is set to ON, or it is set to OFF. [k] ...
...check the recording date/time during recording The indicators are not recorded on the tapes. [a] [b] [c] Li REC 00:00:00:01 [d] 45min [e] [f] [g] DVCAM ND1 32K JUL 4 2001 12:05:56PM [h] [k] [j] [i] [a] Remaining battery capacity indicator This appears after you select the appropriate position, it will stop ...switch to NI-CD, "Ni" is indicated. [b]Cassette memory indicator This appears when using the menu. After you insert a cassette. [f] Guide frame [g]DVCAM format/DV format in the menu settings, "Li" is indicated, and when it is set to ON, or it is set to OFF. [k] ...
Operating Instructions
Page 35
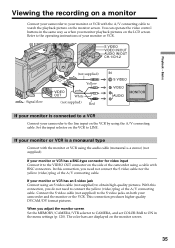
... y stereo) (not supplied). Connect the S video cable (not supplied) to the line input on both your camcorder and the monitor or the VCR. This connection produces higher quality DVCAM/DV format pictures. If your monitor or VCR has a BNC-type connector for video input Connect it to the ...monitor or VCR has an S video jack Connect using a cable with the A/V connecting cable to watch the playback picture on a monitor Connect your camcorder to obtain high-quality pictures. Playback - You can operate the video control buttons in the menu settings (p. 120). Refer to LINE. Set the input...
... y stereo) (not supplied). Connect the S video cable (not supplied) to the line input on both your camcorder and the monitor or the VCR. This connection produces higher quality DVCAM/DV format pictures. If your monitor or VCR has a BNC-type connector for video input Connect it to the ...monitor or VCR has an S video jack Connect using a cable with the A/V connecting cable to watch the playback picture on a monitor Connect your camcorder to obtain high-quality pictures. Playback - You can operate the video control buttons in the menu settings (p. 120). Refer to LINE. Set the input...
Operating Instructions
Page 62
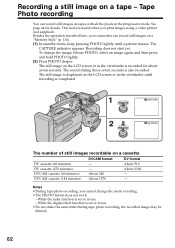
...image on a cassette DV cassette (60 minutes) DV cassette (270 minutes) DVCAM cassette (40 minutes) DVCAM cassette (184 minutes) DVCAM format - - Notes •During tape photo recording, you print images using a video printer (not supplied). While the digital effect function is set or in use . - This mode is useful when ... record still images on a tape - While the fader function is set or in use . •Do not shake the camcorder during those seven seconds is also recorded. Tape Photo recording You can record still images on a "Memory Stick" (p. 134). (1) In standby ...
...image on a cassette DV cassette (60 minutes) DV cassette (270 minutes) DVCAM cassette (40 minutes) DVCAM cassette (184 minutes) DVCAM format - - Notes •During tape photo recording, you print images using a video printer (not supplied). While the digital effect function is set or in use . - This mode is useful when ... record still images on a tape - While the fader function is set or in use . •Do not shake the camcorder during those seven seconds is also recorded. Tape Photo recording You can record still images on a "Memory Stick" (p. 134). (1) In standby ...
Operating Instructions
Page 85
... the menu settings. (Default setting is not satisfying for professional use. For details, refer to VTR. (4) Play back the recorded tape on your camcorder. (5) Start recording on VCRs that support the following buttons so as not to the VCR using the audio cable (monaural y stereo) (not supplied... If they are displayed, press the following systems 8 mm, Hi8, Digital8, VHS, S-VHS, VHSC, S-VHSC, Betamax, ED Betamax, DVCAM, mini DV or DV If your camcorder to record the indicators on the dubbed tape: •The DATA CODE button •The SEARCH MODE button on the Remote Commander...
... the menu settings. (Default setting is not satisfying for professional use. For details, refer to VTR. (4) Play back the recorded tape on your camcorder. (5) Start recording on VCRs that support the following buttons so as not to the VCR using the audio cable (monaural y stereo) (not supplied... If they are displayed, press the following systems 8 mm, Hi8, Digital8, VHS, S-VHS, VHSC, S-VHSC, Betamax, ED Betamax, DVCAM, mini DV or DV If your camcorder to record the indicators on the dubbed tape: •The DATA CODE button •The SEARCH MODE button on the Remote Commander...
Operating Instructions
Page 86
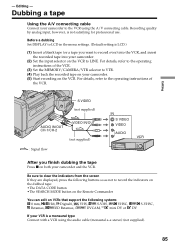
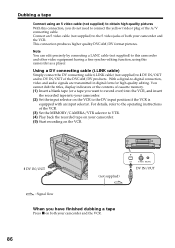
...: Signal flow When you want to record over) into the VCR, and insert the recorded tape into your camcorder and the VCR. 86 This connection produces higher quality DVCAM/DV format pictures. Using a DV connecting cable (i.LINK cable) Simply connect the DV connecting cable (i.LINK cable...cassette memory. (1) Insert a blank tape (or a tape you have finished dubbing a tape Press x on both your camcorder. (5) Start recording on the VCR. With a digital-to this camcorder and other video equipment having a fine synchro-editing function, using an S video cable (not supplied) to obtain high-quality...
...: Signal flow When you want to record over) into the VCR, and insert the recorded tape into your camcorder and the VCR. 86 This connection produces higher quality DVCAM/DV format pictures. Using a DV connecting cable (i.LINK cable) Simply connect the DV connecting cable (i.LINK cable...cassette memory. (1) Insert a blank tape (or a tape you have finished dubbing a tape Press x on both your camcorder. (5) Start recording on the VCR. With a digital-to this camcorder and other video equipment having a fine synchro-editing function, using an S video cable (not supplied) to obtain high-quality...
Operating Instructions
Page 97
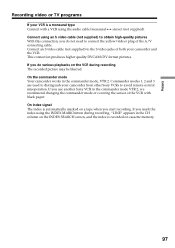
This connection produces higher quality DVCAM/DV format pictures. Commander modes 1, 2 and 3 are used to distinguish your camcorder and the VCR. On index signal The index is recorded on a tape when you use another Sony VCR in the commander mode, VTR 2. If you mark the index using the INDEX MARK...monaural type Connect with black paper. If you start recording. Connect an S video cable (not supplied) to the S video jacks of both your camcorder from other Sony VCRs to connect the yellow (video) plug of the VCR with a VCR using an S video cable (not supplied) to obtain high-quality ...
This connection produces higher quality DVCAM/DV format pictures. Commander modes 1, 2 and 3 are used to distinguish your camcorder and the VCR. On index signal The index is recorded on a tape when you use another Sony VCR in the commander mode, VTR 2. If you mark the index using the INDEX MARK...monaural type Connect with black paper. If you start recording. Connect an S video cable (not supplied) to the S video jacks of both your camcorder from other Sony VCRs to connect the yellow (video) plug of the VCR with a VCR using an S video cable (not supplied) to obtain high-quality ...
Operating Instructions
Page 98
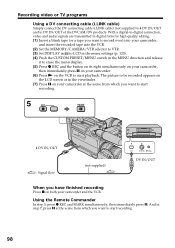
... which you want to DV IN/OUT of the DVCAM/DV products. The picture to be recorded appears on the LCD screen or in the viewfinder. (7) Press X on both your camcorder, and insert the recorded tape into your camcorder and the VCR. With a digital-to-digital connection, video and audio signals are transmitted in the...
... which you want to DV IN/OUT of the DVCAM/DV products. The picture to be recorded appears on the LCD screen or in the viewfinder. (7) Press X on both your camcorder, and insert the recorded tape into your camcorder and the VCR. With a digital-to-digital connection, video and audio signals are transmitted in the...
Operating Instructions
Page 106
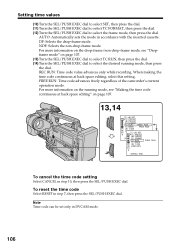
... time code setting Select CANCEL in step 7, then press the SEL/PUSH EXEC dial. AUTO: Automatically sets the mode in DVCAM mode. 106 FREE RUN: Time code advances freely regardless of the camcorder's current operation mode. NDF: Selects the non-drop-frame mode. For more information on the drop-frame/non-drop...
... time code setting Select CANCEL in step 7, then press the SEL/PUSH EXEC dial. AUTO: Automatically sets the mode in DVCAM mode. 106 FREE RUN: Time code advances freely regardless of the camcorder's current operation mode. NDF: Selects the non-drop-frame mode. For more information on the drop-frame/non-drop...
Operating Instructions
Page 108
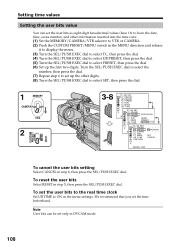
... the date, time, scene number, and other digits. (8) Turn the SEL/PUSH EXEC dial to select SET, then press the dial. Setting time values Setting the user bits value You can be set the time beforehand. We recommend that you set only in DVCAM mode. 108 Note User bits can set the... select UB PRESET, then press the dial. (5) Turn the SEL/PUSH EXEC dial to select PRESET, then press the dial. (6) Set up the first two digits. CUSTOM PRESET MENU 1 MEMORY CAMERA VTR 2 3-8 TC / UB SET TC PRESET UB PRESET TC FORMAT TC RUN TC MAKE UB T I ME TC / UB SET TC...
... the date, time, scene number, and other digits. (8) Turn the SEL/PUSH EXEC dial to select SET, then press the dial. Setting time values Setting the user bits value You can be set the time beforehand. We recommend that you set only in DVCAM mode. 108 Note User bits can set the... select UB PRESET, then press the dial. (5) Turn the SEL/PUSH EXEC dial to select PRESET, then press the dial. (6) Set up the first two digits. CUSTOM PRESET MENU 1 MEMORY CAMERA VTR 2 3-8 TC / UB SET TC PRESET UB PRESET TC FORMAT TC RUN TC MAKE UB T I ME TC / UB SET TC...
Operating Instructions
Page 125
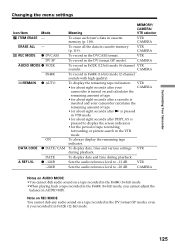
... VTR during playback. VTR CAMERA To erase all the data in the DV format (SP mode). CAMERA To record in the DVCAM format. Customizing Your Camcorder Changing the menu settings Icon/item Mode ITEM ERASE - VTR CAMERA To record in Fs48K (16-bit) mode (2-channel sounds ...with high quality). REC MODE z DVCAM DV SP AUDIO MODE z FS32K FS48K qREMAIN z AUTO ON DATA CODE z DATE/CAM A REF LVL DATE z -12dB -20dB ...
... VTR during playback. VTR CAMERA To erase all the data in the DV format (SP mode). CAMERA To record in the DVCAM format. Customizing Your Camcorder Changing the menu settings Icon/item Mode ITEM ERASE - VTR CAMERA To record in Fs48K (16-bit) mode (2-channel sounds ...with high quality). REC MODE z DVCAM DV SP AUDIO MODE z FS32K FS48K qREMAIN z AUTO ON DATA CODE z DATE/CAM A REF LVL DATE z -12dB -20dB ...
Operating Instructions
Page 138
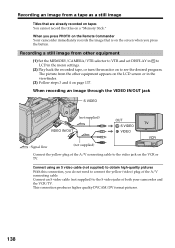
... Connect an S video cable (not supplied) to connect the yellow (video) plug of both your camcorder and the VCR/TV. When you press PHOTO on the Remote Commander Your camcorder immediately records the image that are already recorded on tapes You cannot record the titles on the VCR ... using an S video cable (not supplied) to obtain high-quality pictures With this connection, you press the button. This connection produces higher quality DVCAM/DV format pictures. 138 The picture from other equipment appears on the LCD screen or in the menu settings. (2) Play back the recorded tape...
... Connect an S video cable (not supplied) to connect the yellow (video) plug of both your camcorder and the VCR/TV. When you press PHOTO on the Remote Commander Your camcorder immediately records the image that are already recorded on tapes You cannot record the titles on the VCR ... using an S video cable (not supplied) to obtain high-quality pictures With this connection, you press the button. This connection produces higher quality DVCAM/DV format pictures. 138 The picture from other equipment appears on the LCD screen or in the menu settings. (2) Play back the recorded tape...
Operating Instructions
Page 156
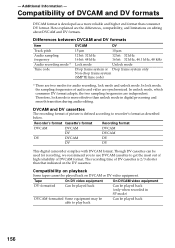
..., lock mode is developed as described below. Recorder's format Cassette's format Recording format DVCAM DVCAM DVCAM DV DVCAM DV DVCAM DV DV DV This digital camcorder complies with DVCAM format. Differences between DVCAM and DV formats Item Track pitch Audio sampling frequency Audio recording mode 1) Time code DVCAM DV 15 µm 10 µm 12 bit: 32 kHz 16 bit: 48...
..., lock mode is developed as described below. Recorder's format Cassette's format Recording format DVCAM DVCAM DVCAM DV DVCAM DV DVCAM DV DV DV This digital camcorder complies with DVCAM format. Differences between DVCAM and DV formats Item Track pitch Audio sampling frequency Audio recording mode 1) Time code DVCAM DV 15 µm 10 µm 12 bit: 32 kHz 16 bit: 48...
Operating Instructions
Page 157
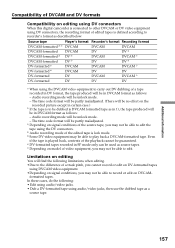
..., the recording format of edited tapes is defined according to recorder's format as described below. formatted tapes. Compatibility of DVCAM and DV formats Compatibility on editing using DV connectors When this digital camcorder is connected to other DVCAM or DV video equipment using audio/video jacks, then use the dubbed tape as a source tape.
..., the recording format of edited tapes is defined according to recorder's format as described below. formatted tapes. Compatibility of DVCAM and DV formats Compatibility on editing using DV connectors When this digital camcorder is connected to other DVCAM or DV video equipment using audio/video jacks, then use the dubbed tape as a source tape.
Operating Instructions
Page 158
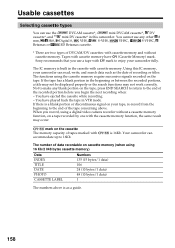
.... is built in the cassette with cassette memory have (Cassette Memory) mark. Sony recommends that you use a tape with mark to enjoy your tape, re-record.... Not to make any other 8 mm, Hi8, Digital 8, VHS, S-VHS, VHSC, S-VHSC, Betamax or ED Betamax cassette. * There are two types of DVCAM/DV cassettes: with cassette memory and without a cassette...when: - Using this camcorder. Usable cassettes Selecting cassette types You can use the DVCAM cassette*, mini DVCAM cassette*, DV cassette*, and mini DV cassette* in this IC memory, your camcorder can The number of data...
.... is built in the cassette with cassette memory have (Cassette Memory) mark. Sony recommends that you use a tape with mark to enjoy your tape, re-record.... Not to make any other 8 mm, Hi8, Digital 8, VHS, S-VHS, VHSC, S-VHSC, Betamax or ED Betamax cassette. * There are two types of DVCAM/DV cassettes: with cassette memory and without a cassette...when: - Using this camcorder. Usable cassettes Selecting cassette types You can use the DVCAM cassette*, mini DVCAM cassette*, DV cassette*, and mini DV cassette* in this IC memory, your camcorder can The number of data...
