Instruction Manual
Page 3
... set on or pinched by items placed upon or against them . If the plug should be operated only from the type of the set from battery power, or other similar surface. 3 Use a cloth lightly dampened with water for necessary ventilation. for future reference. Use only a cart, stand, tripod, bracket, or table...
... set on or pinched by items placed upon or against them . If the plug should be operated only from the type of the set from battery power, or other similar surface. 3 Use a cloth lightly dampened with water for necessary ventilation. for future reference. Use only a cart, stand, tripod, bracket, or table...

Instruction Manual
Page 5
..., including interference that may cause undesired operation. 5 This Class B digital apparatus complies with Part 15 of rechargeable batteries, call : Sony Customer Information Services Center 1-800-222-SONY (7669) The number below is subject to the following two conditions:... damaged or leaking Lithium-Ion batteries. If you . Regulatory Information Declaration of Conformity Trade Name: SONY Model No.: DSLR-A350 Responsible Party: Sony Electronics Inc. Declaration of Conformity Trade Name: SONY Model No.: DSLR-A300 Responsible Party: Sony Electronics Inc. Telephone No.: 858...
..., including interference that may cause undesired operation. 5 This Class B digital apparatus complies with Part 15 of rechargeable batteries, call : Sony Customer Information Services Center 1-800-222-SONY (7669) The number below is subject to the following two conditions:... damaged or leaking Lithium-Ion batteries. If you . Regulatory Information Declaration of Conformity Trade Name: SONY Model No.: DSLR-A350 Responsible Party: Sony Electronics Inc. Declaration of Conformity Trade Name: SONY Model No.: DSLR-A300 Responsible Party: Sony Electronics Inc. Telephone No.: 858...
Instruction Manual
Page 6
... . For more of the following measures: - Note: This equipment has been tested and found compliant with the limits for a digital device pursuant to provide reasonable protection against harmful interference in a particular installation. The supplied interface cable must be treated as household waste... Union and other European countries with the instructions, may apply, See www.dtsc.ca.gov/hazardouswaste/ perchlorate Perchlorate Material: Lithium battery contains perchlorate. 6 For Customers in Europe This product has been tested and found to comply with the limits for help to...
... . For more of the following measures: - Note: This equipment has been tested and found compliant with the limits for a digital device pursuant to provide reasonable protection against harmful interference in a particular installation. The supplied interface cable must be treated as household waste... Union and other European countries with the instructions, may apply, See www.dtsc.ca.gov/hazardouswaste/ perchlorate Perchlorate Material: Lithium battery contains perchlorate. 6 For Customers in Europe This product has been tested and found to comply with the limits for help to...

Instruction Manual
Page 7
... or data integrity reasons require a permanent connection with an incorporated battery, this battery should lose the fuse cover, please contact your safety and convenience. To ensure that for EMC and product safety is Sony Corporation, 1-7-1 Konan Minato-ku Tokyo, 108-0075 Japan. Notice...EU Directives The manufacturer of this product is Sony Deutschland GmbH, Hedelfinger Strasse 61, 70327 Stuttgart, Germany. Hand the battery over the product at end-oflife to the applicable collection point for your nearest Sony service station. For any service or guarantee matters...
... or data integrity reasons require a permanent connection with an incorporated battery, this battery should lose the fuse cover, please contact your safety and convenience. To ensure that for EMC and product safety is Sony Corporation, 1-7-1 Konan Minato-ku Tokyo, 108-0075 Japan. Notice...EU Directives The manufacturer of this product is Sony Deutschland GmbH, Hedelfinger Strasse 61, 70327 Stuttgart, Germany. Hand the battery over the product at end-oflife to the applicable collection point for your nearest Sony service station. For any service or guarantee matters...
Instruction Manual
Page 9
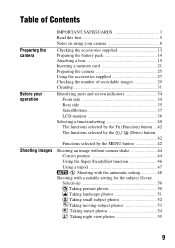
...Shooting images IMPORTANT SAFEGUARDS 3 Read this first 5 Notes on using your camera 8 Checking the accessories supplied 13 Preparing the battery pack 14 Attaching a lens 19 Inserting a memory card 21 Preparing the camera 25 Using the accessories supplied 27 Checking the number of recordable images ... button ... 42 The functions selected by the (Drive) button 42 Functions selected by the MENU button 42 Shooting an image without camera shake 44 Correct posture 44 Using the Super SteadyShot function 46 Using a tripod 47 / Shooting with the automatic setting 48 Shooting with...
...Shooting images IMPORTANT SAFEGUARDS 3 Read this first 5 Notes on using your camera 8 Checking the accessories supplied 13 Preparing the battery pack 14 Attaching a lens 19 Inserting a memory card 21 Preparing the camera 25 Using the accessories supplied 27 Checking the number of recordable images ... button ... 42 The functions selected by the (Drive) button 42 Functions selected by the MENU button 42 Shooting an image without camera shake 44 Correct posture 44 Using the Super SteadyShot function 46 Using a tripod 47 / Shooting with the automatic setting 48 Shooting with...

Instruction Manual
Page 13
Preparing the camera Preparing the camera Checking the accessories supplied The number in parentheses indicates the number of pieces. • BC-VM10 Battery charger (1)/ Power cord (mains lead) (1) • Rechargeable battery pack NPFM500H (1) • Eyecup (1) (Attached on the camera) • CD-ROM (Application Software for α camera) (1) • Quick Start Guide (1) • Instruction Manual (This manual) (1) • USB cable (1) • Video cable (1) • Shoulder strap (1) • Eyepiece cover (1) • Body cap (1) (Attached on the camera) 13
Preparing the camera Preparing the camera Checking the accessories supplied The number in parentheses indicates the number of pieces. • BC-VM10 Battery charger (1)/ Power cord (mains lead) (1) • Rechargeable battery pack NPFM500H (1) • Eyecup (1) (Attached on the camera) • CD-ROM (Application Software for α camera) (1) • Quick Start Guide (1) • Instruction Manual (This manual) (1) • USB cable (1) • Video cable (1) • Shoulder strap (1) • Eyepiece cover (1) • Body cap (1) (Attached on the camera) 13
Instruction Manual
Page 14
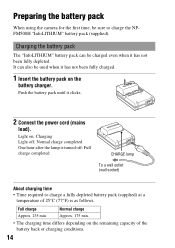
...battery pack When using the camera for the first time, be sure to charge a fully depleted battery pack (supplied) at a temperature of the battery back or charging conditions. 14 Light on: Charging Light off: Normal charge completed One hour after the lamp is as follows. Charging the battery pack The "InfoLITHIUM" battery... lead). Full charge Normal charge Approx. 235 min. Approx. 175 min. • The charging time differs depending on the battery charger. Push the battery pack until it has not been fully depleted. It can be used when it has not been fully charged. 1 Insert the...
...battery pack When using the camera for the first time, be sure to charge a fully depleted battery pack (supplied) at a temperature of the battery back or charging conditions. 14 Light on: Charging Light off: Normal charge completed One hour after the lamp is as follows. Charging the battery pack The "InfoLITHIUM" battery... lead). Full charge Normal charge Approx. 235 min. Approx. 175 min. • The charging time differs depending on the battery charger. Push the battery pack until it has not been fully depleted. It can be used when it has not been fully charged. 1 Insert the...
Instruction Manual
Page 15
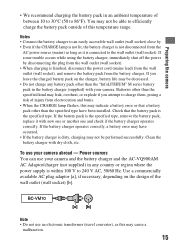
... outlet (wall socket) [b]. Power sources You can use your camera and the battery charger and the AC-VQ900AM AC Adaptor/charger (not supplied) in any battery pack other than the "InfoLITHIUM" M series battery pack in an ambient temperature of between 10 to 30°C...Do not use your camera. Check that a battery pack other than the specified type have occurred. • If the battery charger is the specified type. Preparing the camera • We recommend charging the battery pack in the battery charger (supplied) with your camera abroad - If the battery pack is connected to...
... outlet (wall socket) [b]. Power sources You can use your camera and the battery charger and the AC-VQ900AM AC Adaptor/charger (not supplied) in any battery pack other than the "InfoLITHIUM" M series battery pack in an ambient temperature of between 10 to 30°C...Do not use your camera. Check that a battery pack other than the specified type have occurred. • If the battery charger is the specified type. Preparing the camera • We recommend charging the battery pack in the battery charger (supplied) with your camera abroad - If the battery pack is connected to...
Instruction Manual
Page 16
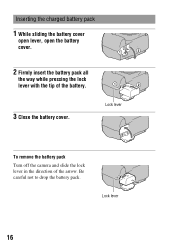
Be careful not to drop the battery pack. Lock lever 16 Inserting the charged battery pack 1 While sliding the battery cover open lever, open the battery cover. 2 Firmly insert the battery pack all the way while pressing the lock lever with the tip of the arrow. Lock lever To remove the battery pack Turn off the camera and slide the lock lever in the direction of the battery. 3 Close the battery cover.
Be careful not to drop the battery pack. Lock lever 16 Inserting the charged battery pack 1 While sliding the battery cover open lever, open the battery cover. 2 Firmly insert the battery pack all the way while pressing the lock lever with the tip of the arrow. Lock lever To remove the battery pack Turn off the camera and slide the lock lever in the direction of the battery. 3 Close the battery cover.
Instruction Manual
Page 17
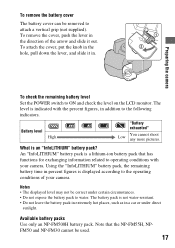
...Set the POWER switch to operating conditions with the percent figures, in the direction of your camera. The level is indicated with your camera. Available battery packs Use only an NP-FM500H battery pack. What is displayed according to the operating conditions of the arrow and slide it ...in a car or under certain circumstances. • Do not expose the battery pack to attach a vertical grip (...
...Set the POWER switch to operating conditions with the percent figures, in the direction of your camera. The level is indicated with your camera. Available battery packs Use only an NP-FM500H battery pack. What is displayed according to the operating conditions of the arrow and slide it ...in a car or under certain circumstances. • Do not expose the battery pack to attach a vertical grip (...
Instruction Manual
Page 18
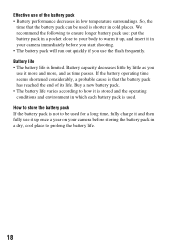
...use it up once a year on your camera immediately before storing the battery pack in cold places. If the battery operating time seems shortened considerably, a probable cause is shorter in a dry, cool place to store the battery pack If the battery pack is limited. We recommend the following ..., and as time passes. Battery life • The battery life is not to ensure longer battery pack use the flash frequently. Buy a new battery pack. • The battery life varies according to how it in your camera before you start shooting. • The battery pack will run out quickly...
...use it up once a year on your camera immediately before storing the battery pack in cold places. If the battery operating time seems shortened considerably, a probable cause is shorter in a dry, cool place to store the battery pack If the battery pack is limited. We recommend the following ..., and as time passes. Battery life • The battery life is not to ensure longer battery pack use the flash frequently. Buy a new battery pack. • The battery life varies according to how it in your camera before you start shooting. • The battery pack will run out quickly...
Instruction Manual
Page 22
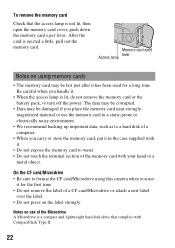
... used for the first time. • Do not remove the label of the Microdrive A Microdrive is lit, do not remove the memory card or the battery pack, or turn off the power. Notes on use of a CF card/Microdrive or attach a new label over the label. • Do not press on... using this camera when you place the memory card near stronglymagnetized material or use it . • When the access lamp is a compact and lightweight hard disk drive that...
... used for the first time. • Do not remove the label of the Microdrive A Microdrive is lit, do not remove the memory card or the battery pack, or turn off the power. Notes on use of a CF card/Microdrive or attach a new label over the label. • Do not press on... using this camera when you place the memory card near stronglymagnetized material or use it . • When the access lamp is a compact and lightweight hard disk drive that...
Instruction Manual
Page 27
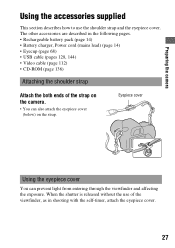
... cover You can also attach the eyepiece cover (below) on the strap. Preparing the camera Using the accessories supplied This section describes how to use of the strap on the camera. • You can prevent light from entering through the viewfinder and affecting the exposure.... The other accessories are described in the following pages. • Rechargeable battery pack (page 14) • Battery charger, Power cord (mains lead) (page 14)...
... cover You can also attach the eyepiece cover (below) on the strap. Preparing the camera Using the accessories supplied This section describes how to use of the strap on the camera. • You can prevent light from entering through the viewfinder and affecting the exposure.... The other accessories are described in the following pages. • Rechargeable battery pack (page 14) • Battery charger, Power cord (mains lead) (page 14)...
Instruction Manual
Page 30
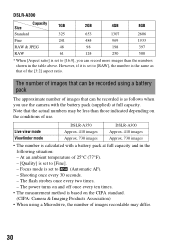
... view mode Viewfinder mode DSLR-A350 Approx. 410 images Approx. 730 images DSLR-A300 Approx. 410 images Approx. 730 images • The number is calculated with the battery pack (supplied) at full capacity and in the table above. The flash strobes once every two times. - DSLR-A300 Size Capacity 1GB ...] is set to [16:9], you use . The number of images that can be recorded using a Microdrive, the number of use the camera with a battery pack at full capacity. The power turns on and off once every ten times. • The measurement method is based on the conditions of...
... view mode Viewfinder mode DSLR-A350 Approx. 410 images Approx. 730 images DSLR-A300 Approx. 410 images Approx. 730 images • The number is calculated with the battery pack (supplied) at full capacity and in the table above. The flash strobes once every two times. - DSLR-A300 Size Capacity 1GB ...] is set to [16:9], you use . The number of images that can be recorded using a Microdrive, the number of use the camera with a battery pack at full capacity. The power turns on and off once every ten times. • The measurement method is based on the conditions of...
Instruction Manual
Page 32
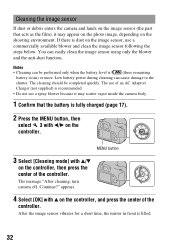
...and clean the image sensor following the steps below. The message "After cleaning, turn camera off. After the image sensor vibrates for a short time, the mirror in front is lifted. 32 Low battery power during cleaning can easily clean the image sensor using only the blower and the ...on the shooting environment. Continue?" Notes • Cleaning can be completed quickly. Cleaning the image sensor If dust or debris enters the camera and lands on the image sensor (the part that the battery is fully charged (page 17). 2 Press the MENU button, then select 3 with b/B on the controller.
...and clean the image sensor following the steps below. The message "After cleaning, turn camera off. After the image sensor vibrates for a short time, the mirror in front is lifted. 32 Low battery power during cleaning can easily clean the image sensor using only the blower and the ...on the shooting environment. Continue?" Notes • Cleaning can be completed quickly. Cleaning the image sensor If dust or debris enters the camera and lands on the image sensor (the part that the battery is fully charged (page 17). 2 Press the MENU button, then select 3 with b/B on the controller.
Instruction Manual
Page 33
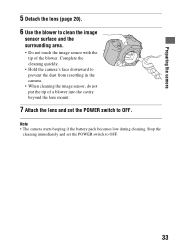
Note • The camera starts beeping if the battery pack becomes low during cleaning. Stop the cleaning immediately and set the POWER switch to OFF. Preparing the camera 5 Detach the lens (page 20). 6 Use the blower to clean the image sensor surface and the surrounding area. • Do not touch the image... cavity beyond the lens mount. 7 Attach the lens and set the POWER switch to OFF. 33 Complete the cleaning quickly. • Hold the camera's face downward to prevent the dust from resettling in the camera. • When cleaning the image sensor, do not put the tip of the blower.
Note • The camera starts beeping if the battery pack becomes low during cleaning. Stop the cleaning immediately and set the POWER switch to OFF. Preparing the camera 5 Detach the lens (page 20). 6 Use the blower to clean the image sensor surface and the surrounding area. • Do not touch the image... cavity beyond the lens mount. 7 Attach the lens and set the POWER switch to OFF. 33 Complete the cleaning quickly. • Hold the camera's face downward to prevent the dust from resettling in the camera. • When cleaning the image sensor, do not put the tip of the blower.

Instruction Manual
Page 37
... the plug of the Remote Commander in the REMOTE terminal, aligning the guide of the plug on the camera. Sides/Bottom Before your operation A VIDEO OUT/USB terminal (112, 128) B Memory card cover C Memory card insertion slot (21) D Memory card eject lever (22) E Hooks ... supplied) to the DC IN terminal on the guide of the REMOTE terminal. You will be unable to firmly secure the camera to tripods having screws longer than 5.5 mm (7/32 inch). H Battery cover (17) I Tripod receptacle • Use a tripod with a screw length of less than 5.5 mm (7/32 inch), and may damage the...
... the plug of the Remote Commander in the REMOTE terminal, aligning the guide of the plug on the camera. Sides/Bottom Before your operation A VIDEO OUT/USB terminal (112, 128) B Memory card cover C Memory card insertion slot (21) D Memory card eject lever (22) E Hooks ... supplied) to the DC IN terminal on the guide of the REMOTE terminal. You will be unable to firmly secure the camera to tripods having screws longer than 5.5 mm (7/32 inch). H Battery cover (17) I Tripod receptacle • Use a tripod with a screw length of less than 5.5 mm (7/32 inch), and may damage the...
Instruction Manual
Page 38
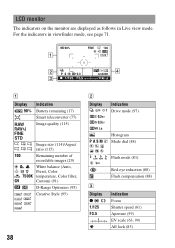
... indicators in Live view mode. LCD monitor The indicators on the monitor are displayed as follows in viewfinder mode, see page 71. A Display 90% Indication Battery remaining (17) Smart teleconverter (77) Image quality (115) Image size (114)/Aspect ratio (115) 100 Remaining number of recordable images (29) White balance (Auto, Preset...
... indicators in Live view mode. LCD monitor The indicators on the monitor are displayed as follows in viewfinder mode, see page 71. A Display 90% Indication Battery remaining (17) Smart teleconverter (77) Image quality (115) Image size (114)/Aspect ratio (115) 100 Remaining number of recordable images (29) White balance (Auto, Preset...
Instruction Manual
Page 70
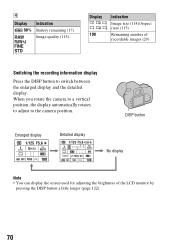
D Display 90% Indication Battery remaining (17) Image quality (115) Display 100 Indication Image size (114)/Aspect ratio (115) Remaining number of the LCD monitor by pressing the DISP button a little longer (page 122). 70 When you rotate the camera to a vertical position, the display automatically rotates to adjust to switch between the enlarged...; You can display the screen used for adjusting the brightness of recordable images (29) Switching the recording information display Press the DISP button to the camera position.
D Display 90% Indication Battery remaining (17) Image quality (115) Display 100 Indication Image size (114)/Aspect ratio (115) Remaining number of the LCD monitor by pressing the DISP button a little longer (page 122). 70 When you rotate the camera to a vertical position, the display automatically rotates to adjust to switch between the enlarged...; You can display the screen used for adjusting the brightness of recordable images (29) Switching the recording information display Press the DISP button to the camera position.

Instruction Manual
Page 106
file number (132) Protect (109) DPOF set (141) Image quality (115) 1/125 F3.5 ISO100 2008 1 1 10:37AM 3/7 Image size (114)/Aspect ratio (115) Battery remaining warning (17) Shutter speed (61) Aperture (59) ISO sensitivity (90) Date of recording File number/total number of recorded images Each time you press the DISP button, the information display changes (page 101). Basic information display Display 100-0003 DPOF3 Indication Folder - Checking the information of images 106
file number (132) Protect (109) DPOF set (141) Image quality (115) 1/125 F3.5 ISO100 2008 1 1 10:37AM 3/7 Image size (114)/Aspect ratio (115) Battery remaining warning (17) Shutter speed (61) Aperture (59) ISO sensitivity (90) Date of recording File number/total number of recorded images Each time you press the DISP button, the information display changes (page 101). Basic information display Display 100-0003 DPOF3 Indication Folder - Checking the information of images 106


