
Instruction Manual
Page 11
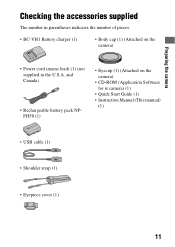
...; Eyecup (1) (Attached on the camera) • Power cord (mains lead) (1) (not supplied in parentheses indicates the number of pieces. • BC-VH1 Battery charger (1) • Body cap (1) (Attached on the camera) • CD-ROM (Application Software for α camera) (1) • Quick Start Guide (1) • Instruction Manual (This manual) (1) • USB cable...
...; Eyecup (1) (Attached on the camera) • Power cord (mains lead) (1) (not supplied in parentheses indicates the number of pieces. • BC-VH1 Battery charger (1) • Body cap (1) (Attached on the camera) • CD-ROM (Application Software for α camera) (1) • Quick Start Guide (1) • Instruction Manual (This manual) (1) • USB cable...
Instruction Manual
Page 16
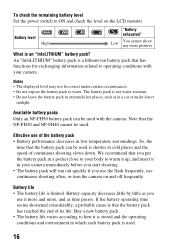
... according to ON and check the level on and off frequently. Available battery packs Only an NP-FH50 battery pack can be used with your body to water. If the battery operating time seems shortened considerably, a probable cause is shorter in cold places and the speed of the battery pack •...
... according to ON and check the level on and off frequently. Available battery packs Only an NP-FH50 battery pack can be used with your body to water. If the battery operating time seems shortened considerably, a probable cause is shorter in cold places and the speed of the battery pack •...

Instruction Manual
Page 18
...-R55. • When attaching a lens, do not press the lens release button. • Do not use force when attaching a lens. 18 Attaching a lens 1 Remove the body cap from the camera and the packaging lid from the rear of the lens. • When changing the lens, quickly change the lens away from.... 2 Mount the lens by aligning the orange index marks on the lens and camera. 3 Turn the lens clockwise until it clicks into the locked position. Body cap Packaging lid Orange index marks Notes • A rear lens cap is not supplied with the DT 18-55mm F3.5-5.6 SAM Lens Kit.
...-R55. • When attaching a lens, do not press the lens release button. • Do not use force when attaching a lens. 18 Attaching a lens 1 Remove the body cap from the camera and the packaging lid from the rear of the lens. • When changing the lens, quickly change the lens away from.... 2 Mount the lens by aligning the orange index marks on the lens and camera. 3 Turn the lens clockwise until it clicks into the locked position. Body cap Packaging lid Orange index marks Notes • A rear lens cap is not supplied with the DT 18-55mm F3.5-5.6 SAM Lens Kit.

Instruction Manual
Page 19
... the surface of the image sensor (the part that acts as the film), it stops. 2 Replace the packaging lid on the lens and attach the body cap to prevent dust from them. • When you attach them, remove dust from landing on the shooting environment.
... the surface of the image sensor (the part that acts as the film), it stops. 2 Replace the packaging lid on the lens and attach the body cap to prevent dust from them. • When you attach them, remove dust from landing on the shooting environment.
Instruction Manual
Page 30
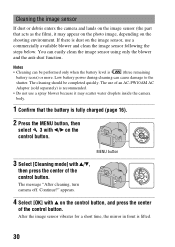
... "After cleaning, turn camera off. If there is dust on the image sensor, use a spray blower because it may scatter water droplets inside the camera body. 1 Confirm that acts as the film), it may appear on the photo image, depending on the shooting environment. Cleaning the image sensor If dust or...
... "After cleaning, turn camera off. If there is dust on the image sensor, use a spray blower because it may scatter water droplets inside the camera body. 1 Confirm that acts as the film), it may appear on the photo image, depending on the shooting environment. Cleaning the image sensor If dust or...
Instruction Manual
Page 45
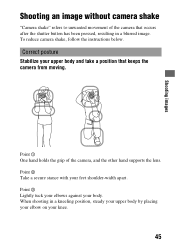
Correct posture Stabilize your knee. 45 Point 2 Take a secure stance with your body. To reduce camera shake, follow the instructions below. Point 3 Lightly tuck your elbows against your feet shoulder-width apart. Point 1 One hand holds the grip ...of the camera that keeps the camera from moving. When shooting in a kneeling position, steady your upper body by placing your elbow on your upper body and take a position that occurs after the shutter button has been pressed, resulting in a blurred image. Shooting images Shooting images Shooting...
Correct posture Stabilize your knee. 45 Point 2 Take a secure stance with your body. To reduce camera shake, follow the instructions below. Point 3 Lightly tuck your elbows against your feet shoulder-width apart. Point 1 One hand holds the grip ...of the camera that keeps the camera from moving. When shooting in a kneeling position, steady your upper body by placing your elbow on your upper body and take a position that occurs after the shutter button has been pressed, resulting in a blurred image. Shooting images Shooting images Shooting...
Instruction Manual
Page 70
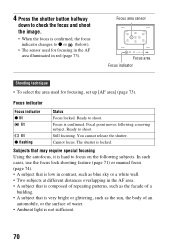
...; A subject that is composed of repeating patterns, such as the facade of a building. • A subject that is low in contrast, such as the sun, the body of an automobile, or the surface of water. • Ambient light is not sufficient. 70
...; A subject that is composed of repeating patterns, such as the facade of a building. • A subject that is low in contrast, such as the sun, the body of an automobile, or the surface of water. • Ambient light is not sufficient. 70
Instruction Manual
Page 141
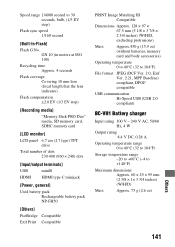
... III Compatible Dimensions Approx. 128 × 97 × 67.5 mm (5 1/8 × 3 7/8 × 2 3/4 inches) (W/H/D, excluding protrusions) Mass Approx.450 g (15.9 oz) (without batteries, memory card and body accessories) Operating temperature 0 to 40°C (32 to 104°F) File format JPEG (DCF Ver. 2.0, Exif Ver. 2.21, MPF Baseline) compliant, DPOF compatible USB communication...
... III Compatible Dimensions Approx. 128 × 97 × 67.5 mm (5 1/8 × 3 7/8 × 2 3/4 inches) (W/H/D, excluding protrusions) Mass Approx.450 g (15.9 oz) (without batteries, memory card and body accessories) Operating temperature 0 to 40°C (32 to 104°F) File format JPEG (DCF Ver. 2.0, Exif Ver. 2.21, MPF Baseline) compliant, DPOF compatible USB communication...

Instruction Manual
Page 156
...or dusty places Be careful not to conditions at the new location over about an hour for the moisture to attach the lens cap or body cap when not using the camera. On operating temperatures Your camera is designed for maintaining the date and time and other settings regardless of the... bringing the camera from a cold to shoot with moisture remaining inside or outside the camera. If moisture condensation occurs Turn off . 156 When attaching the body cap, remove all the dust from the cap before placing it to adapt to let sand or dust get into the camera. Precautions Do not...
...or dusty places Be careful not to conditions at the new location over about an hour for the moisture to attach the lens cap or body cap when not using the camera. On operating temperatures Your camera is designed for maintaining the date and time and other settings regardless of the... bringing the camera from a cold to shoot with moisture remaining inside or outside the camera. If moisture condensation occurs Turn off . 156 When attaching the body cap, remove all the dust from the cap before placing it to adapt to let sand or dust get into the camera. Precautions Do not...