
Instruction Manual
Page 9
...Selecting the focus area (AF area 73 Adjusting the focus manually (Manual focus 74 Using the flash 75 Performing wireless flash shooting 78 Adjusting the brightness of the image (Exposure, Flash compensation, Metering 79 Using brightness compensation for the entire image (Exposure compensation 79 Adjusting the amount... of flash light (Flash compensation) 80 Selecting the method for measuring the brightness of a subject (Metering mode 81 Setting ISO 82 Adjusting ...
...Selecting the focus area (AF area 73 Adjusting the focus manually (Manual focus 74 Using the flash 75 Performing wireless flash shooting 78 Adjusting the brightness of the image (Exposure, Flash compensation, Metering 79 Using brightness compensation for the entire image (Exposure compensation 79 Adjusting the amount... of flash light (Flash compensation) 80 Selecting the method for measuring the brightness of a subject (Metering mode 81 Setting ISO 82 Adjusting ...

Instruction Manual
Page 13
.... 265 min. Approx. 205 min. • The charging time differs depending on and off repeatedly at the interval of the supplied battery charger flashes in either way: - and Canada Plug To the wall outlet (wall socket) Preparing the camera CHARGE lamp For customers in the U.S.A. Slow... a temperature of 25°C (77°F) is turned off repeatedly at the interval of the battery back or charging conditions. When the CHARGE lamp flashes • The CHARGE lamp of 1.5 seconds. 13 Light on and off : Full charge completed For customers in countries/regions other than the U.S.A.
.... 265 min. Approx. 205 min. • The charging time differs depending on and off repeatedly at the interval of the supplied battery charger flashes in either way: - and Canada Plug To the wall outlet (wall socket) Preparing the camera CHARGE lamp For customers in the U.S.A. Slow... a temperature of 25°C (77°F) is turned off repeatedly at the interval of the battery back or charging conditions. When the CHARGE lamp flashes • The CHARGE lamp of 1.5 seconds. 13 Light on and off : Full charge completed For customers in countries/regions other than the U.S.A.
Instruction Manual
Page 14
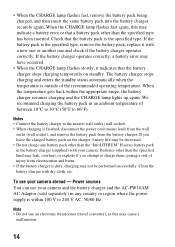
..., it with dry cloth, etc. If you attempt to 240 V AC, 50/60 Hz. • When the CHARGE lamp flashes fast, remove the battery pack being charged, and then insert the same battery pack into the battery charger securely again. Clean the battery charger with a ...
..., it with dry cloth, etc. If you attempt to 240 V AC, 50/60 Hz. • When the CHARGE lamp flashes fast, remove the battery pack being charged, and then insert the same battery pack into the battery charger securely again. Clean the battery charger with a ...
Instruction Manual
Page 16
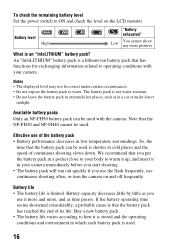
... pack is that has functions for exchanging information related to warm it up, and insert it more and more pictures. Note that you use the flash frequently, use of its life. We recommend that the NP-FH30 and NP-FH40 cannot be used with your camera immediately before you start shooting...
... pack is that has functions for exchanging information related to warm it up, and insert it more and more pictures. Note that you use the flash frequently, use of its life. We recommend that the NP-FH30 and NP-FH40 cannot be used with your camera immediately before you start shooting...

Instruction Manual
Page 26
.... In such cases, turn off both [Eye-Start AF] (page 71) and [Auto off by pushing on the situation, and the focus may continue to flash. When the shutter is released without the use of the viewfinder, as in shooting with the self-timer, attach the eyepiece cover. 1 Carefully slide the...
.... In such cases, turn off both [Eye-Start AF] (page 71) and [Auto off by pushing on the situation, and the focus may continue to flash. When the shutter is released without the use of the viewfinder, as in shooting with the self-timer, attach the eyepiece cover. 1 Carefully slide the...

Instruction Manual
Page 27
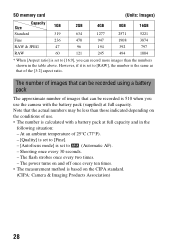
... card formatted with another one, or delete images in the current memory card (page 102). • When "NO CARD" (the number of recordable images) flashes in yellow, the memory card is displayed on the shooting conditions. The values are defined using the current settings) is full. Image size: L 10M Aspect... 797 RAW 60 123 245 494 1004 27 Preparing the camera Checking the number of recordable images Once you continue to shoot using Sony standard memory cards for testing. Replace the memory card with this camera. The values may vary depending on the LCD monitor.
... card formatted with another one, or delete images in the current memory card (page 102). • When "NO CARD" (the number of recordable images) flashes in yellow, the memory card is displayed on the shooting conditions. The values are defined using the current settings) is full. Image size: L 10M Aspect... 797 RAW 60 123 245 494 1004 27 Preparing the camera Checking the number of recordable images Once you continue to shoot using Sony standard memory cards for testing. Replace the memory card with this camera. The values may vary depending on the LCD monitor.
Instruction Manual
Page 28
... numbers may be recorded is calculated with the battery pack (supplied) at full capacity and in the table above. Shooting once every 30 seconds. - The flash strobes once every two times. - The number of images that can be recorded using a battery pack The approximate number of images that of the [3:2] aspect...
... numbers may be recorded is calculated with the battery pack (supplied) at full capacity and in the table above. Shooting once every 30 seconds. - The flash strobes once every two times. - The number of images that can be recorded using a battery pack The approximate number of images that of the [3:2] aspect...

Instruction Manual
Page 32
Before your operation Identifying parts and screen indicators See the pages in flash* (75) J Image sensor position mark (71) K Mode dial (48 - 68) L Lens release button (19) 32 M Focus mode switch (69, 74) * Do not directly touch these parts. Front side A Shutter button (48) B Power switch (23) C Control dial (62, 113) D Self-timer lamp (90) E Lens contacts* F Remote sensor G Mirror* H Mount I Built-in parentheses for details of operation.
Before your operation Identifying parts and screen indicators See the pages in flash* (75) J Image sensor position mark (71) K Mode dial (48 - 68) L Lens release button (19) 32 M Focus mode switch (69, 74) * Do not directly touch these parts. Front side A Shutter button (48) B Power switch (23) C Control dial (62, 113) D Self-timer lamp (90) E Lens contacts* F Remote sensor G Mirror* H Mount I Built-in parentheses for details of operation.

Instruction Manual
Page 36
C Display Indication Flash mode (75)/Red-eye reduction (77) Drive mode (89) +2.0 ISO AUTO Exposure compensation (79) ISO sensitivity (82) 36 See the pages in parentheses for details ...
C Display Indication Flash mode (75)/Red-eye reduction (77) Drive mode (89) +2.0 ISO AUTO Exposure compensation (79) ISO sensitivity (82) 36 See the pages in parentheses for details ...

Instruction Manual
Page 38
... A Display Indication P A S M Mode dial (48 - 68) 1/125 F5.6 +2.0 B Display Shutter speed (63) Aperture (61) Exposure (79) SteadyShot (46) Indication Flash mode (75)/Red-eye reduction (77) ISO AUTO Exposure compensation (79) Flash compensation (80) EV scale (66, 92) ISO sensitivity (82) Drive mode (89) 38 Display Indication Focus mode (72) AF area...
... A Display Indication P A S M Mode dial (48 - 68) 1/125 F5.6 +2.0 B Display Shutter speed (63) Aperture (61) Exposure (79) SteadyShot (46) Indication Flash mode (75)/Red-eye reduction (77) ISO AUTO Exposure compensation (79) Flash compensation (80) EV scale (66, 92) ISO sensitivity (82) Drive mode (89) 38 Display Indication Focus mode (72) AF area...

Instruction Manual
Page 40
... sync feature at any shutter speed. Viewfinder A Display B Display WL z 125 5.6 0 Indication AF area (73) Shooting area for aspect ratio 16:9 (108) Indication Flash compensation (80) Flash charging (75) Wireless flash (78) High-speed sync* Manual focus (74) Focus Shutter speed (63) Aperture (61) EV scale (66, 92) "Shooting unavailable" warning (89) Camera...
... sync feature at any shutter speed. Viewfinder A Display B Display WL z 125 5.6 0 Indication AF area (73) Shooting area for aspect ratio 16:9 (108) Indication Flash compensation (80) Flash charging (75) Wireless flash (78) High-speed sync* Manual focus (74) Focus Shutter speed (63) Aperture (61) EV scale (66, 92) "Shooting unavailable" warning (89) Camera...

Instruction Manual
Page 42
... directly and also switch the display status with v/V/ b/B on the control button, then press the center z to the control button. DISP (Display) (pages 35, 94) (Flash) (page 75) ISO (page 82) (Drive mode) (page 89) • Single-shot adv. (page 89) 42 2 Select [White balance] with the control button. For example...
... directly and also switch the display status with v/V/ b/B on the control button, then press the center z to the control button. DISP (Display) (pages 35, 94) (Flash) (page 75) ISO (page 82) (Drive mode) (page 89) • Single-shot adv. (page 89) 42 2 Select [White balance] with the control button. For example...
Instruction Manual
Page 43
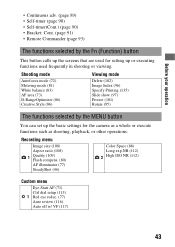
... basic settings for setting up the screens that are used frequently in shooting or viewing. Recording menu Image size (108) Aspect ratio (108) 1 Quality (109) Flash compens. (80) AF illuminator (77) SteadyShot (46) Color Space (88) Long exp.NR (112) 2 High ISO NR (112) Custom menu Eye-Start AF (71) Ctrl...
... basic settings for setting up the screens that are used frequently in shooting or viewing. Recording menu Image size (108) Aspect ratio (108) 1 Quality (109) Flash compens. (80) AF illuminator (77) SteadyShot (46) Color Space (88) Long exp.NR (112) 2 High ISO NR (112) Custom menu Eye-Start AF (71) Ctrl...

Instruction Manual
Page 46
... is set the shutter speed. This indicator is displayed only in the modes that automatically set to potential camera shake, the (Camera shake warning) indicator flashes in the viewfinder. Wait until the scale becomes low, then start shooting. (SteadyShot scale) indicator To deactivate the SteadyShot function MENU button t 1 t [SteadyShot] ... down slowly. 46 Camera shake warning indicator Due to [On] in the default setting. In this case, use a tripod or the flash. (Camera shake warning) indicator Note • The (Camera shake warning) indicator is not displayed in M/S modes.
... is set the shutter speed. This indicator is displayed only in the modes that automatically set to potential camera shake, the (Camera shake warning) indicator flashes in the viewfinder. Wait until the scale becomes low, then start shooting. (SteadyShot scale) indicator To deactivate the SteadyShot function MENU button t 1 t [SteadyShot] ... down slowly. 46 Camera shake warning indicator Due to [On] in the default setting. In this case, use a tripod or the flash. (Camera shake warning) indicator Note • The (Camera shake warning) indicator is not displayed in M/S modes.

Instruction Manual
Page 47
Note • When using a tripod, deactivate the SteadyShot function because there is a potential for malfunction of the SteadyShot function (page 46). 47 Shooting images Using a tripod In the following cases, we recommend that you mount the camera on a tripod. • Shooting without a flash under dark conditions. • Shooting with slow shutter speeds, which are typically used in night-time shooting. • Shooting a close subject, such as in macro shooting. • Shooting with a telescopic lens.
Note • When using a tripod, deactivate the SteadyShot function because there is a potential for malfunction of the SteadyShot function (page 46). 47 Shooting images Using a tripod In the following cases, we recommend that you mount the camera on a tripod. • Shooting without a flash under dark conditions. • Shooting with slow shutter speeds, which are typically used in night-time shooting. • Shooting a close subject, such as in macro shooting. • Shooting with a telescopic lens.

Instruction Manual
Page 48
...automatically (Eye-Start AF, page 71). Focus area 3 Place the desired subject within the focus area. • If the (Camera shake warning) indicator flashes, carefully shoot the subject, holding the camera steady, or by using a tripod. (Camera shake warning) indicator 48 The subject inside the focus area ...makes appropriate judgments on the screen (Help Guide disp.). You can clear the Help Guide (page 114). 1 Set the mode dial to or (Flash Off). Select when shooting in a location where the use of shooting are displayed on the situation to adjust the settings. / Shooting with the ...
...automatically (Eye-Start AF, page 71). Focus area 3 Place the desired subject within the focus area. • If the (Camera shake warning) indicator flashes, carefully shoot the subject, holding the camera steady, or by using a tripod. (Camera shake warning) indicator 48 The subject inside the focus area ...makes appropriate judgments on the screen (Help Guide disp.). You can clear the Help Guide (page 114). 1 Set the mode dial to or (Flash Off). Select when shooting in a location where the use of shooting are displayed on the situation to adjust the settings. / Shooting with the ...
Instruction Manual
Page 52
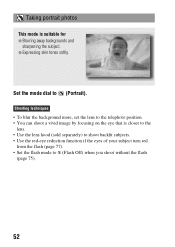
... lens hood (sold separately) to shoot backlit subjects. • Use the red-eye reduction function if the eyes of your subject turn red from the flash (page 77). • Set the flash mode to (Flash Off) when you shoot without the...
... lens hood (sold separately) to shoot backlit subjects. • Use the red-eye reduction function if the eyes of your subject turn red from the flash (page 77). • Set the flash mode to (Flash Off) when you shoot without the...
Instruction Manual
Page 53
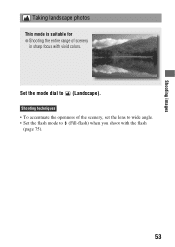
Shooting techniques • To accentuate the openness of scenery in sharp focus with the flash (page 75). 53 Shooting images Taking landscape photos This mode is suitable for z Shooting the entire range of the scenery, set the lens to wide angle. • Set the flash mode to (Landscape). Set the mode dial to (Fill-flash) when you shoot with vivid colors.
Shooting techniques • To accentuate the openness of scenery in sharp focus with the flash (page 75). 53 Shooting images Taking landscape photos This mode is suitable for z Shooting the entire range of the scenery, set the lens to wide angle. • Set the flash mode to (Landscape). Set the mode dial to (Fill-flash) when you shoot with vivid colors.
Instruction Manual
Page 54
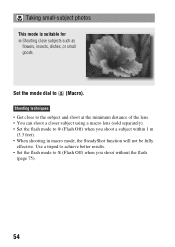
... 75). 54 Use a tripod to achieve better results. • Set the flash mode to (Flash Off) when you shoot a subject within 1 m (3.3 feet). • When shooting in macro mode, the SteadyShot function will not be fully effective. Shooting techniques • Get ... the subject and shoot at the minimum distance of the lens. • You can shoot a closer subject using a macro lens (sold separately). • Set the flash mode to (Macro).
... 75). 54 Use a tripod to achieve better results. • Set the flash mode to (Flash Off) when you shoot a subject within 1 m (3.3 feet). • When shooting in macro mode, the SteadyShot function will not be fully effective. Shooting techniques • Get ... the subject and shoot at the minimum distance of the lens. • You can shoot a closer subject using a macro lens (sold separately). • Set the flash mode to (Macro).

Instruction Manual
Page 55
Shooting techniques • The camera shoots images continuously while the shutter button is suitable for z Shooting moving subjects outdoors or in bright places. Set the mode dial to (Fill-flash) when you shoot with the flash (page 75). 55 Shooting images Taking moving-subject photos This mode is pressed. • Press and hold the shutter button halfway down until the right moment. • Set the flash mode to (Sports Action).
Shooting techniques • The camera shoots images continuously while the shutter button is suitable for z Shooting moving subjects outdoors or in bright places. Set the mode dial to (Fill-flash) when you shoot with the flash (page 75). 55 Shooting images Taking moving-subject photos This mode is pressed. • Press and hold the shutter button halfway down until the right moment. • Set the flash mode to (Sports Action).