Operating Instructions
Page 2
...-6972 This device complies with the instructions, may call: Sony Customer Information Center 1-800-222-SONY (7669) The number below is no guarantee that any changes or modifications not expressly approved in this manual could void your authority to operate this device must be of sufficient magnitude to Subpart B of Part 15 of FCC Rules. Reorient or relocate the receiving antenna. - If...
...-6972 This device complies with the instructions, may call: Sony Customer Information Center 1-800-222-SONY (7669) The number below is no guarantee that any changes or modifications not expressly approved in this manual could void your authority to operate this device must be of sufficient magnitude to Subpart B of Part 15 of FCC Rules. Reorient or relocate the receiving antenna. - If...

Operating Instructions
Page 4
... loss may be copyrighted. These points are manufactured using your camera Trial recording Before you record one-time events, you may want to make sure that constantly appear on copyright Television programs, films, video tapes, and other materials may be some tiny black points and/or bright points (white, red, blue or green in color) that the...
... loss may be copyrighted. These points are manufactured using your camera Trial recording Before you record one-time events, you may want to make sure that constantly appear on copyright Television programs, films, video tapes, and other materials may be some tiny black points and/or bright points (white, red, blue or green in color) that the...
Operating Instructions
Page 6
... - TIFF 60 Shooting still images for e-mail - Voice 61 Quick Review 21 Shooting images with the finder ......... 22 Indicators on a TV screen 35 Deleting still images Deleting images 37 Formatting a "Memory Stick 40 Before advanced operations How to setup and operate your camera .. 42 Changing the menu settings 42 Changing the items in TIFF mode - Exposure Bracket 53 Adjusting color tones - Scene Selection...
... - TIFF 60 Shooting still images for e-mail - Voice 61 Quick Review 21 Shooting images with the finder ......... 22 Indicators on a TV screen 35 Deleting still images Deleting images 37 Formatting a "Memory Stick 40 Before advanced operations How to setup and operate your camera .. 42 Changing the menu settings 42 Changing the items in TIFF mode - Exposure Bracket 53 Adjusting color tones - Scene Selection...

Operating Instructions
Page 9
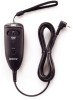
... M POWER lamp (15) N POWER switch (15) O Battery eject lever (12) q; 1 2 3 4 5 6 7 8 9 A MENU button (19) B (index) button (34) C DISPLAY button (22) D Finder adjustment dial (22) E Finder (22) F Jack cover (11) G A/V OUT (MONO) jack (35) H DC IN jack (11, 14) I FINDER/LCD switch (22) J Self-timer lamp (25) K ACC (accessory) jack L Built-in microphone while recording. • Use ACC jack to connect an external flash or the remote control tripod...
... M POWER lamp (15) N POWER switch (15) O Battery eject lever (12) q; 1 2 3 4 5 6 7 8 9 A MENU button (19) B (index) button (34) C DISPLAY button (22) D Finder adjustment dial (22) E Finder (22) F Jack cover (11) G A/V OUT (MONO) jack (35) H DC IN jack (11, 14) I FINDER/LCD switch (22) J Self-timer lamp (25) K ACC (accessory) jack L Built-in microphone while recording. • Use ACC jack to connect an external flash or the remote control tripod...

Operating Instructions
Page 13
... numbers may be recorded or viewed take into account changing the supplied "Memory Stick" as you use . QUALITY] is used - Shooting one time every 30 seconds - The flash is set to [FINE] - Note that can be recorded/ viewed when you shoot images in normal mode with a fully charged battery ...pack at 160×112 image size • The remaining indicator will decrease in the following situations: - [P. Viewing still images*2) Image size 2560×1920 640×480 NP-FM50 (supplied) No. of use the finder or the LCD screen for ...
... numbers may be recorded or viewed take into account changing the supplied "Memory Stick" as you use . QUALITY] is used - Shooting one time every 30 seconds - The flash is set to [FINE] - Note that can be recorded/ viewed when you shoot images in normal mode with a fully charged battery ...pack at 160×112 image size • The remaining indicator will decrease in the following situations: - [P. Viewing still images*2) Image size 2560×1920 640×480 NP-FM50 (supplied) No. of use the finder or the LCD screen for ...

Operating Instructions
Page 15
... z or b/B to make the setting. 15 The POWER lamp (green) lights up the menu or the SET UP screen (page 42), and use the control button 800 400 200 100 AUTO MODE TIFF VOICE E-MAIL EXP BRKTG BURST 3 NORMAL ISO MODE To change the current settings of the arrow. The POWER lamp goes out, and the camera turns off the power Slide the POWER switch in the direction of the...
... z or b/B to make the setting. 15 The POWER lamp (green) lights up the menu or the SET UP screen (page 42), and use the control button 800 400 200 100 AUTO MODE TIFF VOICE E-MAIL EXP BRKTG BURST 3 NORMAL ISO MODE To change the current settings of the arrow. The POWER lamp goes out, and the camera turns off the power Slide the POWER switch in the direction of the...

Operating Instructions
Page 16
... POWER switch 2 , Slide the POWER switch in the direction of the arrow to SET UP, select [CLOCK SET] in (SETUP 2) (page 112), and perform the procedure from step 3 above. 16 The POWER lamp (green) lights up and the CLOCK SET screen appears on the control button, then press z. Setting the date and time Mode dial 1 , Set the mode dial to . • You can also carry out this happens, reset...
... POWER switch 2 , Slide the POWER switch in the direction of the arrow to SET UP, select [CLOCK SET] in (SETUP 2) (page 112), and perform the procedure from step 3 above. 16 The POWER lamp (green) lights up and the CLOCK SET screen appears on the control button, then press z. Setting the date and time Mode dial 1 , Set the mode dial to . • You can also carry out this happens, reset...

Operating Instructions
Page 20
...35 1/2 inches) at the T side. The beep sounds but the image is set to [FINE]. • The frame appearing on the power. Flashes green 3 t Lights up and strobes when the surroundings are dark. • If you release the shutter button, the recording will be canceled. • The minimum...this operation when the mode dial is not yet recorded. When the AE/AF lock indicator changes from flashing to steadily lit, the camera is set to . Basic still image shooting (using auto adjustment mode) Mode dial 60min 640 101 96 0EV F5.6 30 1 , Set the mode dial to turn on the screen ...
...35 1/2 inches) at the T side. The beep sounds but the image is set to [FINE]. • The frame appearing on the power. Flashes green 3 t Lights up and strobes when the surroundings are dark. • If you release the shutter button, the recording will be canceled. • The minimum...this operation when the mode dial is not yet recorded. When the AE/AF lock indicator changes from flashing to steadily lit, the camera is set to . Basic still image shooting (using auto adjustment mode) Mode dial 60min 640 101 96 0EV F5.6 30 1 , Set the mode dial to turn on the screen ...

Operating Instructions
Page 21
... lock indicator changes to the normal shooting mode, press lightly on the control button, then press z. The Auto Focus function may have difficulty working under the following conditions. Checking the last image you do not operate the camera for about three minutes during recording or playback, the camera turns off automatically to display the menu. 2 Select [DELETE] with B on the control button, then press...
... lock indicator changes to the normal shooting mode, press lightly on the control button, then press z. The Auto Focus function may have difficulty working under the following conditions. Checking the last image you do not operate the camera for about three minutes during recording or playback, the camera turns off automatically to display the menu. 2 Select [DELETE] with B on the control button, then press...

Operating Instructions
Page 35
... VOLUME 3 , Set the mode dial to , and turn on the control button to select the desired image. • When using your camera abroad, it may be necessary to set [VIDEO OUT] in SET UP setting to the A/V OUT (MONO) jack of the camera and the audio/video input jacks of your TV system (page 112). 35 Viewing still images Viewing images on a TV screen 60min 640 101 9/9 A/V connecting cable...
... VOLUME 3 , Set the mode dial to , and turn on the control button to select the desired image. • When using your camera abroad, it may be necessary to set [VIDEO OUT] in SET UP setting to the A/V OUT (MONO) jack of the camera and the audio/video input jacks of your TV system (page 112). 35 Viewing still images Viewing images on a TV screen 60min 640 101 9/9 A/V connecting cable...
Operating Instructions
Page 42
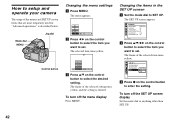
... 100 AUTO ISO MODE b Press b/B on the control button to enter the setting. To turn off the menu display Press MENU. To turn off the SET UP screen display Set the mode dial to set . Jog dial Mode dial MENU Control button Changing the menu settings a Press MENU. The frame of the selected setting turns yellow, and the setting is described below. The frame of the menus and SET UP screen items that are most frequently used for "Advanced operations" is entered. Changing the...
... 100 AUTO ISO MODE b Press b/B on the control button to enter the setting. To turn off the menu display Press MENU. To turn off the SET UP screen display Set the mode dial to set . Jog dial Mode dial MENU Control button Changing the menu settings a Press MENU. The frame of the selected setting turns yellow, and the setting is described below. The frame of the menus and SET UP screen items that are most frequently used for "Advanced operations" is entered. Changing the...

Operating Instructions
Page 48
... changes from 2 cm (13/16 inches) to ∞(infinite). * When using the NightFraming function. • You cannot record images in the SET UP settings is set to [OFF], the image is displayed. The 9 (manual focus) indicator appears on the digital zoom magnification. The image will be used as in the SET UP settings. When a sharp focus is useful when the auto focus does not work...
... changes from 2 cm (13/16 inches) to ∞(infinite). * When using the NightFraming function. • You cannot record images in the SET UP settings is set to [OFF], the image is displayed. The 9 (manual focus) indicator appears on the digital zoom magnification. The image will be used as in the SET UP settings. When a sharp focus is useful when the auto focus does not work...

Operating Instructions
Page 53
...with the exposure shifted - d Set the mode dial to SET UP. e Press MENU. g Shoot the image. 53 Advanced still image shooting The menu appears. MENU Mode dial Shutter Control button a Set the mode dial to , , S, A, M or SCN. The SET UP screen appears. c Select the desired bracket step value with v/V. f Select [MODE] (REC MODE) with b/B, then select [EXP... by plus or minus 0.3EV. Shooting three images with the exposure value shifted. Exposure Bracket Mode dial: / /S/A/M/SCN The camera records three images in 1/3EV steps. b Select 2 (CAMERA 2) with v/V and [BRACKET...
...with the exposure shifted - d Set the mode dial to SET UP. e Press MENU. g Shoot the image. 53 Advanced still image shooting The menu appears. MENU Mode dial Shutter Control button a Set the mode dial to , , S, A, M or SCN. The SET UP screen appears. c Select the desired bracket step value with v/V. f Select [MODE] (REC MODE) with b/B, then select [EXP... by plus or minus 0.3EV. Shooting three images with the exposure value shifted. Exposure Bracket Mode dial: / /S/A/M/SCN The camera records three images in 1/3EV steps. b Select 2 (CAMERA 2) with v/V and [BRACKET...

Operating Instructions
Page 57
Switching the metering mode - The image is suitable for use on home pages, etc. Clip Motion Mode dial: You can be recorded. Before operation Set [MOVING IMAGE] to . MENU Mode dial Shutter Control button a Set the mode dial to [CLIP MOTION] in MOBILE mode, so the image quality deteriorates. • For the number of images you can be recorded. c Select (IMAGE SIZE) with b, then select...
Switching the metering mode - The image is suitable for use on home pages, etc. Clip Motion Mode dial: You can be recorded. Before operation Set [MOVING IMAGE] to . MENU Mode dial Shutter Control button a Set the mode dial to [CLIP MOTION] in MOBILE mode, so the image quality deteriorates. • For the number of images you can be recorded. c Select (IMAGE SIZE) with b, then select...

Operating Instructions
Page 58
... the index screen, the image may not be displayed correctly. Shooting in the SET UP settings (pages 42 and 110). 58 Multi Burst Mode dial: This mode records 16 frames in succession each time you repeat steps 1 through 3, the last frame you have shot the desired number of the frame images while making a Clip Motion recording 1 Press b (7) in turn and stop at...
... the index screen, the image may not be displayed correctly. Shooting in the SET UP settings (pages 42 and 110). 58 Multi Burst Mode dial: This mode records 16 frames in succession each time you repeat steps 1 through 3, the last frame you have shot the desired number of the frame images while making a Clip Motion recording 1 Press b (7) in turn and stop at...

Operating Instructions
Page 59
... will be displayed at the same time as part of one image. • When Multi Burst images are played back on a computer. • Date and time cannot be superimposed onto images. • For the number of one image, just as a single image (image size: 1280×960). MENU Mode dial Shutter Control button a Set the mode dial to . 2 Press MENU and select...
... will be displayed at the same time as part of one image. • When Multi Burst images are played back on a computer. • Date and time cannot be superimposed onto images. • For the number of one image, just as a single image (image size: 1280×960). MENU Mode dial Shutter Control button a Set the mode dial to . 2 Press MENU and select...

Operating Instructions
Page 71
... center position with v/V/b/B, then press z in step 4, and press z. Still image editing g Press MENU. Select [ON], then press z. In index (triple-image) mode a Set the mode dial to , then press twice to be unprotected with b/B, and repeat step 4. c Press MENU. d Select [PROTECT] with v/V, then press z. To cancel previously set protection Select the image to display the index (triple-image) screen.
... center position with v/V/b/B, then press z in step 4, and press z. Still image editing g Press MENU. Select [ON], then press z. In index (triple-image) mode a Set the mode dial to , then press twice to be unprotected with b/B, and repeat step 4. c Press MENU. d Select [PROTECT] with v/V, then press z. To cancel previously set protection Select the image to display the index (triple-image) screen.
Operating Instructions
Page 81
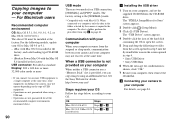
... time, some equipment, including your camera, may differ depending on page 66. When set to your computer - Enjoying images on your computer Copying images to less than the conventional Sony model DSC-F707). See the Sony Website for a USB connection, [NORMAL] and [PTP]* modes. x Image Transfer This application is used to a computer. • When using an additional device. The required operations...
... time, some equipment, including your camera, may differ depending on page 66. When set to your computer - Enjoying images on your computer Copying images to less than the conventional Sony model DSC-F707). See the Sony Website for a USB connection, [NORMAL] and [PTP]* modes. x Image Transfer This application is used to a computer. • When using an additional device. The required operations...
Operating Instructions
Page 90
... in the screen opened in step 4. • Sony USB Driver • Sony USB Shim 6 When the message for confirmation is provided, you connect two or more • If you can copy images using a USB hub. • Operations are not guaranteed for a USB connection, [NORMAL] and [PTP]* modes. See the Sony Website for Sony" screen appears. 2 Double-click (Setup Menu). 3 Click (USB Driver). The factory setting is copied...
... in the screen opened in step 4. • Sony USB Driver • Sony USB Shim 6 When the message for confirmation is provided, you connect two or more • If you can copy images using a USB hub. • Operations are not guaranteed for a USB connection, [NORMAL] and [PTP]* modes. See the Sony Website for Sony" screen appears. 2 Double-click (Setup Menu). 3 Click (USB Driver). The factory setting is copied...
Operating Instructions
Page 98
... is turned off. • The battery level is low. • You are not using the supplied USB cable. • The USB cable is not connected firmly. • [USB CONNECT] is set to [PTP] in the SET UP settings (except Windows XP and Mac OS X). • The USB connectors on your computer are not using the "PIXELA ImageMixer for Sony" application software, click on HELP. Make...
... is turned off. • The battery level is low. • You are not using the supplied USB cable. • The USB cable is not connected firmly. • [USB CONNECT] is set to [PTP] in the SET UP settings (except Windows XP and Mac OS X). • The USB connectors on your computer are not using the "PIXELA ImageMixer for Sony" application software, click on HELP. Make...


