
Instruction Manual
Page 2
... above 60°C (140°F) such as hammering, dropping or stepping on the bottom. DSC-W510 Serial No WARNING To reduce fire or shock hazard, do not expose the unit to these numbers whenever you call upon your Sony dealer regarding this product. GB • Do not handle damaged or leaking lithium ion...
... above 60°C (140°F) such as hammering, dropping or stepping on the bottom. DSC-W510 Serial No WARNING To reduce fire or shock hazard, do not expose the unit to these numbers whenever you call upon your Sony dealer regarding this product. GB • Do not handle damaged or leaking lithium ion...
Instruction Manual
Page 3
This Class B digital apparatus complies with Part 15 of the FCC Rules. If some trouble occurs while using a genuine Sony battery charger or a device that can help preserve our environment by GB disconnecting the plug from the AC power source (mains) as long as described ... pack out of the reach of small children. • Keep the battery pack dry. • Replace only with the same or equivalent type recommended by Sony. • Dispose of rechargeable batteries, call toll free 1-800-822-8837, or visit http://www.rbrc.org/ Caution: Do not handle damaged or leaking Lithium...
This Class B digital apparatus complies with Part 15 of the FCC Rules. If some trouble occurs while using a genuine Sony battery charger or a device that can help preserve our environment by GB disconnecting the plug from the AC power source (mains) as long as described ... pack out of the reach of small children. • Keep the battery pack dry. • Replace only with the same or equivalent type recommended by Sony. • Dispose of rechargeable batteries, call toll free 1-800-822-8837, or visit http://www.rbrc.org/ Caution: Do not handle damaged or leaking Lithium...
Instruction Manual
Page 4
...occur in accordance with the limits for the FCC related matters only. [ Regulatory Information Declaration of Conformity Trade Name: SONY Model No.: DSC-W510 Responsible Party: Sony Electronics Inc. If this product, you may cause undesired operation. [ CAUTION You are designed to correct the interference ... limits for help. 4GB The supplied interface cable must accept any interference received, including interference that may call: Sony Customer Information Center 1-800-222-SONY (7669). Connect the equipment into an outlet on the product means it has been UL Listed. For Customers...
...occur in accordance with the limits for the FCC related matters only. [ Regulatory Information Declaration of Conformity Trade Name: SONY Model No.: DSC-W510 Responsible Party: Sony Electronics Inc. If this product, you may cause undesired operation. [ CAUTION You are designed to correct the interference ... limits for help. 4GB The supplied interface cable must accept any interference received, including interference that may call: Sony Customer Information Center 1-800-222-SONY (7669). Connect the equipment into an outlet on the product means it has been UL Listed. For Customers...
Instruction Manual
Page 5
The Authorized Representative for EMC and product safety is Sony Corporation, 1-7-1 Konan Minato-ku Tokyo, 108-0075 Japan. GB 5 For any service or guarantee matters please refer to the applicable collection point for the recycling ... in the European Union and other European countries with the limits set out in the countries applying EU Directives The manufacturer of this product is Sony Deutschland GmbH, Hedelfinger Strasse 61, 70327 Stuttgart, Germany. By ensuring this product is disposed of correctly, you purchased the product. The recycling of materials will...
The Authorized Representative for EMC and product safety is Sony Corporation, 1-7-1 Konan Minato-ku Tokyo, 108-0075 Japan. GB 5 For any service or guarantee matters please refer to the applicable collection point for the recycling ... in the European Union and other European countries with the limits set out in the countries applying EU Directives The manufacturer of this product is Sony Deutschland GmbH, Hedelfinger Strasse 61, 70327 Stuttgart, Germany. By ensuring this product is disposed of correctly, you purchased the product. The recycling of materials will...
Instruction Manual
Page 6
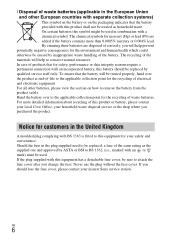
... by ASTA or BSI to the applicable collection point for the recycling of this product or battery, please contact your local Civic Office, your nearest Sony service station. The recycling of waste batteries (applicable in the plug supplied need to remove the battery from the product safely. To ensure that the...
... by ASTA or BSI to the applicable collection point for the recycling of this product or battery, please contact your local Civic Office, your nearest Sony service station. The recycling of waste batteries (applicable in the plug supplied need to remove the battery from the product safely. To ensure that the...
Instruction Manual
Page 7
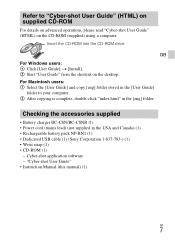
... users: 1 Select the [User Guide] and copy [eng] folder stored in the USA and Canada) (1) • Rechargeable battery pack NP-BN1 (1) • Dedicated USB cable (1) (Sony Corporation 1-837-783-) (1) • Wrist strap (1) • CD-ROM (1) - Insert the CD-ROM into the CD-ROM drive. "Cyber-shot User Guide" • Instruction Manual...
... users: 1 Select the [User Guide] and copy [eng] folder stored in the USA and Canada) (1) • Rechargeable battery pack NP-BN1 (1) • Dedicated USB cable (1) (Sony Corporation 1-837-783-) (1) • Wrist strap (1) • CD-ROM (1) - Insert the CD-ROM into the CD-ROM drive. "Cyber-shot User Guide" • Instruction Manual...
Instruction Manual
Page 8
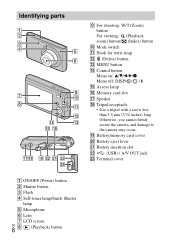
Otherwise, you cannot firmly secure the camera, and damage to the camera may occur. S Battery/memory card cover T Battery eject lever U Battery insertion slot V (USB) / A/V OUT jack W Terminal cover A ON/OFF (Power) button B Shutter button C Flash D Self-timer lamp/Smile Shutter lamp E Microphone F Lens G LCD screen 8GB H (Playback) button Identifying parts I For shooting: W/T (Zoom) button For viewing: (Playback zoom) button/ (Index) button J Mode switch K Hook for wrist strap L (Delete) button M MENU button N Control button Menu on: v/V/b/B/z Menu off: DISP/ / / ...
Otherwise, you cannot firmly secure the camera, and damage to the camera may occur. S Battery/memory card cover T Battery eject lever U Battery insertion slot V (USB) / A/V OUT jack W Terminal cover A ON/OFF (Power) button B Shutter button C Flash D Self-timer lamp/Smile Shutter lamp E Microphone F Lens G LCD screen 8GB H (Playback) button Identifying parts I For shooting: W/T (Zoom) button For viewing: (Playback zoom) button/ (Index) button J Mode switch K Hook for wrist strap L (Delete) button M MENU button N Control button Menu on: v/V/b/B/z Menu off: DISP/ / / ...
Instruction Manual
Page 9
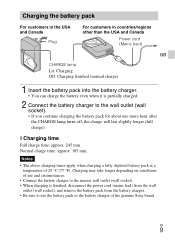
... charge will last slightly longer (full charge). Notes • The above charging times apply when charging a fully depleted battery pack at a temperature of the genuine Sony brand.
... charge will last slightly longer (full charge). Notes • The above charging times apply when charging a fully depleted battery pack at a temperature of the genuine Sony brand.

Instruction Manual
Page 10
.... - The flash strobes once every two times. - The power turns on the CIPA standard, and is based on and off once every ten times. - Using Sony "Memory Stick PRO Duo" media (sold separately). • With the notched corner facing as illustrated, insert the memory card until it clicks into place. The...
.... - The flash strobes once every two times. - The power turns on the CIPA standard, and is based on and off once every ten times. - Using Sony "Memory Stick PRO Duo" media (sold separately). • With the notched corner facing as illustrated, insert the memory card until it clicks into place. The...
Instruction Manual
Page 11
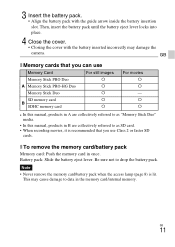
x To remove the memory card/battery pack Memory card: Push the memory card in B are collectively referred to as SD card. • When recording movies, it is lit. 3 Insert the battery pack. • Align the battery pack with the battery inserted incorrectly may cause damage to drop the battery pack. GB x Memory cards that you can use Class 2 or faster SD cards. Be sure not to data in the memory card/internal memory. Note • Never remove the memory card/battery pack when the access lamp (page 8) is recommended that you use Memory Card Memory Stick PRO Duo A ...
x To remove the memory card/battery pack Memory card: Push the memory card in B are collectively referred to as SD card. • When recording movies, it is lit. 3 Insert the battery pack. • Align the battery pack with the battery inserted incorrectly may cause damage to drop the battery pack. GB x Memory cards that you can use Class 2 or faster SD cards. Be sure not to data in the memory card/internal memory. Note • Never remove the memory card/battery pack when the access lamp (page 8) is recommended that you use Memory Card Memory Stick PRO Duo A ...
Instruction Manual
Page 12
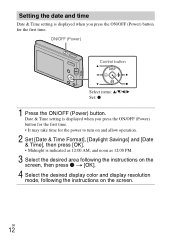
GB 12 Setting the date and time Date & Time setting is indicated as 12:00 AM, and noon as 12:00 PM. 3 Select the desired area following the instructions on the screen, then press z t [OK]. 4 Select the desired display color and display resolution mode, following the instructions on and allow operation. 2 Set [Date & Time Format], [Daylight Savings] and [Date & Time], then press [OK]. • Midnight is displayed when you press the ON/OFF (Power) button for the first time. • It may take time for the power to turn on the screen. Date & Time setting is displayed when you press the ...
GB 12 Setting the date and time Date & Time setting is indicated as 12:00 AM, and noon as 12:00 PM. 3 Select the desired area following the instructions on the screen, then press z t [OK]. 4 Select the desired display color and display resolution mode, following the instructions on and allow operation. 2 Set [Date & Time Format], [Daylight Savings] and [Date & Time], then press [OK]. • Midnight is displayed when you press the ON/OFF (Power) button for the first time. • It may take time for the power to turn on the screen. Date & Time setting is displayed when you press the ...
Instruction Manual
Page 13
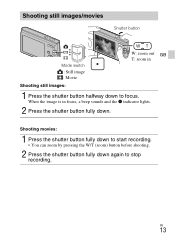
Shooting movies: 1 Press the shutter button fully down to start recording. • You can zoom by pressing the W/T (zoom) button before shooting. 2 Press the shutter button fully down to stop recording. GB 13 Shooting still images/movies Shutter button Mode switch : Still image : Movie W: zoom out GB T: zoom in focus, a beep sounds and the z indicator lights. 2 Press the shutter button fully down. When the image is in Shooting still images: 1 Press the shutter button halfway down again to focus.
Shooting movies: 1 Press the shutter button fully down to start recording. • You can zoom by pressing the W/T (zoom) button before shooting. 2 Press the shutter button fully down to stop recording. GB 13 Shooting still images/movies Shutter button Mode switch : Still image : Movie W: zoom out GB T: zoom in focus, a beep sounds and the z indicator lights. 2 Press the shutter button fully down. When the image is in Shooting still images: 1 Press the shutter button halfway down again to focus.
Instruction Manual
Page 14
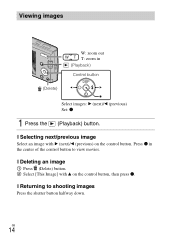
x Returning to view movies. GB 14 Viewing images (Delete) W: zoom out T: zoom in the center of the control button to shooting images Press the shutter button halfway down. x Selecting next/previous image Select an image with v on the control button. Press z in (Playback) Control button 1 Press the Select images: B (next)/b (previous) Set: z (Playback) button. x Deleting an image 1 Press (Delete) button. 2 Select [This Image] with B (next)/b (previous) on the control button, then press z.
x Returning to view movies. GB 14 Viewing images (Delete) W: zoom out T: zoom in the center of the control button to shooting images Press the shutter button halfway down. x Selecting next/previous image Select an image with v on the control button. Press z in (Playback) Control button 1 Press the Select images: B (next)/b (previous) Set: z (Playback) button. x Deleting an image 1 Press (Delete) button. 2 Select [This Image] with B (next)/b (previous) on the control button, then press z.
Instruction Manual
Page 16
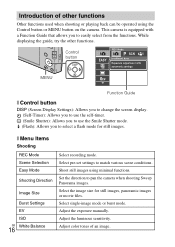
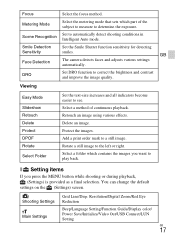
Select pre-set settings to pan the camera when shooting Sweep Panorama images. Shoot still images using the Control button or MENU button on the camera. Adjust the exposure manually. Adjust color tones of other functions. Control button MENU Function Guide x Control button DISP (Screen Display Settings): Allows you to change the screen display. (Self-Timer): Allows you to use the self-timer. (Smile Shutter): Allows you to use the Smile Shutter mode. (Flash): Allows you to select a flash mode for still images, panoramic images or movie files. Set the direction to match ...
Select pre-set settings to pan the camera when shooting Sweep Panorama images. Shoot still images using the Control button or MENU button on the camera. Adjust the exposure manually. Adjust color tones of other functions. Control button MENU Function Guide x Control button DISP (Screen Display Settings): Allows you to change the screen display. (Self-Timer): Allows you to use the self-timer. (Smile Shutter): Allows you to use the Smile Shutter mode. (Flash): Allows you to select a flash mode for still images, panoramic images or movie files. Set the direction to match ...
Instruction Manual
Page 17
Select a method of the subject to measure to a still image. Retouch an image using various effects. Protect the images. You can change the default settings on the (Settings) screen. Grid Line/Disp. Scene Recognition Set to the left or right. GB The camera detects faces and adjusts various settings automatically. Rotate a still image to automatically detect shooting conditions in Intelligent Auto mode. x Setting items If you want to play back. Resolution/Digital Zoom/Red Eye Shooting Settings Reduction Main Settings Beep/Language Setting/Function Guide/Display ...
Select a method of the subject to measure to a still image. Retouch an image using various effects. Protect the images. You can change the default settings on the (Settings) screen. Grid Line/Disp. Scene Recognition Set to the left or right. GB The camera detects faces and adjusts various settings automatically. Rotate a still image to automatically detect shooting conditions in Intelligent Auto mode. x Setting items If you want to play back. Resolution/Digital Zoom/Red Eye Shooting Settings Reduction Main Settings Beep/Language Setting/Function Guide/Display ...
Instruction Manual
Page 18
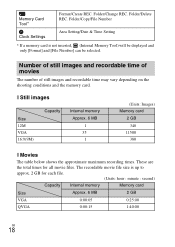
These are the total times for each file. (Units: hour : minute : second) Capacity Internal memory Memory card Size Approx. 6 MB 2 GB VGA 0:00:05 0:25:00 QVGA 0:00:15 1:40:00 GB 18 x Still images Size 12M VGA 16:9(9M) Capacity Internal memory Approx. 6 MB 1 35 1 (Units: Images) Memory card 2 GB 340 11500 380 x Movies The table below shows the approximate maximum recording times. The recordable movie file size is not inserted, (Internal Memory Tool) will be displayed and only [Format] and [File Number] can be selected. Folder/Copy/File Number Area Setting/Date & Time ...
These are the total times for each file. (Units: hour : minute : second) Capacity Internal memory Memory card Size Approx. 6 MB 2 GB VGA 0:00:05 0:25:00 QVGA 0:00:15 1:40:00 GB 18 x Still images Size 12M VGA 16:9(9M) Capacity Internal memory Approx. 6 MB 1 35 1 (Units: Images) Memory card 2 GB 340 11500 380 x Movies The table below shows the approximate maximum recording times. The recordable movie file size is not inserted, (Internal Memory Tool) will be displayed and only [Format] and [File Number] can be selected. Folder/Copy/File Number Area Setting/Date & Time ...
Instruction Manual
Page 19
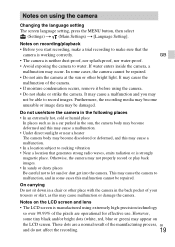
If water enters inside the camera, a malfunction may appear on the LCD screen. It may cause a malfunction and you start recording, make sure that generates strong radio waves, emits radiation or is neither dust-proof, nor splash-proof, nor water-proof. • Avoid exposing the camera to record images. Furthermore, the recording media may become discolored or deformed, and this malfunction cannot be repaired. • Do not aim the camera at the sun or other place with the camera in the back pocket of the camera. • If moisture condensation occurs, remove it before ...
If water enters inside the camera, a malfunction may appear on the LCD screen. It may cause a malfunction and you start recording, make sure that generates strong radio waves, emits radiation or is neither dust-proof, nor splash-proof, nor water-proof. • Avoid exposing the camera to record images. Furthermore, the recording media may become discolored or deformed, and this malfunction cannot be repaired. • Do not aim the camera at the sun or other place with the camera in the back pocket of the camera. • If moisture condensation occurs, remove it before ...
Instruction Manual
Page 20
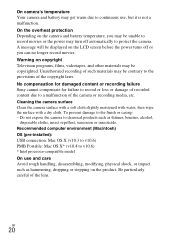
... turns off automatically to protect the camera. GB 20 On the overheat protection Depending on the product. No compensation for damaged content or recording failure Sony cannot compensate for failure to record or loss or damage of the lens. Do not expose the camera to v10.6) * Intel processor-compatible model On...
... turns off automatically to protect the camera. GB 20 On the overheat protection Depending on the product. No compensation for damaged content or recording failure Sony cannot compensate for failure to record or loss or damage of the lens. Do not expose the camera to v10.6) * Intel processor-compatible model On...
Instruction Manual
Page 21
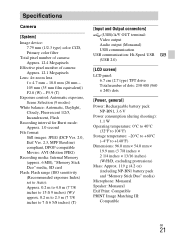
Specifications Camera [System] Image device: 7.79 mm (1/2.3 type) color CCD, Primary color filter Total pixel number of camera: Approx. 12.4 Megapixels Effective pixel number of dots: 230 400 (960 × 240) dots [Power, general] Power: Rechargeable battery pack NP-BN1, 3.6 V Power consumption (during shooting): 1.1 W Operating temperature: 0°C to 40°C (32°F to 104°F) Storage temperature: -20°C to +60°C (-4°F to 7 ft 6 5/8 inches) (T) [Input and Output connectors] (USB)/A/V OUT terminal: Video output Audio output (Monaural) USB communication USB ...
Specifications Camera [System] Image device: 7.79 mm (1/2.3 type) color CCD, Primary color filter Total pixel number of camera: Approx. 12.4 Megapixels Effective pixel number of dots: 230 400 (960 × 240) dots [Power, general] Power: Rechargeable battery pack NP-BN1, 3.6 V Power consumption (during shooting): 1.1 W Operating temperature: 0°C to 40°C (32°F to 104°F) Storage temperature: -20°C to +60°C (-4°F to 7 ft 6 5/8 inches) (T) [Input and Output connectors] (USB)/A/V OUT terminal: Video output Audio output (Monaural) USB communication USB ...
Instruction Manual
Page 22
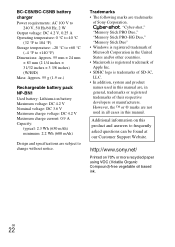
... on this product and answers to frequently asked questions can be found at our Customer Support Website. Trademarks • The following marks are trademarks of Sony Corporation. , "Cyber-shot," "Memory Stick PRO Duo," "Memory Stick PRO-HG Duo," "Memory Stick Duo" • Windows is registered trademark of Microsoft Corporation in the...
... on this product and answers to frequently asked questions can be found at our Customer Support Website. Trademarks • The following marks are trademarks of Sony Corporation. , "Cyber-shot," "Memory Stick PRO Duo," "Memory Stick PRO-HG Duo," "Memory Stick Duo" • Windows is registered trademark of Microsoft Corporation in the...
