Instruction Manual
Page 7
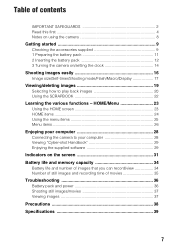
...23 HOME items 24 Using the menu items 25 Menu items 26 Enjoying your computer 28 Connecting the camera to your computer 28 Viewing "Cyber-shot Handbook 29 Enjoying the supplied software 29 Indicators on /setting the clock 14 Shooting images easily 16 Image size/Self-timer/Shooting mode/Flash...back images 20 Using the SCRAPBOOK 22 Learning the various functions - Table of contents IMPORTANT SAFEGUARDS 2 Read this first 4 Notes on using the camera 8 Getting started 9 Checking the accessories supplied 9 1 Preparing the battery pack 11 2 Inserting the battery pack 12 3 Turning the...
...23 HOME items 24 Using the menu items 25 Menu items 26 Enjoying your computer 28 Connecting the camera to your computer 28 Viewing "Cyber-shot Handbook 29 Enjoying the supplied software 29 Indicators on /setting the clock 14 Shooting images easily 16 Image size/Self-timer/Shooting mode/Flash...back images 20 Using the SCRAPBOOK 22 Learning the various functions - Table of contents IMPORTANT SAFEGUARDS 2 Read this first 4 Notes on using the camera 8 Getting started 9 Checking the accessories supplied 9 1 Preparing the battery pack 11 2 Inserting the battery pack 12 3 Turning the...
Instruction Manual
Page 9
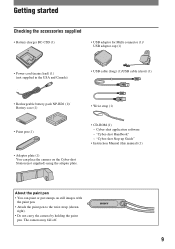
... still images with the paint pen. • Attach the paint pen to the wrist strap (shown right). • Do not carry the camera by holding the paint pen. Getting started Checking the accessories supplied • Battery charger BC-CSD (1) • USB adaptor for Multi connector (1)/ USB adaptor cap (1) &#...; Adaptor plate (1) You can paint or put stamps on the Cyber-shot Station (not supplied) using the adaptor plate. • CD-ROM (1) - Cyber-shot application software -
... still images with the paint pen. • Attach the paint pen to the wrist strap (shown right). • Do not carry the camera by holding the paint pen. Getting started Checking the accessories supplied • Battery charger BC-CSD (1) • USB adaptor for Multi connector (1)/ USB adaptor cap (1) &#...; Adaptor plate (1) You can paint or put stamps on the Cyber-shot Station (not supplied) using the adaptor plate. • CD-ROM (1) - Cyber-shot application software -
Instruction Manual
Page 21
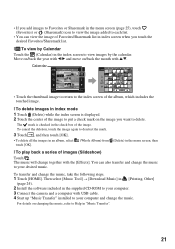
...a series of images (Slideshow) Touch . To transfer and change together with v/V. Then select [Music Tool] t [Download Music] in [Printing, Other] (page 24). 2 Install the software included in the index screen to view images by Calendar Touch the (Calendar) in the supplied CD-ROM to your computer. 3 Connect the... camera and a computer with USB cable. 4 Start up "Music Transfer" installed to your desired music. • If you add images to Favorites or Sharemark in...
...a series of images (Slideshow) Touch . To transfer and change together with v/V. Then select [Music Tool] t [Download Music] in [Printing, Other] (page 24). 2 Install the software included in the index screen to view images by Calendar Touch the (Calendar) in the supplied CD-ROM to your computer. 3 Connect the... camera and a computer with USB cable. 4 Start up "Music Transfer" installed to your desired music. • If you add images to Favorites or Sharemark in...

Instruction Manual
Page 29
... Windows users 1 Turn on your computer. 2 Click [Install]. 3 Follow the on-screen instructions to install the software. 29 The screen below appears. Enjoying the supplied software [ Recommended environment for using "Picture Motion Browser", you click the "Cyber-shot Handbook" button, both of your ...computer, and insert the CD- When you can do the followings. • You can import images shot with the camera more efficiently. ROM...
... Windows users 1 Turn on your computer. 2 Click [Install]. 3 Follow the on-screen instructions to install the software. 29 The screen below appears. Enjoying the supplied software [ Recommended environment for using "Picture Motion Browser", you click the "Cyber-shot Handbook" button, both of your ...computer, and insert the CD- When you can do the followings. • You can import images shot with the camera more efficiently. ROM...
Instruction Manual
Page 30
... 5 When the completion screen is not installed with "Picture Motion Browser" are explained here. 1 Connect the computer with the camera. 2 Select [PMB_Portable] in Windows 2000, [Programs]) t [Sony Picture Utility] t [Picture Motion Browser]. If you accept the terms of the agreement, go on to the next screen. ...• To display the License Agreement screen of "Picture Motion Browser" and English. 1 Turn on the Camera, and connect it to the computer using the software ...
... 5 When the completion screen is not installed with "Picture Motion Browser" are explained here. 1 Connect the computer with the camera. 2 Select [PMB_Portable] in Windows 2000, [Programs]) t [Sony Picture Utility] t [Picture Motion Browser]. If you accept the terms of the agreement, go on to the next screen. ...• To display the License Agreement screen of "Picture Motion Browser" and English. 1 Turn on the Camera, and connect it to the computer using the software ...


