Fall 2005 Product Guide
Page 14
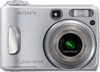
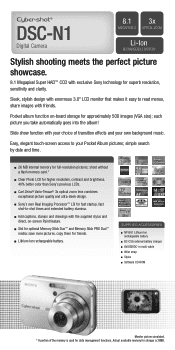
...function with the supplied stylus and direct, on -board storage for fast startup, fast shot-to your own background music. Carl Zeiss® Vario-Tessar® 3x optical ...Sleek, stylish design with enormous 3.0" LCD monitor that makes it easy to read menus, share images with exclusive Sony technology for friends. each picture you take automatically goes into the album!... picture simulated. * A portion of transition effects and your Pocket Album pictures; DSC-N1 Digital Camera 8.1 3x MEGAPIXELS OPTICAL ZOOM Li-Ion RECHARGEABLE BATTERY Stylish shooting meets the perfect picture showcase....
...function with the supplied stylus and direct, on -board storage for fast startup, fast shot-to your own background music. Carl Zeiss® Vario-Tessar® 3x optical ...Sleek, stylish design with enormous 3.0" LCD monitor that makes it easy to read menus, share images with exclusive Sony technology for friends. each picture you take automatically goes into the album!... picture simulated. * A portion of transition effects and your Pocket Album pictures; DSC-N1 Digital Camera 8.1 3x MEGAPIXELS OPTICAL ZOOM Li-Ion RECHARGEABLE BATTERY Stylish shooting meets the perfect picture showcase....
Fall 2005 Product Guide
Page 15
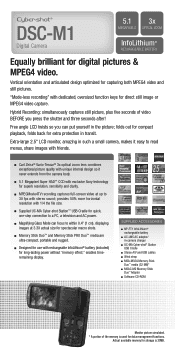
...AC power. Supplied UC-MA Cyber-shot Station™ USB Cradle for long-lasting power without "memory effect;" enables timeremaining display. Designed for use with exclusive Sony technology for direct still image or MPEG4 video capture. DSC-M1 Digital Camera 5.1 3x MEGAPIXELS OPTICAL ZOOM ...connection to read menus, share images with stereo sound; Vertical orientation and articulated design optimized for digital pictures & MPEG4 video. Magnifying Glass Mode can put yourself in transit. folds out for compact playback, folds back for spectacular macro shots. MPEGMovie4TV...
...AC power. Supplied UC-MA Cyber-shot Station™ USB Cradle for long-lasting power without "memory effect;" enables timeremaining display. Designed for use with exclusive Sony technology for direct still image or MPEG4 video capture. DSC-M1 Digital Camera 5.1 3x MEGAPIXELS OPTICAL ZOOM ...connection to read menus, share images with stereo sound; Vertical orientation and articulated design optimized for digital pictures & MPEG4 video. Magnifying Glass Mode can put yourself in transit. folds out for compact playback, folds back for spectacular macro shots. MPEGMovie4TV...
Read This First
Page 1
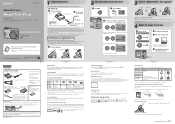
... the battery charger. 2-590-636-11 (1) Digital Still Camera Read This First Operating Instructions Before operating the unit, please read this may cause a malfunction. 2 Turn the camera on/set the clock 1 Select . 2 Press POWER. Attach the strap to complete the setting. To use terminal (1) (DSC-S90/S80/S60) • Cyber-shot Station (DSC-ST80) - http://www.sony.net/ 1 Prepare the battery For...
... the battery charger. 2-590-636-11 (1) Digital Still Camera Read This First Operating Instructions Before operating the unit, please read this may cause a malfunction. 2 Turn the camera on/set the clock 1 Select . 2 Press POWER. Attach the strap to complete the setting. To use terminal (1) (DSC-S90/S80/S60) • Cyber-shot Station (DSC-ST80) - http://www.sony.net/ 1 Prepare the battery For...
Read This First Guide
Page 1
... Stick" is recommended. • Wrist strap (1) • CD-ROM (Cyber-shot application software) (1) • Operating instructions for digital still camera "Read This First" (this manual) (1) • Operating instructions "User's Guide/...When charging is not a malfunction. 4 Insert the batteries. 2 Bottom 1 DSC-S90/S80/S60 2 1 While pressing OPEN, open the battery cover and remove the batteries. ... When turning on the power • Unless you experience trouble with your camera. © 2005 Sony Corporation Printed in step 3-1, set the numeric value with fully charged ones,...
... Stick" is recommended. • Wrist strap (1) • CD-ROM (Cyber-shot application software) (1) • Operating instructions for digital still camera "Read This First" (this manual) (1) • Operating instructions "User's Guide/...When charging is not a malfunction. 4 Insert the batteries. 2 Bottom 1 DSC-S90/S80/S60 2 1 While pressing OPEN, open the battery cover and remove the batteries. ... When turning on the power • Unless you experience trouble with your camera. © 2005 Sony Corporation Printed in step 3-1, set the numeric value with fully charged ones,...
Operating Instructions
Page 1
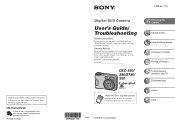
... Record the serial number in China Digital Still Camera User's Guide/ Troubleshooting Operating Instructions Before operating the unit, please read this product. Model No. Refer to these numbers whenever you call upon your Sony dealer regarding this manual and "Read This First" (separate volume) thoroughly,...ink. DSC-S60/S80/ST80/S90 Serial No DSC-S60/ S80/ST80/ S90 "Read This First" (separate volume) Explains the set-up and basic operations for future reference. Additional information on this product and answers to your TV Troubleshooting Others Index © 2005 Sony Corporation...
... Record the serial number in China Digital Still Camera User's Guide/ Troubleshooting Operating Instructions Before operating the unit, please read this product. Model No. Refer to these numbers whenever you call upon your Sony dealer regarding this manual and "Read This First" (separate volume) thoroughly,...ink. DSC-S60/S80/ST80/S90 Serial No DSC-S60/ S80/ST80/ S90 "Read This First" (separate volume) Explains the set-up and basic operations for future reference. Additional information on this product and answers to your TV Troubleshooting Others Index © 2005 Sony Corporation...

Operating Instructions
Page 4
... radio waves or emits radiation. Read "Precautions" (page 95) before operating the camera. • Before you do not intend to a malfunction of your camera or recording media, etc. Note... NP-NH25 (supplied with DSC-S80/S90 only) • Charge both of the internal memory • If you can use the camera near a location that the camera is working correctly. •...the operating instructions "Cyber-shot Station". 4 Carl Zeiss lens This camera is a "Memory Stick". Memory Stick Duo Adaptor • For details on recording/playback • This camera is capable of reproducing...
... radio waves or emits radiation. Read "Precautions" (page 95) before operating the camera. • Before you do not intend to a malfunction of your camera or recording media, etc. Note... NP-NH25 (supplied with DSC-S80/S90 only) • Charge both of the internal memory • If you can use the camera near a location that the camera is working correctly. •...the operating instructions "Cyber-shot Station". 4 Carl Zeiss lens This camera is a "Memory Stick". Memory Stick Duo Adaptor • For details on recording/playback • This camera is capable of reproducing...

Operating Instructions
Page 6
For full use of the digital still camera Prepare the camera and shoot in auto adjustment mode "Read This First" (separate volume) 1 Prepare the battery 2 Turn the camera on/set the clock 3 Insert a "Memory Stick" (not supplied) 4 Select the image size for use 5 Shoot images easily (Auto adjustment mode) Shoot still images (Scene Selection) 6 View/Delete images Get...
For full use of the digital still camera Prepare the camera and shoot in auto adjustment mode "Read This First" (separate volume) 1 Prepare the battery 2 Turn the camera on/set the clock 3 Insert a "Memory Stick" (not supplied) 4 Select the image size for use 5 Shoot images easily (Auto adjustment mode) Shoot still images (Scene Selection) 6 View/Delete images Get...

Operating Instructions
Page 14
Selecting the image size for use (t step 4 in "Read This First") Pixel Many (Fine image quality and large file size) Example: Printing in combination (page 34) You can select the compression ratio when digital images are saved. Image size 4M (2304×1728) 3:2 (2304×1536)* 3M (2048×1536) 1M (1280×...
Selecting the image size for use (t step 4 in "Read This First") Pixel Many (Fine image quality and large file size) Example: Printing in combination (page 34) You can select the compression ratio when digital images are saved. Image size 4M (2304×1728) 3:2 (2304×1536)* 3M (2048×1536) 1M (1280×...

Operating Instructions
Page 15
...camera Identifying parts See the pages in parentheses for details of less than 5.5 mm (7/32 inch). qa qs qd qf qg A Shutter button (t step 5 in "Read This First") B Mode dial (26) C POWER lamp (t step 2 in "Read This First") D POWER button (t step 2 in "Read This First") E Lens F Microphone G Finder window H Flash (t step 5 in "Read... cord when you close the cover. 15 M Battery/"Memory Stick" cover (t step 1 and 3 in "Read This First") N OPEN button (t step 1 and 3 in "Read This First")/AF illuminator (48) J Lens ring Removing Attaching K Multi connector (59, 75) L Tripod...
...camera Identifying parts See the pages in parentheses for details of less than 5.5 mm (7/32 inch). qa qs qd qf qg A Shutter button (t step 5 in "Read This First") B Mode dial (26) C POWER lamp (t step 2 in "Read This First") D POWER button (t step 2 in "Read This First") E Lens F Microphone G Finder window H Flash (t step 5 in "Read... cord when you close the cover. 15 M Battery/"Memory Stick" cover (t step 1 and 3 in "Read This First") N OPEN button (t step 1 and 3 in "Read This First")/AF illuminator (48) J Lens ring Removing Attaching K Multi connector (59, 75) L Tripod...

Operating Instructions
Page 16
.../LCD on/off) button (21) I MENU button (29) J Control button Menu on: v/V/b/B/z (t step 2 in "Read This First") Menu off: / / / (t step 5 in "Read This First") Mode dial "M": Shutter speed/aperture value (27) K Access lamp (t step 4 in "Read This First" L (Image Size/Delete) button (t step 4 and 6 in "Read This First") 16 qa qs DSC-S80/ST80/S60 1 2 3 6 4 7 8 5 9 q; DSC-S90 1 2 3 6 4 7 8 5 9 q;
.../LCD on/off) button (21) I MENU button (29) J Control button Menu on: v/V/b/B/z (t step 2 in "Read This First") Menu off: / / / (t step 5 in "Read This First") Mode dial "M": Shutter speed/aperture value (27) K Access lamp (t step 4 in "Read This First" L (Image Size/Delete) button (t step 4 and 6 in "Read This First") 16 qa qs DSC-S80/ST80/S60 1 2 3 6 4 7 8 5 9 q; DSC-S90 1 2 3 6 4 7 8 5 9 q;
Operating Instructions
Page 17
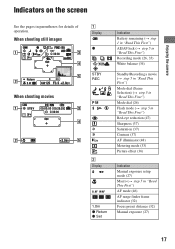
...still images VGA 101 1/30" C:32:00 Return S AF 125 F3.5 +2.0EV When shooting movies STBY STD 640 101 00:00:00 [00:28:25] C:32:00 + +2.0EV A Display z M STBY REC SL 5 6 ON B Display S AF M AF 1.0m z Return z Set Indication Battery remaining (t step 1 in "Read This First") AE/AF lock (t step 5 in "Read...36) Indication Manual exposure setup mode (27) Macro (t step 5 in parentheses for details of operation. Enjoying the camera Indicators on the screen See the pages in "Read This First") AF mode (46) AF range finder frame indicator (32) Focus preset distance (32) Manual exposure (...
...still images VGA 101 1/30" C:32:00 Return S AF 125 F3.5 +2.0EV When shooting movies STBY STD 640 101 00:00:00 [00:28:25] C:32:00 + +2.0EV A Display z M STBY REC SL 5 6 ON B Display S AF M AF 1.0m z Return z Set Indication Battery remaining (t step 1 in "Read This First") AE/AF lock (t step 5 in "Read...36) Indication Manual exposure setup mode (27) Macro (t step 5 in parentheses for details of operation. Enjoying the camera Indicators on the screen See the pages in "Read This First") AF mode (46) AF range finder frame indicator (32) Focus preset distance (32) Manual exposure (...

Operating Instructions
Page 18
... (88) Date/Time (47) ISO number (34) D Display E + Indication Vibration warning (10) • Indicates vibration will prevent you can still shoot images. Remaining internal memory capacity (22) Remaining "Memory Stick" capacity (22) Recording time [maximum recordable time] (22) Multi Burst interval (36...) Remaining number of recordable images (22) Self-timer (t step 5 in "Read This First") Image quality (34) Recording folder (51) • This does not appear when using the flash or a tripod to increase the amount ...
... (88) Date/Time (47) ISO number (34) D Display E + Indication Vibration warning (10) • Indicates vibration will prevent you can still shoot images. Remaining internal memory capacity (22) Remaining "Memory Stick" capacity (22) Recording time [maximum recordable time] (22) Multi Burst interval (36...) Remaining number of recordable images (22) Self-timer (t step 5 in "Read This First") Image quality (34) Recording folder (51) • This does not appear when using the flash or a tripod to increase the amount ...

Operating Instructions
Page 19
... internal memory capacity (22) Remaining "Memory Stick" capacity (22) 19 Enjoying the camera Playback folder (38) • This does not appear when using the internal memory. When playing back still images M VGA 101 101 12/12 C:32:00 1.3 +2.0EV 500 F3.5 BACK... B Display 101-0012 C Display 101 101 Indication Battery remaining (t step 1 in "Read This First") Image size (t step 4 in "Read This First") Recording mode (26, 35) Playback (t step 6 in "Read This First") Volume (t step 6 in "Read This First") Indication PictBridge connecting (71) Recording folder (51) • This does ...
... internal memory capacity (22) Remaining "Memory Stick" capacity (22) 19 Enjoying the camera Playback folder (38) • This does not appear when using the internal memory. When playing back still images M VGA 101 101 12/12 C:32:00 1.3 +2.0EV 500 F3.5 BACK... B Display 101-0012 C Display 101 101 Indication Battery remaining (t step 1 in "Read This First") Image size (t step 4 in "Read This First") Recording mode (26, 35) Playback (t step 6 in "Read This First") Volume (t step 6 in "Read This First") Indication PictBridge connecting (71) Recording folder (51) • This does ...

Operating Instructions
Page 20
... menu (29) Select images Adjust volume 20 Recording date/time of images recorded in selected folder (38) Self-diagnosis display (88) Counter (t step 6 in "Read This First") Indication Do not disconnect the cable for multi-use terminal/the USB cable (72) EV level value (31) ISO number (34) Metering mode... (33) Flash White balance (34) 500 F3.5 Shutter speed (27) Aperture value (27) Playback image (t step 6 in "Read This First") E Display 2005 1 1 DPOF BACK/ NEXT VOLUME Indication Histogram (21, 31) • appears when histogram display is disabled.
... menu (29) Select images Adjust volume 20 Recording date/time of images recorded in selected folder (38) Self-diagnosis display (88) Counter (t step 6 in "Read This First") Indication Do not disconnect the cable for multi-use terminal/the USB cable (72) EV level value (31) ISO number (34) Metering mode... (33) Flash White balance (34) 500 F3.5 Shutter speed (27) Aperture value (27) Playback image (t step 6 in "Read This First") E Display 2005 1 1 DPOF BACK/ NEXT VOLUME Indication Histogram (21, 31) • appears when histogram display is disabled.
Operating Instructions
Page 26
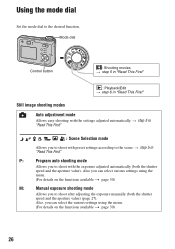
... settings according to shoot with the settings adjusted automatically. Mode dial Control button : Shooting movies t step 5 in "Read This First" : Playback/Edit t step 6 in "Read This First" : Scene Selection mode Allows you to the desired function. Also, you to the scene. Also you ...can select the various settings using the menu. (For details on the functions available t page 30) 26 t step 5 in "Read This First" Still image shooting modes : Auto adjustment mode Allows easy shooting with the exposure adjusted automatically (both the shutter speed and the aperture value)...
... settings according to shoot with the settings adjusted automatically. Mode dial Control button : Shooting movies t step 5 in "Read This First" : Playback/Edit t step 6 in "Read This First" : Scene Selection mode Allows you to the desired function. Also, you to the scene. Also you ...can select the various settings using the menu. (For details on the functions available t page 30) 26 t step 5 in "Read This First" Still image shooting modes : Auto adjustment mode Allows easy shooting with the exposure adjusted automatically (both the shutter speed and the aperture value)...
Operating Instructions
Page 27
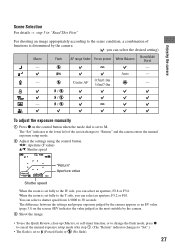
... Selection For details t step 5 in "Read This First" For shooting an image appropriately according to the scene condition, a combination of the screen changes to "Return," and the camera enters the manual exposure setup mode. 2 Adjust the settings using the control button. The difference between the settings ...and proper exposure judged by the camera appears as the most suitable by the camera. ( : you can select an aperture, F5.2 or F10. The "Set" indicator at the lower left of functions ...
... Selection For details t step 5 in "Read This First" For shooting an image appropriately according to the scene condition, a combination of the screen changes to "Return," and the camera enters the manual exposure setup mode. 2 Adjust the settings using the control button. The difference between the settings ...and proper exposure judged by the camera appears as the most suitable by the camera. ( : you can select an aperture, F5.2 or F10. The "Set" indicator at the lower left of functions ...

Operating Instructions
Page 36
Normal - ( -) Toward -: Makes the flash level lower. • To change flash mode t step 5 in "Read This First" PFX (P.Effect) Allows you to other than [Multi Burst] (page 35). (Flash Level) Adjusts the amount of continuous shots Quality Size Fine 4M 4 3:2 4 3M 4 1M 10 VGA(E-Mail) 30 (Units: images) Standard 6 6 7 18 30 M (Interval) Selects...
Normal - ( -) Toward -: Makes the flash level lower. • To change flash mode t step 5 in "Read This First" PFX (P.Effect) Allows you to other than [Multi Burst] (page 35). (Flash Level) Adjusts the amount of continuous shots Quality Size Fine 4M 4 3:2 4 3M 4 1M 10 VGA(E-Mail) 30 (Units: images) Standard 6 6 7 18 30 M (Interval) Selects...

Operating Instructions
Page 41
...The setting size is just a guideline. 3M t step 4 in a continuous loop. Start Cancel See the following procedure. Repeat On Off Plays back images in "Read This First" 1M VGA Cancel Cancels resizing. 1 Display the image you want to resize. 2 Press MENU to an image size of a recorded image (Resize),...in the recording folder as a new file. For details on the operation t page 29 Using the menu Image Folder All Plays back all images in "Read This First" • You cannot change the size of movies or [Multi Burst] images. • When you change the image size of 3:2. &#...
...The setting size is just a guideline. 3M t step 4 in a continuous loop. Start Cancel See the following procedure. Repeat On Off Plays back images in "Read This First" 1M VGA Cancel Cancels resizing. 1 Display the image you want to resize. 2 Press MENU to an image size of a recorded image (Resize),...in the recording folder as a new file. For details on the operation t page 29 Using the menu Image Folder All Plays back all images in "Read This First" • You cannot change the size of movies or [Multi Burst] images. • When you change the image size of 3:2. &#...
Operating Instructions
Page 44
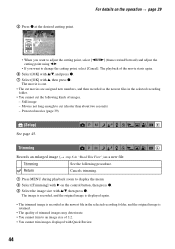
... in the selected recording folder, and the original image is recorded as a new file. Trimming Records an enlarged image (t step 6 in "Read This First") as the newest file in the selected recording folder. • You cannot cut (shorter than about two seconds) - The image...the operation t page 29 5 Press z at the desired cutting point. The playback of 3:2. • You cannot trim images displayed with v/V, then press z. Still image - Divide Dividing Point STD 640 00:00:02 O K Cancel Exit • When you want to adjust the cutting point, select [c/C] (frame rewind/...
... in the selected recording folder, and the original image is recorded as a new file. Trimming Records an enlarged image (t step 6 in "Read This First") as the newest file in the selected recording folder. • You cannot cut (shorter than about two seconds) - The image...the operation t page 29 5 Press z at the desired cutting point. The playback of 3:2. • You cannot trim images displayed with v/V, then press z. Still image - Divide Dividing Point STD 640 00:00:02 O K Cancel Exit • When you want to adjust the cutting point, select [c/C] (frame rewind/...
Operating Instructions
Page 47
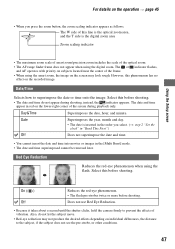
... this before shooting. Red Eye Reduction Reduces the red-eye phenomenon when using the digital zoom. Does not use Red Eye Reduction. • Because it takes about a second until the shutter clicks, hold the camera firmly to superimpose the date or time onto the image. Day&Time Superimposes the ...8226; The date is the digital zoom area Zoom scaling indicator • The maximum zoom scale of smart zoom/precision zoom includes the scale of this phenomenon has no effect on the operation t page 45 • When you select. (t step 2 "Set the clock" in "Read This First") Off Does ...
... this before shooting. Red Eye Reduction Reduces the red-eye phenomenon when using the digital zoom. Does not use Red Eye Reduction. • Because it takes about a second until the shutter clicks, hold the camera firmly to superimpose the date or time onto the image. Day&Time Superimposes the ...8226; The date is the digital zoom area Zoom scaling indicator • The maximum zoom scale of smart zoom/precision zoom includes the scale of this phenomenon has no effect on the operation t page 45 • When you select. (t step 2 "Set the clock" in "Read This First") Off Does ...