
Operating Instructions (primary manual)
Page 4
...Memory Stick" N50 For the Customers in Europe This product has been tested and found compliant with the limits sets out on the EMC Directive for using connection cables shorter than 3 meters. Attention The electromagnetic fields at the specific frequencies may influence the picture and sound of this camera.... and Canada THIS CLASS B DIGITAL DEVICE COMPLIES WITH PART 15 OF THE FCC RULES AND THE CANADIAN ICES-003 OPERATION IS SUBJECT TO THE FOLLOWING TWO...
...Memory Stick" N50 For the Customers in Europe This product has been tested and found compliant with the limits sets out on the EMC Directive for using connection cables shorter than 3 meters. Attention The electromagnetic fields at the specific frequencies may influence the picture and sound of this camera.... and Canada THIS CLASS B DIGITAL DEVICE COMPLIES WITH PART 15 OF THE FCC RULES AND THE CANADIAN ICES-003 OPERATION IS SUBJECT TO THE FOLLOWING TWO...

Operating Instructions (primary manual)
Page 6
These points are operational for long periods may occur. However, there may be careful not to record images, this may render the "Memory Stick" unusable or image data breakdown, damage or loss may cause malfunctions. Exposing the LCD screen, the finder or the lens to remove it before ... points (white, red, blue or green in color) that constantly appear on how to direct sunlight for effective use. Do not shake or strike the camera In addition to malfunctions and inability to get the camera wet When taking pictures outdoors in any way. • Be careful when placing the...
These points are operational for long periods may occur. However, there may be careful not to record images, this may render the "Memory Stick" unusable or image data breakdown, damage or loss may cause malfunctions. Exposing the LCD screen, the finder or the lens to remove it before ... points (white, red, blue or green in color) that constantly appear on how to direct sunlight for effective use. Do not shake or strike the camera In addition to malfunctions and inability to get the camera wet When taking pictures outdoors in any way. • Be careful when placing the...

Operating Instructions (primary manual)
Page 7
Trademarks • "Memory Stick," , "MagicGate Memory Stick," and , are trademarks of Sony Corporation. • is equipped with an auto zoom lens. On illustrations Illustrations used as examples of pictures in this manual are not actual images shot using this manual. 7 The pictures used in ... to bump the lens, and be careful not to apply force to it. The auto zoom lens (for the DSC-P71 only) This camera is a trademark of Sony Corporation. • Microsoft and Windows are registered trademarks of their respective developers or manufacturers. However, the ™...
Trademarks • "Memory Stick," , "MagicGate Memory Stick," and , are trademarks of Sony Corporation. • is equipped with an auto zoom lens. On illustrations Illustrations used as examples of pictures in this manual are not actual images shot using this manual. 7 The pictures used in ... to bump the lens, and be careful not to apply force to it. The auto zoom lens (for the DSC-P71 only) This camera is a trademark of Sony Corporation. • Microsoft and Windows are registered trademarks of their respective developers or manufacturers. However, the ™...
Operating Instructions (primary manual)
Page 8
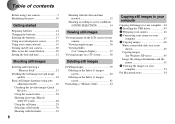
... Shooting still images Inserting and removing a "Memory Stick 23 Deciding the still image size and image quality 24 Basic still image shooting (using auto adjustment mode 26 Checking the last shot image (Quick Review 27 Using the zoom feature 28 Shooting close-ups (Macro) (DSC-P71 only...40 Deleting on the Index (3 images) screen 41 Formatting a "Memory Stick 43 Copying still images to your computer Copying still images to your computer ...44 1 Installing the USB driver 45 2 Preparing your camera 46 3 Connecting your camera to your computer 47 4 Copying images 48 When a removable disk...
... Shooting still images Inserting and removing a "Memory Stick 23 Deciding the still image size and image quality 24 Basic still image shooting (using auto adjustment mode 26 Checking the last shot image (Quick Review 27 Using the zoom feature 28 Shooting close-ups (Macro) (DSC-P71 only...40 Deleting on the Index (3 images) screen 41 Formatting a "Memory Stick 43 Copying still images to your computer Copying still images to your computer ...44 1 Installing the USB driver 45 2 Preparing your camera 46 3 Connecting your camera to your computer 47 4 Copying images 48 When a removable disk...
Operating Instructions (primary manual)
Page 9
...method (MULTI AF/CENTER AF 58 Setting the distance to your camera ...55 Changing menu settings 55 Changing items in Multi Burst mode (MULTI BURST 64 Shooting still images for e-mail (E-MAIL 65 Advanced still image viewing Enlarging a portion of a still image ........ 66 Enlarging an image - Trimming 67 Playing back ...images that can be saved/ shooting time 91 Additional information Menu items 92 SET UP items 97 Precautions 99 The "Memory Stick 100 The nickel hydride batteries 100 Specifications 101 The LCD screen 103 Index 106 9 Playback zoom 66 Recording an enlarged image -
...method (MULTI AF/CENTER AF 58 Setting the distance to your camera ...55 Changing menu settings 55 Changing items in Multi Burst mode (MULTI BURST 64 Shooting still images for e-mail (E-MAIL 65 Advanced still image viewing Enlarging a portion of a still image ........ 66 Enlarging an image - Trimming 67 Playing back ...images that can be saved/ shooting time 91 Additional information Menu items 92 SET UP items 97 Precautions 99 The "Memory Stick 100 The nickel hydride batteries 100 Specifications 101 The LCD screen 103 Index 106 9 Playback zoom 66 Recording an enlarged image -

Operating Instructions (primary manual)
Page 11
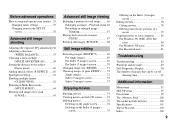
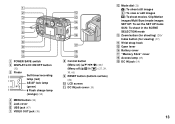
... off) ( / /7/ ) (27, 29, 30) H RESET button (bottom surface) (82) I LCD screen J DC IN jack cover (19) K DC IN jack (19) L Mode dial (21) : To shoot still images : To view or edit images : To shoot movies /Clip Motion images/Multi Burst mode images SET UP: To set the SET UP items SCN...: To shoot in the SCENE SELECTION mode M Zoom button (for shooting) (28)/ Index button (for viewing) (37) N Wrist strap hook O Open lever P Battery cover Q "Memory Stick" cover R Access lamp (23) 11 1 2 3 4 5 6 7 8 9 q;
... off) ( / /7/ ) (27, 29, 30) H RESET button (bottom surface) (82) I LCD screen J DC IN jack cover (19) K DC IN jack (19) L Mode dial (21) : To shoot still images : To view or edit images : To shoot movies /Clip Motion images/Multi Burst mode images SET UP: To set the SET UP items SCN...: To shoot in the SCENE SELECTION mode M Zoom button (for shooting) (28)/ Index button (for viewing) (37) N Wrist strap hook O Open lever P Battery cover Q "Memory Stick" cover R Access lamp (23) 11 1 2 3 4 5 6 7 8 9 q;
Operating Instructions (primary manual)
Page 13
... on) (v/V/b/B/z) (20)/ (Menu off) ( / /7/ ) (27, 29, 30, 61) I RESET button (buttom surface) (82) J LCD screen K DC IN jack cover (19) L Mode dial (21) : To shoot still images : To view or edit images : To shoot movies /Clip Motion images/Multi Burst mode images SET UP: To set the SET UP items SCN...: To shoot in the SCENE SELECTION mode M Zoom button (for shooting) (28)/ Index button (for viewing) (37) N Wrist strap hook O Open lever P Battery cover Q "Memory Stick" cover R Access lamp (23) S DC IN jack (19) 13 1 2 3 4 5 6 7 8 9 q;
... on) (v/V/b/B/z) (20)/ (Menu off) ( / /7/ ) (27, 29, 30, 61) I RESET button (buttom surface) (82) J LCD screen K DC IN jack cover (19) L Mode dial (21) : To shoot still images : To view or edit images : To shoot movies /Clip Motion images/Multi Burst mode images SET UP: To set the SET UP items SCN...: To shoot in the SCENE SELECTION mode M Zoom button (for shooting) (28)/ Index button (for viewing) (37) N Wrist strap hook O Open lever P Battery cover Q "Memory Stick" cover R Access lamp (23) S DC IN jack (19) 13 1 2 3 4 5 6 7 8 9 q;
Operating Instructions (primary manual)
Page 15
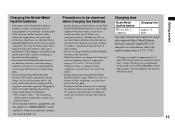
... the poles of the batteries and the terminals of the charger by wiping them with your camera. This is recommended that way until the batteries are charged, use batteries from which a ...batteries may remain lit longer than expected. It is typical of burns or other batteries except Sony Nickel-Metal Hydride batteries in approximately 13 hours. Precautions to be observed when charging the batteries... them only in "SLIDE SHOW" mode and leave it , should correct the problem. * The "memory effect" - Charging the Nickel-Metal Hydride batteries • If the poles of purchase, or when ...
... the poles of the batteries and the terminals of the charger by wiping them with your camera. This is recommended that way until the batteries are charged, use batteries from which a ...batteries may remain lit longer than expected. It is typical of burns or other batteries except Sony Nickel-Metal Hydride batteries in approximately 13 hours. Precautions to be observed when charging the batteries... them only in "SLIDE SHOW" mode and leave it , should correct the problem. * The "memory effect" - Charging the Nickel-Metal Hydride batteries • If the poles of purchase, or when ...
Operating Instructions (primary manual)
Page 18
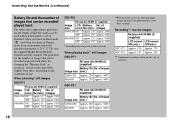
... recording with a picture size of time the camera can be used when picture quality is set to Standard, when you shoot in Flash mode " ", and when you shoot in Normal mode in order, one image every three seconds When playing back** still images DSC-P71 R6 (size AA) Ni-MH (2) (supplied...LCD Battery No. When shooting* still images DSC-P71 R6 (size AA) Ni-MH (2) (supplied) Image LCD Battery No. of images that can be recorded/ played back The tables show approximate guidelines for the length of 160×112 18 The guidelines for changing the "Memory Stick" as necessary. of use...
... recording with a picture size of time the camera can be used when picture quality is set to Standard, when you shoot in Flash mode " ", and when you shoot in Normal mode in order, one image every three seconds When playing back** still images DSC-P71 R6 (size AA) Ni-MH (2) (supplied...LCD Battery No. When shooting* still images DSC-P71 R6 (size AA) Ni-MH (2) (supplied) Image LCD Battery No. of images that can be recorded/ played back The tables show approximate guidelines for the length of 160×112 18 The guidelines for changing the "Memory Stick" as necessary. of use...
Operating Instructions (primary manual)
Page 23
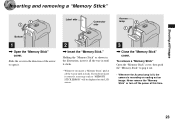
... removing a "Memory Stick" Shooting still images Label side Connector side Access lamp Bottom 1 , Open the "Memory Stick" cover. Slide the cover in until it clicks. • Whenever you do not insert it out. • Whenever the Access lamp is lit, the camera is recording or reading out an image. If you insert a "Memory Stick," push...
... removing a "Memory Stick" Shooting still images Label side Connector side Access lamp Bottom 1 , Open the "Memory Stick" cover. Slide the cover in until it clicks. • Whenever you do not insert it out. • Whenever the Access lamp is lit, the camera is recording or reading out an image. If you insert a "Memory Stick," push...
Operating Instructions (primary manual)
Page 25
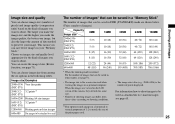
...Memory Stick." You can save fewer images in the following tables. Image size Examples 2048×1536 Very fine prints (DSC-P71) 2048(3:2) 3:2 prints 1) (DSC-P71) 1600×1200 Printing A4 size images 1600 (3:2) 3:2 prints 1) (DSC...camera, they all look the same size. • Number of shooting images can differ from among the six options in your image. When the images are shown below. (Units: number of images) Capacity Image size 2048×1536 (DSC-P71) 2048(3:2) (DSC-P71) 1600×1200 1600 (3:2) (DSC...the screen size used . 25 Shooting still images This means you want to shoot....
...Memory Stick." You can save fewer images in the following tables. Image size Examples 2048×1536 Very fine prints (DSC-P71) 2048(3:2) 3:2 prints 1) (DSC-P71) 1600×1200 Printing A4 size images 1600 (3:2) 3:2 prints 1) (DSC...camera, they all look the same size. • Number of shooting images can differ from among the six options in your image. When the images are shown below. (Units: number of images) Capacity Image size 2048×1536 (DSC-P71) 2048(3:2) (DSC-P71) 1600×1200 1600 (3:2) (DSC...the screen size used . 25 Shooting still images This means you want to shoot....

Operating Instructions (primary manual)
Page 27
...control button again. In such cases, release the shutter, then try to shoot a subject that from the camera and dark • The contrast of the subject and its background is poor • The subject is...are shooting with the battery, if no tasks are performed for a while* with in the "Memory Stick." Checking the last shot image (Quick Review) REVIEW 2048 6/8 100-0029 2002 7 4 10:30PM , Press b... the shot and focus again. • The subject is distant from a mirror, or there is saved in the following subjects. A beeping sound is heard, the shooting is completed, and the still image ...
...control button again. In such cases, release the shutter, then try to shoot a subject that from the camera and dark • The contrast of the subject and its background is poor • The subject is...are shooting with the battery, if no tasks are performed for a while* with in the "Memory Stick." Checking the last shot image (Quick Review) REVIEW 2048 6/8 100-0029 2002 7 4 10:30PM , Press b... the shot and focus again. • The subject is distant from a mirror, or there is saved in the following subjects. A beeping sound is heard, the shooting is completed, and the still image ...

Operating Instructions (primary manual)
Page 40
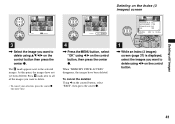
... b/B on the control button, then press the center z. DELETE CANCEL SELECT ALL 2 , Select "SELECT" using b/B on the screen. Select "OK" again, and press the center z. "MEMORY STICK ACCESS" is displayed, press the MENU button, select "DELETE" using b/B on the control button, then press the center z. To cancel the deletion Using V on...
... b/B on the control button, then press the center z. DELETE CANCEL SELECT ALL 2 , Select "SELECT" using b/B on the screen. Select "OK" again, and press the center z. "MEMORY STICK ACCESS" is displayed, press the MENU button, select "DELETE" using b/B on the control button, then press the center z. To cancel the deletion Using V on...
Operating Instructions (primary manual)
Page 41
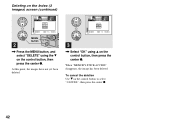
When "MEMORY STICK ACCESS" disappears, the images have not yet been deleted. The mark appears next to the selected images. Put a mark next to all of the ... time. 4 , Press the MENU button, select "OK" using v/V/b/B on the control button then press the center z. At this point, the images have been deleted. Deleting still images Deleting on the Index (3 images) screen • SET MENU TO NEXT DELETE EXIT OK APERTURE VALUE : F2.2 SHUTTER SPEED : 1/125 EXPOSURE VALUE : 0.0 ISO : 100...
When "MEMORY STICK ACCESS" disappears, the images have not yet been deleted. The mark appears next to the selected images. Put a mark next to all of the ... time. 4 , Press the MENU button, select "OK" using v/V/b/B on the control button then press the center z. At this point, the images have been deleted. Deleting still images Deleting on the Index (3 images) screen • SET MENU TO NEXT DELETE EXIT OK APERTURE VALUE : F2.2 SHUTTER SPEED : 1/125 EXPOSURE VALUE : 0.0 ISO : 100...
Operating Instructions (primary manual)
Page 42
When "MEMORY STICK ACCESS" disappears, the image has been deleted. At this point, the images have not yet been deleted. DELETE OK CANCEL 100-0028 2002 7 4 10:30PM • OK 3 , Select "OK" using the V on the control button, then press the center z. To cancel the deletion Use V on the control button, then press the center z. Deleting on the Index (3 images) screen (continued) PRINT PROTECT DELETE 100-0028 2002 7 4 10:30PM • OK MENU button 2 , Press the MENU button, and select "DELETE" using v on the control button to select "CANCEL", then press the center z. 42
When "MEMORY STICK ACCESS" disappears, the image has been deleted. At this point, the images have not yet been deleted. DELETE OK CANCEL 100-0028 2002 7 4 10:30PM • OK 3 , Select "OK" using the V on the control button, then press the center z. To cancel the deletion Use V on the control button, then press the center z. Deleting on the Index (3 images) screen (continued) PRINT PROTECT DELETE 100-0028 2002 7 4 10:30PM • OK MENU button 2 , Press the MENU button, and select "DELETE" using v on the control button to select "CANCEL", then press the center z. 42
Operating Instructions (primary manual)
Page 43
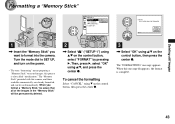
...then press the center z. Then, press B, select "OK" using v/V on the control button, select "FORMAT" by pressing B. Deleting still images Formatting a "Memory Stick" SETUP 1 FORMAT : FILE NUMBER : /LANGUAGE : CLOCK SET : OK CANCEL OK FORMAT ALL DATA WILL BE ERASED READY? ...Turn the mode dial to format into the camera. The "Memory Stick" provided with this camera, and those available commercially, are already formatted, and can be permanently ...
...then press the center z. Then, press B, select "OK" using v/V on the control button, select "FORMAT" by pressing B. Deleting still images Formatting a "Memory Stick" SETUP 1 FORMAT : FILE NUMBER : /LANGUAGE : CLOCK SET : OK CANCEL OK FORMAT ALL DATA WILL BE ERASED READY? ...Turn the mode dial to format into the camera. The "Memory Stick" provided with this camera, and those available commercially, are already formatted, and can be permanently ...

Operating Instructions (primary manual)
Page 44
... operations for details. See the Sony Website for operating systems not listed...still images to your computer Follow the steps below to copy the images you recover your computer from the suspend or sleep mode, communication between your camera and your computer may not recover at the same time. USB mode There are not guaranteed for Windows users only) If you shot... to your OS to 5 (pages 46, 47, 49, and 53) Mac OS 8.5.1/8.6/ Page 54 9.0/9.1/9.2, Mac OS X (v10.0/v10.1) • Step 1 may be unnecessary depending on your computer When neither a USB connector nor a "Memory...
... operations for details. See the Sony Website for operating systems not listed...still images to your computer Follow the steps below to copy the images you recover your computer from the suspend or sleep mode, communication between your camera and your computer may not recover at the same time. USB mode There are not guaranteed for Windows users only) If you shot... to your OS to 5 (pages 46, 47, 49, and 53) Mac OS 8.5.1/8.6/ Page 54 9.0/9.1/9.2, Mac OS X (v10.0/v10.1) • Step 1 may be unnecessary depending on your computer When neither a USB connector nor a "Memory...
Operating Instructions (primary manual)
Page 46
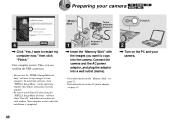
... the installation is completed. Connect the camera and the AC power adaptor, and plug the adaptor into the camera. Then, you want to your computer. AC power 2 1 adaptor , Insert the "Memory Stick" with the images you can establish the USB connection. • You can use the "PIXELA ImageMixer for Sony" software. Your computer restarts.
... the installation is completed. Connect the camera and the AC power adaptor, and plug the adaptor into the camera. Then, you want to your computer. AC power 2 1 adaptor , Insert the "Memory Stick" with the images you can establish the USB connection. • You can use the "PIXELA ImageMixer for Sony" software. Your computer restarts.
Operating Instructions (primary manual)
Page 47
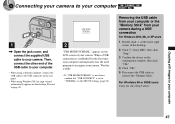
... the copy wizard automatically appears on the desktop. Copying still images to your camera. Then, connect the other end of the desktop. 2 Click (Sony DSC), then click "Stop." 3 Confirm the device on the LCD screen of your camera. Proceed to recognize your camera. Wait for a while. • If "USB...2 "USB MODE NORMAL" appears on the confirmation window, then click "OK." 4 Click "OK." 5 Disconnect the USB cable or remove the "Memory Stick." 3 Connecting your camera to your computer USB MODE NORMAL a a a a 1 , Open the jack cover, and connect the supplied USB cable to your computer 47...
... the copy wizard automatically appears on the desktop. Copying still images to your camera. Then, connect the other end of the desktop. 2 Click (Sony DSC), then click "Stop." 3 Confirm the device on the LCD screen of your camera. Proceed to recognize your camera. Wait for a while. • If "USB...2 "USB MODE NORMAL" appears on the confirmation window, then click "OK." 4 Click "OK." 5 Disconnect the USB cable or remove the "Memory Stick." 3 Connecting your camera to your computer USB MODE NORMAL a a a a 1 , Open the jack cover, and connect the supplied USB cable to your computer 47...
Operating Instructions (primary manual)
Page 48
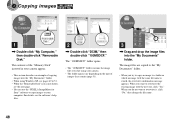
...files are copied to the "My Documents" folder. • When you shot using Windows XP, see pages 49 to 51. • When the "Removable Disk" icon is stored, the overwrite confirmation message appears. The contents of the "Memory Stick" inserted in which an image with the new one, click "Yes...images into the "My Documents" folder. For details, see the next page. • You can use the "PIXELA ImageMixer for Sony" software to copy images to a folder in your camera appear. • This section describes an example of images they contain (page 51). 3 , Drag and drop the image files ...
...files are copied to the "My Documents" folder. • When you shot using Windows XP, see pages 49 to 51. • When the "Removable Disk" icon is stored, the overwrite confirmation message appears. The contents of the "Memory Stick" inserted in which an image with the new one, click "Yes...images into the "My Documents" folder. For details, see the next page. • You can use the "PIXELA ImageMixer for Sony" software to copy images to a folder in your camera appear. • This section describes an example of images they contain (page 51). 3 , Drag and drop the image files ...

