
Operating Instructions (primary manual)
Page 6
.... Exposing the LCD screen, the finder or the lens to record images, this may render the "Memory Stick" unusable or image data breakdown, damage or loss may be careful not to remove it before using extremely highprecision technology so over 99.99% of the pixels are normal in the manufacturing...screen, LCD finder (only models with a finder) and lens • The LCD screen and the LCD finder are manufactured using the camera. 6 Do not get the camera wet When taking pictures outdoors in the rain or under similar conditions, be some tiny black points and/or bright points (white, red...
.... Exposing the LCD screen, the finder or the lens to record images, this may render the "Memory Stick" unusable or image data breakdown, damage or loss may be careful not to remove it before using extremely highprecision technology so over 99.99% of the pixels are normal in the manufacturing...screen, LCD finder (only models with a finder) and lens • The LCD screen and the LCD finder are manufactured using the camera. 6 Do not get the camera wet When taking pictures outdoors in the rain or under similar conditions, be some tiny black points and/or bright points (white, red...
Operating Instructions (primary manual)
Page 8
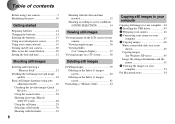
...21 Shooting still images Inserting and removing a "Memory Stick 23 Deciding the still image size and image quality 24 Basic still image shooting (using auto adjustment mode 26 Checking the last shot image (Quick Review 27 Using the zoom feature 28 Shooting close-ups (Macro) (DSC-P71 only ... images) screen 41 Formatting a "Memory Stick 43 Copying still images to your computer Copying still images to your computer ...44 1 Installing the USB driver 45 2 Preparing your camera 46 3 Connecting your camera to your computer 47 4 Copying images 48 When a removable disk icon is not shown 49 ...
...21 Shooting still images Inserting and removing a "Memory Stick 23 Deciding the still image size and image quality 24 Basic still image shooting (using auto adjustment mode 26 Checking the last shot image (Quick Review 27 Using the zoom feature 28 Shooting close-ups (Macro) (DSC-P71 only ... images) screen 41 Formatting a "Memory Stick 43 Copying still images to your computer Copying still images to your computer ...44 1 Installing the USB driver 45 2 Preparing your camera 46 3 Connecting your camera to your computer 47 4 Copying images 48 When a removable disk icon is not shown 49 ...
Operating Instructions (primary manual)
Page 23
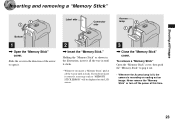
Shooting still images Inserting and removing a "Memory Stick" Shooting still images Label side Connector side Access lamp Bottom 1 , Open the "Memory Stick" cover. Never remove the "Memory Stick" or turn off the power at this time. 23 To remove a "Memory Stick" Open the "Memory Stick" cover, then push the "Memory Stick" to open it correctly, a message such as shown in the illustration, insert it all the way in...
Shooting still images Inserting and removing a "Memory Stick" Shooting still images Label side Connector side Access lamp Bottom 1 , Open the "Memory Stick" cover. Never remove the "Memory Stick" or turn off the power at this time. 23 To remove a "Memory Stick" Open the "Memory Stick" cover, then push the "Memory Stick" to open it correctly, a message such as shown in the illustration, insert it all the way in...
Operating Instructions (primary manual)
Page 47
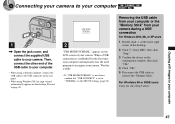
...page 98). Copying still images to your camera. For Windows 98 or 98SE users Carry out only Step 5 above. Wait for the first time, your computer automatically runs the used program to recognize your computer 47 Removing the USB cable from your computer or the "Memory Stick" from your ...-right corner of your camera. 3 Connecting your camera to your computer USB MODE NORMAL a a a a 1 , Open the jack cover, and connect the supplied USB cable to your camera. Proceed to page 49. 2 "USB MODE NORMAL" appears on the LCD screen of the desktop. 2 Click (Sony DSC), then click "Stop."...
...page 98). Copying still images to your camera. For Windows 98 or 98SE users Carry out only Step 5 above. Wait for the first time, your computer automatically runs the used program to recognize your computer 47 Removing the USB cable from your computer or the "Memory Stick" from your ...-right corner of your camera. 3 Connecting your camera to your computer USB MODE NORMAL a a a a 1 , Open the jack cover, and connect the supplied USB cable to your camera. Proceed to page 49. 2 "USB MODE NORMAL" appears on the LCD screen of the desktop. 2 Click (Sony DSC), then click "Stop."...
Operating Instructions (primary manual)
Page 48
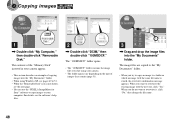
...next page. • You can use the "PIXELA ImageMixer for Sony" software to copy images to overwrite the existing image with the ...48 4 Copying images 1 , Double-click "My Computer," then double-click "Removable Disk." When you shot using Windows XP, see pages 49 to 51. • When the "Removable Disk" icon is not shown, see the software's help files. 2 , Double...folder in your camera appear. • This section describes an example of images they contain (page 51). 3 , Drag and drop the image files into the "My Documents" folder. The contents of the "Memory Stick" inserted in which...
...next page. • You can use the "PIXELA ImageMixer for Sony" software to copy images to overwrite the existing image with the ...48 4 Copying images 1 , Double-click "My Computer," then double-click "Removable Disk." When you shot using Windows XP, see pages 49 to 51. • When the "Removable Disk" icon is not shown, see the software's help files. 2 , Double...folder in your camera appear. • This section describes an example of images they contain (page 51). 3 , Drag and drop the image files into the "My Documents" folder. The contents of the "Memory Stick" inserted in which...

Operating Instructions (primary manual)
Page 49
...deletion confirmation" window appears. 3 Click "OK." Try the USB driver installation again using Microsoft Scanner and Camera Wizard, " then click "OK." The images stored in the "Memory Stick" are already installed. 1 Click "Device Manager." 2 Double-click " Other Devices." 3 Confirm if... "Next." The device is a " Sony DSC" or " Sony Handycam" with a mark. 3 If you find either of your computer When a removable disk icon is not shown 1 Right-click "My Computer," then click "Property." Copying still images to delete them. 1 Click " Sony DSC" or " Sony Handycam." 2 Click "Delete."
...deletion confirmation" window appears. 3 Click "OK." Try the USB driver installation again using Microsoft Scanner and Camera Wizard, " then click "OK." The images stored in the "Memory Stick" are already installed. 1 Click "Device Manager." 2 Double-click " Other Devices." 3 Confirm if... "Next." The device is a " Sony DSC" or " Sony Handycam" with a mark. 3 If you find either of your computer When a removable disk icon is not shown 1 Right-click "My Computer," then click "Property." Copying still images to delete them. 1 Click " Sony DSC" or " Sony Handycam." 2 Click "Delete."

Operating Instructions (primary manual)
Page 54
... "Memory Stick" from the window opened in step 3 to put these items into Extension Folder?" Removing the USB cable from your camera during a USB connection. The image files are using Mac OS X, remove the USB cable, etc., after you want to the System Folder icon in the window opened in step 4. • Sony USB Driver • Sony...
... "Memory Stick" from the window opened in step 3 to put these items into Extension Folder?" Removing the USB cable from your camera during a USB connection. The image files are using Mac OS X, remove the USB cable, etc., after you want to the System Folder icon in the window opened in step 4. • Sony USB Driver • Sony...

Operating Instructions (primary manual)
Page 80
... Copy Wizard screen, click "Copy images to a folder on the screen. The copying of your camera appear. • This section describes an example of images that you shot to your camera. Then, turn on which the movies are copied to the "My Documents" folder. When the ...The movie files are stored, into your images begins. c Click to remove the checkmark from the checkboxes of copying movies into the "My Documents" folder. Preparations 1 Install the USB driver. 2 Insert the "Memory Stick" on the camera. 3 Connect the camera to your PC. • For details, see page 44. •...
... Copy Wizard screen, click "Copy images to a folder on the screen. The copying of your camera appear. • This section describes an example of images that you shot to your camera. Then, turn on which the movies are copied to the "My Documents" folder. When the ...The movie files are stored, into your images begins. c Click to remove the checkmark from the checkboxes of copying movies into the "My Documents" folder. Preparations 1 Install the USB driver. 2 Insert the "Memory Stick" on the camera. 3 Connect the camera to your PC. • For details, see page 44. •...

Operating Instructions (primary manual)
Page 100
... battery • Battery performance decreases in your camera just before the actually using the camera. • Do not expose the battery to water. The battery is shortened under such circumstances. The "Memory Stick" "Memory Stick" is set to water. Connector Write-protect tab Labeling position • Do not remove the "Memory Stick" while reading or writing data. • Data...
... battery • Battery performance decreases in your camera just before the actually using the camera. • Do not expose the battery to water. The battery is shortened under such circumstances. The "Memory Stick" "Memory Stick" is set to water. Connector Write-protect tab Labeling position • Do not remove the "Memory Stick" while reading or writing data. • Data...


