Read This First guide
Page 1
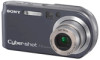
...camera is running on battery power and you selected [D/M/Y] in step 3-1, set the time on : Charging Light off your camera. © 2005 Sony...USB, A/V cable for multiuse terminal (1) • NP-FR1 battery pack (1) • Wrist strap (1) • CD-ROM (Cyber-shot application software) (1) • Operating instructions for a long period of time, the camera... your camera before using VOC (Volatile Organic Compound)-free vegetable oil based ink. DSC-P200 Refer to...charging starts. 1 Install the battery pack. Digital Still Camera 2-582-853-11 (1) Operating Instructions Before...
...camera is running on battery power and you selected [D/M/Y] in step 3-1, set the time on : Charging Light off your camera. © 2005 Sony...USB, A/V cable for multiuse terminal (1) • NP-FR1 battery pack (1) • Wrist strap (1) • CD-ROM (Cyber-shot application software) (1) • Operating instructions for a long period of time, the camera... your camera before using VOC (Volatile Organic Compound)-free vegetable oil based ink. DSC-P200 Refer to...charging starts. 1 Install the battery pack. Digital Still Camera 2-582-853-11 (1) Operating Instructions Before...
Operating Instructions
Page 3
... rating as the supplied one and approved by returning your nearest Sony service station. THIS CLASS B DIGITAL APPARATUS COMPLIES WITH CANADIAN ICES003. 3 For Customers in the plug... you should lose the fuse cover, please contact your used rechargeable batteries to this camera. and Canada THIS DEVICE COMPLIES WITH PART 15 OF THE FCC RULES. Notice on...digital device pursuant to discontinue midway (fail), restart the application or disconnect and connect the communication cable (USB, etc.) again. For more information regarding recycling of this equipment for using connection cables...
... rating as the supplied one and approved by returning your nearest Sony service station. THIS CLASS B DIGITAL APPARATUS COMPLIES WITH CANADIAN ICES003. 3 For Customers in the plug... you should lose the fuse cover, please contact your used rechargeable batteries to this camera. and Canada THIS DEVICE COMPLIES WITH PART 15 OF THE FCC RULES. Notice on...digital device pursuant to discontinue midway (fail), restart the application or disconnect and connect the communication cable (USB, etc.) again. For more information regarding recycling of this equipment for using connection cables...
Operating Instructions
Page 51
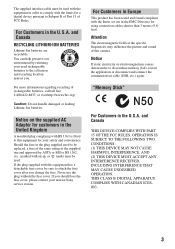
PTP When [PTP] (Picture Transfer Protocol) is set and the camera is assigned.) USB Connect Selects the USB mode to be used to assign file numbers to NTSC mode (e.g., for the USA, Japan). PictBridge Connects the camera to a computer (page 56). NTSC Sets the video output signal to ... the camera to connected equipment. Using the Setup screen Setup 2 2 For details on the operation t page 43 The default settings are copied to the computer. (Compatible with . Video Out Sets the video signal output according to a computer or a PictBridge compliant printer using the cable for ...
PTP When [PTP] (Picture Transfer Protocol) is set and the camera is assigned.) USB Connect Selects the USB mode to be used to assign file numbers to NTSC mode (e.g., for the USA, Japan). PictBridge Connects the camera to a computer (page 56). NTSC Sets the video output signal to ... the camera to connected equipment. Using the Setup screen Setup 2 2 For details on the operation t page 43 The default settings are copied to the computer. (Compatible with . Video Out Sets the video signal output according to a computer or a PictBridge compliant printer using the cable for ...
Operating Instructions
Page 56
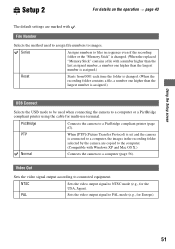
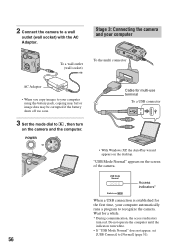
... for a while. * During communication, the access indicators turn red. POWER Cable for multi-use terminal To a USB connector • With Windows XP, the AutoPlay wizard appears on the screen of the camera. 2 Connect the camera to [Normal] (page 51). 56 Stage 3: Connecting the camera and your computer To a wall outlet (wall socket) To the multi...
... for a while. * During communication, the access indicators turn red. POWER Cable for multi-use terminal To a USB connector • With Windows XP, the AutoPlay wizard appears on the screen of the camera. 2 Connect the camera to [Normal] (page 51). 56 Stage 3: Connecting the camera and your computer To a wall outlet (wall socket) To the multi...
Operating Instructions
Page 59
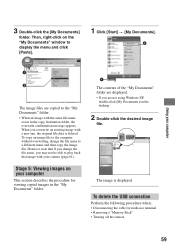
... Stage 5: Viewing images on the desktop. 2 Double-click the desired image file. To delete the USB connection Perform the following procedure when: • Disconnecting the cable for viewing copied images in the copy destination folder, the overwrite confirmation message appears. To copy an image...Documents] on your computer This section describes the procedure for multi-use terminal • Removing a "Memory Stick" • Turning off the camera 59 However, note that if you overwrite an existing image with your computer 3 Double-click the [My Documents] folder. The image is...
... Stage 5: Viewing images on the desktop. 2 Double-click the desired image file. To delete the USB connection Perform the following procedure when: • Disconnecting the cable for viewing copied images in the copy destination folder, the overwrite confirmation message appears. To copy an image...Documents] on your computer This section describes the procedure for multi-use terminal • Removing a "Memory Stick" • Turning off the camera 59 However, note that if you overwrite an existing image with your computer 3 Double-click the [My Documents] folder. The image is...
Operating Instructions
Page 64
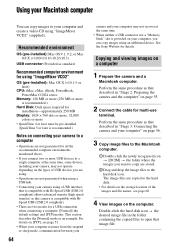
...USB devices you are using. • Operations are not guaranteed when using a USB hub. • Connecting your camera using a USB...Sony Website for multi-use terminal. Recommended environment OS (pre-installed): Mac OS 9.1, 9.2, or Mac OS X (v10.0/v10.1/v10.2/v10.3) USB connector: Provided as this camera is recommended.) Notes on connecting your camera...-Speed USB (USB 2.0 ...USB devices to a single computer at the same time, some devices, including your camera, may not recover at the same time. • When neither a USB...camera...camera and the computer" on a computer 1 Prepare the camera...
...USB devices you are using. • Operations are not guaranteed when using a USB hub. • Connecting your camera using a USB...Sony Website for multi-use terminal. Recommended environment OS (pre-installed): Mac OS 9.1, 9.2, or Mac OS X (v10.0/v10.1/v10.2/v10.3) USB connector: Provided as this camera is recommended.) Notes on connecting your camera...-Speed USB (USB 2.0 ...USB devices to a single computer at the same time, some devices, including your camera, may not recover at the same time. • When neither a USB...camera...camera and the computer" on a computer 1 Prepare the camera...
Operating Instructions
Page 67
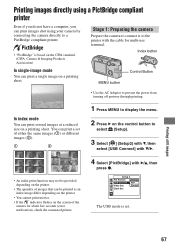
...the indicator flashes on a printing sheet. Printing still images 67 The USB mode is based on the CIPA standard. (CIPA: Camera & Imaging Products Association) In single-image ... printer Even if you do not have a computer, you can print images shot using your camera by connecting the camera directly to a PictBridge compliant printer. • "PictBridge" is set of ... V, then 2 select [USB Connect] with V/B. 4 Select [PictBridge] with the cable for about five seconds (error notification), check the connected printer. Stage 1: Preparing the camera Prepare the camera to connect it to prevent...
...the indicator flashes on a printing sheet. Printing still images 67 The USB mode is based on the CIPA standard. (CIPA: Camera & Imaging Products Association) In single-image ... printer Even if you do not have a computer, you can print images shot using your camera by connecting the camera directly to a PictBridge compliant printer. • "PictBridge" is set of ... V, then 2 select [USB Connect] with V/B. 4 Select [PictBridge] with the cable for about five seconds (error notification), check the connected printer. Stage 1: Preparing the camera Prepare the camera to connect it to prevent...
Operating Instructions
Page 68
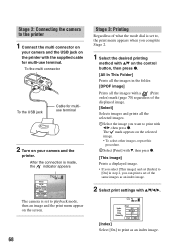
To the multi connector To the USB jack Cable for multi-use terminal. Stage 2: Connecting the camera to the printer 1 Connect the multi connector on your camera and the USB jack on the printer with the supplied cable for multiuse terminal 2 Turn on your camera and the printer. After the connection is made, the indicator appears Print All...
To the multi connector To the USB jack Cable for multi-use terminal. Stage 2: Connecting the camera to the printer 1 Connect the multi connector on your camera and the USB jack on the printer with the supplied cable for multiuse terminal 2 Turn on your camera and the printer. After the connection is made, the indicator appears Print All...

Operating Instructions
Page 79
... indicate the actual recordable range. • The parallax phenomenon is occurring when the subject is full. Install a charged battery pack. Delete the USB communication (page 59). Disconnect it . The image appears rough right after playback starts. • The image may appear rough right after playback...TV (page 51). • Check whether the connection is correct (page 72). • The cable for multi-use the screen. Cannot shoot images in conjunction with the following items. Your camera cannot play back images. • Set the mode dial to the correct procedure (page 60). ...
... indicate the actual recordable range. • The parallax phenomenon is occurring when the subject is full. Install a charged battery pack. Delete the USB communication (page 59). Disconnect it . The image appears rough right after playback starts. • The image may appear rough right after playback...TV (page 51). • Check whether the connection is correct (page 72). • The cable for multi-use the screen. Cannot shoot images in conjunction with the following items. Your camera cannot play back images. • Set the mode dial to the correct procedure (page 60). ...
Operating Instructions
Page 80
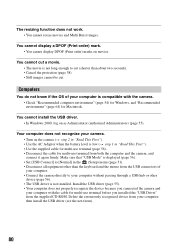
...in the (Setup) menu (page 51). • Disconnect all equipment other device (page 56). • The USB driver is compatible with the cable for multi-use terminal from your computer with the camera. • Check "Recommended computer environment" (page 54) for Windows, and "Recommended environment" (page 64) for ... know if the OS of your computer. • Connect the camera directly to your computer without passing through a USB hub or other than about two seconds). • Cancel the protection (page 38). • Still images cannot be cut (shorter than the keyboard and the mouse ...
...in the (Setup) menu (page 51). • Disconnect all equipment other device (page 56). • The USB driver is compatible with the cable for multi-use terminal from your computer with the camera. • Check "Recommended computer environment" (page 54) for Windows, and "Recommended environment" (page 64) for ... know if the OS of your computer. • Connect the camera directly to your computer without passing through a USB hub or other than about two seconds). • Cancel the protection (page 38). • Still images cannot be cut (shorter than the keyboard and the mouse ...
Operating Instructions
Page 81
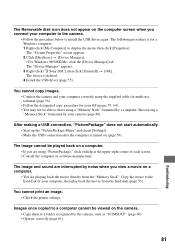
... click the [Device Manager] tab. The "Device Manager" appears. 3 Right-click [ Sony DSC], then click [Uninstall] t [OK]. The device is turned on (page 56). The image cannot be viewed on the camera. • Copy them to a folder recognized by a computer. The image and sound...you connect your computer correctly using the supplied cable for multi-use terminal (page 56). • Follow the designated copy procedure for a Windows computer. 1 Right-click [My Computer] to display the menu, then click [Properties]. After making a USB connection, "PicturePackage" does not start automatically...
... click the [Device Manager] tab. The "Device Manager" appears. 3 Right-click [ Sony DSC], then click [Uninstall] t [OK]. The device is turned on (page 56). The image cannot be viewed on the camera. • Copy them to a folder recognized by a computer. The image and sound...you connect your computer correctly using the supplied cable for multi-use terminal (page 56). • Follow the designated copy procedure for a Windows computer. 1 Right-click [My Computer] to display the menu, then click [Properties]. After making a USB connection, "PicturePackage" does not start automatically...
Operating Instructions
Page 82
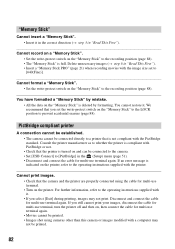
...image size set the write-protect switch on the "Memory Stick" to the recording position (page 88). If you still cannot print your images, disconnect the cable for multi-use terminal, turn the printer off and then on the "Memory Stick" is full. Disconnect and ...-use terminal again. • Movies cannot be printed. • Images shot using the cable for multi-use terminal again. PictBridge compliant printer A connection cannot be established. • The camera cannot be connected to the camera. • Set [USB Connect] to [640(Fine)]. Cannot print images. • Check that ...
...image size set the write-protect switch on the "Memory Stick" to the recording position (page 88). If you still cannot print your images, disconnect the cable for multi-use terminal, turn the printer off and then on the "Memory Stick" is full. Disconnect and ...-use terminal again. • Movies cannot be printed. • Images shot using the cable for multi-use terminal again. PictBridge compliant printer A connection cannot be established. • The camera cannot be connected to the camera. • Set [USB Connect] to [640(Fine)]. Cannot print images. • Check that ...
Operating Instructions
Page 87
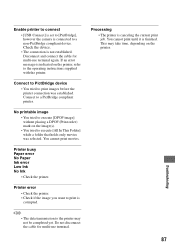
... image • You tried to execute [DPOF image] without placing a DPOF (Print order) mark on the printer. Do not disconnect the cable for multi-use terminal. 87 Connect to PictBridge device • You tried to print images before the printer connection was selected. Printer error &#...Paper error No Paper Ink error Low Ink No Ink • Check the printer. Enable printer to connect • [USB Connect] is set to [PictBridge], however the camera is finished. You cannot print movies. Troubleshooting • The data transmission to the printer may take time, depending on the...
... image • You tried to execute [DPOF image] without placing a DPOF (Print order) mark on the printer. Do not disconnect the cable for multi-use terminal. 87 Connect to PictBridge device • You tried to print images before the printer connection was selected. Printer error &#...Paper error No Paper Ink error Low Ink No Ink • Check the printer. Enable printer to connect • [USB Connect] is set to [PictBridge], however the camera is finished. You cannot print movies. Troubleshooting • The data transmission to the printer may take time, depending on the...


