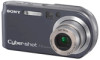
Read This First guide
Page 1
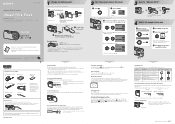
...button On still image sizes...Cyber-shot application software) (1) • Operating instructions for digital still camera "Read This First" (this manual) (1) • Operating instructions "User's Guide/ Troubleshooting" (1) Notes before use your camera before using the camera... display the menu screen. http://www.sony.net/ 1 Charge the battery pack Be...Still image: Select . AC-LS5/LS5B • Do not use the AC Adaptor placed in until the correct battery remaining time appears. • The displayed time remaining may take longer under certain circumstances. DSC-P200...
...button On still image sizes...Cyber-shot application software) (1) • Operating instructions for digital still camera "Read This First" (this manual) (1) • Operating instructions "User's Guide/ Troubleshooting" (1) Notes before use your camera before using the camera... display the menu screen. http://www.sony.net/ 1 Charge the battery pack Be...Still image: Select . AC-LS5/LS5B • Do not use the AC Adaptor placed in until the correct battery remaining time appears. • The displayed time remaining may take longer under certain circumstances. DSC-P200...
Read This First guide
Page 2
... Snow Shoots whitish scenes brightly. Select . 2 Shoot with v/V. For details on the [Digital Zoom] settings and the image quality t "User's Guide/Troubleshooting" (page 44) Checking the last still image you shot (Quick Review) 60min Review VGA 101 8/8 101-0029 2005 1 1 10:30PM RETURN ...deletion Select [Exit], then press z. To use the Macro mode (left column). • When the camera cannot focus on the control button, then press z. 2 Select the image you shoot a still image of a subject that is poor. - The first time is displayed, press (Delete) and select...
... Snow Shoots whitish scenes brightly. Select . 2 Shoot with v/V. For details on the [Digital Zoom] settings and the image quality t "User's Guide/Troubleshooting" (page 44) Checking the last still image you shot (Quick Review) 60min Review VGA 101 8/8 101-0029 2005 1 1 10:30PM RETURN ...deletion Select [Exit], then press z. To use the Macro mode (left column). • When the camera cannot focus on the control button, then press z. 2 Select the image you shoot a still image of a subject that is poor. - The first time is displayed, press (Delete) and select...

Operating Instructions
Page 10
..., then Flashing,lit/beeps 60min VGA FINE 101 96 Press fully down S AF 30 F2.8 To shoot a still image difficult to press the shutter button only halfway down , the camera adjusts the focus automatically (Auto Focus). It tells you press the shutter button halfway down . Remember to focus on . Also, you can stabilize the...
..., then Flashing,lit/beeps 60min VGA FINE 101 96 Press fully down S AF 30 F2.8 To shoot a still image difficult to press the shutter button only halfway down , the camera adjusts the focus automatically (Auto Focus). It tells you press the shutter button halfway down . Remember to focus on . Also, you can stabilize the...
Operating Instructions
Page 14
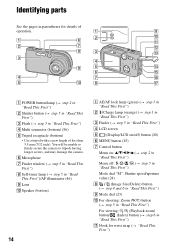
You will be unable to firmly secure the camera to tripods having longer screws, and may damage the camera. F Microphone G Finder window (t step 5 in "Read This First") H Self-timer lamp (t step 5 in "Read This First")/AF illuminator (46) I Lens J Speaker ... First") B /Charge lamp (orange) (t step 1 in "Read This First") C Finder (t step 5 in "Read This First") D LCD screen E (Display/LCD on/off) button (20) F MENU button (25) G Control button Menu on: v/V/b/B/z (t step 2 in "Read This First") Menu off: / / / (t step 5 in "Read This First") Mode dial "M": Shutter speed/aperture value (24)...
You will be unable to firmly secure the camera to tripods having longer screws, and may damage the camera. F Microphone G Finder window (t step 5 in "Read This First") H Self-timer lamp (t step 5 in "Read This First")/AF illuminator (46) I Lens J Speaker ... First") B /Charge lamp (orange) (t step 1 in "Read This First") C Finder (t step 5 in "Read This First") D LCD screen E (Display/LCD on/off) button (20) F MENU button (25) G Control button Menu on: v/V/b/B/z (t step 2 in "Read This First") Menu off: / / / (t step 5 in "Read This First") Mode dial "M": Shutter speed/aperture value (24)...
Operating Instructions
Page 15
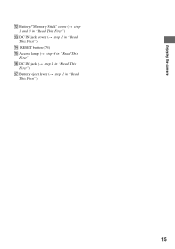
Enjoying the camera L Battery/"Memory Stick" cover (t step 1 and 3 in "Read This First") M DC IN jack cover (t step 1 in "Read This First") N RESET button (74) O Access lamp (t step 4 in "Read This First" P DC IN jack (t step 1 in "Read This First") Q Battery eject lever (t step 1 in "Read This First") 15
Enjoying the camera L Battery/"Memory Stick" cover (t step 1 and 3 in "Read This First") M DC IN jack cover (t step 1 in "Read This First") N RESET button (74) O Access lamp (t step 4 in "Read This First" P DC IN jack (t step 1 in "Read This First") Q Battery eject lever (t step 1 in "Read This First") 15
Operating Instructions
Page 20
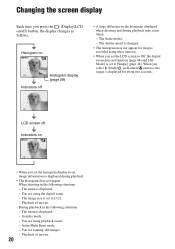
... are using playback zoom. - Playback of movies. 20 Histogram on 60min VGA 101 96 S AF Indicators off ) button, the display changes as follows. The flash strobes. - You are rotating still images. - In the Multi Burst mode. - Changing the screen display Each time you set the histogram display to ... - Playback of movies. The image size is set to [3:2]. - The menu is displayed. - You are using other cameras. • When you set the LCD screen to Off, the digital zoom does not function (page 44) and [AF Mode] is changed. • The histogram may occur when: - ...
... are using playback zoom. - Playback of movies. 20 Histogram on 60min VGA 101 96 S AF Indicators off ) button, the display changes as follows. The flash strobes. - You are rotating still images. - In the Multi Burst mode. - Changing the screen display Each time you set the histogram display to ... - Playback of movies. The image size is set to [3:2]. - The menu is displayed. - You are using other cameras. • When you set the LCD screen to Off, the digital zoom does not function (page 44) and [AF Mode] is changed. • The histogram may occur when: - ...
Operating Instructions
Page 23
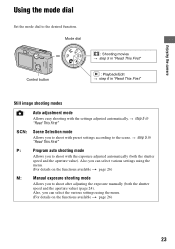
Mode dial : Shooting movies t step 5 in "Read This First" Control button : Playback/Edit t step 6 in "Read This First" SCN: Scene Selection mode Allows you to the desired function. t step 5 in "Read This First" Still image shooting modes : Auto adjustment mode Allows easy shooting with the settings adjusted ... settings using the menu. (For details on the functions available t page 26) 23 Also, you to the scene. Enjoying the camera Using the mode dial Set the mode dial to shoot with the exposure adjusted automatically (both the shutter speed and the aperture value)...
Mode dial : Shooting movies t step 5 in "Read This First" Control button : Playback/Edit t step 6 in "Read This First" SCN: Scene Selection mode Allows you to the desired function. t step 5 in "Read This First" Still image shooting modes : Auto adjustment mode Allows easy shooting with the settings adjusted ... settings using the menu. (For details on the functions available t page 26) 23 Also, you to the scene. Enjoying the camera Using the mode dial Set the mode dial to shoot with the exposure adjusted automatically (both the shutter speed and the aperture value)...
Operating Instructions
Page 24
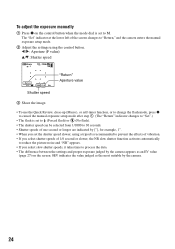
...If you select slow shutter speeds, it takes time to process the data. • The difference between the settings and proper exposure judged by the camera appears as the most suitable by ["], for example, 1". • When you set to (Forced flash) or (No flash). • The ...shutter speed can be selected from 1/1000 to "Return," and the camera enters the manual exposure setup mode. 2 Adjust the settings using a tripod is set the shutter speed slower, using the control button. b/B: Aperture (F value) v/V: Shutter speed 60min M VGA FINE 101 98 Return SAF 250...
...If you select slow shutter speeds, it takes time to process the data. • The difference between the settings and proper exposure judged by the camera appears as the most suitable by ["], for example, 1". • When you set to (Forced flash) or (No flash). • The ...shutter speed can be selected from 1/1000 to "Return," and the camera enters the manual exposure setup mode. 2 Adjust the settings using a tripod is set the shutter speed slower, using the control button. b/B: Aperture (F value) v/V: Shutter speed 60min M VGA FINE 101 98 Return SAF 250...

Operating Instructions
Page 25
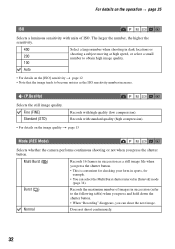
... available vary depending on the mode dial position. 2 Press MENU to display the menu. 3 Select the desired menu item with b/B on the control button. • If the desired item is invisible, keep pressing b/B until it appears on the screen. • Press z after selecting an item when... set. 5 Press MENU to . 4 Select the setting with the control button. • You cannot select items that are grayed out. 25 Using the menu Using the menu Using menu items v/V/b/B button Mode dial z button Control button MENU button 1 Turn on the edges of the location where menu items usually appear. ...
... available vary depending on the mode dial position. 2 Press MENU to display the menu. 3 Select the desired menu item with b/B on the control button. • If the desired item is invisible, keep pressing b/B until it appears on the screen. • Press z after selecting an item when... set. 5 Press MENU to . 4 Select the setting with the control button. • You cannot select items that are grayed out. 25 Using the menu Using the menu Using menu items v/V/b/B button Mode dial z button Control button MENU button 1 Turn on the edges of the location where menu items usually appear. ...

Operating Instructions
Page 30
...subject and the background. 60min P VGA FINE 101 98 SAF 250 F2.8 Spot metering cross hairs Positions on , return to the fully composed shot, and press the shutter button fully down. 60min P VGAFINE 101 98 S AF F2.8 30 (Metering Mode) Selects the metering mode that sets which part of the subject... When shooting with the subject at the edge of the frame. Center (Center-weighted metering)( ) Measures the center of the subject there. The camera determines a well-balanced exposure. • For details on the exposure t page 11 • When using [Center AF] or [Spot AF]. the...
...subject and the background. 60min P VGA FINE 101 98 SAF 250 F2.8 Spot metering cross hairs Positions on , return to the fully composed shot, and press the shutter button fully down. 60min P VGAFINE 101 98 S AF F2.8 30 (Metering Mode) Selects the metering mode that sets which part of the subject... When shooting with the subject at the edge of the frame. Center (Center-weighted metering)( ) Measures the center of the subject there. The camera determines a well-balanced exposure. • For details on the exposure t page 11 • When using [Center AF] or [Spot AF]. the...
Operating Instructions
Page 32
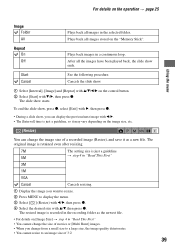
The larger the number, the higher the sensitivity. 400 Select a large number when shooting in succession (refer to become noisier as a still image file when you press the shutter button. • This is convenient for checking your form in sports, for example. • You can shoot the next image. Records the maximum number... select a small number to obtain high image quality. 100 Auto • For details on the image quality t page 13 Mode (REC Mode) Selects whether the camera performs continuous shooting or not when you press the shutter...
The larger the number, the higher the sensitivity. 400 Select a large number when shooting in succession (refer to become noisier as a still image file when you press the shutter button. • This is convenient for checking your form in sports, for example. • You can shoot the next image. Records the maximum number... select a small number to obtain high image quality. 100 Auto • For details on the image quality t page 13 Mode (REC Mode) Selects whether the camera performs continuous shooting or not when you press the shutter...
Operating Instructions
Page 33
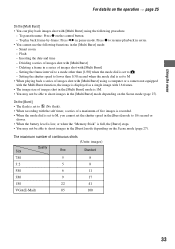
...in the [Burst] mode depending on the Scene mode (page 27). Smart zoom - Deleting a frame in a series of continuous shots (Units: images) Quality Size Fine Standard 7M 5 8 3:2 5 8 5M 6 11 3M 9 17 1M 22 41 VGA(E-Mail) ... in the [Multi Burst] mode: - To play back images shot with [Multi Burst] - Inserting the date and time - Dividing a series of images shot with [Multi Burst] using a computer or a camera not equipped with the Multi Burst function, the image is displayed ... 27). Press z to shoot images in the [Multi Burst] mode depending on the control button. -
...in the [Burst] mode depending on the Scene mode (page 27). Smart zoom - Deleting a frame in a series of continuous shots (Units: images) Quality Size Fine Standard 7M 5 8 3:2 5 8 5M 6 11 3M 9 17 1M 22 41 VGA(E-Mail) ... in the [Multi Burst] mode: - To play back images shot with [Multi Burst] - Inserting the date and time - Dividing a series of images shot with [Multi Burst] using a computer or a camera not equipped with the Multi Burst function, the image is displayed ... 27). Press z to shoot images in the [Multi Burst] mode depending on the control button. -
Operating Instructions
Page 36
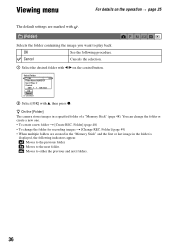
...image you want to either the previous and next folders. 36 Select Folder 102 2/2 Folder Name:102MSDCF No. Viewing menu For details on the control button. Folder] (page 49) • When multiple folders are marked with b/B on the operation t page 25 The default settings are created in ...the "Memory Stick" and the first or last image in a specified folder of a "Memory Stick" (page 48). z On the [Folder] The camera stores images in the folder is displayed, the following procedure. Of Files: 9 Created: 2005 1 1 1:05:34AM OK Cancel BACK/NEXT 2 Select [OK] with...
...image you want to either the previous and next folders. 36 Select Folder 102 2/2 Folder Name:102MSDCF No. Viewing menu For details on the control button. Folder] (page 49) • When multiple folders are marked with b/B on the operation t page 25 The default settings are created in ...the "Memory Stick" and the first or last image in a specified folder of a "Memory Stick" (page 48). z On the [Folder] The camera stores images in the folder is displayed, the following procedure. Of Files: 9 Created: 2005 1 1 1:05:34AM OK Cancel BACK/NEXT 2 Select [OK] with...

Operating Instructions
Page 37
... in index mode 1 Press (index) to display the index screen. 2 Press MENU to display the menu. 3 Select [-] (Protect) with b/B on the control button, then press z. 4 Select [Select] with v/V, then press z. 5 Select the image you want to protect other images, select the desired image with B, then ...press z. 37 A green - The - indicator appears on the control button, then press z. indicator turns white. The selected images are protected. • To protect all images in the folder, select [All In This ...
... in index mode 1 Press (index) to display the index screen. 2 Press MENU to display the menu. 3 Select [-] (Protect) with b/B on the control button, then press z. 4 Select [Select] with v/V, then press z. 5 Select the image you want to protect other images, select the desired image with B, then ...press z. 37 A green - The - indicator appears on the control button, then press z. indicator turns white. The selected images are protected. • To protect all images in the folder, select [All In This ...
Operating Instructions
Page 39
... the menu. 3 Select [ ] (Resize) with b/B, then press z. 4 Select the desired size with v/V, then press z. The slide show ends. After all images stored on the control button. 2 Select [Start] with V/B, then press z. The original image is retained even after resizing. 7M The setting size is just a guideline, so it may vary depending...
... the menu. 3 Select [ ] (Resize) with b/B, then press z. 4 Select the desired size with v/V, then press z. The slide show ends. After all images stored on the control button. 2 Select [Start] with V/B, then press z. The original image is retained even after resizing. 7M The setting size is just a guideline, so it may vary depending...

Operating Instructions
Page 40
...rotated. 2 Press MENU to display the menu. 3 Select [ ] (Rotate) with b/B on the control button, then press z. 4 Select [ ] with v, then rotate the image with b/B. 5 Select [OK] with other cameras. • When viewing images on a computer, the image rotation information may not be able to your email... "Memory Stick" capacity is insufficient, or when you attach movies to rotate images shot with v/V, then press z. • You cannot rotate protected images, movies, or [Multi Burst] images. • You may not be reflected depending on the image. (Rotate) Rotates a still image.
...rotated. 2 Press MENU to display the menu. 3 Select [ ] (Rotate) with b/B on the control button, then press z. 4 Select [ ] with v, then rotate the image with b/B. 5 Select [OK] with other cameras. • When viewing images on a computer, the image rotation information may not be able to your email... "Memory Stick" capacity is insufficient, or when you attach movies to rotate images shot with v/V, then press z. • You cannot rotate protected images, movies, or [Multi Burst] images. • You may not be reflected depending on the image. (Rotate) Rotates a still image.

Operating Instructions
Page 41
... 4 Only the desired scenes remain. 1 3 2 101_0006 Procedure 1 Display the movie to be divided. 2 Press MENU to display the menu. 3 Select [ ] (Divide) with B on the control button, then press z. 4 Select [OK] with v, then press z. For details on the operation t page 25 Using the menu Example: Cutting a movie numbered 101_0002 This section describes...
... 4 Only the desired scenes remain. 1 3 2 101_0006 Procedure 1 Display the movie to be divided. 2 Press MENU to display the menu. 3 Select [ ] (Divide) with B on the control button, then press z. 4 Select [OK] with v, then press z. For details on the operation t page 25 Using the menu Example: Cutting a movie numbered 101_0002 This section describes...

Operating Instructions
Page 43
... select the item you want to enter the setting. MENU button 5 Press z to set. To turn off . 43 To cancel the (Setup) setting Select [Cancel] if it does not appear, select the previous setting again. • ... Using the Setup screen Using Setup items You can change the default settings using the Setup screen. The frame of the selected item turns yellow. v/V/b/B button Mode dial z button Control button 1 Turn on the power. 2 Press MENU to display the menu. 3 Press B on the control...
... select the item you want to enter the setting. MENU button 5 Press z to set. To turn off . 43 To cancel the (Setup) setting Select [Cancel] if it does not appear, select the previous setting again. • ... Using the Setup screen Using Setup items You can change the default settings using the Setup screen. The frame of the selected item turns yellow. v/V/b/B button Mode dial z button Control button 1 Turn on the power. 2 Press MENU to display the menu. 3 Press B on the control...
Operating Instructions
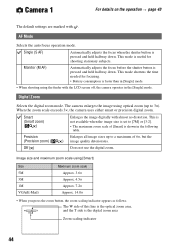
Page 44
... . Off ( ) Does not use the digital zoom. Monitor (M AF) Automatically adjusts the focus before the shutter button is pressed and held halfway down . When the zoom scale exceeds 3×, the camera uses either smart or precision digital zoom. This mode shortens the time needed for...215; Approx. 7.2× Approx. 14.0× • When you press the zoom button, the zoom scaling indicator appears as follows. Smart (Smart zoom) ( ) Enlarges the image digitally with the LCD screen off, the camera operates in [Single] mode. • When shooting using the finder with almost no...
... . Off ( ) Does not use the digital zoom. Monitor (M AF) Automatically adjusts the focus before the shutter button is pressed and held halfway down . When the zoom scale exceeds 3×, the camera uses either smart or precision digital zoom. This mode shortens the time needed for...215; Approx. 7.2× Approx. 14.0× • When you press the zoom button, the zoom scaling indicator appears as follows. Smart (Smart zoom) ( ) Enlarges the image digitally with the LCD screen off, the camera operates in [Single] mode. • When shooting using the finder with almost no...
Operating Instructions
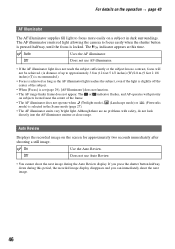
Page 46
... emitter at this period, the recorded image display disappears and you can immediately shoot the next image. 46 If you press the shutter button halfway down during the Auto Review display. Auto Uses the AF illuminator. Although there are no contrast, focus will not be achieved....8226; When [Focus] is selected in dark surroundings. The AF illuminator emits red light allowing the camera to focus more easily on the screen for approximately two seconds immediately after shooting a still image. On Use the Auto Review. Auto Review Displays the recorded image on a subject in ...
... emitter at this period, the recorded image display disappears and you can immediately shoot the next image. 46 If you press the shutter button halfway down during the Auto Review display. Auto Uses the AF illuminator. Although there are no contrast, focus will not be achieved....8226; When [Focus] is selected in dark surroundings. The AF illuminator emits red light allowing the camera to focus more easily on the screen for approximately two seconds immediately after shooting a still image. On Use the Auto Review. Auto Review Displays the recorded image on a subject in ...


