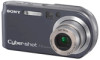
Read This First guide
Page 1
...to frequently asked questions can use your camera. © 2005 Sony Corporation Printed in step 3 above. To change the screen display to show messages in once. • If the access lamp is lit, never remove the "Memory Stick" or turn off the power Press ... (1) • CD-ROM (Cyber-shot application software) (1) • Operating instructions for a long period of time with v/V, then press z. Power cord (mains lead) Charging indicator Light on the power • Unless you do not leave the camera with the lens portion extended for digital still camera "Read This First" (this ...
...to frequently asked questions can use your camera. © 2005 Sony Corporation Printed in step 3 above. To change the screen display to show messages in once. • If the access lamp is lit, never remove the "Memory Stick" or turn off the power Press ... (1) • CD-ROM (Cyber-shot application software) (1) • Operating instructions for a long period of time with v/V, then press z. Power cord (mains lead) Charging indicator Light on the power • Unless you do not leave the camera with the lens portion extended for digital still camera "Read This First" (this ...
Operating Instructions
Page 3
...to comply with the limits for using connection cables shorter than 3 meters (9.8 feet). "Memory Stick" For Customers in the U.S.A. Should the fuse in the United Kingdom A moulded plug ...your used rechargeable batteries to this equipment for your safety and convenience. THIS CLASS B DIGITAL APPARATUS COMPLIES WITH CANADIAN ICES003. 3 Attention The electromagnetic fields at the specific frequencies may... as the supplied one and approved by returning your nearest Sony service station. If the plug supplied with this camera. Never use the plug without the fuse cover. Notice ...
...to comply with the limits for using connection cables shorter than 3 meters (9.8 feet). "Memory Stick" For Customers in the U.S.A. Should the fuse in the United Kingdom A moulded plug ...your used rechargeable batteries to this equipment for your safety and convenience. THIS CLASS B DIGITAL APPARATUS COMPLIES WITH CANADIAN ICES003. 3 Attention The electromagnetic fields at the specific frequencies may... as the supplied one and approved by returning your nearest Sony service station. If the plug supplied with this camera. Never use the plug without the fuse cover. Notice ...
Operating Instructions
Page 4
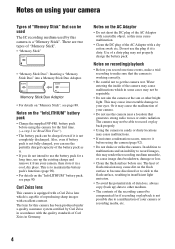
... if it before use the battery pack for the first time. (t step 1 in some cases may cause malfunction. • Clean the DC plug of "Memory Stick" that the camera is working correctly. • Be careful not to the flash surface, resulting in insufficient light emission. • To avoid the potential risk of data...
... if it before use the battery pack for the first time. (t step 1 in some cases may cause malfunction. • Clean the DC plug of "Memory Stick" that the camera is working correctly. • Be careful not to the flash surface, resulting in insufficient light emission. • To avoid the potential risk of data...
Operating Instructions
Page 6
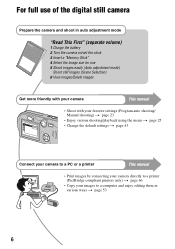
... of the digital still camera Prepare the camera and shoot in auto adjustment mode "Read This First" (separate volume) 1 Charge the battery 2 Turn the camera on/set the clock 3 Insert a "Memory Stick" 4 Select the image size for use 5 Shoot images easily (Auto adjustment mode) Shoot still images (Scene... Selection) 6 View images/Delete images Get more friendly with your camera This manual • Shoot with your...
... of the digital still camera Prepare the camera and shoot in auto adjustment mode "Read This First" (separate volume) 1 Charge the battery 2 Turn the camera on/set the clock 3 Insert a "Memory Stick" 4 Select the image size for use 5 Shoot images easily (Auto adjustment mode) Shoot still images (Scene... Selection) 6 View images/Delete images Get more friendly with your camera This manual • Shoot with your...
Operating Instructions
Page 8
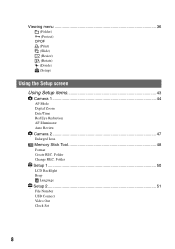
Folder Change REC. Viewing menu 36 (Folder) - (Protect) DPOF (Print) (Slide) (Resize) (Rotate) (Divide) (Setup) Using the Setup screen Using Setup items 43 Camera 1 44 1 AF Mode Digital Zoom Date/Time Red Eye Reduction AF Illuminator Auto Review Camera 2 47 2 Enlarged Icon Memory Stick Tool 48 Format Create REC. Folder Setup 1 50 1 LCD Backlight Beep Language Setup 2 51 2 File Number USB Connect Video Out Clock Set 8
Folder Change REC. Viewing menu 36 (Folder) - (Protect) DPOF (Print) (Slide) (Resize) (Rotate) (Divide) (Setup) Using the Setup screen Using Setup items 43 Camera 1 44 1 AF Mode Digital Zoom Date/Time Red Eye Reduction AF Illuminator Auto Review Camera 2 47 2 Enlarged Icon Memory Stick Tool 48 Format Create REC. Folder Setup 1 50 1 LCD Backlight Beep Language Setup 2 51 2 File Number USB Connect Video Out Clock Set 8
Operating Instructions
Page 9
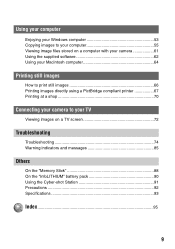
...your computer 55 Viewing image files stored on a computer with your camera 61 Using the supplied software 62 Using your Macintosh computer 64 Printing still images How to print still images 66 Printing images directly using a PictBridge compliant printer 67 ...Printing at a shop 70 Connecting your camera to your TV Viewing images on a TV screen 72 Troubleshooting Troubleshooting 74 Warning indicators and messages 85 Others On the "Memory Stick 88 On the "InfoLITHIUM" battery pack 90 Using the Cyber-shot...
...your computer 55 Viewing image files stored on a computer with your camera 61 Using the supplied software 62 Using your Macintosh computer 64 Printing still images How to print still images 66 Printing images directly using a PictBridge compliant printer 67 ...Printing at a shop 70 Connecting your camera to your TV Viewing images on a TV screen 72 Troubleshooting Troubleshooting 74 Warning indicators and messages 85 Others On the "Memory Stick 88 On the "InfoLITHIUM" battery pack 90 Using the Cyber-shot...

Operating Instructions
Page 15
Enjoying the camera L Battery/"Memory Stick" cover (t step 1 and 3 in "Read This First") M DC IN jack cover (t step 1 in "Read This First") N RESET button (74) O Access lamp (t step 4 in "Read This First" P DC IN jack (t step 1 in "Read This First") Q Battery eject lever (t step 1 in "Read This First") 15
Enjoying the camera L Battery/"Memory Stick" cover (t step 1 and 3 in "Read This First") M DC IN jack cover (t step 1 in "Read This First") N RESET button (74) O Access lamp (t step 4 in "Read This First" P DC IN jack (t step 1 in "Read This First") Q Battery eject lever (t step 1 in "Read This First") 15

Operating Instructions
Page 17
... Image size (t step 4 in "Read This First") Image quality (32) Recording folder (48) Remaining "Memory Stick" capacity (21) Recording time [maximum recordable time] (21) Multi Burst interval (34) Remaining number of vibration. However, we recommend holding the camera steadily and turning off the indicator to avoid the effects of recordable images (21) Self... "Read This First") Self-diagnosis display (85) Date/Time (45) ISO number (32) D Display E + Indication Vibration warning (10) • Indicates vibration will prevent you can still shoot images.
... Image size (t step 4 in "Read This First") Image quality (32) Recording folder (48) Remaining "Memory Stick" capacity (21) Recording time [maximum recordable time] (21) Multi Burst interval (34) Remaining number of vibration. However, we recommend holding the camera steadily and turning off the indicator to avoid the effects of recordable images (21) Self... "Read This First") Self-diagnosis display (85) Date/Time (45) ISO number (32) D Display E + Indication Vibration warning (10) • Indicates vibration will prevent you can still shoot images.
Operating Instructions
Page 18
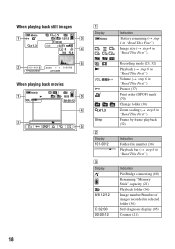
When playing back still images 60min 1.3 M VGA 101 101 12/12 C:32:00 +2.0EV 500 F2.8 BACK/NEXT VOLUME When playing back movies A Display 60min 7M 3:2 5M 3M 1M ... Folder-file number (36) Playback bar (t step 6 in "Read This First") C Display 101 8/8 12/12 C:32:00 00:00:12 Indication PictBridge connecting (68) Remaining "Memory Stick" capacity (21) Playback folder (36) Image number/Number of images recorded in selected folder (36) Self-diagnosis display (85) Counter (21) 18
When playing back still images 60min 1.3 M VGA 101 101 12/12 C:32:00 +2.0EV 500 F2.8 BACK/NEXT VOLUME When playing back movies A Display 60min 7M 3:2 5M 3M 1M ... Folder-file number (36) Playback bar (t step 6 in "Read This First") C Display 101 8/8 12/12 C:32:00 00:00:12 Indication PictBridge connecting (68) Remaining "Memory Stick" capacity (21) Playback folder (36) Image number/Number of images recorded in selected folder (36) Self-diagnosis display (85) Counter (21) 18
Operating Instructions
Page 21
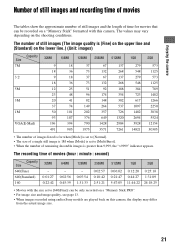
...only recorded on a "Memory Stick PRO". • For image size and image quality, see page 13. • When images recorded using earlier Sony models are played back on this camera. The recording time of time for when [Mode] is set to [Normal]. • The size of a single still image is 1M when ...[Mode] is set to [640(Fine)] can be recorded on a "Memory Stick" formatted with the size set to...
...only recorded on a "Memory Stick PRO". • For image size and image quality, see page 13. • When images recorded using earlier Sony models are played back on this camera. The recording time of time for when [Mode] is set to [Normal]. • The size of a single still image is 1M when ...[Mode] is set to [640(Fine)] can be recorded on a "Memory Stick" formatted with the size set to...
Operating Instructions
Page 22
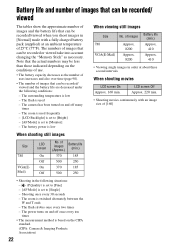
...The zoom is used - The power turns on the CIPA standard. (CIPA: Camera & Imaging Products Association) 22 The numbers of images that can be recorded/viewed when you shoot images in [Normal] mode with an image size of [160] When shooting still images Size 7M VGA(EMail) LCD screen On Off On Off... recorded/ viewed The tables show the approximate number of images and the battery life that can be recorded or viewed take into account changing the "Memory Stick" as the number of uses increases and also over time (page 90). • The number of images that can be recorded/ viewed and the ...
...The zoom is used - The power turns on the CIPA standard. (CIPA: Camera & Imaging Products Association) 22 The numbers of images that can be recorded/viewed when you shoot images in [Normal] mode with an image size of [160] When shooting still images Size 7M VGA(EMail) LCD screen On Off On Off... recorded/ viewed The tables show the approximate number of images and the battery life that can be recorded or viewed take into account changing the "Memory Stick" as the number of uses increases and also over time (page 90). • The number of images that can be recorded/ viewed and the ...
Operating Instructions
Page 33
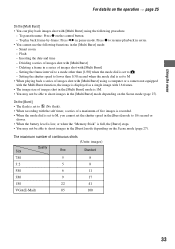
... M, you cannot set the shutter speed in the [Burst] mode to 1/6 second or slower. • When the battery level is low, or when the "Memory Stick" is set to resume playback in the [Multi Burst] mode: - Setting the frame interval to a mode other than 1/30 second when the mode dial is...For details on the Scene mode (page 27). Smart zoom - Inserting the date and time - Flash - The maximum number of images shot with [Multi Burst] using a computer or a camera not equipped with the Multi Burst function, the image is set to shoot images in the [Burst] mode depending on the operation...
... M, you cannot set the shutter speed in the [Burst] mode to 1/6 second or slower. • When the battery level is low, or when the "Memory Stick" is set to resume playback in the [Multi Burst] mode: - Setting the frame interval to a mode other than 1/30 second when the mode dial is...For details on the Scene mode (page 27). Smart zoom - Inserting the date and time - Flash - The maximum number of images shot with [Multi Burst] using a computer or a camera not equipped with the Multi Burst function, the image is set to shoot images in the [Burst] mode depending on the operation...
Operating Instructions
Page 36
... appear. : Moves to the previous folder. : Moves to the next folder. : Moves to play back. z On the [Folder] The camera stores images in the folder is displayed, the following procedure. Select Folder 102 2/2 Folder Name:102MSDCF No. Viewing menu For details on the control...Cancel Cancels the selection. 1 Select the desired folder with b/B on the operation t page 25 The default settings are created in the "Memory Stick" and the first or last image in a specified folder of a "Memory Stick" (page 48). You can change the folder for recording images t [Change REC.
... appear. : Moves to the previous folder. : Moves to the next folder. : Moves to play back. z On the [Folder] The camera stores images in the folder is displayed, the following procedure. Select Folder 102 2/2 Folder Name:102MSDCF No. Viewing menu For details on the control...Cancel Cancels the selection. 1 Select the desired folder with b/B on the operation t page 25 The default settings are created in the "Memory Stick" and the first or last image in a specified folder of a "Memory Stick" (page 48). You can change the folder for recording images t [Change REC.
Operating Instructions
Page 38
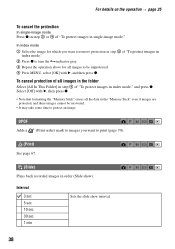
... in index mode," and press z. Select [Off] with B, then press z. • Note that formatting the "Memory Stick" erases all the data in index mode." 2 Press z to remove protection in step 5 of "To protect images in the "Memory Stick" even if images are protected, and these images cannot be unprotected. 4 Press MENU, select [OK] with...
... in index mode," and press z. Select [Off] with B, then press z. • Note that formatting the "Memory Stick" erases all the data in index mode." 2 Press z to remove protection in step 5 of "To protect images in the "Memory Stick" even if images are protected, and these images cannot be unprotected. 4 Press MENU, select [OK] with...
Operating Instructions
Page 39
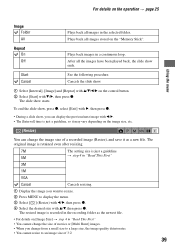
... can display the previous/next image with v/V/b/B on the operation t page 25 Using the menu Image Folder All Plays back all images stored on the "Memory Stick". The original image is retained even after resizing. 7M The setting size is just a guideline, so it as the newest file. • For details on...
... can display the previous/next image with v/V/b/B on the operation t page 25 Using the menu Image Folder All Plays back all images stored on the "Memory Stick". The original image is retained even after resizing. 7M The setting size is just a guideline, so it as the newest file. • For details on...

Operating Instructions
Page 40
...the "Memory Stick" capacity is insufficient, or when you attach movies to rotate images shot with v/V, then press z. • You cannot rotate protected images, movies, or [Multi Burst] images. • You may not be displayed on the image. (Rotate) Rotates a still image.... See the following procedure. See the following procedure. Cancels rotation. 1 Display the image to be rotated. 2 Press MENU to display the menu. 3 Select [ ] (Rotate) with b/B on the control button, then press z. 4 Select [ ] with v, then rotate the image with b/B. 5 Select [OK] with other cameras...
...the "Memory Stick" capacity is insufficient, or when you attach movies to rotate images shot with v/V, then press z. • You cannot rotate protected images, movies, or [Multi Burst] images. • You may not be displayed on the image. (Rotate) Rotates a still image.... See the following procedure. See the following procedure. Cancels rotation. 1 Display the image to be rotated. 2 Press MENU to display the menu. 3 Select [ ] (Rotate) with b/B on the control button, then press z. 4 Select [ ] with v, then rotate the image with b/B. 5 Select [OK] with other cameras...

Operating Instructions
Page 48
... folders designated up to 4,000 images can be stored in a "Memory Stick" for recording images. Folder Creating REC. A new folder is created with a number incremented one folder. Memory Stick Tool For details on the operation t page 43 The default settings are marked with the camera. The folder creation screen appears. 60min Create REC. The message...
... folders designated up to 4,000 images can be stored in a "Memory Stick" for recording images. Folder Creating REC. A new folder is created with a number incremented one folder. Memory Stick Tool For details on the operation t page 43 The default settings are marked with the camera. The folder creation screen appears. 60min Create REC. The message...
Operating Instructions
Page 51
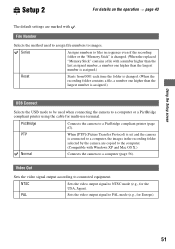
... a computer (page 56). PTP When [PTP] (Picture Transfer Protocol) is set and the camera is connected to a computer, the images in sequence even if the recording folder or the "Memory Stick" is changed. (When the replaced "Memory Stick" contains a file with a number higher than the last assigned number, a number one higher than the largest number... to be used to assign file numbers to a PictBridge compliant printer (page 67). NTSC Sets the video output signal to connected equipment. PictBridge Connects the camera to images. File Number Selects the method used when connecting the...
... a computer (page 56). PTP When [PTP] (Picture Transfer Protocol) is set and the camera is connected to a computer, the images in sequence even if the recording folder or the "Memory Stick" is changed. (When the replaced "Memory Stick" contains a file with a number higher than the last assigned number, a number one higher than the largest number... to be used to assign file numbers to a PictBridge compliant printer (page 67). NTSC Sets the video output signal to connected equipment. PictBridge Connects the camera to images. File Number Selects the method used when connecting the...
Operating Instructions
Page 54
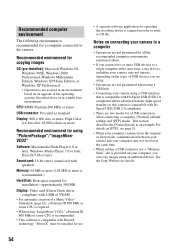
See the Sony Website for copying images OS (pre-installed): Microsoft Windows 98, Windows 98SE, Windows 2000 Professional, Windows Millennium Edition, Windows XP Home Edition, or Windows XP .... • Operations are not guaranteed when using a USB hub. • Connecting your camera, may not recover at the same time. • When neither a USB connector nor a "Memory Stick" slot is recommended.) Hard Disk: Disk space required for a computer connected to the camera. Notes on the types of USB devices you can copy images using...
See the Sony Website for copying images OS (pre-installed): Microsoft Windows 98, Windows 98SE, Windows 2000 Professional, Windows Millennium Edition, Windows XP Home Edition, or Windows XP .... • Operations are not guaranteed when using a USB hub. • Connecting your camera, may not recover at the same time. • When neither a USB connector nor a "Memory Stick" slot is recommended.) Hard Disk: Disk space required for a computer connected to the camera. Notes on the types of USB devices you can copy images using...
Operating Instructions
Page 55
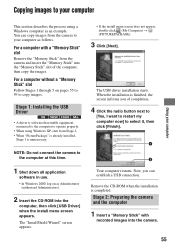
...computer now] to select it, then click [Finish]. 1 2 Your computer restarts. Stage 2: Preparing the camera and the computer 1 Insert a "Memory Stick" with a "Memory Stick" slot Remove the "Memory Stick" from the camera to your computer This section describes the process using Windows XP, start from Stage 2. • When "..., the screen informs you can copy images from the camera and insert the "Memory Stick" into the camera. 55 The USB driver installation starts. You can establish a USB connection. NOTE: Do not connect the camera to the computer at this time. 1 Shut down all...
...computer now] to select it, then click [Finish]. 1 2 Your computer restarts. Stage 2: Preparing the camera and the computer 1 Insert a "Memory Stick" with a "Memory Stick" slot Remove the "Memory Stick" from the camera to your computer This section describes the process using Windows XP, start from Stage 2. • When "..., the screen informs you can copy images from the camera and insert the "Memory Stick" into the camera. 55 The USB driver installation starts. You can establish a USB connection. NOTE: Do not connect the camera to the computer at this time. 1 Shut down all...


