
Instruction Manual
Page 8
HX7V only) H Microphone I Self-timer lamp/Smile Shutter lamp/AF illuminator J Lens K (TransferJet™) mark L LCD screen M (Playback) button N Control wheel O MOVIE (Movie) button P HDMI connector Q Hook for wrist strap R / (In-Camera Guide/Delete) button S MENU button T Speaker U Tripod receptacle • Use a ... dial C For shooting: W/T (Zoom) lever For viewing: (Playback GB zoom) lever/ (Index) lever 8 D Flash E ON/OFF (Power) button F Power/Charge lamp G GPS sensor (built-in, DSC- Otherwise, you cannot firmly secure the camera, and damage to the camera may occur.
HX7V only) H Microphone I Self-timer lamp/Smile Shutter lamp/AF illuminator J Lens K (TransferJet™) mark L LCD screen M (Playback) button N Control wheel O MOVIE (Movie) button P HDMI connector Q Hook for wrist strap R / (In-Camera Guide/Delete) button S MENU button T Speaker U Tripod receptacle • Use a ... dial C For shooting: W/T (Zoom) lever For viewing: (Playback GB zoom) lever/ (Index) lever 8 D Flash E ON/OFF (Power) button F Power/Charge lamp G GPS sensor (built-in, DSC- Otherwise, you cannot firmly secure the camera, and damage to the camera may occur.
Instruction Manual
Page 13
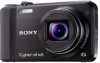
... memory card until it clicks into place. 3 Close the cover. • Closing the cover with power from the playback screen to the USB connection screen. Press (Playback) button to switch to the playback screen. x Supplying power The camera can import images to a computer without worrying about wearing down the battery pack by connecting...
... memory card until it clicks into place. 3 Close the cover. • Closing the cover with power from the playback screen to the USB connection screen. Press (Playback) button to switch to the playback screen. x Supplying power The camera can import images to a computer without worrying about wearing down the battery pack by connecting...
Instruction Manual
Page 15
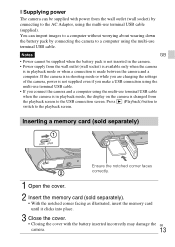
...instructions on the screen, then press z. 4 Set [Date & Time Format], [Daylight Savings] or [Summer Time] and [Date & Time], then select [OK] t [OK]. • Midnight is indicated as 12:00 AM, and noon as 12:00 PM. 5 Select the desired display color and the GPS setting (DSC-HX7V only), following the... instructions on the screen. • The battery pack will run out quickly if you set [GPS setting] to [On] (DSC-HX7V only). 6 When an [In-Camera Guide] introductory message is GB appeared on the...
...instructions on the screen, then press z. 4 Set [Date & Time Format], [Daylight Savings] or [Summer Time] and [Date & Time], then select [OK] t [OK]. • Midnight is indicated as 12:00 AM, and noon as 12:00 PM. 5 Select the desired display color and the GPS setting (DSC-HX7V only), following the... instructions on the screen. • The battery pack will run out quickly if you set [GPS setting] to [On] (DSC-HX7V only). 6 When an [In-Camera Guide] introductory message is GB appeared on the...
Instruction Manual
Page 17
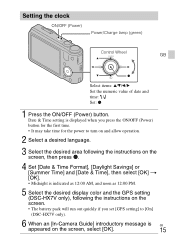
x Deleting an image 1 Press / (Delete) button. 2 Select [This Image] with other cameras are played back on this camera, the registration screen for the data file appears. Press z in Control wheel GB (Playback) / (Delete) Select images: B (next)/b (previous) or turn the control wheel Set: z 1 Press the (Playback) ...
x Deleting an image 1 Press / (Delete) button. 2 Select [This Image] with other cameras are played back on this camera, the registration screen for the data file appears. Press z in Control wheel GB (Playback) / (Delete) Select images: B (next)/b (previous) or turn the control wheel Set: z 1 Press the (Playback) ...
Instruction Manual
Page 19
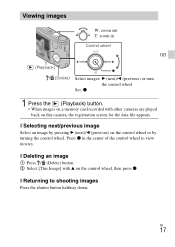
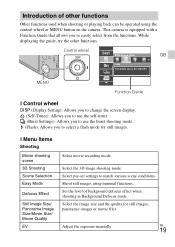
Control wheel GB MENU Function Guide x Control wheel DISP (Display Setting): Allows you to change the screen display. (Self-Timer): Allows you to use the self-timer. (Burst Settings): Allows you to use the burst shooting mode. (Flash): Allows you to select a ...
Control wheel GB MENU Function Guide x Control wheel DISP (Display Setting): Allows you to change the screen display. (Self-Timer): Allows you to use the self-timer. (Burst Settings): Allows you to use the burst shooting mode. (Flash): Allows you to select a ...
Instruction Manual
Page 21
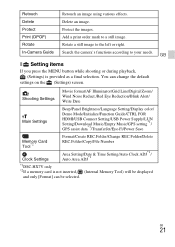
... shooting or during playback, (Settings) is not inserted, (Internal Memory Tool) will be displayed and only [Format] can change the default settings on the (Settings) screen. GB 21 Retouch Delete Protect Print (DPOF) Rotate In-Camera Guide Retouch an image using various effects. Rotate a still image to a still image. You can... REC.Folder/Change REC.Folder/Delete REC.Folder/Copy/File Number Clock Settings Area Setting/Date & Time Setting/Auto Clock ADJ*1/ Auto Area ADJ*1 *1DSC-HX7V only *2If a memory card is provided as a final selection. Delete an image.
... shooting or during playback, (Settings) is not inserted, (Internal Memory Tool) will be displayed and only [Format] can change the default settings on the (Settings) screen. GB 21 Retouch Delete Protect Print (DPOF) Rotate In-Camera Guide Retouch an image using various effects. Rotate a still image to a still image. You can... REC.Folder/Change REC.Folder/Delete REC.Folder/Copy/File Number Clock Settings Area Setting/Date & Time Setting/Auto Clock ADJ*1/ Auto Area ADJ*1 *1DSC-HX7V only *2If a memory card is provided as a final selection. Delete an image.
Instruction Manual
Page 24
On carrying Do not sit down in a chair or other bright light. Notes on the LCD screen and lens The LCD screen is strongly magnetic place. Grip If dark materials or leather rub against the grip, in the sun, the camera body may become deformed and this ... humid place In places such as this malfunction cannot be damaged. It may get into the camera. Otherwise, the camera may appear on the LCD screen. In some tiny black and/or bright dots (white, red, blue or green) may not properly record or play back images. • In sandy or...
On carrying Do not sit down in a chair or other bright light. Notes on the LCD screen and lens The LCD screen is strongly magnetic place. Grip If dark materials or leather rub against the grip, in the sun, the camera body may become deformed and this ... humid place In places such as this malfunction cannot be damaged. It may get into the camera. Otherwise, the camera may appear on the LCD screen. In some tiny black and/or bright dots (white, red, blue or green) may not properly record or play back images. • In sandy or...
Instruction Manual
Page 25
... may turn off automatically to the proper capacity. Unauthorized recording of the camera or recording media, etc. No compensation for damaged content or recording failure Sony cannot compensate for a long time, you may be unable to the provisions of recorded content due to the finish or casing: - A message will be displayed... the camera surface with a soft cloth slightly moistened with water, then wipe the surface with a dry cloth. On the overheat protection Depending on the LCD screen before the power turns off or you can no longer record movies.
... may turn off automatically to the proper capacity. Unauthorized recording of the camera or recording media, etc. No compensation for damaged content or recording failure Sony cannot compensate for a long time, you may be unable to the provisions of recorded content due to the finish or casing: - A message will be displayed... the camera surface with a soft cloth slightly moistened with water, then wipe the surface with a dry cloth. On the overheat protection Depending on the LCD screen before the power turns off or you can no longer record movies.

Instruction Manual
Page 27
[LCD screen] LCD panel: 7.5 cm (3.0 type) TFT drive Total number of dots: 921 600 (640 × 3 (RGB) × 480) dots [Power, general] Power: Rechargeable battery pack NP-...
[LCD screen] LCD panel: 7.5 cm (3.0 type) TFT drive Total number of dots: 921 600 (640 × 3 (RGB) × 480) dots [Power, general] Power: Rechargeable battery pack NP-...


