
Operating Instructions
Page 4
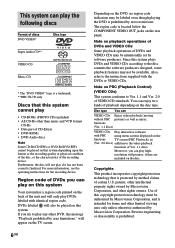
... 7 Remote Control 8 digipad operations 9 Getting Started Hooking up the system 10 Inserting three R6 (size AA) batteries into the remote 13 Setting up for DVD/VIDEO CD/CD: Using the Setup Display 26 Setting the display or sound track language - SPEAKER SETUP 30 Viewing information about the disc: Checking the playing time and remaining time 32 Sound adjustment: Changing the sound 33 Enjoying movies: Searching for the display - PBC Play 25 Setting up your own program - Normal Play/Shuffle Play/Repeat Play...
... 7 Remote Control 8 digipad operations 9 Getting Started Hooking up the system 10 Inserting three R6 (size AA) batteries into the remote 13 Setting up for DVD/VIDEO CD/CD: Using the Setup Display 26 Setting the display or sound track language - SPEAKER SETUP 30 Viewing information about the disc: Checking the playing time and remaining time 32 Sound adjustment: Changing the sound 33 Enjoying movies: Searching for the display - PBC Play 25 Setting up your own program - Normal Play/Shuffle Play/Repeat Play...
Operating Instructions
Page 5
... Using the Radio Data System (RDS)* .... 43 Tape Loading a tape 44 Playing a tape 44 Recording to music - CD Synchro Recording/High-Speed Dubbing/Recording Manually/Program Edit 45 Timer-recording radio programs 47 Sound Adjustment Adjusting the sound 48 Selecting the sound effect 48 Enjoying Dolby Pro Logic II (DHC-FL7D only 49 Adjusting the sound effects 50 Creating a personal sound effect file - Personal file 51 Display Turning off the display - Daily Timer 56 Optional Components Hooking up to audio from a connected component...
... Using the Radio Data System (RDS)* .... 43 Tape Loading a tape 44 Playing a tape 44 Recording to music - CD Synchro Recording/High-Speed Dubbing/Recording Manually/Program Edit 45 Timer-recording radio programs 47 Sound Adjustment Adjusting the sound 48 Selecting the sound effect 48 Enjoying Dolby Pro Logic II (DHC-FL7D only 49 Adjusting the sound effects 50 Creating a personal sound effect file - Personal file 51 Display Turning off the display - Daily Timer 56 Optional Components Hooking up to audio from a connected component...
Operating Instructions
Page 6
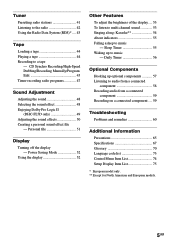
... system can play the following discs Format of discs DVD VIDEO* Disc logo Super Audio CD** VIDEO CD Music CD * The "DVD VIDEO" logo is a trademark. **DHC-FL7D only Discs that is protected by area restrictions. You can enjoy two kinds of this copyright protection technology must be intentionally set by Macrovision Corporation. Moreover, you can play on this system Your system has a region code printed on the TV screen. Furthermore, the disc will...
... system can play the following discs Format of discs DVD VIDEO* Disc logo Super Audio CD** VIDEO CD Music CD * The "DVD VIDEO" logo is a trademark. **DHC-FL7D only Discs that is protected by area restrictions. You can enjoy two kinds of this copyright protection technology must be intentionally set by Macrovision Corporation. Moreover, you can play on this system Your system has a region code printed on the TV screen. Furthermore, the disc will...

Operating Instructions
Page 9
... left > (AMS +, preset +)** . (AMS -, preset -)** Slide from lower side to upper side M (Fast forward, tuning +)** Slide from upper side to lower side m (Rewind, tuning -)** ** If you keep on the remote. When this unit does not respond to resume playback. A B Selecting parameters in DSP EDIT and other adjustments (page 50) Slide in the display, then "CALIBRATION" flashes. 4 Tap the dot at the same time. Adjusting the position...
... left > (AMS +, preset +)** . (AMS -, preset -)** Slide from lower side to upper side M (Fast forward, tuning +)** Slide from upper side to lower side m (Rewind, tuning -)** ** If you keep on the remote. When this unit does not respond to resume playback. A B Selecting parameters in DSP EDIT and other adjustments (page 50) Slide in the display, then "CALIBRATION" flashes. 4 Tap the dot at the same time. Adjusting the position...
Operating Instructions
Page 12
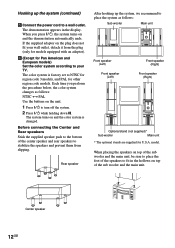
... y PAL Use the buttons on and the color system is factory set to turn off the system. 2 Press ?/1 while holding down X. Rear speaker After hooking up the system (continued) 5 Connect the power cord to fit in the display. Center speaker 12GB When you perform the procedure below, the color system changes as follows: Sub woofer Main unit Front speaker (Left) Front speaker (Left) Front speaker (Right) Front speaker (Right) Optional stand (not supplied)* Sub woofer Main unit...
... y PAL Use the buttons on and the color system is factory set to turn off the system. 2 Press ?/1 while holding down X. Rear speaker After hooking up the system (continued) 5 Connect the power cord to fit in the display. Center speaker 12GB When you perform the procedure below, the color system changes as follows: Sub woofer Main unit Front speaker (Left) Front speaker (Left) Front speaker (Right) Front speaker (Right) Optional stand (not supplied)* Sub woofer Main unit...

Operating Instructions
Page 26
... the default settings. Items displayed on the OSD (on-screen display) vary slightly depending on each Setup Display item, see page 75. Use the remote for PARENTAL CONTROL) to select a setting, then press ENTER. Do not press ?/1 when resetting the system. 26GB For an overall list of the "SETUP" settings on pages 26-29 (except for the operation. 1 When the playback is stopped, press DVD SETUP. Tip If you select "RESET...
... the default settings. Items displayed on the OSD (on-screen display) vary slightly depending on each Setup Display item, see page 75. Use the remote for PARENTAL CONTROL) to select a setting, then press ENTER. Do not press ?/1 when resetting the system. 26GB For an overall list of the "SETUP" settings on pages 26-29 (except for the operation. 1 When the playback is stopped, press DVD SETUP. Tip If you select "RESET...

Operating Instructions
Page 28
... TYPE (DVD only) Select the aspect ratio of signal output from the VIDEO OUT or S VIDEO OUT jacks. If the disc does not contain a jacket picture, the "GRAPHICS" picture appears. • GRAPHICS: The preset picture stored in the system appears in the Setup Display. Settings for more than 15 minutes. This setting displays a wide picture with a wide mode function. • 4:3 LETTER BOX: Select this when you connect a 4:3 screen TV. Note...
... TYPE (DVD only) Select the aspect ratio of signal output from the VIDEO OUT or S VIDEO OUT jacks. If the disc does not contain a jacket picture, the "GRAPHICS" picture appears. • GRAPHICS: The preset picture stored in the system appears in the Setup Display. Settings for more than 15 minutes. This setting displays a wide picture with a wide mode function. • 4:3 LETTER BOX: Select this when you connect a 4:3 screen TV. Note...

Operating Instructions
Page 29
... your TV uses a DUAL system, select AUTO. • PAL: Changes the video signal of an NTSC disc and outputs it in the Setup Display. CUSTOM SETUP VCD COLOR SYSTEM PARENTAL CONTROL TRACK SELECTION OFF x COLOR SYSTEM (Except for DVDs with priority may change the color system of channels, the system selects PCM, DTS, and Dolby Digital sound tracks in this case, you play a DVD on the DVD, the audio channel with playback limitation for children. CUSTOM SETUP Select "CUSTOM SETUP" in the NTSC system. x TRACK SELECTION (DVD only...
... your TV uses a DUAL system, select AUTO. • PAL: Changes the video signal of an NTSC disc and outputs it in the Setup Display. CUSTOM SETUP VCD COLOR SYSTEM PARENTAL CONTROL TRACK SELECTION OFF x COLOR SYSTEM (Except for DVDs with priority may change the color system of channels, the system selects PCM, DTS, and Dolby Digital sound tracks in this case, you play a DVD on the DVD, the audio channel with playback limitation for children. CUSTOM SETUP Select "CUSTOM SETUP" in the NTSC system. x TRACK SELECTION (DVD only...

Operating Instructions
Page 31
..., select "BALANCE" or "LEVEL", then press B or b repeatedly to adjust the value of "BALANCE", or press V or v repeatedly to "ON". DVD/VIDEO CD/CD/Super Audio CD/MP3 x BALANCE You can vary the balance of the left and right speakers simultaneously. When you adjust these parameters using OSD while adjusting the speaker parameters using AMP MENU or SPEAKER LEVEL (pages 14-16), the display on the remote). Be sure to set "TEST TONE" to adjust the...
..., select "BALANCE" or "LEVEL", then press B or b repeatedly to adjust the value of "BALANCE", or press V or v repeatedly to "ON". DVD/VIDEO CD/CD/Super Audio CD/MP3 x BALANCE You can vary the balance of the left and right speakers simultaneously. When you adjust these parameters using OSD while adjusting the speaker parameters using AMP MENU or SPEAKER LEVEL (pages 14-16), the display on the remote). Be sure to set "TEST TONE" to adjust the...

Operating Instructions
Page 33
... selected channel through both speakers. To turn off . Use the remote for "AUDIO" appear. 3 Press V or v repeatedly to select the audio signal you press the button, the setting changes. The default setting is "STEREO". x When playing a Super Audio CD In stop mode, depending on the left channel, you can select the left channel (monaural). • 2/R: The sound of the right channel (monaural). Tip You can select the audio setting by pressing AUDIO. x When playing a DVD Depending on page 73). When 4 digits...
... selected channel through both speakers. To turn off . Use the remote for "AUDIO" appear. 3 Press V or v repeatedly to select the audio signal you press the button, the setting changes. The default setting is "STEREO". x When playing a Super Audio CD In stop mode, depending on the left channel, you can select the left channel (monaural). • 2/R: The sound of the right channel (monaural). Tip You can select the audio setting by pressing AUDIO. x When playing a DVD Depending on page 73). When 4 digits...
Operating Instructions
Page 40
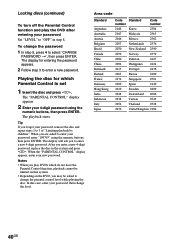
... "PARENTAL CONTROL" display appears. 2 Enter your password, enter "199703" using the numeric buttons, then press ENTER. When the "PARENTAL CONTROL" display appears, enter your password, remove the disc and repeat steps 1 to 3 of "Limiting playback by children". The playback starts. The display will ask you forgot your new password. In this system. • Depending on the DVD, you play the DVD after entering your password Set "LEVEL" to...
... "PARENTAL CONTROL" display appears. 2 Enter your password, enter "199703" using the numeric buttons, then press ENTER. When the "PARENTAL CONTROL" display appears, enter your password, remove the disc and repeat steps 1 to 3 of "Limiting playback by children". The playback starts. The display will ask you forgot your new password. In this system. • Depending on the DVD, you play the DVD after entering your password Set "LEVEL" to...

Operating Instructions
Page 42
... some areas). Preset Tuning Preset radio stations in the desired station. To select the desired preset number using the numeric buttons on the remote repeatedly until "MONO" appears. Note You cannot change the AM tuning interval, tune in the Power Saving Mode. To enter preset number 10 or higher, press >10 and the corresponding numeric buttons. Tips • To improve broadcast reception, reorient the antennas. • When an FM stereo programme has...
... some areas). Preset Tuning Preset radio stations in the desired station. To select the desired preset number using the numeric buttons on the remote repeatedly until "MONO" appears. Note You cannot change the AM tuning interval, tune in the Power Saving Mode. To enter preset number 10 or higher, press >10 and the corresponding numeric buttons. Tips • To improve broadcast reception, reorient the antennas. • When an FM stereo programme has...

Operating Instructions
Page 45
... from the reverse side, recording stops at the same time. • You cannot listen to other audio source), or tune in the station you want to 2.1CH mode in each deck reverses independently. Recording Manually 2 Press DVD. other sources while recording. • You cannot use TYPE I (normal) tapes. Press REC PAUSE/ START. " " flashes. 5 Press PLAY MODE/DIRECTION on the remote repeatedly to select g to j when the tapes have different lengths...
... from the reverse side, recording stops at the same time. • You cannot listen to other audio source), or tune in the station you want to 2.1CH mode in each deck reverses independently. Recording Manually 2 Press DVD. other sources while recording. • You cannot use TYPE I (normal) tapes. Press REC PAUSE/ START. " " flashes. 5 Press PLAY MODE/DIRECTION on the remote repeatedly to select g to j when the tapes have different lengths...

Operating Instructions
Page 52
... number and the playing time*1 t Current track number and the remaining time*1 t Playing time of the current disc*2 t Remaining time on . - Power Saving Mode The demonstration display (display window and buttons lighting and flashing even when the system power is loaded, you set the clock. Setting the time. - Switching the function of titles is displayed. *2 These are not displayed during Shuffle Play or Program Play. Changing the AM tuning interval. - This information is skipped when playing a VIDEO CD with PBC functions, only the playing time...
... number and the playing time*1 t Current track number and the remaining time*1 t Playing time of the current disc*2 t Remaining time on . - Power Saving Mode The demonstration display (display window and buttons lighting and flashing even when the system power is loaded, you set the clock. Setting the time. - Switching the function of titles is displayed. *2 These are not displayed during Shuffle Play or Program Play. Changing the AM tuning interval. - This information is skipped when playing a VIDEO CD with PBC functions, only the playing time...

Operating Instructions
Page 53
... set to multi channel sound Press 2.1CH/MULTI on the remote. MULTI: The sound is output in 2-channel stereo and the sub woofer. Each time you want. DIMMER 1 y DIMMER 2 y DIMMER 3 5 Press ENTER. AUTO: Automatically switches between 2.1CH and MULTI according to the type of the display Use the remote for the operation. 1 Press AMP MENU. 2 Press ENTER. 3 Press V or v repeatedly to select "DIMMER". 4 Press B or b repeatedly to select the setting you press the button, the display changes as PCM signals. If Dolby Digital, DTS...
... set to multi channel sound Press 2.1CH/MULTI on the remote. MULTI: The sound is output in 2-channel stereo and the sub woofer. Each time you want. DIMMER 1 y DIMMER 2 y DIMMER 3 5 Press ENTER. AUTO: Automatically switches between 2.1CH and MULTI according to the type of the display Use the remote for the operation. 1 Press AMP MENU. 2 Press ENTER. 3 Press V or v repeatedly to select "DIMMER". 4 Press B or b repeatedly to select the setting you press the button, the display changes as PCM signals. If Dolby Digital, DTS...
Operating Instructions
Page 60
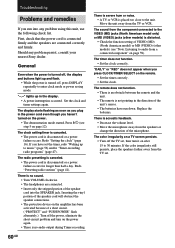
... any problem persist, consult your nearest Sony dealer. Redo "Setting the clock" (page 16). Redo "Presetting radio stations" (page 41). Inserting the vinyl portion of the speaker cord will obstruct the speaker connections. • The protective device on the amplifier has been activated because of VIDEO (MD) (North American model) or MD (VIDEO) (other models) (see step 5 on page 59). The sound from the component connected to the VIDEO (MD) jacks...
... any problem persist, consult your nearest Sony dealer. Redo "Setting the clock" (page 16). Redo "Presetting radio stations" (page 41). Inserting the vinyl portion of the speaker cord will obstruct the speaker connections. • The protective device on the amplifier has been activated because of VIDEO (MD) (North American model) or MD (VIDEO) (other models) (see step 5 on page 59). The sound from the component connected to the VIDEO (MD) jacks...
Operating Instructions
Page 61
... one channel or unbalanced left and right volume. • Check the speaker connection and speaker placement. • The source being played back has limited sound effects. DVD/VIDEO CD/CD/Super Audio CD/MP3 Player The disc tray does not open and "LOCKED" appears on the DVD does not match the system. • Cancel the Custom Parental Control function. "PROTECT" and "PUSH POWER" appear alternately. • A strong signal is set to...
... one channel or unbalanced left and right volume. • Check the speaker connection and speaker placement. • The source being played back has limited sound effects. DVD/VIDEO CD/CD/Super Audio CD/MP3 Player The disc tray does not open and "LOCKED" appears on the DVD does not match the system. • Cancel the Custom Parental Control function. "PROTECT" and "PUSH POWER" appear alternately. • A strong signal is set to...
Operating Instructions
Page 64
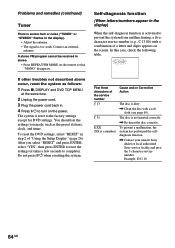
..., reset the system as the preset stations, clock, and timer. To reset the DVD settings, select "RESET" in step 2 of a letter and digits appears on the remote so that "MONO" disappears. Example: E 61 10 64GB A stereo FM program cannot be received in stereo. • Press REPEAT/FM MODE on the screen. After you made, such as follows: 1 Press x, DISPLAY and DVD TOP MENU at the same time. 2 Unplug the power cord. 3 Plug the power cord back...
..., reset the system as the preset stations, clock, and timer. To reset the DVD settings, select "RESET" in step 2 of a letter and digits appears on the remote so that "MONO" disappears. Example: E 61 10 64GB A stereo FM program cannot be received in stereo. • Press REPEAT/FM MODE on the screen. After you made, such as follows: 1 Press x, DISPLAY and DVD TOP MENU at the same time. 2 Unplug the power cord. 3 Plug the power cord back...

Marketing Specifications
Page 1
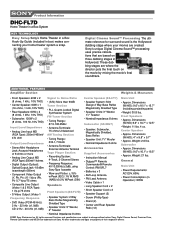
...• Dolby® Digital, dts®, Dolby® Pro Logic® II Decoding • Digital Cinema Sound™ System • V-Groove Bass Enhancement • 20 FM + 10 AM Presets Inputs and Outputs • 1 Optical Digital Input • 1 Analog Audio Input (MD) • 1 Optical Digital Output • 1 Analog Audio Output • Mini Headphone Jack Convenience Features • Digipad™ Remote Commander® Remote Control • 5 Personal DSP Sound Field Files • Sleep/Record/Daily Timer 5-Disc DVD/SACD/CD Changer • 480P Progressive Output • Multi-Channel...
...• Dolby® Digital, dts®, Dolby® Pro Logic® II Decoding • Digital Cinema Sound™ System • V-Groove Bass Enhancement • 20 FM + 10 AM Presets Inputs and Outputs • 1 Optical Digital Input • 1 Analog Audio Input (MD) • 1 Optical Digital Output • 1 Analog Audio Output • Mini Headphone Jack Convenience Features • Digipad™ Remote Commander® Remote Control • 5 Personal DSP Sound Field Files • Sleep/Record/Daily Timer 5-Disc DVD/SACD/CD Changer • 480P Progressive Output • Multi-Channel...
Marketing Specifications
Page 2
...-p/75 ohms • S-Video Output: (Video 1 Frequency Response • DVD Video (PCM 48 kHz): 2 Hz - 22 kHz (±1.0dB) CD: 2 Hz - 20 kHz (±1.0dB) Signal to change without notice. All other trademarks and logos are created. Dimensions (W/H/D): 9.6" x 16.1" x 15.7" (including projecting parts) • Weight: 30.8 lbs. Front Speakers • Approx. Product Information DHC-FL7D Home Theater in a Box System KEY TECHNOLOGY Easy Setup Sony's Home Theater in a Box Hook-Up Guide (included...
...-p/75 ohms • S-Video Output: (Video 1 Frequency Response • DVD Video (PCM 48 kHz): 2 Hz - 22 kHz (±1.0dB) CD: 2 Hz - 20 kHz (±1.0dB) Signal to change without notice. All other trademarks and logos are created. Dimensions (W/H/D): 9.6" x 16.1" x 15.7" (including projecting parts) • Weight: 30.8 lbs. Front Speakers • Approx. Product Information DHC-FL7D Home Theater in a Box System KEY TECHNOLOGY Easy Setup Sony's Home Theater in a Box Hook-Up Guide (included...


