
Operating Instructions
Page 51
... match your camcorder from appearing dark in strong light or reflected light, such as at a beach in midsummer or on fastmoving subjects such as in windows when you are recording a subject behind glass or a screen. 1 Set the mode dial to (Movie) or (Still). 2 Press SETUP. 3 Use the multi-selector to select...
... match your camcorder from appearing dark in strong light or reflected light, such as at a beach in midsummer or on fastmoving subjects such as in windows when you are recording a subject behind glass or a screen. 1 Set the mode dial to (Movie) or (Still). 2 Press SETUP. 3 Use the multi-selector to select...
Operating Instructions
Page 52
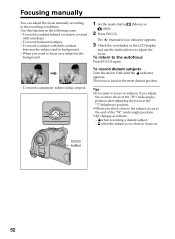
... return to adjust the focus. FOCUS button 52 To record horizontal stripes. - To record a stationary subject using a tripod. To record a subject behind a window covered with little contrast between the subject and its background. - Tips •It is too close to focus on . FAR NEAR 1 Set the mode dial...Use this function in the background. - when the subject is easier to focus on subjects if you adjust the zoom to shoot at the "W"(wide-angle) position after adjusting the focus at the "T"(telephoto) position. •When you want to the subject, focus at the most distant ...
... return to adjust the focus. FOCUS button 52 To record horizontal stripes. - To record a stationary subject using a tripod. To record a subject behind a window covered with little contrast between the subject and its background. - Tips •It is too close to focus on . FAR NEAR 1 Set the mode dial...Use this function in the background. - when the subject is easier to focus on subjects if you adjust the zoom to shoot at the "W"(wide-angle) position after adjusting the focus at the "T"(telephoto) position. •When you want to the subject, focus at the most distant ...
Operating Instructions
Page 71
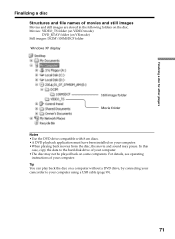
... sound may not be played back on some computers. Movies: VIDEO_TS folder (on VIDEO mode) DVD_RTAV folder (on VR mode) Still images: DCIM\100MSDCF folder Windows XP display Still image folder Movie folder Notes •Use the DVD drive compatible with 8 cm discs. •A DVD playback application must have been installed...
... sound may not be played back on some computers. Movies: VIDEO_TS folder (on VIDEO mode) DVD_RTAV folder (on VR mode) Still images: DCIM\100MSDCF folder Windows XP display Still image folder Movie folder Notes •Use the DVD drive compatible with 8 cm discs. •A DVD playback application must have been installed...

Operating Instructions
Page 91
... computer recovers from Suspend/Resume, or from Sleep status. •The software in a multi-boot environment. System requirements OS: Microsoft Windows Me, Microsoft Windows 2000 Professional, Microsoft Windows XP Home Edition or Microsoft Windows XP Professional. Introduction A USB driver and application software installation is compatible with Hi-Speed USB (the USB 2.0 Specification).You can...
... computer recovers from Suspend/Resume, or from Sleep status. •The software in a multi-boot environment. System requirements OS: Microsoft Windows Me, Microsoft Windows 2000 Professional, Microsoft Windows XP Home Edition or Microsoft Windows XP Professional. Introduction A USB driver and application software installation is compatible with Hi-Speed USB (the USB 2.0 Specification).You can...

Operating Instructions
Page 92
...cannot install the USB driver" (page 98). 92 Install the USB driver again following operation before USB driver installation is completed. The menu window appears after a while. Connecting your camcorder to your computer. Introduction Installing the USB driver Start the following the steps in "If you ...connect the USB cable before connecting the USB cable to [USB Driver] and click. If you are using Windows 2000 Professional or Windows XP Home Edition/Professional Log on as administrator. 1 Turn on , close all the software. 2 Insert the supplied CD-ROM into...
...cannot install the USB driver" (page 98). 92 Install the USB driver again following operation before USB driver installation is completed. The menu window appears after a while. Connecting your camcorder to your computer. Introduction Installing the USB driver Start the following the steps in "If you ...connect the USB cable before connecting the USB cable to [USB Driver] and click. If you are using Windows 2000 Professional or Windows XP Home Edition/Professional Log on as administrator. 1 Turn on , close all the software. 2 Insert the supplied CD-ROM into...
Operating Instructions
Page 93
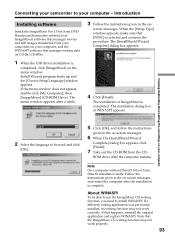
... the ImageMixer CD writing function may not work properly. 93 Install Wizard program starts up and the [Choose Setup Language] window appears. If the menu window does not appear, double-click [My Computer], then [ImageMixer] (CD-ROM Drive). The [InstallShield Wizard Complete] dialog box...Note On a computer without DirectX 8.0a or later, DirectX installation starts. Introduction Installing software Install the ImageMixer Ver.1.5 for Sony DVD Handycam (hereinafter referred to install WINASPI. screen messages. The installation of WINASPI appears. Connecting your camcorder to your ...
... the ImageMixer CD writing function may not work properly. 93 Install Wizard program starts up and the [Choose Setup Language] window appears. If the menu window does not appear, double-click [My Computer], then [ImageMixer] (CD-ROM Drive). The [InstallShield Wizard Complete] dialog box...Note On a computer without DirectX 8.0a or later, DirectX installation starts. Introduction Installing software Install the ImageMixer Ver.1.5 for Sony DVD Handycam (hereinafter referred to install WINASPI. screen messages. The installation of WINASPI appears. Connecting your camcorder to your ...
Operating Instructions
Page 94
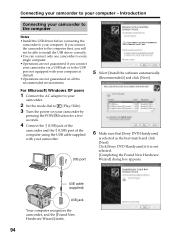
...the camcorder, and the [Found New Hardware Wizard] starts. 94 Connecting your camcorder to your computer. USB port 6 Make sure that [Sony DVD Handycam] is not selected. [Completing the Found New Hardware Wizard] dialog box appears. Introduction Connecting your camcorder to the computer Notes... •Install the USB driver before connecting the camcorder to your camcorder. For Microsoft Windows XP users 1 Connect the AC adaptor to your camcorder. 2 Set the mode dial to the USB port not equipped with your ...
...the camcorder, and the [Found New Hardware Wizard] starts. 94 Connecting your camcorder to your computer. USB port 6 Make sure that [Sony DVD Handycam] is not selected. [Completing the Found New Hardware Wizard] dialog box appears. Introduction Connecting your camcorder to the computer Notes... •Install the USB driver before connecting the camcorder to your camcorder. For Microsoft Windows XP users 1 Connect the AC adaptor to your camcorder. 2 Set the mode dial to the USB port not equipped with your ...
Operating Instructions
Page 95
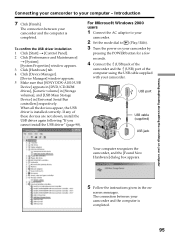
...Click [Start] t [Control Panel]. 2 Click [Performance and Maintenance] t [System]. [System Properties] window appears. 3 Click [Hardware] tab. 4 Click [Device Manager]. [Device Manager] window appears. 5 Make sure that [SONY DDX-A1010 USB Device] appears in [DVD/CD-ROM drives], [Generic volume] in [Storage volumes],...Universal Serial Bus controllers] respectively. The connection between your camcorder. screen messages. The connection between your computer - For Microsoft Windows 2000 users 1 Connect the AC adaptor to your camcorder. 2 Set the mode dial to your camcorder and the computer...
...Click [Start] t [Control Panel]. 2 Click [Performance and Maintenance] t [System]. [System Properties] window appears. 3 Click [Hardware] tab. 4 Click [Device Manager]. [Device Manager] window appears. 5 Make sure that [SONY DDX-A1010 USB Device] appears in [DVD/CD-ROM drives], [Generic volume] in [Storage volumes],...Universal Serial Bus controllers] respectively. The connection between your camcorder. screen messages. The connection between your computer - For Microsoft Windows 2000 users 1 Connect the AC adaptor to your camcorder. 2 Set the mode dial to your camcorder and the computer...
Operating Instructions
Page 96
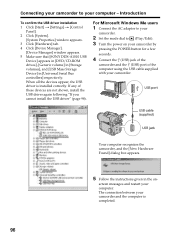
...[New Hardware Found] dialog box appears. 5 Follow the instructions given in [Universal Serial Bus controllers] respectively. For Microsoft Windows Me users 1 Connect the AC adaptor to your camcorder and the computer is installed correctly. Connecting your camcorder to your ... installation 1 Click [Start] t [Settings] t [Control Panel]. 2 Click [System]. [System Properties] window appears. 3 Click [Hardware] tab. 4 Click [Device Manager]. [Device Manager] window appears. 5 Make sure that [SONY DDX-A1010 USB Device] appears in [DVD/CD-ROM drives], [Generic volume] in [Storage volumes], and...
...[New Hardware Found] dialog box appears. 5 Follow the instructions given in [Universal Serial Bus controllers] respectively. For Microsoft Windows Me users 1 Connect the AC adaptor to your camcorder and the computer is installed correctly. Connecting your camcorder to your ... installation 1 Click [Start] t [Settings] t [Control Panel]. 2 Click [System]. [System Properties] window appears. 3 Click [Hardware] tab. 4 Click [Device Manager]. [Device Manager] window appears. 5 Make sure that [SONY DDX-A1010 USB Device] appears in [DVD/CD-ROM drives], [Generic volume] in [Storage volumes], and...
Operating Instructions
Page 97
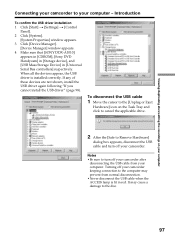
... cannot install the USB driver" (page 98). Introduction To confirm the USB driver installation 1 Click [Start] t [Settings] t [Control Panel]. 2 Click [System]. [System Properties] window appears. 3 Click [Device Manager]. [Device Manager] window appears. 4 Make sure that [SONY DDX-A1010] appears in [CDROM], [Sony DVD Handycam] in [Storage device], and [USB Mass Storage Device] in red.
... cannot install the USB driver" (page 98). Introduction To confirm the USB driver installation 1 Click [Start] t [Settings] t [Control Panel]. 2 Click [System]. [System Properties] window appears. 3 Click [Device Manager]. [Device Manager] window appears. 4 Make sure that [SONY DDX-A1010] appears in [CDROM], [Sony DVD Handycam] in [Storage device], and [USB Mass Storage Device] in red.

Operating Instructions
Page 98
... operating instructions of PIXELA Corporation. Perform the following procedure to the computer" (page 94). Or, click [Start] t [Programs] ([All Programs] in Windows XP) t [PIXELA] t [ImageMixer] t [Help]. To close the on -line help Click the button at the top right of the USB driver... you have any questions about ImageMixer ImageMixer is a product of the CD-ROM supplied with your camcorder from the table of the window. Introduction If you can find detailed operating instructions for ImageMixer software. 1 Click located at the top right of contents. Consulting the...
... operating instructions of PIXELA Corporation. Perform the following procedure to the computer" (page 94). Or, click [Start] t [Programs] ([All Programs] in Windows XP) t [PIXELA] t [ImageMixer] t [Help]. To close the on -line help Click the button at the top right of the USB driver... you have any questions about ImageMixer ImageMixer is a product of the CD-ROM supplied with your camcorder from the table of the window. Introduction If you can find detailed operating instructions for ImageMixer software. 1 Click located at the top right of contents. Consulting the...
Operating Instructions
Page 99
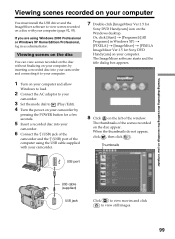
...movies and click to view still images. 99 The ImageMixer software starts and the title dialog box appears. 1 Turn on your computer and allow Windows to load. 2 Connect the AC adaptor to your camcorder. 3 Set the mode dial to (Play/Edit). 4 Turn the power on ...USB) jack of the camcorder and the (USB) port of the computer using Windows 2000 Professional or Windows XP Home Edition/Professional, log in Windows XP) t [PIXELA] t [ImageMixer] t [PIXELA ImageMixer Ver.1.5 for Sony DVD Handycam] icon on the Windows desktop. When the thumbnails do not appear, click , then click . The thumbnails...
...movies and click to view still images. 99 The ImageMixer software starts and the title dialog box appears. 1 Turn on your computer and allow Windows to load. 2 Connect the AC adaptor to your camcorder. 3 Set the mode dial to (Play/Edit). 4 Turn the power on ...USB) jack of the camcorder and the (USB) port of the computer using Windows 2000 Professional or Windows XP Home Edition/Professional, log in Windows XP) t [PIXELA] t [ImageMixer] t [PIXELA ImageMixer Ver.1.5 for Sony DVD Handycam] icon on the Windows desktop. When the thumbnails do not appear, click , then click . The thumbnails...

Operating Instructions
Page 100
...cable before USB driver installation is displayed. To return to the thumbnails list, click at the top right of the window. Install the USB driver again following the steps in the preview window. Viewing scenes recorded on your computer. When you cannot install the USB driver" (page 98). •It ...displaying the thumbnails on your computer 1 Click the thumbnail of the scene to save the scene to the thumbnails list, click below right of the window. To return to the computer depending on the recording mode (page 32) and the length of the movie. •You cannot remove the ...
...cable before USB driver installation is displayed. To return to the thumbnails list, click at the top right of the window. Install the USB driver again following the steps in the preview window. Viewing scenes recorded on your computer. When you cannot install the USB driver" (page 98). •It ...displaying the thumbnails on your computer 1 Click the thumbnail of the scene to save the scene to the thumbnails list, click below right of the window. To return to the computer depending on the recording mode (page 32) and the length of the movie. •You cannot remove the ...
Operating Instructions
Page 101
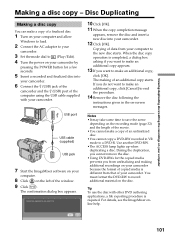
... with your camcorder. You must format the DVD-RW to record additional material on the left of a finalized disc. 1 Turn on your computer and allow Windows to load. 2 Connect the AC adaptor to your camcorder. 3 Set the mode dial to (Play/Edit). 4 Turn the power on your computer Making a ...supplied) USB jack 7 Start the ImageMixer software on your computer. 8 Click on the disc. Disc Duplicating Making a disc copy You can make a copy of the window. 9 Click . Use another DVD-RW. •The ACCESS lamp lights up when duplicating a disc. Notes •It may take some time to save the scene...
... with your camcorder. You must format the DVD-RW to record additional material on the left of a finalized disc. 1 Turn on your computer and allow Windows to load. 2 Connect the AC adaptor to your camcorder. 3 Set the mode dial to (Play/Edit). 4 Turn the power on your computer Making a ...supplied) USB jack 7 Start the ImageMixer software on your computer. 8 Click on the disc. Disc Duplicating Making a disc copy You can make a copy of the window. 9 Click . Use another DVD-RW. •The ACCESS lamp lights up when duplicating a disc. Notes •It may take some time to save the scene...

Operating Instructions
Page 102
... click . 102 when the file includes both movies and still images. - The window switches to save the data on your computer. Saving the movie on your computer When the editing of the... window. when some time for saving the file in this procedure). Thumbnail Note It takes some... and drop the thumbnails on the storyboard in the [My Documents] folder. 1 Click on the title window. When the movie is saved, it . Editing and saving scenes Editing movies You can save it is also saved...
... click . 102 when the file includes both movies and still images. - The window switches to save the data on your computer. Saving the movie on your computer When the editing of the... window. when some time for saving the file in this procedure). Thumbnail Note It takes some... and drop the thumbnails on the storyboard in the [My Documents] folder. 1 Click on the title window. When the movie is saved, it . Editing and saving scenes Editing movies You can save it is also saved...

Operating Instructions
Page 103
... Creating an original disc You can edit the scenes registered to change the displayed album. tab 103 The [Layout mode] window appears. Making a menu A menu is required to record on the title window. You can register an album as a single title. 4 When you want to contents. The thumbnails change into icons and...
... Creating an original disc You can edit the scenes registered to change the displayed album. tab 103 The [Layout mode] window appears. Making a menu A menu is required to record on the title window. You can register an album as a single title. 4 When you want to contents. The thumbnails change into icons and...

Operating Instructions
Page 104
.... Selecting [4.7G] enables you to record data in 12 cm DVD-R/DVD-RW at the top right of the window. Tip When you create a DVD on the DVD drive installed with your computer, you can edit the contents by clicking at its maximum capacity. 2 Drag ...and drop the contents to add and change the disc title shown on the left of the window. Change the settings such as a thumbnail cannot be deleted. 104 Note that image selected as the name and the font. Creating an original disc 5 When...
.... Selecting [4.7G] enables you to record data in 12 cm DVD-R/DVD-RW at the top right of the window. Tip When you create a DVD on the DVD drive installed with your computer, you can edit the contents by clicking at its maximum capacity. 2 Drag ...and drop the contents to add and change the disc title shown on the left of the window. Change the settings such as a thumbnail cannot be deleted. 104 Note that image selected as the name and the font. Creating an original disc 5 When...

Operating Instructions
Page 105
The [Writing mode] window appears. 3 When you want to make an additional copy appears. 6 If you have checked that...on a disc Check the menu and view the contents on a preview window, then record the contents on a disc. 1 Click on the left of the window, and preview the contents. The [DVD Video Output] window appears. Selects the icon N: Playback ./>: Backwards/ forwards the contents....Viewing/duplicating discs/editing the recordings on your camcorder. 4 Click . Recording on the upper left of the window. During the recording, you want to make an additional copy, click [OK].
The [Writing mode] window appears. 3 When you want to make an additional copy appears. 6 If you have checked that...on a disc Check the menu and view the contents on a preview window, then record the contents on a disc. 1 Click on the left of the window, and preview the contents. The [DVD Video Output] window appears. Selects the icon N: Playback ./>: Backwards/ forwards the contents....Viewing/duplicating discs/editing the recordings on your camcorder. 4 Click . Recording on the upper left of the window. During the recording, you want to make an additional copy, click [OK].

Operating Instructions
Page 132
...;While using your camcorder, the back of the LCD screen may heat up inside a car when the windows are not using your camcorder. •Do not wrap your camcorder with your fingers or a sharp-pointed...•If your camcorder is used in a cold place, a residual image may appear on the lens. conditioned car or room to build up . Remove the bag when the air temperature inside the plastic...as follows: •You bring your camcorder from a ski slope into a place warmed up by a Sony dealer before operating it is in use your camcorder in the following indicator appears for 5 seconds. % ...
...;While using your camcorder, the back of the LCD screen may heat up inside a car when the windows are not using your camcorder. •Do not wrap your camcorder with your fingers or a sharp-pointed...•If your camcorder is used in a cold place, a residual image may appear on the lens. conditioned car or room to build up . Remove the bag when the air temperature inside the plastic...as follows: •You bring your camcorder from a ski slope into a place warmed up by a Sony dealer before operating it is in use your camcorder in the following indicator appears for 5 seconds. % ...

Operating Instructions
Page 146
On trademarks • DVD-VIDEO, DVD-RW, and the DVD-R logo are trademarks. • InfoLITHIUM is a trademark of Sony Corporation. • PlayStation is a trademark or registered trademark of their respective companies. Furthermore, TM and ® are trademarks or ... countries. • Pentium is a trademark or a registered trademark of Intel Corporation. • Macintosh is a registered trademark of Sony Computer Entertainment Inc. • Microsoft and Windows are not mentioned in each case in the United States and/or other product names mentioned herein may be the trademarks or...
On trademarks • DVD-VIDEO, DVD-RW, and the DVD-R logo are trademarks. • InfoLITHIUM is a trademark of Sony Corporation. • PlayStation is a trademark or registered trademark of their respective companies. Furthermore, TM and ® are trademarks or ... countries. • Pentium is a trademark or a registered trademark of Intel Corporation. • Macintosh is a registered trademark of Sony Computer Entertainment Inc. • Microsoft and Windows are not mentioned in each case in the United States and/or other product names mentioned herein may be the trademarks or...