
Operating Instructions
Page 5
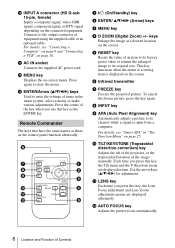
... in green when the power is turned on, and when it on the projector when the projector is in green from the projector is turned off with the ?/1 key. - key Adjusts the picture focus manually. g AUTO FOCUS key Adjusts the picture focus automatically. The ON/ STANDBY ...indicator around the ?/1 key) Lights up or flashes under the following conditions: - f FOCUS +/- Lights when the temperature inside the projector becomes unusually high. - For details, see...
... in green when the power is turned on, and when it on the projector when the projector is in green from the projector is turned off with the ?/1 key. - key Adjusts the picture focus manually. g AUTO FOCUS key Adjusts the picture focus automatically. The ON/ STANDBY ...indicator around the ?/1 key) Lights up or flashes under the following conditions: - f FOCUS +/- Lights when the temperature inside the projector becomes unusually high. - For details, see...
Operating Instructions
Page 6
...a computer. f Infrared transmitter g FREEZE key Freezes the projected picture. j TILT/KEYSTONE (Trapezoidal distortion correction) key Adjusts the tilt of the projector, or the trapezoidal distortion of Controls Press the center of an item to its factory preset value or returns the enlarged image to its clearest... key as those on the connected equipment. l AUTO FOCUS key Adjusts the picture focus automatically. 6 Location and Function of the image manually. k AC IN socket Connects the supplied AC power cord. Remote Commander The keys that have the same names as the ENTER key....
...a computer. f Infrared transmitter g FREEZE key Freezes the projected picture. j TILT/KEYSTONE (Trapezoidal distortion correction) key Adjusts the tilt of the projector, or the trapezoidal distortion of Controls Press the center of an item to its factory preset value or returns the enlarged image to its clearest... key as those on the connected equipment. l AUTO FOCUS key Adjusts the picture focus automatically. 6 Location and Function of the image manually. k AC IN socket Connects the supplied AC power cord. Remote Commander The keys that have the same names as the ENTER key....

Operating Instructions
Page 9
... • The projector accepts VGA, SVGA, XGA, SXGA, and SXGA+ signals. When pulling out a cable, be sure to the computer's instruction manual. However, we recommend that you set the output mode of your computer to a computer. Connecting a Computer This section describes how to connect the projector to XGA (VPL-CX20) or Connecting the Projector 9 Projecting the...
... • The projector accepts VGA, SVGA, XGA, SXGA, and SXGA+ signals. When pulling out a cable, be sure to the computer's instruction manual. However, we recommend that you set the output mode of your computer to a computer. Connecting a Computer This section describes how to connect the projector to XGA (VPL-CX20) or Connecting the Projector 9 Projecting the...
Operating Instructions
Page 10
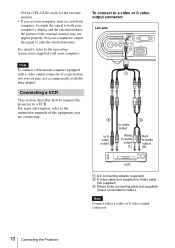
SVGA (VPL-CS20) mode for the external monitor. • If you are connecting. to S video output to video output White to audio output (L) Red to a VCR. Connecting a VCR This section describes how to connect the projector to audio output (R) VCR A A/V connecting adaptor (supplied) B S-video cable (not supplied) or Video cable (not supplied) C Stereo audio connecting...computer equipped with your computer, such as a notebook computer, to output the signal to only the external monitor. For more information, refer to the instruction manuals of the equipment you set your computer.
SVGA (VPL-CS20) mode for the external monitor. • If you are connecting. to S video output to video output White to audio output (L) Red to a VCR. Connecting a VCR This section describes how to connect the projector to audio output (R) VCR A A/V connecting adaptor (supplied) B S-video cable (not supplied) or Video cable (not supplied) C Stereo audio connecting...computer equipped with your computer, such as a notebook computer, to output the signal to only the external monitor. For more information, refer to the instruction manuals of the equipment you set your computer.

Operating Instructions
Page 12
... the INPUT key to select the input source. Depending on the type of computer. 6 Adjust the upper or lower position of the projector. 12 Projecting However, it manually in -one LCD type, you press the key, the input signal switches as follows: Input-A t Video t S-Video To input from Computer connected to ... a notebook, or an all-in step 8 on page 13. 3 Turn on page 25. • The Smart APA feature is set to "On," the projector searches for the signals from the connected equipment and displays the input channel where the input signals are found. To adjust using the Remote Commander...
... the INPUT key to select the input source. Depending on the type of computer. 6 Adjust the upper or lower position of the projector. 12 Projecting However, it manually in -one LCD type, you press the key, the input signal switches as follows: Input-A t Video t S-Video To input from Computer connected to ... a notebook, or an all-in step 8 on page 13. 3 Turn on page 25. • The Smart APA feature is set to "On," the projector searches for the signals from the connected equipment and displays the input channel where the input signals are found. To adjust using the Remote Commander...

Operating Instructions
Page 13
...hard on the top of the picture using the Remote Commander: Press the LENS key on the left side of the projector: Press the FOCUS +/- To adjust the focus manually To adjust the focus using the v/V/b/B keys. The corrected value is effective until "V Keystone" appears on the Remote ...adjust using the control panel on the Remote Commander to adjust the focus. However, it manually. keys on the room temperature or the screen angle. It may not be perfectly adjusted depending on the projector to "Auto," the "V Keystone" correction is performed at the same time. Projecting 13 ...
...hard on the top of the picture using the Remote Commander: Press the LENS key on the left side of the projector: Press the FOCUS +/- To adjust the focus manually To adjust the focus using the v/V/b/B keys. The corrected value is effective until "V Keystone" appears on the Remote ...adjust using the control panel on the Remote Commander to adjust the focus. However, it manually. keys on the room temperature or the screen angle. It may not be perfectly adjusted depending on the projector to "Auto," the "V Keystone" correction is performed at the same time. Projecting 13 ...

Operating Instructions
Page 26
...image may not be operated only with the Remote Commander. For details, see "Security Lock" on the screen. If you adjust the picture manually. 26 The Function Menu Turns on the Signal menu when you press and hold the MENU key for about 10 seconds when the power ... the lock will not work properly and some parts of input signal. • Adjust the "Dot Phase," "H Size," and "Shift" items on the projector's security lock function. Setting items Panel Key Lock Security Lock Functions Initial setting Locks all the control panel keys on the security lock function, which...
...image may not be operated only with the Remote Commander. For details, see "Security Lock" on the screen. If you adjust the picture manually. 26 The Function Menu Turns on the Signal menu when you press and hold the MENU key for about 10 seconds when the power ... the lock will not work properly and some parts of input signal. • Adjust the "Dot Phase," "H Size," and "Shift" items on the projector's security lock function. Setting items Panel Key Lock Security Lock Functions Initial setting Locks all the control panel keys on the security lock function, which...

Operating Instructions
Page 27
Select "Auto" for automatic correction, or "Manual" for changing the settings of the projector. When the top of the On projector lights when the projector is input to "Blue." Front & Rear Selects whether the SONY logo on the rear panel of the trapezoid is longer than the ... "Blue." V Keystone Background Lamp Mode Lens Control IR Receiver Illumination High Altitude Mode Functions Initial setting Adjusts the position (height) of the projector. • Front & Rear: Activates both the front and rear detectors. • Front: Activates the front detector only. • Rear...
Select "Auto" for automatic correction, or "Manual" for changing the settings of the projector. When the top of the On projector lights when the projector is input to "Blue." Front & Rear Selects whether the SONY logo on the rear panel of the trapezoid is longer than the ... "Blue." V Keystone Background Lamp Mode Lens Control IR Receiver Illumination High Altitude Mode Functions Initial setting Adjusts the position (height) of the projector. • Front & Rear: Activates both the front and rear detectors. • Front: Activates the front detector only. • Rear...
Operating Instructions
Page 40
....43/PAL-M/PAL-N/ PAL60 system, switched automatically/manually (NTSC4.43 is a measuring method described in American National Standard IT 7.228. Specifications Optical characteristics Projection system 3 LCD panels, 1 lens, projection system LCD panel VPL-CX20: 0.63-inch XGA panel, approximately 2,360,000 pixels (786,432 pixels × 3) VPL-CS20: 0.63-inch SVGA panel, approximately 1,440,000 pixels (480... fV: 60 Hz 1) Set the resolution and the frequency of the signal of the connected computer within the range of acceptable preset signals of the projector.
....43/PAL-M/PAL-N/ PAL60 system, switched automatically/manually (NTSC4.43 is a measuring method described in American National Standard IT 7.228. Specifications Optical characteristics Projection system 3 LCD panels, 1 lens, projection system LCD panel VPL-CX20: 0.63-inch XGA panel, approximately 2,360,000 pixels (786,432 pixels × 3) VPL-CS20: 0.63-inch SVGA panel, approximately 1,440,000 pixels (480... fV: 60 Hz 1) Set the resolution and the frequency of the signal of the connected computer within the range of acceptable preset signals of the projector.

Operating Instructions
Page 41
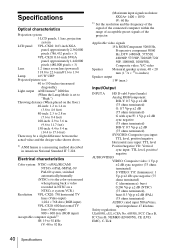
... to 1.0 A, 50/ 60 Hz Power consumption Max. 220 W in some areas. For details, please consult your nearest Sony dealer. Pin assignment INPUT A connector (HD D-sub 15-pin, female) 1 R/R-Y 9 N.C. 2 G/Y 10 GND ...HD/C.Sync 6 GND (R) 14 VD 7 GND (G) 15 DDC/SCL 8 GND (B) Others Specifications 41 Optional accessories Projector Lamp LMP-C162(for replacement) Signal Cable SMF-402 (HD D-sub 15-pin (male) y 3 × phono... (CD-ROM) (1) Quick Reference Manual (1) Safety Regulations (1) Security Label (1) Design and specifications are subject to change without notice.
... to 1.0 A, 50/ 60 Hz Power consumption Max. 220 W in some areas. For details, please consult your nearest Sony dealer. Pin assignment INPUT A connector (HD D-sub 15-pin, female) 1 R/R-Y 9 N.C. 2 G/Y 10 GND ...HD/C.Sync 6 GND (R) 14 VD 7 GND (G) 15 DDC/SCL 8 GND (B) Others Specifications 41 Optional accessories Projector Lamp LMP-C162(for replacement) Signal Cable SMF-402 (HD D-sub 15-pin (male) y 3 × phono... (CD-ROM) (1) Quick Reference Manual (1) Safety Regulations (1) Security Label (1) Design and specifications are subject to change without notice.

