
Limited Warranty (US Only)
Page 1
.... has established telephone numbers for product information or operation, call : 1-800-488-SONY (7669) Printed in the United States. 4-557-172-02 General Stereo/Hifi Components/Tape Decks ® CD Players/Mini Disc Players/Audio Systems Hifi Audio LIMITED WARRANTY Sony Electronics Inc. ("Sony") warrants this Product is determined to be presented to obtain warranty service.
.... has established telephone numbers for product information or operation, call : 1-800-488-SONY (7669) Printed in the United States. 4-557-172-02 General Stereo/Hifi Components/Tape Decks ® CD Players/Mini Disc Players/Audio Systems Hifi Audio LIMITED WARRANTY Sony Electronics Inc. ("Sony") warrants this Product is determined to be presented to obtain warranty service.
Operating Instructions (primary manual)
Page 3
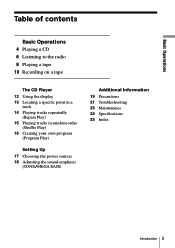
Basic Operations Table of contents Basic Operations 4 Playing a CD 6 Listening to the radio 8 Playing a tape 10 Recording on a tape The CD Player 12 Using the display 13 Locating a specific point in a track 14 Playing tracks repeatedly (Repeat Play) 15 Playing tracks in random order (Shuffle Play) 16 Creating your own program (Program Play) Setting Up 17 Choosing the power sources 18 Adjusting the sound emphasis (TONE/MEGA BASS) Additional Information 19 Precautions 21 Troubleshooting 23 Maintenance 24 Specifications 25 Index Introduction 3
Basic Operations Table of contents Basic Operations 4 Playing a CD 6 Listening to the radio 8 Playing a tape 10 Recording on a tape The CD Player 12 Using the display 13 Locating a specific point in a track 14 Playing tracks repeatedly (Repeat Play) 15 Playing tracks in random order (Shuffle Play) 16 Creating your own program (Program Play) Setting Up 17 Choosing the power sources 18 Adjusting the sound emphasis (TONE/MEGA BASS) Additional Information 19 Precautions 21 Troubleshooting 23 Maintenance 24 Specifications 25 Index Introduction 3
Operating Instructions (primary manual)
Page 5
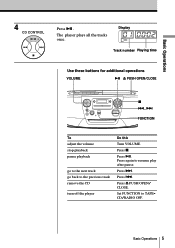
Track number Playing time Use these buttons for additional operations VOLUME ^ 6 PUSH OPEN/CLOSE p =, + FUNCTION To adjust the volume stop playback pause playback go to the next track go back to TAPE• CD/RADIO OFF. Display The player plays all the tracks once. Press +. Press =. Basic Operations 5 Press 6 PUSH OPEN/ CLOSE. Press p. Press ^. Set FUNCTION to the previous track remove the CD turn off the player Do this Turn VOLUME. Press again to resume play after pause. Basic Operations 4 Press ^ .
Track number Playing time Use these buttons for additional operations VOLUME ^ 6 PUSH OPEN/CLOSE p =, + FUNCTION To adjust the volume stop playback pause playback go to the next track go back to TAPE• CD/RADIO OFF. Display The player plays all the tracks once. Press +. Press =. Basic Operations 5 Press 6 PUSH OPEN/ CLOSE. Press p. Press ^. Set FUNCTION to the previous track remove the CD turn off the player Do this Turn VOLUME. Press again to resume play after pause. Basic Operations 4 Press ^ .
Operating Instructions (primary manual)
Page 7
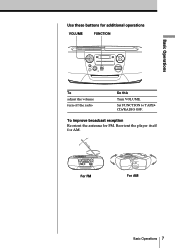
Reorient the player itself for additional operations VOLUME FUNCTION To adjust the volume turn off the radio Do this Turn VOLUME. For FM For AM Basic Operations 7 Basic Operations Use these buttons for AM. To improve broadcast reception Reorient the antenna for FM. Set FUNCTION to TAPE• CD/RADIO OFF.
Reorient the player itself for additional operations VOLUME FUNCTION To adjust the volume turn off the radio Do this Turn VOLUME. For FM For AM Basic Operations 7 Basic Operations Use these buttons for AM. To improve broadcast reception Reorient the antenna for FM. Set FUNCTION to TAPE• CD/RADIO OFF.
Operating Instructions (primary manual)
Page 10
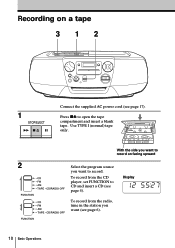
With the side you want to record on a tape 312 Connect the supplied AC power cord (see page 17). 1 Press p6 to open the tape compartment and insert a blank tape. To record from the radio, tune in the station you want (see page 4). Display To record from the CD player, set FUNCTION to CD and insert a CD (see page 6). 10 Basic Operations Recording on facing upward 2 Select the program source you want to record. Use TYPE I (normal) tape only.
With the side you want to record on a tape 312 Connect the supplied AC power cord (see page 17). 1 Press p6 to open the tape compartment and insert a blank tape. To record from the radio, tune in the station you want (see page 4). Display To record from the CD player, set FUNCTION to CD and insert a CD (see page 6). 10 Basic Operations Recording on facing upward 2 Select the program source you want to record. Use TYPE I (normal) tape only.

Operating Instructions (primary manual)
Page 12
... check information about the CD using the display. DISPLAY ENTER Checking the total track number and playing time Check the display in the display. 12 The CD Player Total playing time Total track number Checking the remaining time Press DISPLAY•ENTER while playing a CD. To display remaining time... on the current track* remaining time on the CD and the number of tracks left playing time and...
... check information about the CD using the display. DISPLAY ENTER Checking the total track number and playing time Check the display in the display. 12 The CD Player Total playing time Total track number Checking the remaining time Press DISPLAY•ENTER while playing a CD. To display remaining time... on the current track* remaining time on the CD and the number of tracks left playing time and...
Operating Instructions (primary manual)
Page 13
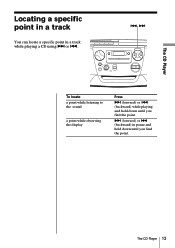
The CD Player 13 The CD Player Locating a specific point in a track You can locate a specific point in a track while playing a CD using + or =. =, + To locate a point while listening to the sound a point while observing the display Press + (forward) or = (backward) while playing and hold down until you find the point. + (forward) or = (backward) in pause and hold down until you find the point.
The CD Player 13 The CD Player Locating a specific point in a track You can locate a specific point in a track while playing a CD using + or =. =, + To locate a point while listening to the sound a point while observing the display Press + (forward) or = (backward) while playing and hold down until you find the point. + (forward) or = (backward) in pause and hold down until you find the point.
Operating Instructions (primary manual)
Page 14
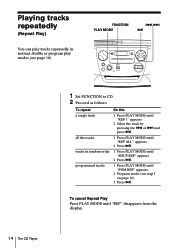
To cancel Repeat Play Press PLAY MODE until "PGM REP" appears. 2 Program tracks (see page 16). FUNCTION PLAY MODE =,+ ^ 14 The CD Player 1 Set FUNCTION to CD. 2 Proceed as follows: To repeat a single track all the tracks tracks in normal, shuffle or program play modes (see step 3 on page 16). 3 Press ^. Playing ...
To cancel Repeat Play Press PLAY MODE until "PGM REP" appears. 2 Program tracks (see page 16). FUNCTION PLAY MODE =,+ ^ 14 The CD Player 1 Set FUNCTION to CD. 2 Proceed as follows: To repeat a single track all the tracks tracks in normal, shuffle or program play modes (see step 3 on page 16). 3 Press ^. Playing ...
Operating Instructions (primary manual)
Page 15
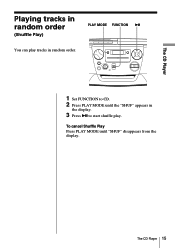
The CD Player Playing tracks in random order (Shuffle Play) PLAY MODE FUNCTION ^ You can play tracks in random order. 1 Set FUNCTION to CD. 2 Press PLAY MODE until "SHUF" disappears from the display. To cancel Shuffle Play Press PLAY MODE until the "SHUF" appears in the display. 3 Press ^ to start shuffle play. The CD Player 15
The CD Player Playing tracks in random order (Shuffle Play) PLAY MODE FUNCTION ^ You can play tracks in random order. 1 Set FUNCTION to CD. 2 Press PLAY MODE until "SHUF" disappears from the display. To cancel Shuffle Play Press PLAY MODE until the "SHUF" appears in the display. 3 Press ^ to start shuffle play. The CD Player 15
Operating Instructions (primary manual)
Page 16
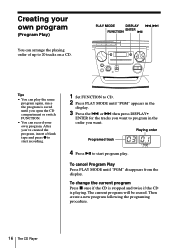
...erased. Then create a new program following the programing procedure. 16 The CD Player Playing order Programed track 4 Press ^ to start recording. 1 Set FUNCTION to CD. 2 Press PLAY MODE until "PGM" appears in the order you open the CD compartment or switch FUNCTION. • You can arrange the playing order of...= or + then press DISPLAY• ENTER for the tracks you want . To change the current program Press p once if the CD is stopped and twice if the CD is saved until "PGM" disappears from the display. Creating your own program (Program Play) You can record your own program. After ...
...erased. Then create a new program following the programing procedure. 16 The CD Player Playing order Programed track 4 Press ^ to start recording. 1 Set FUNCTION to CD. 2 Press PLAY MODE until "PGM" appears in the order you open the CD compartment or switch FUNCTION. • You can arrange the playing order of...= or + then press DISPLAY• ENTER for the tracks you want . To change the current program Press p once if the CD is stopped and twice if the CD is saved until "PGM" disappears from the display. Creating your own program (Program Play) You can record your own program. After ...
Operating Instructions (primary manual)
Page 17
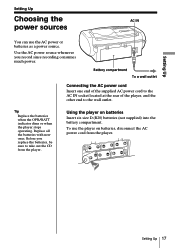
... Insert one end of the supplied AC power cord to the AC IN socket located at the rear of the player, and the other end to take out the CD from the player. To use the AC power or batteries as a power source. Replace all the batteries with new ones. Use the AC... power source whenever you replace the batteries, be sure to the wall outlet. Tip Replace the batteries when the OPR/BATT indicator dims or when the player stops...
... Insert one end of the supplied AC power cord to the AC IN socket located at the rear of the player, and the other end to take out the CD from the player. To use the AC power or batteries as a power source. Replace all the batteries with new ones. Use the AC... power source whenever you replace the batteries, be sure to the wall outlet. Tip Replace the batteries when the OPR/BATT indicator dims or when the player stops...
Operating Instructions (primary manual)
Page 19
...do not use any questions or problems concerning your player, please consult your nearest Sony dealer. Should this case, remove the CD and wait about an hour for the moisture to evaporate. • If the player has not been used in the CD player section is left in a car parked in the... sun, be sure to choose a location in the car where the player will not operate properly. continued Additional Information 19 In this occur, the player will not be caused by qualified personnel before inserting a cassette. On placement &#...
...do not use any questions or problems concerning your player, please consult your nearest Sony dealer. Should this case, remove the CD and wait about an hour for the moisture to evaporate. • If the player has not been used in the CD player section is left in a car parked in the... sun, be sure to choose a location in the car where the player will not operate properly. continued Additional Information 19 In this occur, the player will not be caused by qualified personnel before inserting a cassette. On placement &#...
Operating Instructions (primary manual)
Page 21
... the function you want to CD. • Reduce the volume. • Clean the CD, or replace it if the CD is closed. • Place the CD with an indoor antenna, move the player away from vibration. The sound drops out. Troubleshooting General Radio Symptom The power does not come on. continued CD Player Additional Information 21 There is...
... the function you want to CD. • Reduce the volume. • Clean the CD, or replace it if the CD is closed. • Place the CD with an indoor antenna, move the player away from vibration. The sound drops out. Troubleshooting General Radio Symptom The power does not come on. continued CD Player Additional Information 21 There is...
Operating Instructions (primary manual)
Page 22
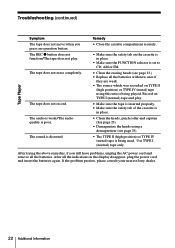
The tape does not record. Remedy • Close the cassette compartment securely. • Make sure the safety tab on the cassette is in place. • Make sure the FUNCTION selector is set to CD, AM or FM. • Clean the erasing heads (see page 23). • The TYPE II (...; The source which was recorded on TYPE I (normal) tape only. If the problem persists, please consult your nearest Sony dealer. 22 Additional Information Troubleshooting (continued) Tape Player Symptom The tape does not move when you still have problems, unplug the AC power cord and remove all the batteries....
The tape does not record. Remedy • Close the cassette compartment securely. • Make sure the safety tab on the cassette is in place. • Make sure the FUNCTION selector is set to CD, AM or FM. • Clean the erasing heads (see page 23). • The TYPE II (...; The source which was recorded on TYPE I (normal) tape only. If the problem persists, please consult your nearest Sony dealer. 22 Additional Information Troubleshooting (continued) Tape Player Symptom The tape does not move when you still have problems, unplug the AC power cord and remove all the batteries....
Operating Instructions (primary manual)
Page 24
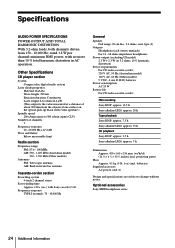
...Sony MDR headphone series 24 Additional Information Other Specifications CD player section System Compact disc digital audio system Laser diode properties Material: GaAlAs Wave length: 780 nm Emission duration: Continuous Laser output: Less than 10 % total harmonic distortion in ferrite bar antenna Cassette-corder... AC 20 W Battery life For CD radio cassette-corder: FM recording Sony R20P: approx. 13.5 h Sony alkaline LR20: approx. 20 h Tape playback Sony R20P: approx. 7.5 h Sony alkaline LR20: approx. 15 h CD playback Sony R20P: approx. 2.5 h Sony alkaline LR20: approx. 7 h Dimensions...
...Sony MDR headphone series 24 Additional Information Other Specifications CD player section System Compact disc digital audio system Laser diode properties Material: GaAlAs Wave length: 780 nm Emission duration: Continuous Laser output: Less than 10 % total harmonic distortion in ferrite bar antenna Cassette-corder... AC 20 W Battery life For CD radio cassette-corder: FM recording Sony R20P: approx. 13.5 h Sony alkaline LR20: approx. 20 h Tape playback Sony R20P: approx. 7.5 h Sony alkaline LR20: approx. 15 h CD playback Sony R20P: approx. 2.5 h Sony alkaline LR20: approx. 7 h Dimensions...
Operating Instructions (primary manual)
Page 25
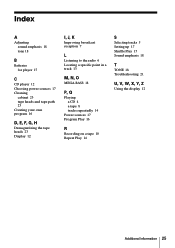
Index A Adjusting sound emphasis 18 tone 18 B Batteries for player 17 C CD player 12 Choosing power sources 17 Cleaning cabinet 23 tape heads and tape path 23 Creating your own program 16 D, E, F, G, H Demagnetizing the tape heads 23 Display 12 I, J, K Improving broadcast reception 7 L Listening to the radio 6 Locating a specific point in a track 13 M, N, O MEGA BASS 18...
Index A Adjusting sound emphasis 18 tone 18 B Batteries for player 17 C CD player 12 Choosing power sources 17 Cleaning cabinet 23 tape heads and tape path 23 Creating your own program 16 D, E, F, G, H Demagnetizing the tape heads 23 Display 12 I, J, K Improving broadcast reception 7 L Listening to the radio 6 Locating a specific point in a track 13 M, N, O MEGA BASS 18...


