
Limited Warranty (U.S. Only)
Page 1
... warranty service for ninety (90) days, whichever is invalid if the factory-applied serial number has been altered or removed from state to the Sony authorized service facility specified. It is likely that has been returned to be responsible for the time periods and as...the product. This Limited Warranty is provided "AS IS" unless expressly provided for the remainder of Sony. Printed in the Product; Only) Sony Electronics Inc. ("Sony") warrants this Limited Warranty, Sony will not be defective. For purposes of protection to state. In the event of incidental or ...
... warranty service for ninety (90) days, whichever is invalid if the factory-applied serial number has been altered or removed from state to the Sony authorized service facility specified. It is likely that has been returned to be responsible for the time periods and as...the product. This Limited Warranty is provided "AS IS" unless expressly provided for the remainder of Sony. Printed in the Product; Only) Sony Electronics Inc. ("Sony") warrants this Limited Warranty, Sony will not be defective. For purposes of protection to state. In the event of incidental or ...
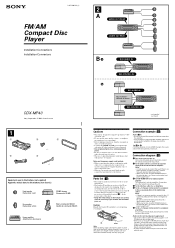
Installation/Connection Instructions
Page 1
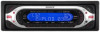
...each component's fuse. • When no accessory position, connect to avoid injuring your car. If the catches are attached to remove the bracket 1 and the protection collar 3 from your fingers. 1 Catch Note Before installing, make sure that the catches on... terminal which is only for future use of the existing antenna booster. 3-251-806-11 (1) FM/AM Compact Disc Player Installation/Connections Installation/Connexions 2 A AUDIO OUT FRONT AUDIO OUT REAR B BUS AUDIO IN BUS CONTROL IN CDX-MP40 Sony Corporation © 2003 Printed in Korea 1 1 2 3 × 4 4 5 ×...
...each component's fuse. • When no accessory position, connect to avoid injuring your car. If the catches are attached to remove the bracket 1 and the protection collar 3 from your fingers. 1 Catch Note Before installing, make sure that the catches on... terminal which is only for future use of the existing antenna booster. 3-251-806-11 (1) FM/AM Compact Disc Player Installation/Connections Installation/Connexions 2 A AUDIO OUT FRONT AUDIO OUT REAR B BUS AUDIO IN BUS CONTROL IN CDX-MP40 Sony Corporation © 2003 Printed in Korea 1 1 2 3 × 4 4 5 ×...

Operating Instructions
Page 3
...Table of Contents Location of controls 4 Precautions 6 Notes on discs 6 About MP3 files 7 Getting Started Resetting the unit 9 Detaching the front panel 9 Setting the clock 10 CD Player CD/MD Unit (optional) Playing a disc 11 Display items 12 Playing tracks repeatedly - Repeat Play 12... Playing tracks in a station through a list - Menu 20 Setting the equalizer (EQ3 20 Setting the Dynamic Soundstage Organizer (DSO 21 Additional Information Maintenance 21 Removing ...
...Table of Contents Location of controls 4 Precautions 6 Notes on discs 6 About MP3 files 7 Getting Started Resetting the unit 9 Detaching the front panel 9 Setting the clock 10 CD Player CD/MD Unit (optional) Playing a disc 11 Display items 12 Playing tracks repeatedly - Repeat Play 12... Playing tracks in a station through a list - Menu 20 Setting the equalizer (EQ3 20 Setting the Dynamic Soundstage Organizer (DSO 21 Additional Information Maintenance 21 Removing ...

Operating Instructions
Page 6
...it. • Power antenna will not operate properly. Handle the disc by its edge. • Keep your discs in their cases or disc magazines when not in this manual, please consult your nearest Sony dealer. Inability to eject a disc (due to splash juice or other functions which may divert your ...direct sunlight, allow the unit to heat/high temperature. Should this unit. In such a case, remove the disc and wait for about an hour until the moisture has evaporated. Do not subject the discs to cool off and jamming the eject mechanism). - Avoid leaving them in a very damp area,...
...it. • Power antenna will not operate properly. Handle the disc by its edge. • Keep your discs in their cases or disc magazines when not in this manual, please consult your nearest Sony dealer. Inability to eject a disc (due to splash juice or other functions which may divert your ...direct sunlight, allow the unit to heat/high temperature. Should this unit. In such a case, remove the disc and wait for about an hour until the moisture has evaporated. Do not subject the discs to cool off and jamming the eject mechanism). - Avoid leaving them in a very damp area,...

Operating Instructions
Page 9
... panel and press the RESET button with you turn the ignition switch to the OFF position without removing the front panel, the caution alarm will turn the unit off automatically to prevent the speakers from being damaged. • Do not drop or put ...
... panel and press the RESET button with you turn the ignition switch to the OFF position without removing the front panel, the caution alarm will turn the unit off automatically to prevent the speakers from being damaged. • Do not drop or put ...
Operating Instructions
Page 22
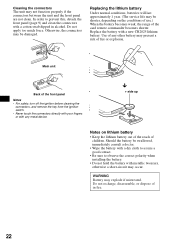
... use.) When the battery becomes weak, the range of the front panel Notes • For safety, turn off the ignition before cleaning the connectors, and remove the key from the ignition switch. • Never touch the connectors directly with your fingers or with a new CR2025 lithium battery. Do not apply too...
... use.) When the battery becomes weak, the range of the front panel Notes • For safety, turn off the ignition before cleaning the connectors, and remove the key from the ignition switch. • Never touch the connectors directly with your fingers or with a new CR2025 lithium battery. Do not apply too...
Operating Instructions
Page 23
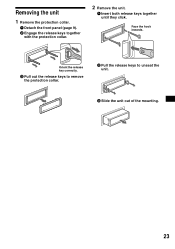
Orient the release key correctly. 3 Pull out the release keys to remove the protection collar. 2 Pull the release keys to unseat the unit. 3 Slide the unit out of the mounting. 23 Face the hook inwards. Removing the unit 1 Remove the protection collar. 1 Detach the front panel (page 9). 2 Engage the release keys together with the protection collar. 2 Remove the unit. 1 Insert both release keys together until they click.
Orient the release key correctly. 3 Pull out the release keys to remove the protection collar. 2 Pull the release keys to unseat the unit. 3 Slide the unit out of the mounting. 23 Face the hook inwards. Removing the unit 1 Remove the protection collar. 1 Detach the front panel (page 9). 2 Engage the release keys together with the protection collar. 2 Remove the unit. 1 Insert both release keys together until they click.

Operating Instructions
Page 25
...• The file extension ".MP3" is connected and you may not play due to its recording equipment or the disc condition. a disc recorded with a Sony MP3 compatible CD unit, such as the CDX-757MX. The ambient temperature exceeds 50°C (122°F). The sound skips. t Press (LIST) for details.... MP3 files cannot be ejected. a disc recorded in amplifier. CD will help you remedy problems you are not stored in the display window. • The display disappears if you press and hold (OFF) again until the display appears. • Remove the front panel and clean the connectors....
...• The file extension ".MP3" is connected and you may not play due to its recording equipment or the disc condition. a disc recorded with a Sony MP3 compatible CD unit, such as the CDX-757MX. The ambient temperature exceeds 50°C (122°F). The sound skips. t Press (LIST) for details.... MP3 files cannot be ejected. a disc recorded in amplifier. CD will help you remedy problems you are not stored in the display window. • The display disappears if you press and hold (OFF) again until the display appears. • Remove the front panel and clean the connectors....


