
Operating Instructions
Page 2
... installation/ connections manual. ZAPPIN and Quick-BrowZer are trademarks of Sony Corporation. 12 TONE ANALYSIS and its logo are trademarks of Sirius XM Radio Inc. For more patents owned by Gracenote" logo are trademarks or registered trademarks of Sony Ericsson Mobile Communications AB. Sirius or XM Subscription required. CD, DVD, Blu-ray Disc, and music and videorelated data from that any changes...
... installation/ connections manual. ZAPPIN and Quick-BrowZer are trademarks of Sony Corporation. 12 TONE ANALYSIS and its logo are trademarks of Sirius XM Radio Inc. For more patents owned by Gracenote" logo are trademarks or registered trademarks of Sony Ericsson Mobile Communications AB. Sirius or XM Subscription required. CD, DVD, Blu-ray Disc, and music and videorelated data from that any changes...
Operating Instructions
Page 4
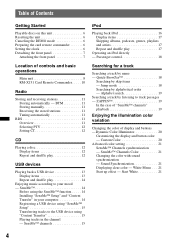
... Changing the color of controls and basic operations Main unit 8 RM-X151 Card Remote Commander . . . . . 10 Radio Storing and receiving stations 11 Storing automatically - Sound Synchronization 21 Displaying clear color - White Menu . . . 21 Start up effect - Alphabet search 19 Searching a track by skip items - Quick-BrowZer 18 Searching by listening to the USB device using the SensMe™ function . . . . . 14 Installing "SensMe™ Setup" and "Content Transfer" in the channel...
... Changing the color of controls and basic operations Main unit 8 RM-X151 Card Remote Commander . . . . . 10 Radio Storing and receiving stations 11 Storing automatically - Sound Synchronization 21 Displaying clear color - White Menu . . . 21 Start up effect - Alphabet search 19 Searching a track by skip items - Quick-BrowZer 18 Searching by listening to the USB device using the SensMe™ function . . . . . 14 Installing "SensMe™ Setup" and "Content Transfer" in the channel...
Operating Instructions
Page 5
Advanced Sound Engine 22 Selecting the sound quality - EQ7 Preset 22 Customizing the equalizer curve - SET 24 Other functions Using optional equipment 25 Auxiliary audio equipment 25 Additional Information Precautions 26 Notes on discs 26 Playback order of MP3/WMA/AAC files 26 About iPod 26 Maintenance 27 Removing the unit 28 Specifications 28 Troubleshooting 29 Error displays/Messages 31 Support site If you have any questions or for the...
Advanced Sound Engine 22 Selecting the sound quality - EQ7 Preset 22 Customizing the equalizer curve - SET 24 Other functions Using optional equipment 25 Auxiliary audio equipment 25 Additional Information Precautions 26 Notes on discs 26 Playback order of MP3/WMA/AAC files 26 About iPod 26 Maintenance 27 Removing the unit 28 Specifications 28 Troubleshooting 29 Error displays/Messages 31 Support site If you have any questions or for the...
Operating Instructions
Page 6
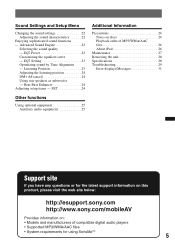
... Resetting the unit Before operating the unit for the first time, or after replacing the car battery or changing the connections, you must reset the unit. The hour indication flashes. 3 Rotate the control dial to select "DEMO-OFF," then press it . Press (DSPL) again to return to replace the battery, see page 27. The setup display appears. 2 Rotate the control dial until "DEMO" appears, then press it. 3 Rotate the control dial to set the clock...
... Resetting the unit Before operating the unit for the first time, or after replacing the car battery or changing the connections, you must reset the unit. The hour indication flashes. 3 Rotate the control dial to select "DEMO-OFF," then press it . Press (DSPL) again to return to replace the battery, see page 27. The setup display appears. 2 Rotate the control dial until "DEMO" appears, then press it. 3 Rotate the control dial to set the clock...
Operating Instructions
Page 9
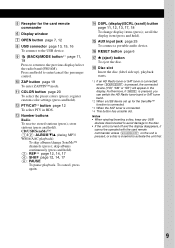
... ZAPPIN™ mode. K COLOR button page 20 To select the preset colors (press); M Number buttons Radio: To receive stored stations (press); E Receptor for the SensMe™ function is connected. *3 When the SAT tuner is connected. *4 This button has a tactile dot. I (BACK)/MODE button*1 page 11, 18 Press to return to activate the unit first. 9 store stations (press and hold). O AUX input jack page 25 To connect a portable audio device. P RESET button page 6 Q Z (eject) button To eject the disc. Furthermore, if (MODE) is pressed...
... ZAPPIN™ mode. K COLOR button page 20 To select the preset colors (press); M Number buttons Radio: To receive stored stations (press); E Receptor for the SensMe™ function is connected. *3 When the SAT tuner is connected. *4 This button has a tactile dot. I (BACK)/MODE button*1 page 11, 18 Press to return to activate the unit first. 9 store stations (press and hold). O AUX input jack page 25 To connect a portable audio device. P RESET button page 6 Q Z (eject) button To eject the disc. Furthermore, if (MODE) is pressed...
Operating Instructions
Page 10
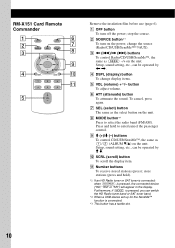
A OFF button To turn on the unit. change display items. E VOL (volume) +*3/- Setup, sound setting, etc., can be operated by < ,. D DSPL (display) button To change the source (Radio/CD/USB/SensMe™*2/AUX). F ATT (attenuate) button To attenuate the sound. K Number buttons To receive stored stations (press); B SOURCE button*1 To turn off the power; Setup, sound setting, etc., can switch the HD Radio tuner band or SAT tuner band. *2 When a USB device set up for the SensMe™ function is connected. *3 This button has a tactile dot. 10 To cancel, press again. J ...
A OFF button To turn on the unit. change display items. E VOL (volume) +*3/- Setup, sound setting, etc., can be operated by < ,. D DSPL (display) button To change the source (Radio/CD/USB/SensMe™*2/AUX). F ATT (attenuate) button To attenuate the sound. K Number buttons To receive stored stations (press); B SOURCE button*1 To turn off the power; Setup, sound setting, etc., can switch the HD Radio tuner band or SAT tuner band. *2 When a USB device set up for the SensMe™ function is connected. *3 This button has a tactile dot. 10 To cancel, press again. J ...
Operating Instructions
Page 11
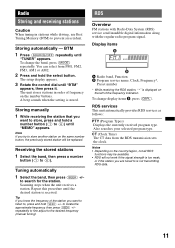
... desired frequency (manual tuning). Tuning automatically 1 Select the band, then press (SEEK) +/- to store another station on the number buttons. RDS Overview FM stations with Radio Data System (RDS) service send inaudible digital information along with the regular radio program signal. Display items A Radio band, Function B Program service name, Clock, Frequency*, Preset number * While receiving the RDS station, " *" is too weak, or if the station you try to locate the approximate frequency, then press (SEEK) +/- To change the...
... desired frequency (manual tuning). Tuning automatically 1 Select the band, then press (SEEK) +/- to store another station on the number buttons. RDS Overview FM stations with Radio Data System (RDS) service send inaudible digital information along with the regular radio program signal. Display items A Radio band, Function B Program service name, Clock, Frequency*, Preset number * While receiving the RDS station, " *" is too weak, or if the station you try to locate the approximate frequency, then press (SEEK) +/- To change the...
Operating Instructions
Page 17
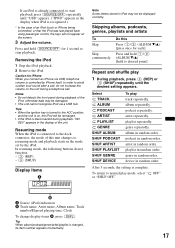
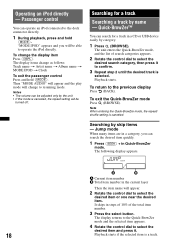
.... A Source (iPod) indication B Track name, Artist name, Album name, Track number/Elapsed playing time, Clock To change display items B, press (DSPL). Tip When album/podcast/genre/artist/playlist is complete. Removing the iPod 1 Stop the iPod playback. 2 Remove the iPod. In resuming mode, the following buttons do not increase the volume on , the iPod will not appear on the screen. 3 Adjust the volume. Notes • Do not detach the front panel...
.... A Source (iPod) indication B Track name, Artist name, Album name, Track number/Elapsed playing time, Clock To change display items B, press (DSPL). Tip When album/podcast/genre/artist/playlist is complete. Removing the iPod 1 Stop the iPod playback. 2 Remove the iPod. In resuming mode, the following buttons do not increase the volume on , the iPod will not appear on the screen. 3 Adjust the volume. Notes • Do not detach the front panel...
Operating Instructions
Page 18
... item number. 3 Press the select button. To exit the Quick-BrowZer mode Press (BROWSE). A Current item number B Total item number in Quick-BrowZer mode. Playback starts. Notes • The volume can operate an iPod connected to operate the iPod directly. Note When entering the Quick-BrowZer mode, the repeat/ shuffle setting is selected. Operating an iPod directly - Passenger control You can be turned off. Then "MODE AUDIO" will appear and the play mode will be adjusted only...
... item number. 3 Press the select button. To exit the Quick-BrowZer mode Press (BROWSE). A Current item number B Total item number in Quick-BrowZer mode. Playback starts. Notes • The volume can operate an iPod connected to operate the iPod directly. Note When entering the Quick-BrowZer mode, the repeat/ shuffle setting is selected. Operating an iPod directly - Passenger control You can be turned off. Then "MODE AUDIO" will appear and the play mode will be adjusted only...

Operating Instructions
Page 20
... car's interior. The display color changes for DAY/NIGHT color mode as a basis for DAY/NIGHT. x Preset patterns "RAINBOW," "OCEAN," "SUNSET," "FOREST," "RANDOM." 1 Press (COLOR). 2 Rotate the control dial to the DIMMER setting. x Preset colors "RED," "AMBER," "M_AMBER," "YELLOW," "WHITE," "LIGHT GREEN," "GREEN," "LIGHT BLUE," "SKY BLUE," "BLUE," "PURPLE," "PINK." Note If the control dial is connected. Changing DAY/NIGHT color mode 1 Select "DAY/NIGHT" in step 2. 2 Select "DAY" or "NIGHT." 3 Customize the preset channel from the setup menu...
... car's interior. The display color changes for DAY/NIGHT color mode as a basis for DAY/NIGHT. x Preset patterns "RAINBOW," "OCEAN," "SUNSET," "FOREST," "RANDOM." 1 Press (COLOR). 2 Rotate the control dial to the DIMMER setting. x Preset colors "RED," "AMBER," "M_AMBER," "YELLOW," "WHITE," "LIGHT GREEN," "GREEN," "LIGHT BLUE," "SKY BLUE," "BLUE," "PURPLE," "PINK." Note If the control dial is connected. Changing DAY/NIGHT color mode 1 Select "DAY/NIGHT" in step 2. 2 Select "DAY" or "NIGHT." 3 Customize the preset channel from the setup menu...
Operating Instructions
Page 22
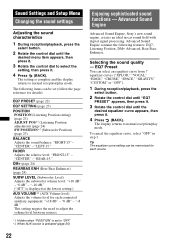
... LEVEL (Subwoofer Level) Adjusts the subwoofer volume level: "+10 dB" - Selecting the sound quality - "CENTER" - "-8 dB." "0 dB" - The following features: EQ7, Listening Position, DM+ Advanced, Rear Bass Enhancer. This setting negates the need to adjust the volume level between sources. *1 Hidden when "POSITION" is set (follow the page reference for each source. Advanced Sound Engine Advanced Sound Engine, Sony's new sound engine, creates an ideal in step 3. The display returns to normal reception/play mode. Sound Settings and Setup Menu Changing...
... LEVEL (Subwoofer Level) Adjusts the subwoofer volume level: "+10 dB" - Selecting the sound quality - "CENTER" - "-8 dB." "0 dB" - The following features: EQ7, Listening Position, DM+ Advanced, Rear Bass Enhancer. This setting negates the need to adjust the volume level between sources. *1 Hidden when "POSITION" is set (follow the page reference for each source. Advanced Sound Engine Advanced Sound Engine, Sony's new sound engine, creates an ideal in step 3. The display returns to normal reception/play mode. Sound Settings and Setup Menu Changing...
Operating Instructions
Page 24
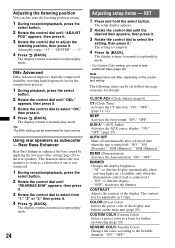
... level is complete. 4 Press (BACK). "-3." 4 Press (BACK). Using rear speakers as a basis for each source. COLOR (Preset Color) Selects the preset color of the display. CUSTOM COLR (Custom Color) Selects a preset color as subwoofer - SENSME COLR (SensMe Color) Changes the color according to normal play mode. The display returns to the SensMe channels: "ON," "OFF." Rear Bass Enhancer Rear Bass Enhancer enhances the bass sound by restoring high frequencies lost in 7 steps. AUTO OFF Shuts off automatically after a desired time when the unit is turned...
... level is complete. 4 Press (BACK). "-3." 4 Press (BACK). Using rear speakers as a basis for each source. COLOR (Preset Color) Selects the preset color of the display. CUSTOM COLR (Custom Color) Selects a preset color as subwoofer - SENSME COLR (SensMe Color) Changes the color according to normal play mode. The display returns to the SensMe channels: "ON," "OFF." Rear Bass Enhancer Rear Bass Enhancer enhances the bass sound by restoring high frequencies lost in 7 steps. AUTO OFF Shuts off automatically after a desired time when the unit is turned...
Operating Instructions
Page 25
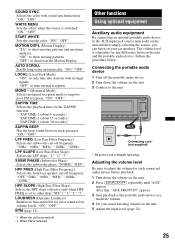
... color: "ON," "OFF." "OFF": to tune normal reception. "OFF": to deactivate the Motion Display. BTM (page 11) *1 When the unit is turned off the portable audio device. 2 Turn down the volume on the unit. 2 Press (SOURCE/OFF) repeatedly until "AUX" appears. AUTO SCROLL Scrolls long items automatically: "ON," "OFF." LPF FREQ (Low Pass Filter Frequency) Selects the subwoofer cut -off frequency: "50Hz," "60Hz," "80Hz," "100Hz," "120Hz." WHITE MENU Sets...
... color: "ON," "OFF." "OFF": to tune normal reception. "OFF": to deactivate the Motion Display. BTM (page 11) *1 When the unit is turned off the portable audio device. 2 Turn down the volume on the unit. 2 Press (SOURCE/OFF) repeatedly until "AUX" appears. AUTO SCROLL Scrolls long items automatically: "ON," "OFF." LPF FREQ (Low Pass Filter Frequency) Selects the subwoofer cut -off frequency: "50Hz," "60Hz," "80Hz," "100Hz," "120Hz." WHITE MENU Sets...

Operating Instructions
Page 26
... to connect specifically to iPod or iPhone, respectively, and has been certified by this unit. • Discs that this device or its compliance with copyright protection technologies do so may ruin the disc. - Moisture condensation Should moisture condensation occur inside the unit, remove the disc and wait for about an hour for - iPod nano (4th generation) - Update your iPod devices to meet Apple performance standards. iPhone * Passenger control...
... to connect specifically to iPod or iPhone, respectively, and has been certified by this unit. • Discs that this device or its compliance with copyright protection technologies do so may ruin the disc. - Moisture condensation Should moisture condensation occur inside the unit, remove the disc and wait for about an hour for - iPod nano (4th generation) - Update your iPod devices to meet Apple performance standards. iPhone * Passenger control...
Operating Instructions
Page 29
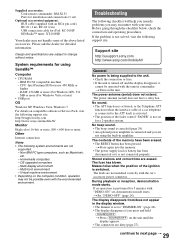
... power amplifier is set to change without notice. The leads are subject to "DIMMER-ON" (page 24). • The display disappears if you press and hold (SOURCE/OFF). The fuse has blown. No sound. • The ATT function is activated, or the Telephone ATT function (when the interface cable of a car telephone is connected to the unit. • Check the connection or fuse. • If the unit is turned off and the display...
... power amplifier is set to change without notice. The leads are subject to "DIMMER-ON" (page 24). • The display disappears if you press and hold (SOURCE/OFF). The fuse has blown. No sound. • The ATT function is activated, or the Telephone ATT function (when the interface cable of a car telephone is connected to the unit. • Check the connection or fuse. • If the unit is turned off and the display...
Operating Instructions
Page 30
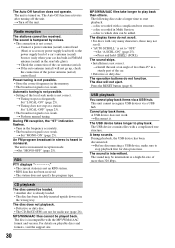
The Auto Off function activates after turning off the unit. t If the auto antenna (aerial) will not eject. t Tuning does not stop playback first for audio use (page 26). MP3/WMA/AAC files cannot be added. t Press and hold (DSPL) (SCRL). The operation buttons do not scroll. • For discs with the MP3/WMA/AAC format and version. t Before disconnecting a USB device, make sure to stop at a station: Set "LOCAL...
The Auto Off function activates after turning off the unit. t If the auto antenna (aerial) will not eject. t Tuning does not stop playback first for audio use (page 26). MP3/WMA/AAC files cannot be added. t Press and hold (DSPL) (SCRL). The operation buttons do not scroll. • For discs with the MP3/WMA/AAC format and version. t Before disconnecting a USB device, make sure to stop at a station: Set "LOCAL...
Operating Instructions
Page 31
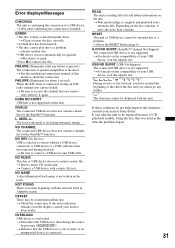
... connect a USB device and USB cable. t Be sure to check the connection. SEEK +/- NO MUSIC The disc or USB device does not contain a music file. OVERLOAD USB device is incorrect. RESET This unit or USB device cannot be displayed with the unit. FAILURE (Illuminates until any further. The local seek mode is not supported. t Insert a music CD in this model to receive the channel that was not automatically recognized. t Disconnect the USB device, then change the source by pressing (SOURCE...
... connect a USB device and USB cable. t Be sure to check the connection. SEEK +/- NO MUSIC The disc or USB device does not contain a music file. OVERLOAD USB device is incorrect. RESET This unit or USB device cannot be displayed with the unit. FAILURE (Illuminates until any further. The local seek mode is not supported. t Insert a music CD in this model to receive the channel that was not automatically recognized. t Disconnect the USB device, then change the source by pressing (SOURCE...
Marketing Specifications
Page 1
... and customize your Sony® CDX-GT65UIW. Flip down the 2-line LCD face plate for iPod®2, iPhone® & USB music players • MP3/WMA/AAC1 playback with DM+ enhancement technology • Intuitive Quick-BrowZer® and ZAPPIN™ search features • Advanced Sound Engine and 52 Watts x 4 High Power • Satellite Radio/HD Radio™ ready3 • 2 Volt Front, Rear and Sub pre-amp output with LPF...
... and customize your Sony® CDX-GT65UIW. Flip down the 2-line LCD face plate for iPod®2, iPhone® & USB music players • MP3/WMA/AAC1 playback with DM+ enhancement technology • Intuitive Quick-BrowZer® and ZAPPIN™ search features • Advanced Sound Engine and 52 Watts x 4 High Power • Satellite Radio/HD Radio™ ready3 • 2 Volt Front, Rear and Sub pre-amp output with LPF...
Marketing Specifications
Page 2
...(s) Supported Preout Impedance Preout Voltage S/N Ratio Signal-to-Noise Ratio (dB) Station Preset(s) Tuner Frequency Range Tuner Type Volume Control Wow and Flutter AUX in Feature Level Adjustment Convenience Tilt Range Convenience Features Dimmer Adjust Key Illumination On-Screen Clock Display Display Color Display Technology Text Displayed Text Lines Display Panel Auto off mode Dimmer Adjust Key Illumination Initial Panel Design Display color (Color Variation/Nega or Posi) Display Device (LCD/FL/OEL/TFT) Key Illumination Panel finish color USB Shutter Feature CODEC (for USB) Jump Mode...
...(s) Supported Preout Impedance Preout Voltage S/N Ratio Signal-to-Noise Ratio (dB) Station Preset(s) Tuner Frequency Range Tuner Type Volume Control Wow and Flutter AUX in Feature Level Adjustment Convenience Tilt Range Convenience Features Dimmer Adjust Key Illumination On-Screen Clock Display Display Color Display Technology Text Displayed Text Lines Display Panel Auto off mode Dimmer Adjust Key Illumination Initial Panel Design Display color (Color Variation/Nega or Posi) Display Device (LCD/FL/OEL/TFT) Key Illumination Panel finish color USB Shutter Feature CODEC (for USB) Jump Mode...

Limited Warranty (U.S. Only)
Page 1
.... Instructions: To obtain warranty service, you . This Limited Warranty is valid only in either its option, repair or replace with the Product. This Limited Warranty is invalid if the factory-applied serial number has been altere or removed from your unit. 3-272-643-02 SONY® Car Audio LIMITED WARRANTY (U.S. Only) Sony Electronics Inc. ("Sony") warrants this Limited Warranty, Sony will , at its original specifications...
.... Instructions: To obtain warranty service, you . This Limited Warranty is valid only in either its option, repair or replace with the Product. This Limited Warranty is invalid if the factory-applied serial number has been altere or removed from your unit. 3-272-643-02 SONY® Car Audio LIMITED WARRANTY (U.S. Only) Sony Electronics Inc. ("Sony") warrants this Limited Warranty, Sony will , at its original specifications...


