Operating Instructions
Page 3
...patents licensed from Fraunhofer IIS and Thomson. Note on the lithium battery Do not expose the battery to set the Auto Off function (page 22). The unit will shut off completely and automatically in the set the Auto Off function, press and hold until the display disappears each time you do not... set time after the unit is turned off . 3 If you turn the ignition off , which prevents battery drain. PANDORA, ...
...patents licensed from Fraunhofer IIS and Thomson. Note on the lithium battery Do not expose the battery to set the Auto Off function (page 22). The unit will shut off completely and automatically in the set the Auto Off function, press and hold until the display disappears each time you do not... set time after the unit is turned off . 3 If you turn the ignition off , which prevents battery drain. PANDORA, ...
Operating Instructions
Page 4
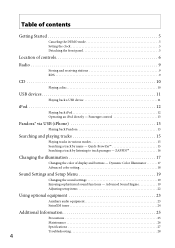
...Playing tracks in various modes 15 Searching a track by listening to track passages - Dynamic Color Illuminator 17 Advanced color setting 18 Sound Settings and Setup Menu 19 Changing the sound settings 19 Enjoying sophisticated sound functions - ZAPPIN 16 Changing the illumination 17 Changing the color of controls 6 Radio 9 ... Additional Information 25 Precautions 25 Maintenance 26 Specifications 27 Troubleshooting 28 4 Table of contents Getting Started 5 Canceling the DEMO mode 5 Setting the clock 5 Detaching the front panel 5 Location of display and buttons -
...Playing tracks in various modes 15 Searching a track by listening to track passages - Dynamic Color Illuminator 17 Advanced color setting 18 Sound Settings and Setup Menu 19 Changing the sound settings 19 Enjoying sophisticated sound functions - ZAPPIN 16 Changing the illumination 17 Changing the color of controls 6 Radio 9 ... Additional Information 25 Precautions 25 Maintenance 26 Specifications 27 Troubleshooting 28 4 Table of contents Getting Started 5 Canceling the DEMO mode 5 Setting the clock 5 Detaching the front panel 5 Location of display and buttons -
Operating Instructions
Page 5
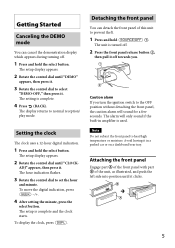
... or moisture. ADJ" appears, then press it in amplifier is turned off . 1 Press and hold the select button. Caution alarm If you . Setting the clock The clock uses a 12-hour digital indication. 1 Press and hold the select button. The setup is complete. 4 Press (BACK). Avoid...setup display appears. 2 Rotate the control dial until "DEMO" appears, then press it . To move the digital indication, press 4 After setting the minute, press the select button. To display the clock, press Detaching the front panel You can cancel the demonstration display which appears during ...
... or moisture. ADJ" appears, then press it in amplifier is turned off . 1 Press and hold the select button. Caution alarm If you . Setting the clock The clock uses a 12-hour digital indication. 1 Press and hold the select button. The setup is complete. 4 Press (BACK). Avoid...setup display appears. 2 Rotate the control dial until "DEMO" appears, then press it . To move the digital indication, press 4 After setting the minute, press the select button. To display the clock, press Detaching the front panel You can cancel the demonstration display which appears during ...
Operating Instructions
Page 8
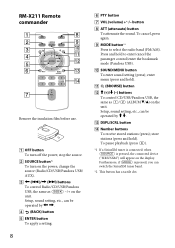
...; MODE button*1 Press to enter/cancel the passenger control/enter the bookmark mode (Pandora USB). SOUND/MENU button To enter sound setting (press); Press and hold ). To pause playback (press ). *1 If a SiriusXM tuner is connected: when is pressed,...the insulation film before use. OFF button To turn on the display. PTY 1 4 DSPL/ SCRL 2 3 PAUSE 5 6 + VOL - 8 9 q; Setup, sound setting, etc., can switch the SiriusXM tuner band. *2 This button has a tactile dot. RM-X211 Remote commander 1 2 3 4 5 6 7 OFF SOURCE MENU SOUND ATT MODE +...
...; MODE button*1 Press to enter/cancel the passenger control/enter the bookmark mode (Pandora USB). SOUND/MENU button To enter sound setting (press); Press and hold ). To pause playback (press ). *1 If a SiriusXM tuner is connected: when is pressed,...the insulation film before use. OFF button To turn on the display. PTY 1 4 DSPL/ SCRL 2 3 PAUSE 5 6 + VOL - 8 9 q; Setup, sound setting, etc., can switch the SiriusXM tuner band. *2 This button has a tactile dot. RM-X211 Remote commander 1 2 3 4 5 6 7 OFF SOURCE MENU SOUND ATT MODE +...
Operating Instructions
Page 10
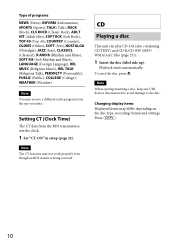
..., keep any USB devices disconnected to avoid damage to the disc. Note The CT function may receive a different radio program from the RDS transmission sets the clock. 1 Set "CT-ON" in setup (page 22). CD Playing a disc This unit can play CD-DA (also containing CD TEXT) and CD-R/CD-RW (MP3... work properly even though an RDS station is being received. Changing display items Displayed items may differ depending on the disc type, recording format and settings.
..., keep any USB devices disconnected to avoid damage to the disc. Note The CT function may receive a different radio program from the RDS transmission sets the clock. 1 Set "CT-ON" in setup (page 22). CD Playing a disc This unit can play CD-DA (also containing CD TEXT) and CD-R/CD-RW (MP3... work properly even though an RDS station is being received. Changing display items Displayed items may differ depending on the disc type, recording format and settings.

Operating Instructions
Page 11
... playback, then remove the USB device. 11 Depending on the USB device, malfunction or damage may differ depending on the USB device, recording format and settings. lossless compression - To remove the USB device, stop playback, press and hold for playback to vibration, or cause a loose connection. • Do not detach the...
... playback, then remove the USB device. 11 Depending on the USB device, malfunction or damage may differ depending on the USB device, recording format and settings. lossless compression - To remove the USB device, stop playback, press and hold for playback to vibration, or cause a loose connection. • Do not detach the...

Operating Instructions
Page 12
..., unless otherwise specified by the text or illustrations. iPod In these Operating Instructions, "iPod" is connected to the dock connector, playback starts in the mode set by the iPod. Note Do not detach the front panel during a telephone call , do not function REP SHUF) Changing display items Press Note Some letters...
..., unless otherwise specified by the text or illustrations. iPod In these Operating Instructions, "iPod" is connected to the dock connector, playback starts in the mode set by the iPod. Note Do not detach the front panel during a telephone call , do not function REP SHUF) Changing display items Press Note Some letters...

Operating Instructions
Page 15
.... Shuffle play Select To play ). SHUF GENRE*1 SHUF DEVICE*3 SHUF OFF genre in random order. Note When entering the Quick-BrowZer mode, the repeat/shuffle setting is selected. Playback in selected play mode may take time to tracks repeatedly (repeat play) or in normal order (Normal play ). device in random order...
.... Shuffle play Select To play ). SHUF GENRE*1 SHUF DEVICE*3 SHUF OFF genre in random order. Note When entering the Quick-BrowZer mode, the repeat/shuffle setting is selected. Playback in selected play mode may take time to tracks repeatedly (repeat play) or in normal order (Normal play ). device in random order...
Operating Instructions
Page 17
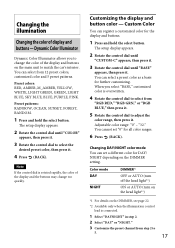
"32." You cannot set a different color for the display and buttons. 1 Press and hold the select button. Preset colors: RED, AMBER, M_AMBER, YELLOW, WHITE, LIGHT GREEN, GREEN, LIGHT BLUE, ... display and buttons on the main unit to match the car's interior. You can register a customized color for DAY/ NIGHT depending on the DIMMER setting. You can set "0" for further customizing. The setup display appears. 2 Rotate the control dial until "BASE" appears, then press it . Dynamic Color Illuminator Dynamic Color Illuminator allows...
"32." You cannot set a different color for the display and buttons. 1 Press and hold the select button. Preset colors: RED, AMBER, M_AMBER, YELLOW, WHITE, LIGHT GREEN, GREEN, LIGHT BLUE, ... display and buttons on the main unit to match the car's interior. You can register a customized color for DAY/ NIGHT depending on the DIMMER setting. You can set "0" for further customizing. The setup display appears. 2 Rotate the control dial until "BASE" appears, then press it . Dynamic Color Illuminator Dynamic Color Illuminator allows...
Operating Instructions
Page 18
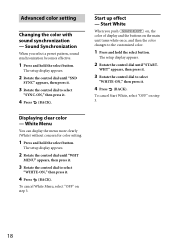
... select "SYNC-ON," then press it . 4 Press (BACK). Start up effect - White Menu You can display the menu more clearly (White) without concern for color setting. 1 Press and hold the select button. Sound Synchronization When you push on, the color of display and the buttons on the main unit turns white... color changes to select "WHITE-ON," then press it . 3 Rotate the control dial to the customized color. 1 Press and hold the select button. Advanced color setting Changing the color with sound synchronization -
... select "SYNC-ON," then press it . 4 Press (BACK). Start up effect - White Menu You can display the menu more clearly (White) without concern for color setting. 1 Press and hold the select button. Sound Synchronization When you push on, the color of display and the buttons on the main unit turns white... color changes to select "WHITE-ON," then press it . 3 Rotate the control dial to the customized color. 1 Press and hold the select button. Advanced color setting Changing the color with sound synchronization -
Operating Instructions
Page 19
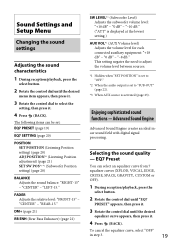
...(Rear Bass Enhancer) (page 21) SW LEVEL*2 (Subwoofer Level) Adjusts the subwoofer volume level: "+10 dB" - EQ7 Preset You can be set to select the setting, then press it. 4 Press (BACK). To cancel the equalizer curve, select "OFF" in step 3. 19 "CENTER" - "REAR-15." ... the control dial to "SUB-OUT" (page 22). *3 When AUX source is activated (page 23). "CENTER" - Sound Settings and Setup Menu Changing the sound settings Adjusting the sound characteristics 1 During reception/playback, press the select button. 2 Rotate the control dial until the desired equalizer curve appears...
...(Rear Bass Enhancer) (page 21) SW LEVEL*2 (Subwoofer Level) Adjusts the subwoofer volume level: "+10 dB" - EQ7 Preset You can be set to select the setting, then press it. 4 Press (BACK). To cancel the equalizer curve, select "OFF" in step 3. 19 "CENTER" - "REAR-15." ... the control dial to "SUB-OUT" (page 22). *3 When AUX source is activated (page 23). "CENTER" - Sound Settings and Setup Menu Changing the sound settings Adjusting the sound characteristics 1 During reception/playback, press the select button. 2 Rotate the control dial until the desired equalizer curve appears...
Operating Instructions
Page 20
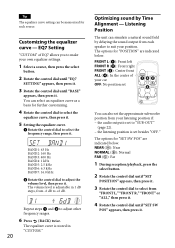
...select an equalizer curve as a basis for further customizing. 4 Rotate the control dial to select the equalizer curve, then press it. 5 Setting the equalizer curve. Rotate the control dial to select the frequency range, then press it . The options for "POSITION" are ... it . NEAR (): Near NORMAL (): Normal FAR (): Far 1 During reception/playback, press the select button. 2 Rotate the control dial until "SET POSITION" appears, then press it. 3 Rotate the control dial to select from your listening position if: - FRONT L (): Front left FRONT R (...
...select an equalizer curve as a basis for further customizing. 4 Rotate the control dial to select the equalizer curve, then press it. 5 Setting the equalizer curve. Rotate the control dial to select the frequency range, then press it . The options for "POSITION" are ... it . NEAR (): Near NORMAL (): Normal FAR (): Far 1 During reception/playback, press the select button. 2 Rotate the control dial until "SET POSITION" appears, then press it. 3 Rotate the control dial to select from your listening position if: - FRONT L (): Front left FRONT R (...
Operating Instructions
Page 21
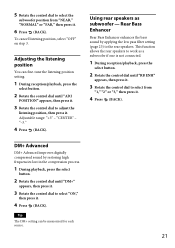
"-3." 4 Press (BACK). Tip The DM+ setting can fine-tune the listening position setting. 1 During reception/playback, press the select button. 2 Rotate the control dial until "ADJ POSITION" appears, then press it. 3 Rotate the control dial to adjust the... select from "NEAR," "NORMAL" or "FAR," then press it . 4 Press (BACK). DM+ Advanced DM+ Advanced improves digitally compressed sound by applying the low pass filter setting (page 23) to the rear speakers. "CENTER" - Using rear speakers as a subwoofer if one is not connected. 1 During reception/playback, press the select button. 2 ...
"-3." 4 Press (BACK). Tip The DM+ setting can fine-tune the listening position setting. 1 During reception/playback, press the select button. 2 Rotate the control dial until "ADJ POSITION" appears, then press it. 3 Rotate the control dial to adjust the... select from "NEAR," "NORMAL" or "FAR," then press it . 4 Press (BACK). DM+ Advanced DM+ Advanced improves digitally compressed sound by applying the low pass filter setting (page 23) to the rear speakers. "CENTER" - Using rear speakers as a subwoofer if one is not connected. 1 During reception/playback, press the select button. 2 ...
Operating Instructions
Page 22
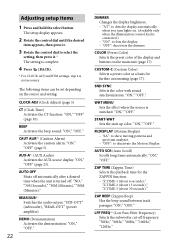
... the select button. "OFF": deactivate the dimmer. "OFF": to deactivate the Motion Display. BEEP Activates the beep sound: "ON," "OFF." WHT MENU Sets the effect when the source is not necessary. "Z.TIME-1 (about 6 seconds)," "Z.TIME-2 (about 15 seconds)," "Z.TIME-3 (about 30 seconds)." COLOR (...Preset Color) Selects the preset color of the display and buttons on the source and setting: CLOCK-ADJ (Clock Adjust) (page 5) CT (Clock Time) Activates the CT function: "ON," "OFF" (page 10). M.DISPLAY (Motion Display) - ...
... the select button. "OFF": deactivate the dimmer. "OFF": to deactivate the Motion Display. BEEP Activates the beep sound: "ON," "OFF." WHT MENU Sets the effect when the source is not necessary. "Z.TIME-1 (about 6 seconds)," "Z.TIME-2 (about 15 seconds)," "Z.TIME-3 (about 30 seconds)." COLOR (...Preset Color) Selects the preset color of the display and buttons on the source and setting: CLOCK-ADJ (Clock Adjust) (page 5) CT (Clock Time) Activates the CT function: "ON," "OFF" (page 10). M.DISPLAY (Motion Display) - ...
Operating Instructions
Page 23
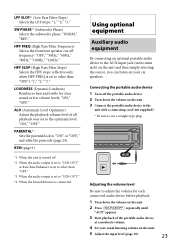
... Using optional equipment Auxiliary audio equipment By connecting an optional portable audio device to adjust the volume for clear sound at a moderate volume. 4 Set your car speakers. Adjusting the volume level Be sure to the AUX input jack (stereo mini jack) on the unit and then simply selecting ...the source, you can listen on your usual listening volume on the unit. 5 Adjust the input level (page 19). 23 PARENTAL*4 Sets the parental lock to the optimum level: "ON," "OFF." SW PHASE*3 (Subwoofer Phase) Selects the subwoofer phase: "NORM," "REV." ALO (...
... Using optional equipment Auxiliary audio equipment By connecting an optional portable audio device to adjust the volume for clear sound at a moderate volume. 4 Set your car speakers. Adjusting the volume level Be sure to the AUX input jack (stereo mini jack) on the unit and then simply selecting ...the source, you can listen on your usual listening volume on the unit. 5 Adjust the input level (page 19). 23 PARENTAL*4 Sets the parental lock to the optimum level: "ON," "OFF." SW PHASE*3 (Subwoofer Phase) Selects the subwoofer phase: "NORM," "REV." ALO (...
Operating Instructions
Page 24
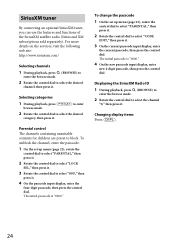
...then press it . 4 On the passcode input display, enter the four-digit passcode, then press the control dial. To change the passcode 1 On the set up menu (page 23), rotate the control dial to select "PARENTAL," then press it. 2 Rotate the control dial to select the desired category, then press... 3 On the current passcode input display, enter the current passcode, then press the control dial. To unblock the channel, enter the passcode. 1 On the set up menu (page 23), rotate the control dial to select "PARENTAL," then press it. 2 Rotate the control dial to select "LOCK SEL," then press ...
...then press it . 4 On the passcode input display, enter the four-digit passcode, then press the control dial. To change the passcode 1 On the set up menu (page 23), rotate the control dial to select "PARENTAL," then press it. 2 Rotate the control dial to select the desired category, then press... 3 On the current passcode input display, enter the current passcode, then press the control dial. To unblock the channel, enter the passcode. 1 On the set up menu (page 23), rotate the control dial to select "PARENTAL," then press it. 2 Rotate the control dial to select "LOCK SEL," then press ...
Operating Instructions
Page 27
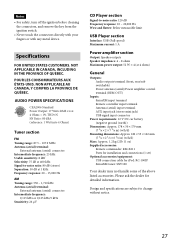
... × 53 × 162 mm (7 1/4 × 2 1/8 × 6 1/2 in) (w/h/d) Mass: Approx. 1.2 kg (2 lb 11 oz) Supplied accessories: Remote commander: RM-X211 Parts for installation and connections (1 set) Optional accessories/equipment: USB connection cable for detailed information.
... × 53 × 162 mm (7 1/4 × 2 1/8 × 6 1/2 in) (w/h/d) Mass: Approx. 1.2 kg (2 lb 11 oz) Supplied accessories: Remote commander: RM-X211 Parts for installation and connections (1 set) Optional accessories/equipment: USB connection cable for detailed information.
Operating Instructions
Page 28
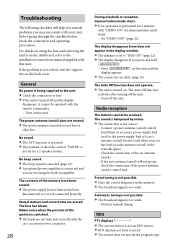
... off and the display disappears, it is not connected properly. Automatic tuning is not possible. The broadcast signal is not set for 5 minutes with "DEMO-ON" set to the unit. Check the connection or fuse. If the unit is turned off the unit. General No ...box. Radio reception The stations cannot be operated with your car has built-in radio antenna (aerial) in the display window. The dimmer is set , demonstration mode starts. - The sound is hampered by noises. The connection is not correct. - The fuse has blown. For details on ...
... off and the display disappears, it is not connected properly. Automatic tuning is not possible. The broadcast signal is not set for 5 minutes with "DEMO-ON" set to the unit. Check the connection or fuse. If the unit is turned off the unit. General No ...box. Radio reception The stations cannot be operated with your car has built-in radio antenna (aerial) in the display window. The dimmer is set , demonstration mode starts. - The sound is hampered by noises. The connection is not correct. - The fuse has blown. For details on ...
Operating Instructions
Page 29
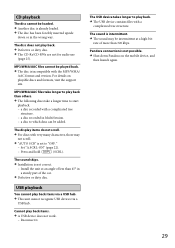
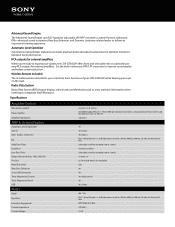
... discs and formats, visit the support site. MP3/WMA/AAC files take longer to start playback. - Set "A.SCRL-ON" (page 22). - The sound is intermittent. The sound may not scroll. "AUTO SCR" is set to play back. The USB device contains files with very many characters, those may be...
... discs and formats, visit the support site. MP3/WMA/AAC files take longer to start playback. - Set "A.SCRL-ON" (page 22). - The sound is intermittent. The sound may not scroll. "AUTO SCR" is set to play back. The USB device contains files with very many characters, those may be...
Marketing Specifications
Page 2
Set the built in electronic HPF/LPF crossovers to deliver an impressive listening experience. Advanced Sound Engine The Advanced Sound Engine uses EQ7 equalizer, adjustable LPF/... or 120 Hz. MP3/WMA/AAC files1 220 ohms 2 volt RCA outputs for external amplifiers When you control the basic functions of your CDX-GT565UP while keeping your system, the CDX-GT565UP offers front and selectable rear or subwoofer preamp RCA outputs for external amplifiers. Radio Data System Radio Data System (RDS) feature displays...
Set the built in electronic HPF/LPF crossovers to deliver an impressive listening experience. Advanced Sound Engine The Advanced Sound Engine uses EQ7 equalizer, adjustable LPF/... or 120 Hz. MP3/WMA/AAC files1 220 ohms 2 volt RCA outputs for external amplifiers When you control the basic functions of your CDX-GT565UP while keeping your system, the CDX-GT565UP offers front and selectable rear or subwoofer preamp RCA outputs for external amplifiers. Radio Data System Radio Data System (RDS) feature displays...


