Operating Instructions
Page 4
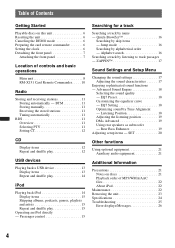
... 17 Sound Settings and Setup Menu Changing the sound settings 17 Adjusting the sound characteristics 17 Enjoying sophisticated sound functions - SET 20 Other ... 6 Canceling the DEMO mode 6 Preparing the card remote commander 6 Setting the clock 6 Detaching the front panel 7 Attaching the front panel 7 Location... Tuning automatically 11 RDS 11 Overview 11 Selecting PTY 11 Setting CT 12 CD Display items 12 Repeat and shuffle play...- Rear Bass Enhancer 19 Adjusting setup items - EQ7 Setting 18 Optimizing sound by skip items - Passenger control 15 Searching for a...
... 17 Sound Settings and Setup Menu Changing the sound settings 17 Adjusting the sound characteristics 17 Enjoying sophisticated sound functions - SET 20 Other ... 6 Canceling the DEMO mode 6 Preparing the card remote commander 6 Setting the clock 6 Detaching the front panel 7 Attaching the front panel 7 Location... Tuning automatically 11 RDS 11 Overview 11 Selecting PTY 11 Setting CT 12 CD Display items 12 Repeat and shuffle play...- Rear Bass Enhancer 19 Adjusting setup items - EQ7 Setting 18 Optimizing sound by skip items - Passenger control 15 Searching for a...
Operating Instructions
Page 6
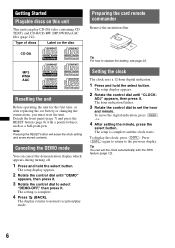
... the battery, see page 22. Getting Started Playable discs on the disc Preparing the card remote commander Remove the insulation film. CD-DA Tip For how to the previous display. Note Pressing the RESET button will erase the clock setting and some stored contents. The hour indication flashes.... 3 Rotate the control dial to set the clock automatically with a pointed object, such as a ball-point pen. ADJ" appears, then press it . The setup is complete. 4 Press (BACK). Type of discs Label on this unit This unit can play mode. The display...
... the battery, see page 22. Getting Started Playable discs on the disc Preparing the card remote commander Remove the insulation film. CD-DA Tip For how to the previous display. Note Pressing the RESET button will erase the clock setting and some stored contents. The hour indication flashes.... 3 Rotate the control dial to set the clock automatically with a pointed object, such as a ball-point pen. ADJ" appears, then press it . The setup is complete. 4 Press (BACK). Type of discs Label on this unit This unit can play mode. The display...
Operating Instructions
Page 11
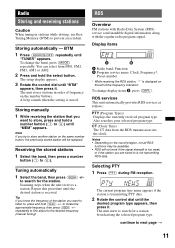
... for a station broadcasting the selected program type. Repeat this procedure until "MEM" appears. You can select from the RDS transmission sets the clock. Receiving the stored stations 1 Select the band, then press a number button ((1) to store another station on the same number button...a number button ((1) to the desired frequency (manual tuning). Scanning stops when the unit receives a station. Selecting PTY 1 Press (PTY) during FM reception. Tip If you know the frequency of the station you are tuned to prevent an accident. Notes • Depending on the number buttons....
... for a station broadcasting the selected program type. Repeat this procedure until "MEM" appears. You can select from the RDS transmission sets the clock. Receiving the stored stations 1 Select the band, then press a number button ((1) to store another station on the same number button...a number button ((1) to the desired frequency (manual tuning). Scanning stops when the unit receives a station. Selecting PTY 1 Press (PTY) during FM reception. Tip If you know the frequency of the station you are tuned to prevent an accident. Notes • Depending on the number buttons....
Operating Instructions
Page 12
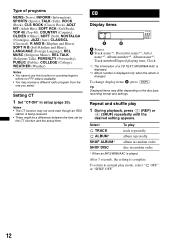
... Album number is displayed only when the album is changed. Tip Displayed items may differ depending on the disc type, recording format and settings. album repeatedly. disc in countries/regions where no PTY data is available. • You may not work even though an RDS... time. After 3 seconds, the setting is played. To change display items B, press (DSPL). Setting CT 1 Set "CT-ON" in random order. CD Display items A Source B Track name*1, Disc/artist name*1, Artist name*1, Album number*2, Album name*1, Track number/Elapsed playing time, Clock *1 The information of programs NEWS ...
... Album number is displayed only when the album is changed. Tip Displayed items may differ depending on the disc type, recording format and settings. album repeatedly. disc in countries/regions where no PTY data is available. • You may not work even though an RDS... time. After 3 seconds, the setting is played. To change display items B, press (DSPL). Setting CT 1 Set "CT-ON" in random order. CD Display items A Source B Track name*1, Disc/artist name*1, Artist name*1, Album number*2, Album name*1, Track number/Elapsed playing time, Clock *1 The information of programs NEWS ...
Operating Instructions
Page 13
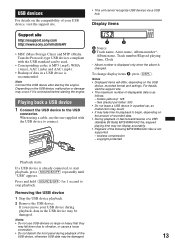
... device 1 Stop the USB device playback. 2 Remove the USB device. Display items Support site http://esupport.sony.com http://www.sony.com/mobileAV • MSC (Mass Storage Class) and MTP (Media Transfer Protocol) type USB devices compliant with...device may be damaged. A Source B Track name, Artist name, Album number*, Album name, Track number/Elapsed playing time, Clock * Album number is displayed only when the album is not supported. - folders (albums): 128 - copyright-protected Playback starts.... Displayed items will differ, depending on the USB device, recorded format and settings.
... device 1 Stop the USB device playback. 2 Remove the USB device. Display items Support site http://esupport.sony.com http://www.sony.com/mobileAV • MSC (Mass Storage Class) and MTP (Media Transfer Protocol) type USB devices compliant with...device may be damaged. A Source B Track name, Artist name, Album number*, Album name, Track number/Elapsed playing time, Clock * Album number is displayed only when the album is not supported. - folders (albums): 128 - copyright-protected Playback starts.... Displayed items will differ, depending on the USB device, recorded format and settings.
Operating Instructions
Page 15
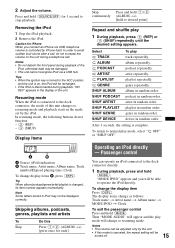
...t Clock To exit the passenger control Press and hold to the dock connector, the mode of the iPod, otherwise data may not be turned off. 15 Resuming mode When the iPod is connected to desired point] Repeat and shuffle play mode will be displayed correctly. playlist in the mode set by...during playback, "NO DEV" appears in iPod may be damaged. • This unit cannot recognize iPod via USB, telephone volume is canceled, the repeat setting will change the display item Press (DSPL). artist in random order. genre in random order. Then "MODE AUDIO" will be adjusted only by the ...
...t Clock To exit the passenger control Press and hold to the dock connector, the mode of the iPod, otherwise data may not be turned off. 15 Resuming mode When the iPod is connected to desired point] Repeat and shuffle play mode will be displayed correctly. playlist in the mode set by...during playback, "NO DEV" appears in iPod may be damaged. • This unit cannot recognize iPod via USB, telephone volume is canceled, the repeat setting will change the display item Press (DSPL). artist in random order. genre in random order. Then "MODE AUDIO" will be adjusted only by the ...

Operating Instructions
Page 20
...," "60Hz," "80Hz," "100Hz," "120Hz." BTM (page 11) *1 When the unit is turned off. *2 When FM is received. *3 When the audio output is set to "SUB-OUT" or Rear Bass Enhancer is set to other than "OFF." *4 When the audio output is not necessary. AUTO OFF Shuts off : "NO," "30S ...Selects the HPF slope (effective only when HPF FREQ is turned off automatically after a desired time when the unit is set (follow the page reference for details): CLOCK-ADJ (Clock Adjust) (page 6) CT (Clock Time) Activates the CT function: "ON," "OFF" (page 11, 12). The setup display appears. 2 Rotate the...
...," "60Hz," "80Hz," "100Hz," "120Hz." BTM (page 11) *1 When the unit is turned off. *2 When FM is received. *3 When the audio output is set to "SUB-OUT" or Rear Bass Enhancer is set to other than "OFF." *4 When the audio output is not necessary. AUTO OFF Shuts off : "NO," "30S ...Selects the HPF slope (effective only when HPF FREQ is turned off automatically after a desired time when the unit is set (follow the page reference for details): CLOCK-ADJ (Clock Adjust) (page 6) CT (Clock Time) Activates the CT function: "ON," "OFF" (page 11, 12). The setup display appears. 2 Rotate the...


