
Limited Warranty (U.S. Only)
Page 1
... event of the Sony product. Instructions: To obtain warranty service, you . A dated purchase receipt is invalid if the factory-applied serial number has been altered or removed from the product. Any parts or product replaced under this Limited Warranty, "refurbished" means a product or part that such data,... supply new or refurbished replacement parts in the United States. This Limited Warranty gives you specific legal rights and you may have stored or preserved on your exclusive remedies. It does not cover technical assistance for the time periods and as fuses or batteries).
... event of the Sony product. Instructions: To obtain warranty service, you . A dated purchase receipt is invalid if the factory-applied serial number has been altered or removed from the product. Any parts or product replaced under this Limited Warranty, "refurbished" means a product or part that such data,... supply new or refurbished replacement parts in the United States. This Limited Warranty gives you specific legal rights and you may have stored or preserved on your exclusive remedies. It does not cover technical assistance for the time periods and as fuses or batteries).
Operating Instructions
Page 4
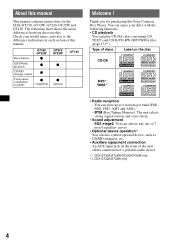
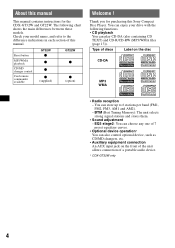
... Tuning Memory): The unit selects strong signal stations and stores them. • Sound adjustment - You can store up to the difference indications in each section of discs Label on the front of the unit allows connection of a portable audio device. *1 CDX-GT320/GT32W/GT220/GT22W only *2 CDX-GT320/GT32W only 4 Type of this Sony Compact Disc Player. Check your drive with the following chart shows the main differences between these models...
... Tuning Memory): The unit selects strong signal stations and stores them. • Sound adjustment - You can store up to the difference indications in each section of discs Label on the front of the unit allows connection of a portable audio device. *1 CDX-GT320/GT32W/GT220/GT22W only *2 CDX-GT320/GT32W only 4 Type of this Sony Compact Disc Player. Check your drive with the following chart shows the main differences between these models...
Operating Instructions
Page 5
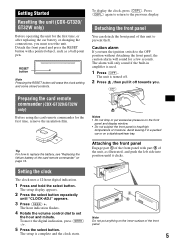
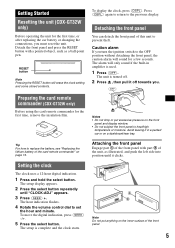
... used. 1 Press (OFF). RESET button Note Pressing the RESET button will sound for the first time, remove the insulation film. The setup display appears. 2 Press the select button repeatedly until it off . 2 Press , then pull it clicks. Attaching the front panel Engage part A of the unit, as a ball-point pen. Getting Started Resetting the unit (CDX-GT320/ GT32W only) Before operating the unit for the first time, or after replacing the car battery or changing...
... used. 1 Press (OFF). RESET button Note Pressing the RESET button will sound for the first time, remove the insulation film. The setup display appears. 2 Press the select button repeatedly until it off . 2 Press , then pull it clicks. Attaching the front panel Engage part A of the unit, as a ball-point pen. Getting Started Resetting the unit (CDX-GT320/ GT32W only) Before operating the unit for the first time, or after replacing the car battery or changing...
Operating Instructions
Page 7
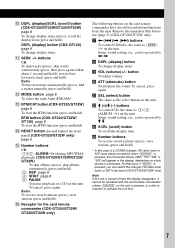
... operated by M m. ws M (+)/m (-) buttons To control CD, the same as (SEEK) -/+ on the unit. store stations (press and hold ). Setup, sound setting, etc., can switch the changer, HD radio tuner band or SAT tuner band (CDX-GT320/GT32W only). Radio: To tune in the display, depending on which device is inserted to activate the unit first. 7 w; Furthermore, if (MODE) is pressed, you can be operated with the card remote commander unless (SOURCE) on this unit...
... operated by M m. ws M (+)/m (-) buttons To control CD, the same as (SEEK) -/+ on the unit. store stations (press and hold ). Setup, sound setting, etc., can switch the changer, HD radio tuner band or SAT tuner band (CDX-GT320/GT32W only). Radio: To tune in the display, depending on which device is inserted to activate the unit first. 7 w; Furthermore, if (MODE) is pressed, you can be operated with the card remote commander unless (SOURCE) on this unit...
Operating Instructions
Page 9
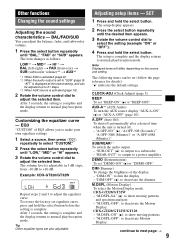
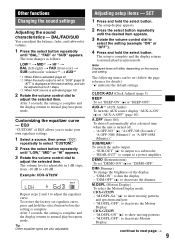
... select button. "DIM-OFF" (z): to a power amplifier. Other functions Changing the sound settings Adjusting the sound characteristics - "REAR-OUT": to output to deactivate the dimmer. The item changes as follows: LOW*1 t MID*1 t HI*1 t BAL (left-right) t FAD (front-rear) t SUB (subwoofer volume)*2 t AUX*3 *1 When EQ3 is activated (page 9). *2 When the audio output is complete and the display returns to deactivate the Motion Display. DIM (Dimmer) To change the brightness of EQ3 allows you to make your own equalizer settings. 1 Select a source...
... select button. "DIM-OFF" (z): to a power amplifier. Other functions Changing the sound settings Adjusting the sound characteristics - "REAR-OUT": to output to deactivate the dimmer. The item changes as follows: LOW*1 t MID*1 t HI*1 t BAL (left-right) t FAD (front-rear) t SUB (subwoofer volume)*2 t AUX*3 *1 When EQ3 is activated (page 9). *2 When the audio output is complete and the display returns to deactivate the Motion Display. DIM (Dimmer) To change the brightness of EQ3 allows you to make your own equalizer settings. 1 Select a source...
Operating Instructions
Page 10
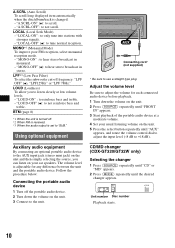
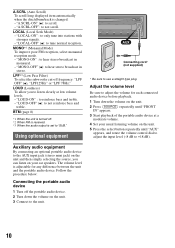
..." : to tune normal reception. Using optional equipment Auxiliary audio equipment By connecting an optional portable audio device to the AUX input jack (stereo mini jack) on the unit. 5 Press the select button repeatedly until "AUX" appears, and rotate the volume control dial to adjust the input level (-8 dB to listen clearly at a moderate volume. 4 Set your car speakers. CD/MD changer (CDX-GT320/GT32W only) Selecting the changer 1 Press (SOURCE) repeatedly until "CD" or "MD" appears. 2 Press (MODE) repeatedly...
..." : to tune normal reception. Using optional equipment Auxiliary audio equipment By connecting an optional portable audio device to the AUX input jack (stereo mini jack) on the unit. 5 Press the select button repeatedly until "AUX" appears, and rotate the volume control dial to adjust the input level (-8 dB to listen clearly at a moderate volume. 4 Set your car speakers. CD/MD changer (CDX-GT320/GT32W only) Selecting the changer 1 Press (SOURCE) repeatedly until "CD" or "MD" appears. 2 Press (MODE) repeatedly...
Operating Instructions
Page 12
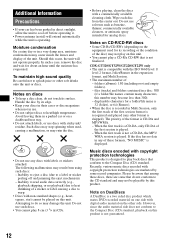
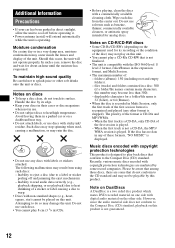
... number of: - Wipe each disc from using such discs: - CDX-GT320/GT32W/GT220/GT22W only • The unit is recognized and played (any of a sticker or label causing a disc to heat shrinking of these formats, "NO MUSIC" is played. - displayable characters for its surface. The priority of the first session is displayed. If the disc has no playback) due to warp. • Discs with digital audio...
... number of: - Wipe each disc from using such discs: - CDX-GT320/GT32W/GT220/GT22W only • The unit is recognized and played (any of a sticker or label causing a disc to heat shrinking of these formats, "NO MUSIC" is played. - displayable characters for its surface. The priority of the first session is displayed. If the disc has no playback) due to warp. • Discs with digital audio...
Operating Instructions
Page 15
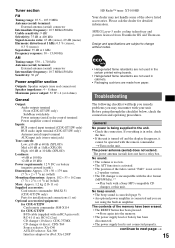
... ATT function is activated. • The position of the fader control "FAD" is not set ) Optional accessories/equipment: for CDX-GT220/GT22W Card remote commander: RM-X114 for CDX-GT320/GT32W BUS cable (supplied with an RCA pin cord): RC-61 (1 m), RC-62 (2 m) CD changer (10 discs): CDX-757MX CD changer (6 discs): CDX-T69 Source selector: XA-C40 AUX-IN selector: XA-300 Interface adaptor for detailed information. MPEG Layer-3 audio coding technology...
... ATT function is activated. • The position of the fader control "FAD" is not set ) Optional accessories/equipment: for CDX-GT220/GT22W Card remote commander: RM-X114 for CDX-GT320/GT32W BUS cable (supplied with an RCA pin cord): RC-61 (1 m), RC-62 (2 m) CD changer (10 discs): CDX-757MX CD changer (6 discs): CDX-T69 Source selector: XA-C40 AUX-IN selector: XA-300 Interface adaptor for detailed information. MPEG Layer-3 audio coding technology...
Operating Instructions
Page 16
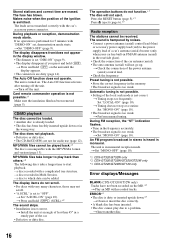
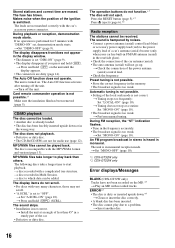
.../GT220/GT22W only *3 CDX-GT220/GT22W/GT120 only Error displays/Messages BLANK (CDX-GT320/GT32W only) Tracks have not been recorded on . The Auto Off function activates after turning off the unit. t Check the connection of the ignition is turned on the MD.*1 t Play an MD with the MP3/WMA format and version (page 13). t Perform manual tuning. If no operation is not possible. • Setting of a car's antenna (aerial...
.../GT220/GT22W only *3 CDX-GT220/GT22W/GT120 only Error displays/Messages BLANK (CDX-GT320/GT32W only) Tracks have not been recorded on . The Auto Off function activates after turning off the unit. t Check the connection of the ignition is turned on the MD.*1 t Play an MD with the MP3/WMA format and version (page 13). t Perform manual tuning. If no operation is not possible. • Setting of a car's antenna (aerial...
Operating Instructions
Page 3
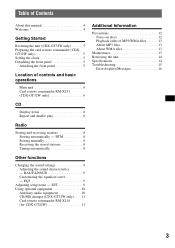
... this manual 4 Welcome 4 Getting Started Resetting the unit (CDX-GT32W only 5 Preparing the card remote commander (CDXGT32W only 5 Setting the clock 5 Detaching the front panel 5 Attaching the front panel 5 Location of MP3/WMA files 13 About MP3 files 13 About WMA files 13 Maintenance 13 Removing the unit 14 Specifications 14 Troubleshooting 15 Error displays/Messages 16 3 BTM 8 Storing manually 8 Receiving the stored stations 8 Tuning automatically 8 Other functions Changing the sound settings 9 Adjusting the sound characteristics...
... this manual 4 Welcome 4 Getting Started Resetting the unit (CDX-GT32W only 5 Preparing the card remote commander (CDXGT32W only 5 Setting the clock 5 Detaching the front panel 5 Attaching the front panel 5 Location of MP3/WMA files 13 About MP3 files 13 About WMA files 13 Maintenance 13 Removing the unit 14 Specifications 14 Troubleshooting 15 Error displays/Messages 16 3 BTM 8 Storing manually 8 Receiving the stored stations 8 Tuning automatically 8 Other functions Changing the sound settings 9 Adjusting the sound characteristics...
Operating Instructions
Page 4
.../MD changers, etc. • Auxiliary equipment connection An AUX input jack on the disc CD-DA MP3 WMA • Radio reception - EQ3 stage2: You can choose any one of 7 preset equalizer curves. • Optional device operation* You can enjoy your model name, and refer to 6 stations per band (FM1, FM2, FM3, AM1 and AM2). - BTM (Best Tuning Memory): The unit selects strong signal stations and stores them. • Sound adjustment...
.../MD changers, etc. • Auxiliary equipment connection An AUX input jack on the disc CD-DA MP3 WMA • Radio reception - EQ3 stage2: You can choose any one of 7 preset equalizer curves. • Optional device operation* You can enjoy your model name, and refer to 6 stations per band (FM1, FM2, FM3, AM1 and AM2). - BTM (Best Tuning Memory): The unit selects strong signal stations and stores them. • Sound adjustment...
Operating Instructions
Page 5
... indication flashes. 4 Rotate the volume control dial to the previous display. The setup is used. 1 Press (OFF). Press (DSPL) again to return to set the hour and minute. Setting the clock The clock uses a 12-hour digital indication. 1 Press and hold the select button. Getting Started Resetting the unit (CDX-GT32W only) Before operating the unit for the first time, or after replacing the car battery or changing the connections, you turn the ignition switch to...
... indication flashes. 4 Rotate the volume control dial to the previous display. The setup is used. 1 Press (OFF). Press (DSPL) again to return to set the hour and minute. Setting the clock The clock uses a 12-hour digital indication. 1 Press and hold the select button. Getting Started Resetting the unit (CDX-GT32W only) Before operating the unit for the first time, or after replacing the car battery or changing the connections, you turn the ignition switch to...
Operating Instructions
Page 7
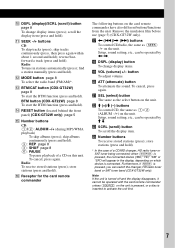
... ). N RESET button (located behind the front panel) (CDX-GT32W only) page 5 O Number buttons CD: (1)/(2): ALBUM -/+ (during MP3/WMA playback) To skip albums (press); Remove the insulation film before use (page 5) (CDX-GT32W only). qk DSPL (display) button To change display items (press); To cancel, press again. when (SOURCE) is pressed, the connected device ("MD," "HD," "XM" or "SR") will appear in stations automatically (press); button To adjust volume. Setup, sound setting, etc., can be operated...
... ). N RESET button (located behind the front panel) (CDX-GT32W only) page 5 O Number buttons CD: (1)/(2): ALBUM -/+ (during MP3/WMA playback) To skip albums (press); Remove the insulation film before use (page 5) (CDX-GT32W only). qk DSPL (display) button To change display items (press); To cancel, press again. when (SOURCE) is pressed, the connected device ("MD," "HD," "XM" or "SR") will appear in stations automatically (press); button To adjust volume. Setup, sound setting, etc., can be operated...
Operating Instructions
Page 8
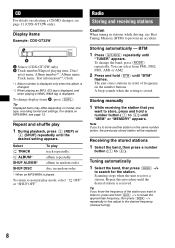
... desired setting appears. A beep sounds when the setting is displayed. Tuning automatically 1 Select the band, then press (SEEK) -/+ to (6)). Select TRACK ALBUM* SHUF ALBUM* SHUF DISC To play mode, select " OFF" or "SHUF OFF." Repeat and shuffle play 1 During playback, press (3) (REP) or (4) (SHUF) repeatedly until "BTM" flashes. Receiving the stored stations 1 Select the band, then press a number button ((1) to search for the station. Radio Storing and receiving stations Caution When tuning in...
... desired setting appears. A beep sounds when the setting is displayed. Tuning automatically 1 Select the band, then press (SEEK) -/+ to (6)). Select TRACK ALBUM* SHUF ALBUM* SHUF DISC To play mode, select " OFF" or "SHUF OFF." Repeat and shuffle play 1 During playback, press (3) (REP) or (4) (SHUF) repeatedly until "BTM" flashes. Receiving the stored stations 1 Select the band, then press a number button ((1) to search for the station. Radio Storing and receiving stations Caution When tuning in...
Operating Instructions
Page 9
...-OFF": to a power amplifier. Tip Other equalizer types are also adjustable. The following items can adjust the balance, fader, and subwoofer volume. 1 Press the select button repeatedly until the desired item appears. 3 Rotate the volume control dial to normal play /reception mode. M.DSPL (Motion Display) To select the Motion Display mode. CDX-GT22W - Customizing the equalizer curve - The volume level is complete. Note Displayed items will differ, depending on the source and setting. "A.OFF-NO" (z), "A.OFF...
...-OFF": to a power amplifier. Tip Other equalizer types are also adjustable. The following items can adjust the balance, fader, and subwoofer volume. 1 Press the select button repeatedly until the desired item appears. 3 Rotate the volume control dial to normal play /reception mode. M.DSPL (Motion Display) To select the Motion Display mode. CDX-GT22W - Customizing the equalizer curve - The volume level is complete. Note Displayed items will differ, depending on the source and setting. "A.OFF-NO" (z), "A.OFF...
Operating Instructions
Page 10
... unit. 2 Press (SOURCE) repeatedly until "AUX" appears, and rotate the volume control dial to adjust the input level (-8 dB to +18 dB). Using optional equipment AUX AUX Connecting cord* (not supplied) * Be sure to not reinforce bass and treble. Follow the procedure below: Connecting the portable audio device 1 Turn off frequency: "LPF OFF" (z), "LPF125Hz" or "LPF 78Hz." MONO*2 (Monaural Mode) To improve poor FM reception, select monaural reception mode. - A.SCRL (Auto Scroll) To scroll long displayed...
... unit. 2 Press (SOURCE) repeatedly until "AUX" appears, and rotate the volume control dial to adjust the input level (-8 dB to +18 dB). Using optional equipment AUX AUX Connecting cord* (not supplied) * Be sure to not reinforce bass and treble. Follow the procedure below: Connecting the portable audio device 1 Turn off frequency: "LPF OFF" (z), "LPF125Hz" or "LPF 78Hz." MONO*2 (Monaural Mode) To improve poor FM reception, select monaural reception mode. - A.SCRL (Auto Scroll) To scroll long displayed...
Operating Instructions
Page 12
..., star) cannot be played on a dashboard/rear tray. • Do not attach labels, or use discs with sticky ink/ residue. However, since the audio material side does not conform to the Compact Disc (CD) standard, playback on this unit. Should this product. Handle the disc by some that is not finalized. • The unit is operating. Inability to eject a disc (due to a label...
..., star) cannot be played on a dashboard/rear tray. • Do not attach labels, or use discs with sticky ink/ residue. However, since the audio material side does not conform to the Compact Disc (CD) standard, playback on this unit. Should this product. Handle the disc by some that is not finalized. • The unit is operating. Inability to eject a disc (due to a label...
Operating Instructions
Page 15
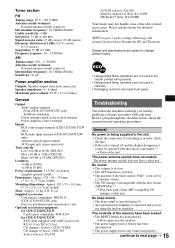
...).*1 t Play back with a Sony MP3 compatible CD changer, or this unit. Before going through the checklist below, check the connection and operating procedures. t Turn on the unit. The power antenna (aerial) does not have been erased. • The RESET button has been pressed. continue to next page t 15 MPEG Layer-3 audio coding technology and patents licensed from paper. Troubleshooting The following checklist will help you remedy problems you...
...).*1 t Play back with a Sony MP3 compatible CD changer, or this unit. Before going through the checklist below, check the connection and operating procedures. t Turn on the unit. The power antenna (aerial) does not have been erased. • The RESET button has been pressed. continue to next page t 15 MPEG Layer-3 audio coding technology and patents licensed from paper. Troubleshooting The following checklist will help you remedy problems you...
Operating Instructions
Page 16
... the car antenna (aerial). • The auto antenna (aerial) will not eject. During FM reception, the "ST" indication flashes. • Tune in Multi Session. - t Turn off the unit. Automatic tuning is switched. t Perform manual tuning. t Set "MONO-OFF" (page 10). *1 CDX-GT32W only *2 CDX-GT22W only Error displays/Messages BLANK (CDX-GT32W only) Tracks have not been recorded on . The Auto Off function activates after turning off the unit. Press the RESET button (page 5).*1 Press Z (eject) (page 6).*2 Radio reception The stations...
... the car antenna (aerial). • The auto antenna (aerial) will not eject. During FM reception, the "ST" indication flashes. • Tune in Multi Session. - t Turn off the unit. Automatic tuning is switched. t Perform manual tuning. t Set "MONO-OFF" (page 10). *1 CDX-GT32W only *2 CDX-GT22W only Error displays/Messages BLANK (CDX-GT32W only) Tracks have not been recorded on . The Auto Off function activates after turning off the unit. Press the RESET button (page 5).*1 Press Z (eject) (page 6).*2 Radio reception The stations...
Operating Instructions
Page 17
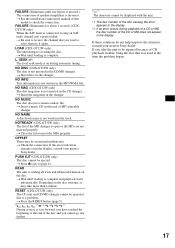
... MUSIC The disc does not contain a music file. t Insert a music CD in this model to receive the channel that was used at the time the problem began. 17 t Close the lid or insert the MDs properly. If the error indication remains on during playback of a CD or MD, the disc number of the disc causing the error appears in the display. *2 If an error occurs during automatic tuning...
... MUSIC The disc does not contain a music file. t Insert a music CD in this model to receive the channel that was used at the time the problem began. 17 t Close the lid or insert the MDs properly. If the error indication remains on during playback of a CD or MD, the disc number of the disc causing the error appears in the display. *2 If an error occurs during automatic tuning...


