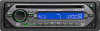
Operating Instructions
Page 3
... optional equipment 7 Auxiliary audio equipment 7 Additional Information Precautions 8 Notes on discs 8 Maintenance 9 Removing the unit 9 Specifications 10 Troubleshooting 10 Error displays/Messages 11 3 EQ3 6 Adjusting setup items - Table of Contents Getting Started Resetting the unit 4 Setting the clock 4 Detaching the front panel 4 Attaching the front panel 4 Location of controls and basic operations Main...
... optional equipment 7 Auxiliary audio equipment 7 Additional Information Precautions 8 Notes on discs 8 Maintenance 9 Removing the unit 9 Specifications 10 Troubleshooting 10 Error displays/Messages 11 3 EQ3 6 Adjusting setup items - Table of Contents Getting Started Resetting the unit 4 Setting the clock 4 Detaching the front panel 4 Attaching the front panel 4 Location of controls and basic operations Main...

Operating Instructions
Page 4
...leaving it off . 2 Press , then pull it in amplifier is complete and the clock starts. The setup display appears. 2 Press the select button repeatedly until it clicks. Press (DSPL) again to return to set the hour and minute. Detach the front panel and press the RESET button with part ...to heat/high temperature or moisture. Detaching the front panel You can detach the front panel of the unit, as a ball-point pen. Setting the clock The clock uses a 12-hour digital indication. 1 Press and hold the select button. A B Note Do not put excessive pressure on the inner surface...
...leaving it off . 2 Press , then pull it in amplifier is complete and the clock starts. The setup display appears. 2 Press the select button repeatedly until it clicks. Press (DSPL) again to return to set the hour and minute. Detach the front panel and press the RESET button with part ...to heat/high temperature or moisture. Detaching the front panel You can detach the front panel of the unit, as a ball-point pen. Setting the clock The clock uses a 12-hour digital indication. 1 Press and hold the select button. A B Note Do not put excessive pressure on the inner surface...
Operating Instructions
Page 7
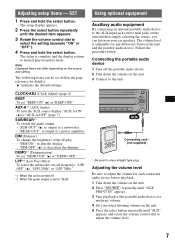
... audio device. The following items can listen on your usual listening volume on the source and setting. SUB/REAR*1 To switch the audio output. - CLOCK-ADJ (Clock Adjust) (page 4) BEEP To set "DEMO-ON" (z) or "DEMO-OFF." The volume level is adjustable for details): "z" ...indicates the default settings. The setup display appears. 2 Press the select button repeatedly until "AUX" appears, and rotate the volume ...
... audio device. The following items can listen on your usual listening volume on the source and setting. SUB/REAR*1 To switch the audio output. - CLOCK-ADJ (Clock Adjust) (page 4) BEEP To set "DEMO-ON" (z) or "DEMO-OFF." The volume level is adjustable for details): "z" ...indicates the default settings. The setup display appears. 2 Press the select button repeatedly until "AUX" appears, and rotate the volume ...

